StarTech.com PCI555WG Specification
- Category
- Networking cards
- Type
- Specification
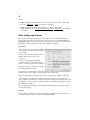
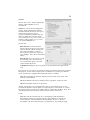
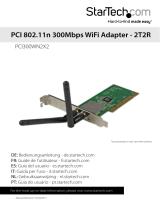
StarTech.com PCI555WG is a wireless network card that allows you to connect to the internet or other devices wirelessly. It supports high-speed data transfer rates up to 54 Mbps and is compatible with 802.11g and 802.11b standards. The card features advanced security protocols such as WEP, WPA, and AES, ensuring secure data transmission. With its detachable antenna, you can adjust its position for optimal signal reception.
StarTech.com PCI555WG is a wireless network card that allows you to connect to the internet or other devices wirelessly. It supports high-speed data transfer rates up to 54 Mbps and is compatible with 802.11g and 802.11b standards. The card features advanced security protocols such as WEP, WPA, and AES, ensuring secure data transmission. With its detachable antenna, you can adjust its position for optimal signal reception.


-
 1
1
-
 2
2
-
 3
3
-
 4
4
-
 5
5
-
 6
6
-
 7
7
-
 8
8
-
 9
9
-
 10
10
-
 11
11
-
 12
12
-
 13
13
-
 14
14
-
 15
15
-
 16
16


StarTech.com PCI555WG Specification
- Category
- Networking cards
- Type
- Specification
StarTech.com PCI555WG is a wireless network card that allows you to connect to the internet or other devices wirelessly. It supports high-speed data transfer rates up to 54 Mbps and is compatible with 802.11g and 802.11b standards. The card features advanced security protocols such as WEP, WPA, and AES, ensuring secure data transmission. With its detachable antenna, you can adjust its position for optimal signal reception.
Ask a question and I''ll find the answer in the document
Finding information in a document is now easier with AI
Related papers
-
 StarTech.com CB555WG User manual
-
StarTech.com USB867WAC22 User manual
-
StarTech.com PEX300WN2X2 User manual
-
StarTech.com R150WN1X1T User manual
-
 StarTech.com PCI300WN2X2 User manual
-
StarTech.com USB300WN2X2C User manual
-
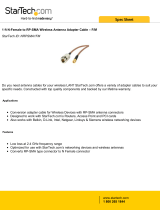 StarTech.com NRPSMA1FM Datasheet
-
StarTech.com USB433WACDB Owner's manual
-
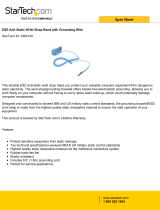 StarTech.com SWS100 Datasheet
-
 StarTech.com NRPSMA1MM Datasheet


Other documents
-
Dell Wireless 1390/1395/1397/1490/1501/1505/1510/1520 WLAN Card Users Guide (SW version 5.60.48) Owner's manual
-
Black Box LW6001A User manual
-
Lindy Wireless LAN PCI Card User manual
-
Advantek Networks AWN-PCI-11N User manual
-
-
-
Digitus DN-7046 Datasheet
-
ZyXEL NWD-310N User manual
-
LevelOne WNC-0601 User manual
-
Advantek Networks AWN-MIMO-54RA User manual