To Charge/Recharge
w Fully charge Trimmer before using for the first
time or after non-use for a long period of time.
w Battery performance is best if you recharge
only when the battery is (almost) completely
empty.
w Charging, recharging, or using the Trimmer at
temperaturesbelow40˚Forhigherthan95˚F
adversely affects lifespan of the battery.
w Continuously recharging Trimmer will reduce
lifespan of battery.
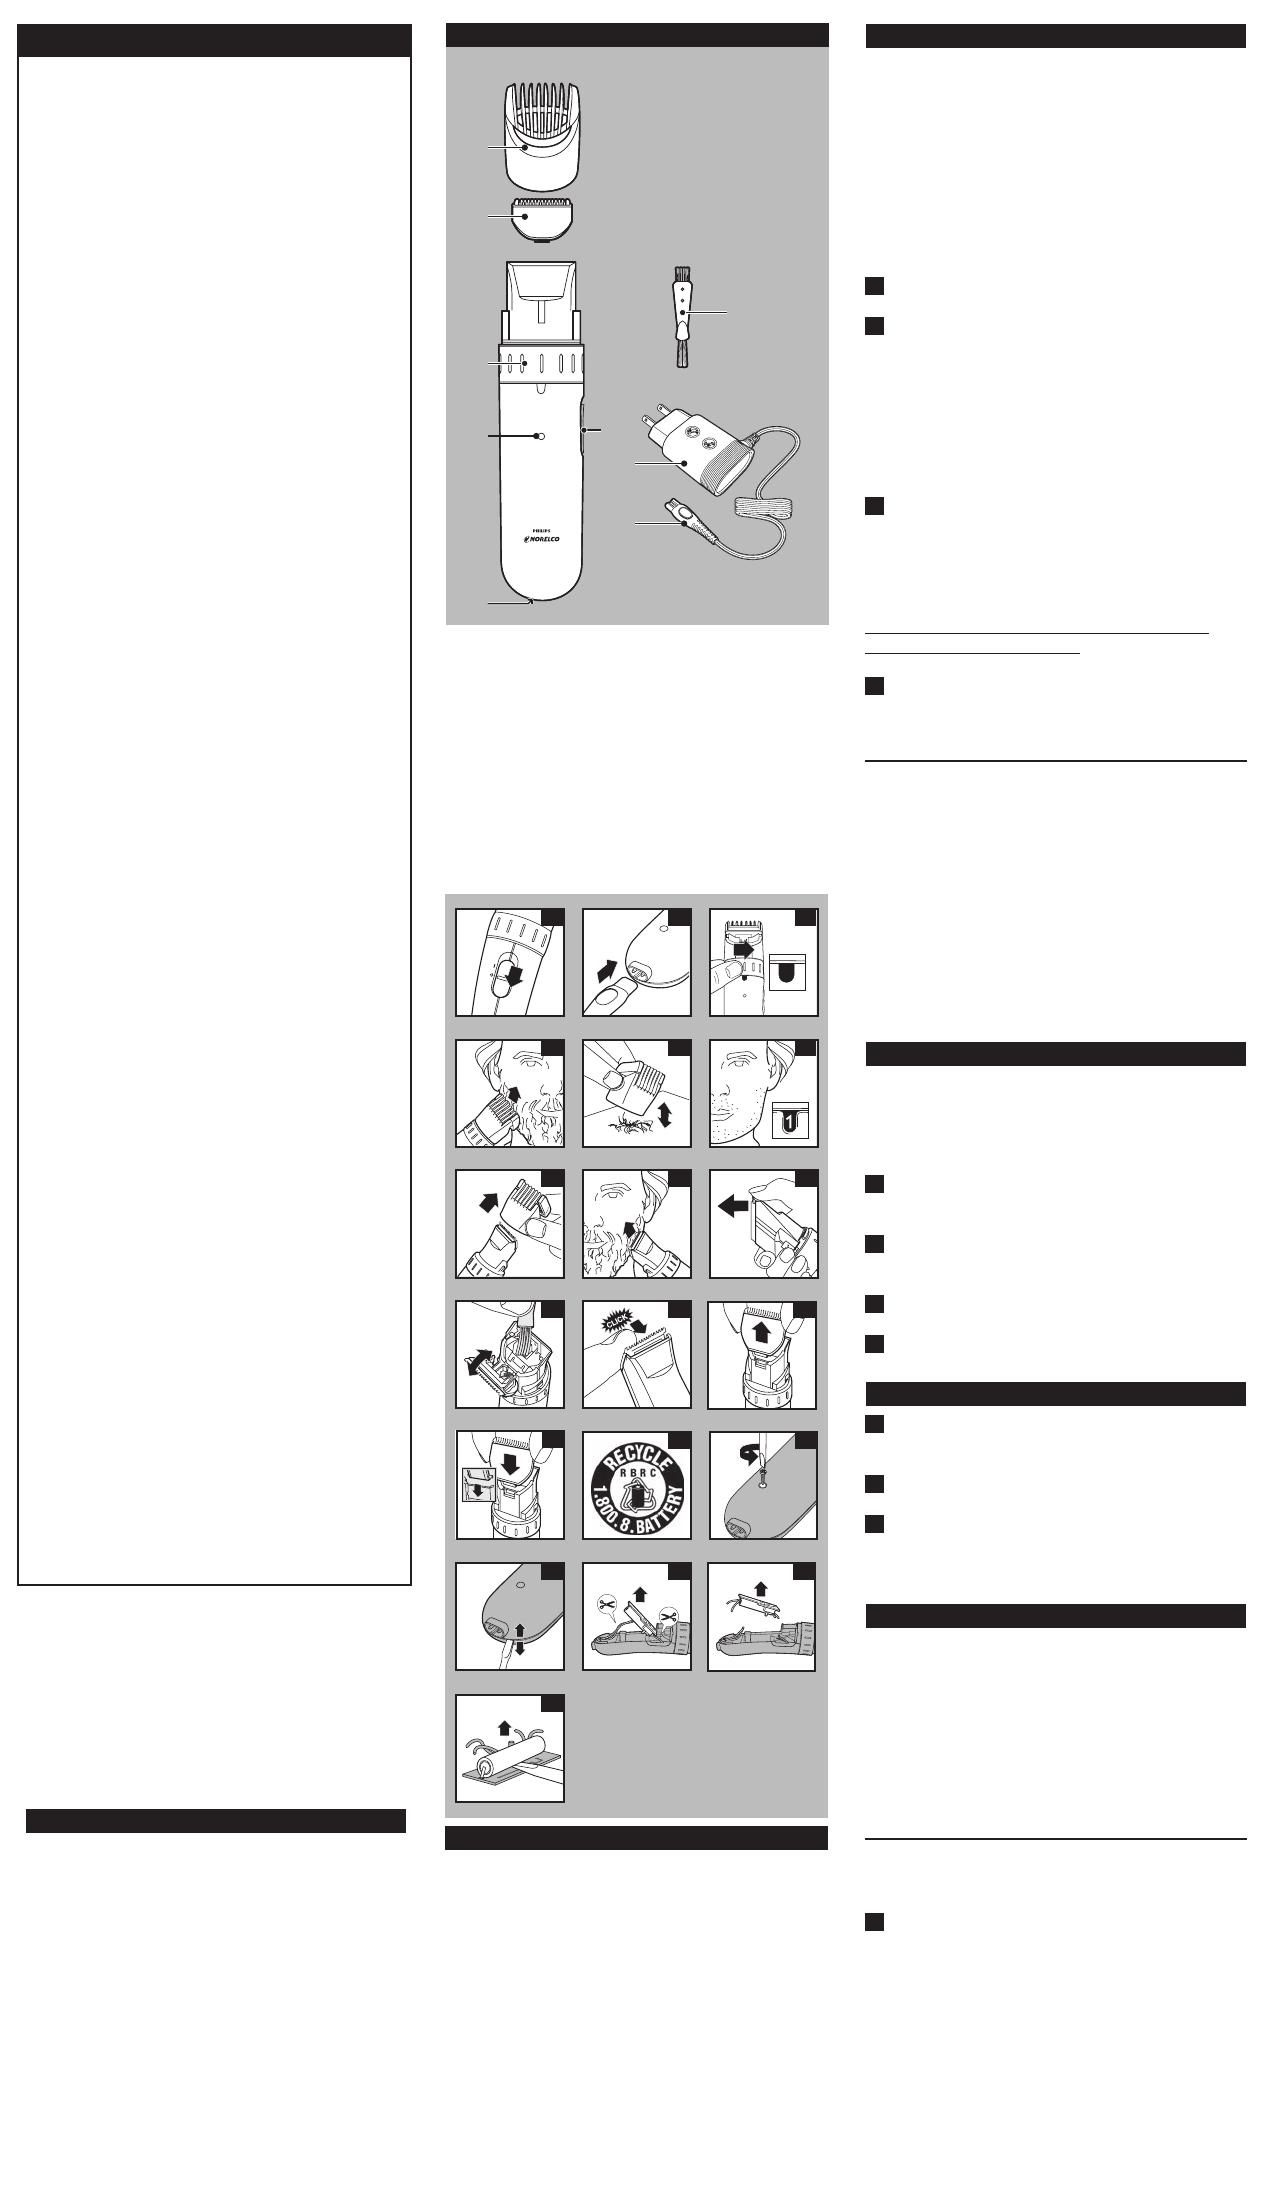
1 Be certain Trimmer is OFF (fig. 1).
2 Insert the appliance plug directly into the
Trimmer (fig. 2) and plug the adaptor into any
120V AC outlet. Use only the cord provided.
w An adaptor plug may be necessary for
cord usage in some foreign countries. Use
an attachment plug adaptor of the proper
configuration for power outlet.
3 The Charging Light on the appliance will light
to indicate the Trimmer is charging.
w It will take approximately 10 hours to fully
charge the Trimmer for a cordless trimming
timeofupto35minutes.
NOTE: After the Trimmer is fully charged, the
Charging Light will remain lit.
4 Disconnect the cord and unplug from
electrical outlet.
Optimize the working life of the battery
w After the Trimmer has been charged for
the first time, do not recharge the Trimmer
between trimming sessions. Continue using it
until the battery is completely empty.
w Do not charge for more than 24 hours.
w Do not keep cord permanently plugged in.
w Discharge/run down the battery completely
twice a year by letting the motor run until it
stops.
w If the Trimmer hasn’t been used for a long
period of time, it must be recharged for a full
10 hours.
Corded Trimming
wOnly use the Trimmer corded when the
battery is empty.
wTrimmer does not recharge during corded
trimming.
1 Connect cord provided to Trimmer and plug
Trimmer into electrical outlet.
2 If battery is completely empty, wait a few
minutes before switching Trimmer ON.
3 Slide ON/OFF switch ON to begin trimming.
4 Turn Trimmer OFF and unplug.
Cordless Trimming
1 Charge according to directions. Unplug
Trimmer from outlet and remove cord.
2 Slide ON/OFF switch ON to begin trimming.
3 If the charge runs out while trimming, simply
connect cord provided to Trimmer and outlet
to continue trimming.
Trimming
w Use this Trimmer for its intended household
use as described in this manual.
w Always comb the beard and/or moustache with
a fine comb before you start trimming.
w If you are trimming for the first time, be
careful. Do not move the Trimmer too fast.
Make smooth and gentle movements.
Trimming with the Guide
Comb Attachment
w Guide Comb Attachment must be on Trimmer
in order to use the Zoom Lock.
1 Turn the Zoom Lock to the desired trimming
length setting (see table). The setting will
appear in the window below the Zoom Lock
(fig. 3).
w If you are trimming for the first time, start by
using the maximum trimming length setting
(#9) to prevent accidentally trimming hairs too
short. As you become familiar with the settings,
adjust Zoom Lock to desired trimming length.
Zoom Lock will “click” into position at each
setting.
After Each Use:
1 Make sure the Trimmer is switched OFF
and disconnected from the electrical outlet.
2 Remove the Guide Comb Attachment.
3 Open the cutting unit (fig. 9).
4 Clean the cutting unit and the inside of the
Trimmer with the brush supplied (fig. 10).
5 Push the cutting unit back into place on the
Trimmer until you hear a click (fig. 11).
Replacing The Cutting Unit
If your cutters become damaged or worn,
do not continue using the Trimmer. Replace
cutters immediately.
1 Open the cutting unit.
2 Remove the old cutting unit by pulling it
upwards (fig. 12).
3 Place the two notches of the new cutting
unit into the guiding slots (fig. 13).
4 Push the cutting unit back onto the Trimmer
until you hear a ‘click’.
This Trimmer has no other user-serviceable
parts. For assistance call 1-800-243-3050.
Assistance
For assistance, visit our website:
www.philips.com/support or
call toll free: 1-800-243-3050.
Information is available 24 hours a day,
7 days a week.
Storage
w Be sure Trimmer is turned OFF. Remove cord
from outlet and Trimmer before storing in a
safe, dry location where it will not be crushed,
banged, or subject to damage.
w Do not wrap cord around Trimmer when
storing.
w Store cord in a safe location where it will not
be cut or damaged.
w Do not place or store Trimmer where
it can fall or be pulled into a tub or sink, water
or other liquid.
Battery Removal
wThis Philips Norelco Trimmer contains a
rechargeable Nickel Metal Hydride battery
which must be disposed of properly (fig. 14).
wBattery should only be removed when Trimmer
is to be discarded.
wForassistance,calltollfree:1-800-243-3050or
visit our website, www.philips.com/support.
1 Unplug electrical cord from outlet and
Trimmer before dismantling Trimmer.
2 Allow Trimmer to run until the battery is
empty/depleted.
3 Turn Trimmer OFF.
4 Use a screwdriver to remove the housing of
theTrimmer(fig.15).
5 Separate the housing parts with a
screwdriver (fig. 16).
6 Cut the wires close to the battery holder
with household scissors (fig. 17).
7 Remove the battery holder with the
rechargeable battery (fig. 18).
8 Use a screwdriver to pry the battery off the
printedcircuitboard(fig.19).
9 Do not attempt to replace battery. Insulate
battery ends by covering with tape and/or
place battery in a small plastic bag.
10 Discard your Trimmer. Do not attempt to
plug electrical cord into the outlet or
recharge the Trimmer after the battery has
been removed.
11 Contact your local town or city officials
for battery disposal information or call
1-800-8-BATTERY or www.rbrc.com for
battery drop-off locations.
2 Switch the Trimmer ON.
3 To trim in the most effective way, move the
Trimmer against the direction of hair growth.
Make sure the surface of the comb always
stays in contact with the skin (fig. 4).
NOTE: Since all hairs do not grow in the
same direction, you may want to try different
trimming positions (i.e., upwards,
downwards, or across). Practice is best for
optimum results.
4 If cut hairs have accumulated in the Guide
Comb, turn Trimmer off, remove the Comb
Attachment and blow and/or shake the
hair out of the comb (fig. 5). The selected
trimming length setting will not change
when you do this.
Never pull off the Guide Comb Attachment
by grasping the flexible top portion. Always
pull off by the bottom part of attachment.
Trimming For ‘Stubble’ Look
1 Be certain Guide Comb is on Trimmer
and use setting #1 to result in a “stubble”
look (fig. 6).
Trimming Without the Comb
Attachment
Remove Guide Comb Attachment if you are:
w Defining hair lines
w Trimming nape of neck
w Removing single, unwanted hairs
1 Be certain Trimmer is in the OFF position.
2 Remove the Guide Comb Attachment by
pulling it off the Trimmer (fig. 7).
3 Switch the Trimmer ON.
4 Make well-controlled movements. Touch the
hair lightly with the Trimmer (fig. 8).
Be careful when you are trimming without comb
attachment as when the Trimmer is turned on it
will trim every hair it touches.
Cleaning
w Clean the comb attachment after each use.
w Always switch Trimmer OFF, unplug and remove
power supply cord from Trimmer before
cleaning.
w Do not use compressed air, abrasive cleaning
agents, scourers or liquids such as alcohol,
benzene, bleach or acetone to clean the
Trimmer and attachments.
w Never clean, replace or remove Trimmer comb
with motor ON.
w Never rinse or immerse the Trimmer in water
or any other liquid.
w Do not apply pressure to cutters.
w Do not touch cutters with hard objects as this
may damage them.
w Use a soft, dry cloth to clean Trimmer handle.
During Use:
w If cut hairs have accumulated in the Guide
Comb area, turn Trimmer off, pull Guide Comb
Attachment off Trimmer and remove hairs by
shaking and/or blowing.
ENGLISH
IMPORTANT
SAFETY
INSTRUCTIONS
When using an electrical appliance, basic safety
precautions should always be followed, including
the following:
Read all instructions before using this
appliance.
DANGER
To reduce the risk of electric shock:
1. Do not reach for a trimmer that has fallen
into water. Unplug immediately.
2. Do not use while bathing or in a shower.
3. Do not place or store trimmer where it can
fall or be pulled into a tub or sink. Do not
place in or drop into water or other liquid.
4. Always unplug this trimmer from the
electrical outlet immediately after using,
except when trimmer is (re)charging.
5. Unplugandremovepowersupplycordfrom
trimmer before cleaning.
WARNING
To reduce the risk of burns, fire, electric
shock or injury to persons:
1. Close supervision is necessary when
this appliance is used by, on, or near children
or invalids.
2. Use this trimmer for its intended household
use as described in this manual. Do not use
attachments not recommended by Philips
Electronics North America Corporation.
3. Never operate this trimmer if it has a
damaged cord or plug, if it is not working
properly, if it has been dropped, damaged, or
dropped into water. For assistance call
1-800-243-3050.
4. Do not rinse or immerse the trimmer in
water or any other liquid.
5. Keepthetrimmer,cordandanyattachments
away from heated surfaces.
6. Never drop or insert any object into any
opening.
7. Do not operate, charge or plug in trimmer
outdoors or where aerosol (spray) products
are being used or where oxygen is being
administered.
8. Always check cutters, cutting unit and comb
before using the trimmer. Do not use the
trimmer if cutters, cutting unit or comb are
damaged, as injury may occur.
9. Alwaysattachplugtotrimmerfirst,then
to outlet. To disconnect, turn on/off switch
to “OFF” position, then remove plug from
outlet.
10. To prevent possible damage to the cord, do
not wrap cord around the trimmer.
11. Never put trimmer in direct sunlight or store
at a temperature above 140°F.
12. This trimmer is for use on human hair only.
Do not use this trimmer for any other
purpose.
13. Always store your trimmer, attachments and
power plug in a moisture-free area. Make
sure the cord is disconnected from the
trimmer.
14. Only use the power plug supplied with the
appliance.
SAVE THESE
INSTRUCTIONS
IMPORTANT: The power plug contains
a transformer. Do not cut off the power
plug to replace it with another plug as this
will cause a hazardous condition.
IMPORTANT: YOUR TRIMMER
CONTAINS A NICKEL METAL HYDRIDE
RECHARGEABLE BATTERY.
See Battery Removal Instructions.
Registration
Congratulations on your purchase and welcome
to Philips Norelco!
To fully benefit from the support that Philips
Norelco offers, register your product at
www.philips.com/norelco
A Guide Comb Attachment
B Cutter Blades
C PrecisionPatentedZoomLockwith9Pre-
Select Settings
D Charging Light
E Socket for Appliance Plug
F On/Off Switch
G Adaptor
H Appliance Plug
I Cleaning Brush
Full Two-Year Warranty
45-DayMoney-BackGuarantee
Put It To The Test
Like many new products, your Philips Norelco
Stubble Trimmer may take a little getting used to. If
you are using an electric Trimmer for the first time,
or if you’ve been using a different brand, take the
time to acquaint yourself with your new Trimmer.
Your Trimmer features an unique stubble look
setting combined with an adjustable Zoom Lock to
make beard trimming goof-proof.
Throw your scissors away and put your new
Trimmer to the test. We guarantee precise,
professional results or Philips Norelco will
refund you the full purchase price as long as the
request is received within 45 days of purchase.
45-DAY
MONEY-BACK
GUARANTEE
If you are not fully satisfied with your Philips
Norelco Trimmer, send the product back along
with dated sales receipt and we’ll refund you
the full purchase price.
The Trimmer must be shipped prepaid by
insured mail, insurance prepaid, and have the
original sales receipt, indicating purchase price
and the date of purchase, enclosed. We cannot
be responsible for lost mail. The Trimmer must
be postmarked no later than 45 days after
the date of purchase. Philips Norelco reserves
the right to verify the purchase price of the
Trimmer and limit refunds not to exceed
suggested retail price.
To obtain Money-Back Guarantee Return
Authorization Form, call 1-800-243-3050 for
assistance. Please allow 4-6 weeks for delivery
of check.
A
B
C
D
G
H
I
F
E
Features
422200280253
Full Two-Year Warranty
Philips Electronics North America Corporation warrants each new Philips
Norelco product, Model QT4021, QT4019 against defects in materials or
workmanship for a period of two years from the date of purchase, and
agrees to repair or replace any defective product without charge.
IMPORTANT: This warranty does not cover damage resulting from
accident, misuse or abuse, lack of reasonable care, the affixing of any
attachment not provided with the product or loss of parts or subjecting
the product to any but the specific voltage.* Use of unauthorized
replacement parts will void this warranty.
PHILIPS ELECTRONICS NORTH AMERICA CORPORATION
WILL NOT PAY FOR WARRANTY SERVICE PERFORMED BY
A NON-AUTHORIZED REPAIR SERVICE AND WILL NOT
REIMBURSE THE CONSUMER FOR DAMAGE RESULTING FROM
WARRANTY SERVICE PERFORMED BY A NON-AUTHORIZED
REPAIR SERVICE.
NO RESPONSIBILITY IS ASSUMED FOR ANY SPECIAL,
INCIDENTAL OR CONSEQUENTIAL DAMAGES.
In order to obtain warranty service, simply go to www.philips.com/
norelco or call 1-800-243-3050 for assistance. It is suggested that for
your protection you return shipments of product by insured mail,
insurance prepaid. Damage occurring during shipment is not covered by
this warranty. NOTE: No other warranty, written or oral, is authorized
by Philips Electronics North America Corporation. This warranty gives
you specific legal rights, and you may also have other rights which vary
from state to state. Some states do not allow the exclusion or limitation
of incidental or consequential damages, so the above exclusion and
limitations may not apply to you.
*Read enclosed instructions carefully.
Manufactured for:
Philips Consumer Lifestyle
A Division of Philips Electronics North America Corporation
P.O. Box 10313, Stamford, CT 06904
Norelco is a Registered Trademark of Philips Electronics
North America Corporation.
Zoom Lock is a Trademark of Philips Electronics North America Corporation.
PHILIPS is a Registered Trademark of Koninklijke Philips Electronics N.V.
© 2010 Philips Electronics North America Corporation. All Rights Reserved.
Register your product and get support at
www.philips.com/norelco
QT4019
QT4021
Rechargeable
Cordless/Cord
Stubble
Trimmer
Trimming Length Settings Table
#1 Stubble Length
#2
#3
#4
#5
#6
#7
#8
#9
3/64 in/1mm
5/64 in/2mm
9/64 in/3.5mm
3/16 in/5mm
9/32 in/7mm
3/8 in/9mm
29/64 in/11.5mm
19/32 in/14.5mm
23/32 in/18mm
1 2
9
9
3
4 5 6
7 8 9
10 11
12
13
14 15
16 17
18
19
ENGLISH
(Model
QT4021 Shown)
10_QT4019_21.indd 1 10/29/10 9:22 AM