Page is loading ...

PK7/PK5
Owner’s manual English

PK7/PK5

Contents i
Contents
Introduction ...................................................................................................... 1
Multimedia workstation........................................................................... 1
The Owner’s Manual .............................................................................. 1
Specifications ......................................................................................... 2
Important information ............................................................................. 4
Important preliminary notes.................................................................... 5
How to update your instrument .............................................................. 5
PK7......................................................................................................... 5
PK5......................................................................................................... 5
SYSTEM RESET.................................................................................... 5
Front Panel PK7 ..................................................................................... 6
Rear Panel PK7/PK5 (Connections) ...................................................... 9
Front Panel PK5 ................................................................................... 10
• 1 Get started................................................................................................ 12
Powering up and preliminary operations .............................................. 12
Power On/Off........................................................................................ 12
Battery Power....................................................................................... 12
Power Supply Unit................................................................................ 12
Play on the keyboard and change the sounds ..................................... 13
Select Performances and play keyboard sounds ................................. 14
Select Styles and play with automatic accompaniments...................... 15
Play the Programmable Pads............................................................... 16
Add Pitch Bend to your playing ............................................................ 16
Play with Effects or bypass them ......................................................... 16
Play with headphones .......................................................................... 17
Play with the pedals ............................................................................. 17
Regulate the general Effect volumes ................................................... 17
Transpose the instrument (Semitones) ................................................ 18
Demo.................................................................................................... 19
How to listen to the Demo Styles ......................................................... 19
Song Play - Direct from Disk (PK7 only) .............................................. 19
• 2 Basic concepts ........................................................................................... 21
Style, Song Style and Song.................................................................. 21
Style and RealTime modes (Style accompaniments off)...................... 21
Style Lock and Single Touch Play buttons ........................................... 21
Song Style mode .................................................................................. 22
Song mode (PK7 only) ......................................................................... 22
Performance......................................................................................... 23
Tracks................................................................................................... 24
Sounds ................................................................................................. 24
Connections ......................................................................................... 25
Power ................................................................................................... 25
Aux Out (Stereo) .................................................................................. 25
Input - (Mic/Line + Gain) [optional for PK7 only) .................................. 25
MIDI...................................................................................................... 25
Pedals .................................................................................................. 26
Computer (PK7 only)............................................................................ 26

ii Contents
Video (optional - PK7 only)................................................................... 27
Headphones ......................................................................................... 27
Music Stand.......................................................................................... 27
The Display .......................................................................................... 28
Data Entry ............................................................................................ 29
Inserting Alphanumeric data................................................................. 30
• 3 Sounds & Performances............................................................................ 31
The Sounds and tracks ........................................................................ 31
The 3 Real Time Keyboard tracks (Upper 1, Upper 2, Lower) ............. 31
Sounds & The keyboard mode............................................................. 31
Full mode.............................................................................................. 31
Split mode ............................................................................................ 32
Selecting Sounds ................................................................................. 33
To select Keyboard Sounds.................................................................. 33
BANK 1, 2 and 3 (bank 3 is present in PK7 only)................................. 34
Selecting Performances ....................................................................... 35
How to program the Performances ...................................................... 36
The Performance parameters .............................................................. 37
Store Performance ............................................................................... 39
Save changes to a different Performance (or create a new one)......... 39
The Performance name........................................................................ 40
To Restore the original Performance settings ...................................... 40
• 4 The Styles ................................................................................................ 41
About PK7/PK5 Styles.......................................................................... 41
Selecting Styles.................................................................................... 42
Recall a Style by selecting the Performances ...................................... 43
The Style controls................................................................................. 45
Start/Stop ............................................................................................. 45
Key Start............................................................................................... 45
Intro ...................................................................................................... 45
Ending .................................................................................................. 46
Var 1, Var 2, Var 3, Var 4 ...................................................................... 46
Fill A, Fill, Fill B ..................................................................................... 46
Tap Tempo (also FILL B) ...................................................................... 47
Fade In/Out .......................................................................................... 47
The Arranger section ............................................................................ 48
Arrange On/Off ..................................................................................... 48
Arrange Memory................................................................................... 48
Lower Memory...................................................................................... 48
Bass To Lowest .................................................................................... 48
The Style Tempo .................................................................................. 49
Tempo Lock .......................................................................................... 49
Saving the Tempo to a Performance .................................................... 49
The Split Point ...................................................................................... 50
Setting a new split point ....................................................................... 50
Arrange Mode....................................................................................... 51
Single Touch Play, Store Performance,
Style/Tempo Lock ................................................................................. 53
Single Touch Play................................................................................. 53
Store Performance ............................................................................... 53
Style/Tempo Lock ................................................................................. 54
The Utility section ................................................................................. 55

Contents iii
• 5 Disk (PK7 only)......................................................................................... 58
Files...................................................................................................... 58
The disk functions ................................................................................ 58
Loading Songs and MIDI files .............................................................. 60
Loading Styles...................................................................................... 60
Loading Performances ......................................................................... 60
Loading Samples.................................................................................. 60
Loading Song Styles ............................................................................ 60
Load operations - Play a Song or MidiFile direct from disk .................. 60
The Load procedure ............................................................................. 61
Recongizing files with extensions......................................................... 62
Save operations ................................................................................... 62
The Save procedure............................................................................. 63
Saving MIDI Files ................................................................................. 64
Saving Song Styles .............................................................................. 64
Delete ................................................................................................... 65
Disk Formatting procedures ................................................................. 66
Formatting procedure ........................................................................... 66
General disk handling information........................................................ 67
Inserting a Disk into the drive ............................................................... 67
Ejecting a Floppy Disk.......................................................................... 67
The Write Protect Tab........................................................................... 67
Handling Floppy Disks.......................................................................... 68
Back-up copies..................................................................................... 68
Disk Drive Head Cleaning .................................................................... 68
Precautions to observe when using PK7 disks with a computer .......... 69
• 6 Songs (PK7 only) ...................................................................................... 70
What is a Song? ................................................................................... 70
The Song Performance ........................................................................ 70
Selecting and playing back Songs ....................................................... 70
To select a Song................................................................................... 70
Song Playback ..................................................................................... 71
Melody off (PK7 only) ........................................................................... 72
Play All Songs (PK7 only)..................................................................... 72
Play a Song with a track in real time .................................................... 72
Displaying lyrics (PK7 only).................................................................. 74
To display lyrics on an external monitor or domestic TV ...................... 74
• 7 Song Styles .............................................................................................. 75
Song/Style Performances..................................................................... 75
To select and playback a Song Style.................................................... 75
Select a Song Style .............................................................................. 75
Play a Song Style in real time .............................................................. 76
Song Style Recording........................................................................... 77
Entering the Song Style Record mode ................................................. 77
Recording ............................................................................................. 77
Listen to the Song Style playback ........................................................ 78
Clear Song Style (User Song/Style) ..................................................... 79
Song Style Name ...................................................................................80
• 8 Digital Signal Processor ............................................................................ 81
Reverb.................................................................................................. 81
Chorus.................................................................................................. 81

iv Contents
Assigning the effect types .................................................................... 82
How to select the effect types .............................................................. 82
Deactivating (bypassing) the effects .................................................... 83
Regulating the Send levels................................................................... 84
Revsend ............................................................................................... 84
Chosend ............................................................................................... 84
• 9 MIDI........................................................................................................ 86
What is MIDI?....................................................................................... 86
The Computer port (PK7 ONLY) .......................................................... 86
Tracks and MIDI channels.................................................................... 87
MIDI Connection rules.......................................................................... 87
Assigning MIDI channels...................................................................... 87
MIDI Lock ............................................................................................. 87
The Common Channel ......................................................................... 88
MIDI Numeration .................................................................................. 88
Principal MIDI applications ................................................................... 88
Piloting an expander (or other keyboard) with PK7/PK5 ...................... 88
Using the PK7/PK5 in Song Mode with a computer
(or external sequencer) ..................................................................... 91
Piloting PK7/PK5 with a master keyboard............................................ 92
• 10 Sampling (PK7 only) & Programmable Pads............................................ 94
Sampling and Programmable Pads assignment .................................. 94
Digital Audio Sampler ........................................................................... 94
Sampling procedure ............................................................................. 95
The Sample Edit parameters................................................................ 96
Reverb.................................................................................................. 96
Chorus.................................................................................................. 96
Volume ................................................................................................. 96
Pan ....................................................................................................... 96
Tuning................................................................................................... 97
Cancelling samples .............................................................................. 97
Programmable Pads Assign ................................................................. 98
The PK7/PK5 Pads .............................................................................. 98
• 11 MIDI/General ........................................................................................ 99
• Reference section
Technical Specifications PK7 .................................................... Specs. 1
Technical Specifications PK 5 ................................................... Specs. 1
Index (alphabetical) ............................................................ Reference. 3
• Appendix
Sounds table .................................................................................... A. 1
Style/Song tables ............................................................................. A. 3
Reverb table ..................................................................................... A. 4
Chorus table ..................................................................................... A. 4
Drumkit tables .................................................................................. A. 5
Recognized chords - example in the key of C.................................. A. 8
MIDI Implementation Chart .............................................................. A. 9
Control Change on tracks............................................................... A. 10

Introduction 1
Congratulations!
Congratulations and thank you for having purchased Generalmusic’s PK7/PK5, a multimedia
workstation packed with features and functions. This instrument unites high quality sounds and
automatic accompaniments with an easy-to-operate user interface.
Note: The functions explained in this manual relate to both instruments PK7 and PK5.
The differences between the two instruments are separately explained (“PK5 only” or
“PK7 only”).
MULTIMEDIA WORKSTATION
PK7/PK5 is not just an ordinary music workstation, it boasts true multimedia features that can
render music making fun. While a guitar player can play through PK7 amplification system, a
group of singers can follow the lyrics projected on a television (or other video projection device).
THE OWNER’S MANUAL
Do not use it as a paperweight: read it. It helps to understand how PK7/PK5 operates, saving
much time.
The first part of the manual is divided into several User Guides while the second part contains
the Appendix with various tables and MIDI specifications.

2 Introduction
Specifications
• Polyphony & multitimbricity
PK7/PK5 is 32 note polyphonic (maximum), 16 part multi-timbral (Song mode) or 8 part
multi-timbral (Style mode). Each part is assigned to a track. In Real Time mode, 3 tracks
(maximum) are assigned to the keyboard.
• Sound Generation
The Sounds are based on PCM and Wavetable technology. The Sounds are based on
elaborated sampled waveforms. The instrument’s 32 oscillators generate “single” (32-note
polyphonic) or “layer” sounds (16 note polyphonic).
• ROM Sounds
The PK7’s ROM (Read Only Memory) contains 384 permanent Sounds including 16
Drumkits. The PK5 contains 256 Sounds including 8 Drumkits.
• Sample-RAM (PK7 only)
PK7 can be fitted with an optional Audio/Video interface which gives access to the incorpo-
rated battery-backed Sample-RAM. This memory is dedicated to the storage of Samples
which can be captured with the Sampling function or loaded from disk. RAM Sounds are
based on (one RAM Sound for all 63 Performances.
• Digital Signal Processor
PK7/PK5 features two on-board Digital Signal Processors, controlled in real time, which
enrich the sounds with effects (reverbs and modulations. Two different effects (1 Reverb
and 1 Modulation) can be assigned and memorized to each Performance.
• Sequencer
An on-board 16-track Sequencer (8 track in PK5) includes a series of functions that allow
the recording and editing of Styles and Songs (PK7 only), and the recording of Song/Styles
(real time recording method) User-programmed sequence data are conserved in the bat-
tery-backed System-RAM.
• Preload, Play Direct from Disk (PK7 only)
The Preload function automatically loads Songs in PK, WK, CD or SMF format into memory
while the sequencer is in play or while you play in real time. Play Direct from Disk allows
you to play a PK, WK, CD or SMF Song directly from disk without first loading all the data
into memory. This is particularly useful for Songs and Midi files that are larger in terms of
memory than the available Sequencer memory.
• Automatic Accompaniments
PK7/PK5 features 96 ROM Styles which provide automatic accompaniments for the three
real time keyboard sections (Upper 1, Upper 2, Lower). Each Style has 4 Variations (2 in
PK5) consisting of Basic, Intro, Fill and Ending patterns, totalling 40 different patterns (20 in
PK5). There is also room in memory for up to 16 User Styles (PK7 only).
• Disk Drive (PK7 only)
The Disk Drive, an invaluable device which renders PK7 more powerful and flexible, pro-
vides a set of functions that permit the transfer of useful data to and from Disks, allowing
you to build a library of Songs, Styles, Performances and Samples. The disk drive can
read and write onto PK7 format 3.5” floppy disks with a capacity of 720 Kbytes (2DD type)
and 1.4 Mbytes (2HD type). Other formats recognized are Ms-Dos (1.44 Mb) and Atari ST/
Falcon (720 kb), both used for the exchange of MIDI Files.
• Sampling and Karaoke (PK7 only)
The optional Audio/Video Interface (AVI - available on request) expands the PK7 specifica-
tions with functions normally reserved for the more advanced instruments. The AVI renders
the Microphone/Line inputs operational for Sampling. Samples can also be loaded to the
Sample-RAM from disk. The Karaoke function allows Song and MIDI File lyrics to be
displayed on an external Television or computer monitor. The AVI can be configured for
different video standards (Europe and USA).
• Updateable Operating System from floppy disk
Since the PK7 operating system resides in a flash ROM, it is possible to load updates from
floppy disk. Operating System updates can add new functions to the instrument.

Introduction 3
• Multitasking operating system (PK7 only)
PK7’s operating system allows you to perform different functions simultaneously, such as
loading a file while the sequencer is in playback, or formatting a disk while you play.
• MIDI
Thanks to the fully implemented MIDI features, PK7/PK5 can act as a Master controlling
device, or as a 16 part multi-timbral slave device, regardless of the current playing mode.
• Direct Connection to a computer (PK7 only)
The Computer jack permits the connection of computers (MAC/PC/Atari) not fitted with a
MIDI interface to PK7 via a single serial cable. The communication speeds can also be
configured to suit your specific computer system.

4 Introduction
Important information
1. The PK7/PK5 should contain the following items from the factory:
a) Instrument;
b) one Floppy disk containing the operating system (PK7 only);
c) Music stand;
d) Owner’s manual.
2. When contacting your retailer or authorised Generalmusic technical assistance centre, al-
ways quote the model name and serial number of your instrument.
Products and/or brand names that are referred to in this publication (Apple, IBM, Macintosh, MS-DOS,
Windows, OS2, Windows 95, Amiga) may either be trademarks and/or registered trademarks of their
respective owners. The Publisher/s and Author/s make no claim to these trademarks
Generalmusic on Internet: http://www.generalmusic.com
The information in this publication has been carefully prepared and checked. The manufacturers however
decline all liability for eventual errors. All rights are reserved. This publication may not be copied,
photocopied or reproduced in part or in whole without prior written consent from Generalmusic S.p.A.
Generalmusic reserves the right to apply any aesthetic, design or function modifications it considers
necessary to any of its products without prior notice. Generalmusic declines all liability for damage to
property or persons resulting from improper use of the instrument.
Make sure that all internal electronic options are installed by an authorized Generalmusic service
technician. Check with an authorized Generalmusic dealer for information on the closest service center.
Copyright Generalmusic © 1997. All rights reserved.

Introduction 5
Important preliminary notes
Observe these important preliminary notes before getting into your instrument
AVOID PLACING DISKS ON TOP OF THE PK7/PK5 SPEAKERS - Do not place floppy disks
on top of speakers, near magnets, telephones, or other sources of electromagnetic fields.
The disk contents could be damaged.
HOW TO UPDATE YOUR INSTRUMENT
To implement new functions in your instrument, you can update your instrument as described
below.
PK7
1. Before turning on the PK7, insert the floppy disk containing the latest release of the
Generlmusic Operating System Turn off the instrument
2. Turn on the instrument. The message “Load OS?” appears in the display.
3. Press ENTER to confirm (pressing ESCAPE cancels the operation)
4. After pressing ENTER, the display shows the message “Loading!”.
5. When the operation is complete, PK7 is ready to play.
NB. To check the date of the Operating System, go into the last page of the MIDI/GENERAL
functions (PK7 only).
PK5
To update the PK5, you must contact an authorised Generalmusic technical assistance centre
or your retailer.
SYSTEM RESET
To restore the instrument’s factory status (default settings), proceed as described below:
• Simultaneously press and hold the UPPER 1 selector button (located to the right of the
display) together with the PROGRAMMABLE PADS buttons 2, 3 and 4.
WARNING
The Reset operation irremediably cancels all user-programmed data contained in the instru-
ment’s RAM.

6 Layout
28
Front Panel PK7
bass accompaniment according to the lowest note played. When
OFF, the bass track follows the programmed pattern of the Style,
regardless of the chord inversion played.
6. VARIATION 1, 2, 3, 4. These buttons allow you to change the
current Style Variation (the display indicator illuminates then goes
off. The current variation (1, 2, 3 or 4) is indicated by the corre-
sponding LED which turns on.
7. CURSOR/PAGE. Navigational arrows: the CURSOR [ ] and [ ]
buttons select the functions listed in the MENU to the left of the dis-
play. The currently selected function is indicated by the arrowhead
in the display which points to the name of the function. The PAGE
[ ] and [ ] buttons pass from function page to another.
8. MELODY OFF. This button turns off the melody of a Song in
playback, useful if a singer wants to sing along with the backing, or if
you want to play the melody yourself.
9. Fade In/Out: Starts and stops a Style with a gradual increase or
decrease of volume. Starting requires pressing the Start button.
During the fade cycle, the corresponding display indicator turns on.
10. FILLL IN A, FILL IN, FILL IN B/TAP TEMPO. FiLL IN A [ ] (Fill-
to-previous-variation): recalls a Fill pattern (display indicator turns
on) then passes to the previous Style Variation. FILL IN [ ] (Fill-to-
current-variation): recalls a Fill pattern then continues with the same
Style variation. FILL IN B [ ] (Fill-to-next-variation): - pressed during
Style play (display indicator turns on), it recalls a Fill pattern then
passes to the next variation. TAP TEMPO - sets the Style playing
speed by tapping on the button and starts the Style automatically.
11. SINGLE TOUCH PLAY. When On (display indicator on) ROM
Style-Performance sounds are assigned to all the tracks when you
select the Styles. The ARRANGE ON/OFF and ARRANGE MEMORY func-
tions are also automatically activated. In this mode, the 9 Function
1. POWER ON/OFF:. Push button to turn the instrument on
and off.
2. VOLUME. Regulates the overall volume of the entire instru-
ment (speakers, headphones, stereo aux out).
3. DEMO. Gains access to the demonstration Style.
4. STYLE/SONG. Numeric selection keypad to select the Styles
(00-95), User Styles (96-103), Song Styles (104-110) and Songs
(111-117) by specifying the corresponding Program change
number using the STYLE / SONG lists as a reference. Three
digit selections are specified by pressing the 100+ button fol-
lowed by the remaining two digits.
5. ARRANGER. 4 functions which control the Styles.: ARRANGE
ON/OFF enables (LED On) or disables (LED Off) the Style ar-
rangements. ARRANGE MEMORY, the Style arrangements con-
tinue playing (display indicator on) or stop (display indicator off)
after releasing the keys from the keyboard below the split point.
LOWER MEMORY, the Sound assigned to the Lower keyboard sec-
tion continues playing (display indicator on) or stops playing
(display indicator off) after releasing the keys from the keyboard
below the split point. BASS TO LOWEST, when on (LED on), the
Bass track of the Style auto accompaniment follows the lowest
left note of the chord played, allowing real time changes of the
1
2
3
4
5
6
29
buttons F1 … F9 also recall nine different Single Touch Play ROM
panel settings which differ according to the Style. When OFF (dis-
play indicator off), selecting Styles recalls sounds for the accompa-
niment tracks while those of the keyboard tracks remain unchanged.
12. STORE PERFORMANCE. Gains access to the STORE PERFORM-
ANCE function where you can save your panel settings to the current
Performance and change the Performance name. Holding this but-
ton pressed for 2 seconds enters into the edit of the current Perform-
ance where you can modify the relative parameters. (arrowhead
shown next to PERF function).
13. FUNCTION BUTTONS F1 … F9 (S.T.PLAY/PERFORMANCE).
These buttons select Performances, Single Touch Play settings or
Style, Song Style or Song tracks, depending on the current status of
the instrument. In Song mode the two rows of numbers under the
buttons correspond to the 16 Song Tracks which are selected with
the buttons F1 … F8. Function button F9 toggles between tracks 01-
08 and 09-16.
14. START/STOP, INTRO, ENDING, KEY START/CONTINUE.
START/STOP starts and stops the playback of a Style. INTRO places
the introduction of a Style on “standby” before Style start ENDING
(the corresponding display indicator turns on). KEY START synchro-
nises the start of a Style with a note (or chord) pressed on the lower
keyboard area. Pressing CONTINUE restarts the Song Style or Song
from the current stop point.
15. TEMPO/DATA DIAL, ENTER, ESCAPE. The TEMPO/DATA DIAL
is active for Tempo changes in Style, Song Style or Song mode, or

Layout 7
operates as a data entry device when the instrument is in one of the
function edit modes. ENTER confirms specified data in edit situations.
ESCAPE cancels specified data and/or escapes an edit situation..
16. STYLE/TEMPO LOCK. STYLE LOCK: when on (corresponding
display indicator on), selecting Performances recalls keyboard sounds
only without changing Style. When off (display indicator off), select-
ing Performances recalls keyboard and accompaniments sounds and
changes Style. TEMPO LOCK: when selected (alternate flashing of
Tempo setting and LOC in the display), the current Tempo setting is
locked for all Style changes. When off (alternate flashing stops),
each Style recalls memorized Tempo data.
17. PLAY ALL SONGS. If a Song or MIDI File disk is inserted in the
disk drive, this buttons triggers the playback of all the Songs or MIDI
Files directly from disk, playing them back one after the other as a
medley.
18. UPPER 1, UPPER 2, LOWER. These buttons activate (LED on)
or Mute (LED off) the respective keyboard sections and, therefore,
determine the configuration of the keyboard sounds.
19. DISK. Enters the Disk operating functions (Load, Save, Erase,
Format) which allow the transfer of files to and from disk.
20. DISPLAY. A backlit, LCD (Liquid Crystal Display) of the multi-
function type that simultaneously displays and provides access to
several parameters. The user interface displays the current situa-
tion of the instrument at all times, showing the On/Off status of sev-
eral panel buttons with the corresponding display indicator. The sur-
rounding markings also form part of the display area (explained in
detail afterwards).
21 SOUND. Numeric selection keypad to select the Sounds (00-
127), including the Drumkits, by specifying the corresponding Pro-
gram change number using the SOUND lists as a reference. Three
10
11
12
13
14
15
16
17
18
19
20
21
22
23
24
25
26
27
digit selections are specified by pressing the 100+ button followed
by the remaining two digits. The Sound Banks (1, 2, 3) are selected
in cyclic order by simultaneously pressing the + and – buttons.
22. OCTAVE –/+. A Track octave transposer which transposes the
selected track (the one shown flashing in the display) over the maxi-
mum range of
±
2 octaves. Pressing both + and – buttons at the
same time cancels the setting.
23. TRANSPOSE
b
/ #. Raises (
#)
or lowers (
b
)
the pitch of the
instrument as a whole in semitone steps, over a range of
±
12 semi-
tones. Pressing both buttons at the same time resets to 0.
24 PADS. 4 buttons which provide sounds or samples that can be
played in real time in any mode. All four buttons are assignable
(samples or percussive sounds).
25. SEQUENCER. The buttons of this section are dedicated to the
recording and playback of a Song Style. CLEAR cancels specific events
from Song Style (all, chord, tracks, etc.). SONG STYLE allows you to
pass directly to the first Song Style of the relative bank (104-111).
RECORD automatically sets the sequencer for Song Style recording.
PLAY/STOP starts and stops the Song Style recording and playback.
26. UTILITY. 6 useful functions which affect the instrument in sev-
eral different ways. METRONOME activates/deactivates the metronome
in playback and record mode. TOUCH allows you to set the keyboard
sensitivity with the Page buttons. HARMONY enables/disables the
melody harmony function according to the current Harmony Type.
SUSTAIN applies the sustain effect to the three keyboard sections (Up-
per 1, 2 and Lower). REVERB activates/deactivates the Reverb effect
processor. CHORUS activates/deactivates the Chorus effect proces-
sor (delay/modulations). Holding the TOUCH, HARMONY, REVERB and
CHORUS buttons pressed allows you to enter into the edit of the corre-
sponding function.
7
8
9

8 Layout
27. SAMPLIING (RECORD, SAMPLE). These buttons are opera-
tional only when the optional Audio/Video interface is fitted. RECORD
activates the sampling process, allowing you record your voice
(through a microphone) or a musical instrument connected to the
Mic/Line jack of the A/V interface. SAMPLES gains access to the SAM-
PLES bank.
28. DISK DRIVE. The Disk Drive is situated to the left of the instru-
ment, under the keyboard. This device works with 3.5" DD disks
(720 Kb) and HD disks (1.44 Mb).
29. WHEEL. This physical controller is preset for PITCH BEND. Verti-
cal movements generate PITCH BEND messages on the Performance
tracks set to receive them.

Layout 9
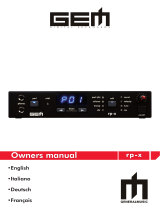
Rear Panel PK7/PK5 (Connections)
1. AUDIO/VIDEO (PK7 only): 25 pin connector in which you can
insert the optional Audio/Video Interface (with RGB and S-HVS ports)
which allows you to project song lyrics on a domestic television or
monitor.
2. COMPUTER (PK7 only). Serial port which permits PK7 to be
connected directly to a computer (Apple Macintosh or IBM PC and
compatibles). Data interchange between PK7 and PC or Mac re-
quires appropriate setting in the MIDI/General functions .
3. MIDI OUT, MIDI IN A MIDI interface consisting of MIDI OUT and
MIDI OUT ports to communicate with other external devices fitted
with a MIDI interface (keyboards, computers, etc.). MIDI cables are
not supplied with the instrument.
When using PK7/5 on its own, these sockets do not require to be
connected.
4. DAMPER. A pedal connector for an optional footswitch preset for
Sustain which affects all Performances.
5. AUX OUT. Stereo Auxiliary Output to listen to the PK7/5 sounds
through an external amplification device (mixer, audio amplifier, home
stereo unit, etc.).
6. HEADPHONES. Jack for a set of stereo headphones. Inserting
the headphone plug into this jack excludes the internal speakers.
7. DC 12 V. Connector for the optional power supply unit.
8. VOLUME. A pedal connector for a continuous control pedal as-
signable for Volume control (All Volume, Section Volume).
5
6
1
2
3
4
7
8

10 Layout
Front Panel PK5
1. POWER ON/OFF:. Push button to turn the instrument on and
off.
2. VOLUME. Regulates the overall volume of the entire instru-
ment (speakers, headphones, stereo aux out).
3. DEMO. Gains access to the demonstration Style.
4. STYLE/SONG. Numeric selection keypad to select the Styles
(00-95) and Song Styles (96-99) by specifying the correspond-
ing Program change number using the STYLE / SONG lists as a
reference.
5. ARRANGER. 4 functions which control the Styles.: ARRANGE
ON/OFF enables (LED On) or disables (LED Off) the Style ar-
rangements. ARRANGE MEMORY, the Style arrangements continue
playing (display indicator on) or stop (display indicator off) after
releasing the keys from the keyboard below the split point. LOWER
MEMORY, the Sound assigned to the Lower keyboard section con-
tinues playing (display indicator on) or stops playing (display
indicator off) after releasing the keys from the keyboard below
the split point. BASS TO LOWEST, when on (LED on), the Bass
track of the Style auto accompaniment follows the lowest left note
of the chord played, allowing real time changes of the bass ac-
companiment according to the lowest note played. When OFF,
the bass track follows the programmed pattern of the Style, re-
gardless of the chord inversion played.
7
24
1
2
3
4
5
6
6. FADE IN/OUT: Starts and stops a Style with a gradual increase or
decrease of volume. Starting requires pressing the Start button.
During the fade cycle, the corresponding display indicator turns on.
7. VARIATION 1, 2. These buttons allow you to change the current
Style Variation (the display indicator illuminates then goes off. The
current variation (1, 2) is indicated by the corresponding LED which
turns on.
8. CURSOR/PAGE. Navigational arrows: the CURSOR [ ] and [ ]
buttons select the functions listed in the MENU to the left of the dis-
play. The currently selected function is indicated by the arrowhead
in the display which points to the name of the function. The PAGE
[ ] and [ ] buttons pass from function page to another.
9. FILLL IN A, FILL IN B/TAP TEMPO. FILL IN A
(Fill-to-current-
variation): recalls a Fill pattern then continues with the same Style
variation. FILL IN B (Fill-to-next-variation): - pressed during Style play
(display indicator turns on), it recalls a Fill pattern then passes to the
next variation. TAP TEMPO - sets the Style playing speed by tapping
on the button and starts the Style automatically.
10. SINGLE TOUCH PLAY. When On (display indicator on) ROM
Style-Performance sounds are assigned to all the tracks when you
select the Styles. The ARRANGE ON/OFF and ARRANGE MEMORY func-
tions are also automatically activated. In this mode, the 9 Function
buttons F1 … F9 also recall nine different Single Touch Play ROM
panel settings which differ according to the Style. When OFF (dis-
play indicator off), selecting Styles recalls sounds for the accompa-
niment tracks while those of the keyboard tracks remain unchanged.
11. STORE PERFORMANCE. Gains access to the STORE PERFORM-
ANCE function where you can save your settings to the Performances
and change the Performance name. If held pressed for 2 seconds,
you enter into the edit of the current Performance where you can
modify the relative parameters. (arrowhead shown next to PERF func-
tion).
12. FUNCTION BUTTONS F1 … F9 (S.T.PLAY/PERFORMANCE).
These buttons select Performances, Single Touch Play settings or
Style and Song Style tracks, depending on the current status of the
instrument.
13. START/STOP, INTRO, ENDING, KEY START/CONTINUE.
START/STOP starts and stops the playback of a Style or Song Style
and starts the Song Style recording of the automatic accompani-
ment. INTRO places the introduction of a Style on “standby” before
Style start ENDING stops a Style with an Ending (the corresponding
display indicator turns on). KEY START synchronises the start of a
Style with a note (or chord) pressed on the lower keyboard area.
Pressing CONTINUE restarts the Song Style from the current stop point.
14. TEMPO/DATA +/– BUTTONS, ENTER, ESCAPE. The TEMPO/
DATA +/– BUTTONS are active for Tempo changes in Style and Song
Style mode, or operate as data entry devices when the instrument is
in one of the function edit modes. ENTER confirms specified data in
edit situations. ESCAPE cancels specified data and/or escapes an
edit situation..
15 STYLE/TEMPO LOCK. STYLE LOCK: when on (corresponding dis-
play indicator on), selecting Performances recalls keyboard sounds
only without changing Style. When off (display indicator off), select-
ing Performances recalls keyboard and accompaniments sounds and
changes Style. TEMPO LOCK: when selected (alternate flashing of
Tempo setting and LOC in the display), the current Tempo setting is
locked for all Style changes. When off (alternate flashing stops),
each Style recalls memorized Tempo data.

Layout 11
16. UPPER 1, UPPER 2, LOWER. These buttons activate (LED
ON) or mute (LED off) the respective keyboard sections and, there-
fore, determine the configuration of the keyboard sounds.
17. DISPLAY. An LCD (Liquid Crystal Display) of the multi-function
type that simultaneously displays and provides access to several
parameters. The user interface displays the current situation of the
instrument at all times, showing the On/Off status of several panel
buttons with the corresponding display indicator. The surrounding
markings also form part of the display area (explained in detail after-
wards).
18 SOUND. Numeric selection keypad to select the Sounds (00-
127), including the Drumkits, by specifying the corresponding Pro-
gram change number using the SOUND lists as a reference. Three
digit selections are specified by pressing the 100+ button followed
by the remaining two digits. The Sound Banks (1, 2, 3) are selected
in cyclic order by simultaneously pressing the + and – buttons.
19. OCTAVE –/+. A Track octave transposer which transposes the
selected track (the one shown flashing in the display) over the maxi-
mum range of
±
2 octaves. Pressing both + and – buttons at the
same time cancels the setting.
20. TRANSPOSE
b
/ #. Raises (
#)
or lowers (
b
)
the pitch of the
instrument as a whole in semitone steps, over a range of
±
12 semi-
tones. Pressing both buttons at the same time resets to 0.
21 PADS. 4 buttons which provide sounds or samples that can be
played in real time in any mode. All four buttons are assignable
(samples or percussive sounds).
22. SEQUENCER. The buttons of this section are dedicated to the
recording and playback of a Song Style. RECORD automatically sets
the sequencer for Song Style recording. PLAY/STOP starts and stops
the Song Style recording and playback.
8
9
10
11
12
13
14
15
16
17
18
19
20
21
22
23
23. UTILITY. 6 useful functions which affect the instrument in sev-
eral different ways. METRONOME activates/deactivates the metronome
in playback and record mode. TOUCH allows you to set the keyboard
sensitivity with the Page buttons. HARMONY enables/disables the
melody harmony function according to the current Harmony Type.
SUSTAIN applies the sustain effect to the three keyboard sections (Up-
per 1, 2 and Lower). REVERB activates/deactivates the Reverb effect
processor. CHORUS activates/deactivates the Chorus effect proces-
sor (delay/modulations). Holding the TOUCH, HARMONY, REVERB and
CHORUS buttons pressed allows you to enter into the edit of the corre-
sponding function.
24. WHEEL. This physical controller is preset for PITCH BEND. Verti-
cal movements generate PITCH BEND messages on the Performance
tracks set to receive them.

12 User Guide
• 1 Get started
In this chapter, you’ll find step by step instructions on some basic functions that will help you get to know your
instrument right away.
Powering up and preliminary operations
POWER ON/OFF
The power switch (located on the left lateral panel) turns the keyboard on and off.
PK7/PK5 can be powered in two ways:
1. with batteries - by inserting a set of batteries into the battery compartment);
OR
2. from the mains - by inserting the jack of the optional power supply into the PK7/PK5 rear panel 12 V D.C.
socket and the other end into a suitable wall outlet.
BATTERY POWER
PK7/PK5 can be powered by 8 “torch” batteries (alkaline, 1.5 volt “LR-20”):
1. Carefully turn the instrument up-side-down in order to remove the lid from the battery compartment.
2. Slide the batteries into the compartment (observe the polarity markings).
3. Replace the lid.
4. Turn the instrument the right way up and turn it on.
POWER SUPPLY UNIT
PK7/PK5 can be powered from the mains via an optional power supply unit. You can purchase the power
supply from your retailer with the following technical characteristics: 12 Volts D.C. (direct current), 1800 MA.
The power supply can be also used when batteries are inserted in the battery compartment.
Warning: the power supply unit must be of the correct type. Do not use power supply units other than the type
indicated by the retailer from whom you purchased your PK7/PK5. Some units at all appearances look very
alike, but can be disastrous to the internal circuitry and can also be harmful to persons.
At this point, PK7/PK5 is ready to play.
E
S
DC12V

Get started 13
Play on the keyboard and change the sounds
1. Play on the keyboard.
You will hear the “Piano” sound play across the full keyboard extension.
The group of Keyboard Activators (Upper 2, Upper 1, Lower) shows Upper 1 selected (LED on), indicating
that the UPPER 1 keyboard section is active to play.
The Upper 2 and Lower keyboard sections are also enabled for activation.
2. Press UPPER 2.
A second sound is introduced, layered with the first.
Pressing a single note on the keyboard plays two sounds simultaneously.
3. Press LOWER and play with both hands.
A third sound is introduced and the keyboard is now divided with a Split Point at note B3. The LOWER
keyboard plays over the range C2 - B3. The UPPER 1 and UPPER 2 sections are assigned to the range
C4 - C7. This keyboard mode is called SPLIT mode.
4. Adjust the overall volume.
Use the VOLUME sliding control (slider) to adjust the general volume of the instrument.
PIANO 1
STRINGS
PIANO 1
PIANO 1
STRINGS
SLO STR
A comfortable level is about two thirds of the maximum course of the slider.

14 User Guide
Select Performances and play keyboard sounds
1. Set the instrument to PERFORMANCE mode by pressing the [ ] and [ ] CURSOR buttons as many times as
necessary until the arrowhead in the display appears next to the “PERF” function in the MENU list .
2. Select a Performance.
Use the Function buttons F1…F9 to select one of the 9 Performances belonging to the first group.
PK7
PK5
3. Play on the keyboard.
The selected Performance recalls a different sound combination. The keyboard mode may also change
(Split or Full mode). The sound combination and keyboard mode will depend on the selected Performance.
The Performances can:
• recall combinations of up to 3 keyboard sounds;
• recall different panel settings;
• recall different Styles.
What happens when Performances are selected is discussed in detail afterwards.
/