Microtek ScanMaker i280 User manual
- Category
- Scanner Transparancy Adapters
- Type
- User manual
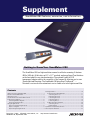
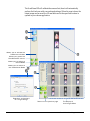
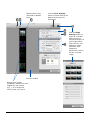
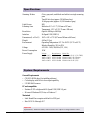
Microtek ScanMaker i280 is a high-resolution scanner for reflective scanning. It features 4800 x 9600 dpi, 48-bit color, an 8.5" x 11.7" scan bed, and seven Smart-Touch buttons on the front panel for one-touch automation. The optional LightLid 35 III transparency adapter adds to the versatility of the scanner by allowing you to scan 35mm slides and filmstrips. The ScanMaker i280 also offers ColoRescue™ — Microtek’s one-touch color restoration to revive faded color in both photos and film.
Microtek ScanMaker i280 is a high-resolution scanner for reflective scanning. It features 4800 x 9600 dpi, 48-bit color, an 8.5" x 11.7" scan bed, and seven Smart-Touch buttons on the front panel for one-touch automation. The optional LightLid 35 III transparency adapter adds to the versatility of the scanner by allowing you to scan 35mm slides and filmstrips. The ScanMaker i280 also offers ColoRescue™ — Microtek’s one-touch color restoration to revive faded color in both photos and film.


-
 1
1
-
 2
2
-
 3
3
-
 4
4
-
 5
5
-
 6
6
-
 7
7
-
 8
8
-
 9
9
-
 10
10
-
 11
11
-
 12
12
-
 13
13
-
 14
14
-
 15
15
-
 16
16
-
 17
17
-
 18
18
-
 19
19
-
 20
20
-
 21
21
-
 22
22
-
 23
23
-
 24
24
-
 25
25


Microtek ScanMaker i280 User manual
- Category
- Scanner Transparancy Adapters
- Type
- User manual
Microtek ScanMaker i280 is a high-resolution scanner for reflective scanning. It features 4800 x 9600 dpi, 48-bit color, an 8.5" x 11.7" scan bed, and seven Smart-Touch buttons on the front panel for one-touch automation. The optional LightLid 35 III transparency adapter adds to the versatility of the scanner by allowing you to scan 35mm slides and filmstrips. The ScanMaker i280 also offers ColoRescue™ — Microtek’s one-touch color restoration to revive faded color in both photos and film.
Ask a question and I''ll find the answer in the document
Finding information in a document is now easier with AI
Related papers
-
Microtek ScanMaker i280 User manual
-
Microtek ScanMaker 6000 Supplementary Manual
-
-
Microtek XT5820 HS User manual
-
-
Microtek ScanMaker 4850 Install Manual
-
-
-
-
Other documents
-
Medion USB 2.0 Flatbed Scanner MD 90090 User manual
-
Medion USB 2.0 Flatbed Scanner MD 90009 User manual
-
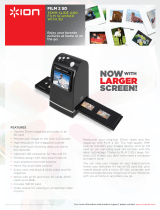 ION Audio FILM2SDMK2 Datasheet
-
Mitsubishi DV1248ST User manual
-
Adesso EZSCAN 1000 User manual
-
Kodak P461 User manual
-
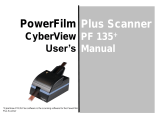 CyberView PF 135 User manual
-
Epson CX7800 User manual
-
-

