Page is loading ...

Euro-Tiller 23-05-2016
1
*
Working width: 6-7-8-9-10m (from machine No 30916)

Euro-Tiller 23-05-2016
2
Content
EC DECLARATION OF CONFORMITY ............................................................................................... 4
Delivery check .............................................................................................................................................. 5
Machine description .................................................................................................................................... 5
Range of application .................................................................................................................................. 5
Technical specifications ............................................................................................................................. 5
Safety instructions for Euro-Tiller ............................................................................................................. 6
Safety and instructions on hydraulics ........................................................................................................ 7
Instructions on transport on the public roads:............................................................................................ 7
Labels on the machine ................................................................................................................................. 8
Start-up of the machine ............................................................................................................................... 9
General information. .................................................................................................................................. 9
Attachment and uncoupling ....................................................................................................................... 9
Maintenance ................................................................................................................................................. 9
Lubrication ................................................................................................................................................. 9
Assembly instructions ................................................................................................................................ 11
Assembling the drawbar. ......................................................................................................................... 11
Mounting of wing sections after transport. .............................................................................................. 11
Assembling the front-harrow ................................................................................................................... 11
Assembling the wing extension ............................................................................................................... 11
Assembling the long finger after-harrow. ................................................................................................ 11
Instructions and adjustment of the harrow............................................................................................. 12
Attaching the harrow ............................................................................................................................... 12
Adjusting the top link of the harrow ........................................................................................................ 12
Adjusting the support wheels ................................................................................................................... 12
Adjusting the levelling bar....................................................................................................................... 13
Depth adjustment of the harrow .............................................................................................................. 13
Locking device ......................................................................................................................................... 14
Spare parts list ........................................................................................................................................... 15
Drawbar ................................................................................................................................................... 15
Middle frame ........................................................................................................................................... 17
Wing ........................................................................................................................................................ 21
Wing extension ........................................................................................................................................ 24
Spring-Board ............................................................................................................................................ 25
Front-harrow ............................................................................................................................................ 29
Long finger after-harrow ......................................................................................................................... 31
Roller ....................................................................................................................................................... 33
Erradicator Tine ....................................................................................................................................... 35
Spare parts wheel ..................................................................................................................................... 37
Clevis, rear ............................................................................................................................................... 39

Euro-Tiller 23-05-2016
3
Control for wheel cylinder ....................................................................................................................... 41
Light mounting ........................................................................................................................................ 43
Hydraulics .................................................................................................................................................. 45
Wings ....................................................................................................................................................... 45
Wheel (with 3m middle frame) ................................................................................................................ 47
Wheel (with 4m middle frame) ................................................................................................................ 49
Spring-Board ............................................................................................................................................ 51
Quick coupling, facing backwards – clevis rear ...................................................................................... 53
El. depth stop ........................................................................................................................................... 55
Notes ............................................................................................................................................................ 56

Euro-Tiller 23-05-2016
4
EC DECLARATION OF CONFORMITY
in accordance with the EU Machinery Directive 2006/42/EC
applicable as from December 29
th
2009:
HE-VA ApS
N. A. Christensensvej 34,
DK-7900 Nykøbing Mors
hereby confirms that the following machine has been manufactured in accordance with the Council
Directive 2006/42/EC.
The declaration comprises the following machine:
Euro-Tiller
6,0 / 7.0 / 8.0 / 9.0 / 10.0 m
No : _____________
Nykøbing the 29th December 2009
Villy Christiansen
The undersigned is furthermore authorised to compile technical documentation for the above machine.

Euro-Tiller 23-05-2016
5
Delivery check
Upon delivery to the dealer/supplier as well as to the customer, check the Euro-Tiller for possible
damages.
Machine description
Range of application
HE-VA Euro-Tiller is a trailed seedbed harrow which is available in 6,0m, 7.0m, 8.0m, 9.0m and 10.0m
working width. Euro-Tiller is a standard harrow built up in a strong frame construction with 7 bars and 4
boogie 300/65x12 – depth / transport wheels ensuring precise harrow depth in all soil types. The harrow
depth is easily adjusted centrally on the machine, and the depth wheel master-slave hydraulic system
ensures a uniform working of the wheels. By means of a switch in the cabin, the driver can stop the
electric depth stop enabling the manual operation of the hydraulic depth control. Euro-Tiller has a wide
range of extra equipment, meaning that the harrow can be built up individually depending on the actual
soil conditions and harrow tasks. In front the Euro-Tiller can be equipped with a strong front-harrow in
front of the Spring-Board leveling bar, ensuring that the leveling bar can level the already loosened soil
effectively. At the rear a Spring-Board after-harrow can be mounted followed by a long finger after-
harrow. It is also possible to mount a long finger after-harrow separately. As a novelty HE-VA is offering
a ø400 mm flat bar roller at the rear, leaving the field with a consolidated surface and a perfect surface
finish for a sowing of for example beets.
Technical specifications
Working width 6,0m 7,0m 8,0m 9,0m 9,0m 10,0m
Center section width 3,0m 3,0m 3,0m 3,0m 4,0m 4,0m
Transport width 3,0m 3,0m 3,0m 3,0m 4,0m 4,0m
Transport heigh 2,8m 3,3m 3,8m 4,3m 3,8m 4,3m
Power required HP 120+ 150+ 175+ 200+ 200+ 225+
Required no. of double acting
oil outlets 4 pcs. 4 pcs. 4 pcs. 4 pcs. 4 pcs. 4 pcs.
No. of tines 69 pcs. 82 pcs. 94 pcs. 106 pcs. 106 pcs. 118 pcs.
Veight
Flat bar roller Ø400 mm 240kg 280kg 320kg 360kg 400kg 440kg

Euro-Tiller 23-05-2016
6
Safety instructions for Euro-Tiller
Do not start-up the machine if there are persons in exposed positions* within a hazardous area**.
When persons are in exposed positions (e.g. in connection with adjustment, maintenance, attachment and
uncoupling), the following conditions must be observed:
1. The machine must be lowered to firm ground.
2. The hydraulics must be relieved.
3. The tractor must be stopped and the key removed from the ignition switch.
4. The driver must ensure that no persons are in exposed positions during the operation.
* Persons in exposed positions: Any person who is wholly or partly within a
hazardous area.
** Hazardous area: On and under the machine within a distance of 10 m from the machine.
Most accidents that happen in connection with the operation, transport and maintenance of machines are
caused by non-compliance with the most elementary safety conditions.
Therefore it is vital that anybody working at the machine carefully complies with the safety instructions
as well as other instructions applying to the machine.
The machine may only be operated, maintained and repaired by persons, who are familiar with this work
and who are further familiar with the possible elements of danger with this particular machine.
CAREFUL! Rotating parts and loose-fitting clothing make up a dangerous combination.
IMPORTANT! Due to the risk of falling down, it is extremely hazardous to stand on the machine
frame during operation of the machine attached to a tractor.

Euro-Tiller 23-05-2016
7
Safety and instructions on hydraulics
1. The maximum working pressure is 225 bar.
2. It is advisable to label the attachment parts at hydraulic connections between the tractor and the
tool in order to eliminate incorrect operation!
3. When checking for hydraulic leaks, use suitable safety wear (eye protectors, gloves, etc.)
High-pressure hydraulic oil may penetrate the skin and cause dangerous injuries.
In case of injury, consult a doctor immediately. RISK OF INFECTION!
4. Before operating the hydraulics, lower the machine to firm ground.
Relieve the hydraulics, stop the motor and remove the ignition key.
5. Check the hydraulic hoses on a regular basis, however, every six months as a minimum due to any
cracks, wear and tear, etc. Replace any defective hoses immediately.
The life of hydraulic hoses is maximum 5 years.
New hydraulic hoses must meet the manufacturer's requirements.
Instructions on transport on the public roads:
Check before transport on public roads that the attachment of the machine at the tractor is in accordance
with the local rules and regulations in force (permitted total weight, permitted axle load, transport width,
lights, warning signs, etc.).

Euro-Tiller 23-05-2016
8
Labels on the machine
On your machine there are several labels containing both practical advice and safety precautions.
Please be sure to read the labels and inform all those who operate the machine of the safety instructions in
the manual.
Keep the labels clean and legible – if not they should be replaced.
Explanation of the labels
A Plate with number and year of manufacture.
B Study the Operating Instructions thoroughly before any operation of the machine and
observe all safety instructions.
C Tighten up the bolts regularly. If this is not performed, our warranty obligations will no
longer apply
D Make sure that the working area is clear before unfolding the wing sections. Never walk
under a suspended section.
A
B
C
D

Euro-Tiller 23-05-2016
9
Start-up of the machine
General information.
The Euro-Tiller requires 2 double-acting oil outlets.
Attachment and uncoupling
From transport to working position:
1. Raise the machine to max. transport height.
2. Fold out the wing sections.
3. Adjust the working depth.
From working to transport position:
4. Raise the machine to max. transport height.
5. Fold in the wing sections. Make sure that the wing sections are locked.
Maintenance
After the first 10 hours of operation, retighten the machine. Check hydraulic hoses, fittings and
cylinders for leaks and retighten.
Further check on a regular basis that all bolts are tightened.
Before the winter storage, wash and lubricate the machine. If you use high-pressure cleaner, do
not spray directly on the ball bearings. After the washing, you may spray the machine with oil.
For permanent outdoor parking during winter harrow parked unfolder.
Lubrication
For lubrication, maintenance and repair, the Euro-Tiller must be lowered, the tractor must be braked and
the motor stopped.
1

Euro-Tiller 23-05-2016
10
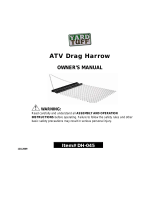
On all widths, Euro-Tiller has 20 lubrication points. The typical lubrication points are located at spindles,
wheel bearings, wing arms, and the possible rollers have 6 lubrication points. All Euro-Tiller have to be
lubricated after every 30 working hours as well as after the cleaning in order to press out any water and
dirt.
Note! However, the double-sealed ball bearings in the roller should only be lubricated every
20 working hours and by 1-2 strokes so that the sealing rings are not pressed out.
Important! The hydraulic system is filled with oil type Hydro Texaco HD32
X = Lubrication point
Euro-Tiller 8 m with roller

Euro-Tiller 23-05-2016
11
Assembly instructions
Assembling the drawbar.
Mount the drawbar on the middle section using bolts and bushes.
Then mount the top link on the drawbar stanchion for the middle section.
Be sure to tighten all bolts.
Mounting of wing sections after transport.
By mounting of the wing section on the middle frame, lubricate the nut
without locking device with loctite and tighten it hereafter (pos. 1)
Assembling the front-harrow
Mount the leveling bars of the front-harrow using bolts and nuts. Make sure
that the bearing plates of the wings are positioned on the outer side of the
front tube supports.
The bearing plates on the middle section must be positioned on the inner
side of the front tube supports.
Mount the hydraulic cylinder between the wing and the cylinder arm of the
front-harrow.
Be sure to tighten all bolts and nuts.
Assembling the wing extension
Mount the wing extension on the wings using the flanges.
Be sure to tighten all bolts and nuts.
Assembling the long finger after-harrow.
Mount the after-harrow sections as shown on the photo. If you have chosen
the option of a rear Spring-Board, the after-harrow sections must be
mounted on the support bar behind the Spring-Board.
1

Euro-Tiller 23-05-2016
12
Instructions and adjustment of the harrow
All fundamental adjustments must be carried out on a plane surface with the
harrow attached to the tractor and the wing sections lowered.
Attaching the harrow
Euro-Tiller is attached to the fixed tractor drawbar. Attach the
hydraulic hoses. Please note that the hoses with blue dust caps are
for lifting the harrow, and the ones with yellow dust caps are for
wing folding and leveling bar.
Adjusting the top link of the harrow
Lift the middle section just enough to lift the harrow tines from the
ground. Using the top link, adjust the middle section until it is
parallel to the ground. Remember to tighten the lock-nut. The top
link must be greased thoroughly so that fine adjustments are easily
carried out.
Adjusting the support wheels
When the harrow is parallel to the ground, the support wheels must
be adjusted.
The working depth is controlled by 3 hydraulic cylinders which are
series connected in a master-slave system.
To ensure an even depth across the entire working width, the
cylinders must be bled, reset and adjusted in relation to each other in
the following way:
Raise the harrow all the way up, so that the cylinders are fully
extended, and hold the lever in this position for approx. 20 seconds.
In this position, the cylinders’ valves allow oil to flow through the
system and bleed the air out, while simultaneously resetting them.
This operation should be repeated for a few seconds when attaching
the machine to the tractor – after unfolding the wings but before
adjusting the harrow. It should also be carried out a couple of times
during the working day.
Make sure that none of the cylinder pistons are detached when
carrying out adjustments. Position the stop of the master cylinder so
that the harrow tines are lifted from the ground. Adjust the middle
section vertically to align it with the wings by shortening /
lengthening the piston rod (pos.1). If this is not sufficient, the same
procedure can be done on the slave cylinders. Be careful not to turn
too much.
The procedures mentioned above are fundamental: the harrow must
be fine adjusted in the field to ensure a perfect result. The earthworks
1

Euro-Tiller 23-05-2016
13
being created in front of the leveling bar should be even across the entire
working width.
The piston rod end of the master cylinder should never be extended more
than 30mm (50mm for the slave cylinders) Be sure to tighten all lock-
nuts.
Make a habit of bleeding out the cylinders each time the harrow is
attached to the tractor, before work, as well as a few times during the
working day.
Adjusting the levelling bar.
In the field, when the harrow is lowered into working position.
First, the system must be bled, in the same way as the support
wheels.
Adjust the piston rods (pos. 1) so that the levelling bars are aligned.
The levelling bar on the middle section may need to be adjusted 5-
10mm lower, in order to eradicate the wheel tracks. When the
piston rod end is extended, the leveling bar is raised, and vice versa.
Do not extend the piston rod end more than 20mm.
Make a habit of bleeding out the hydraulic system each time the
harrow is attached to the tractor, before work, as well as a few times
during the working day. It only takes about 15 seconds.
Depth adjustment of the harrow
The depth adjustment is performed by adjusting
the sensor “A” out (smaller working width) or in
(bigger working depth) Loosen the thumbscrew
“B”, move the sensor arm “C” to the right
position and tighten the thumbscrew “B” again.
When the sensor activator “D” meets the sensor
“A”, the valve “E” will cut off for the return oil
and the harrow depth will be locked. By means
of the on/off switch in the cabin, the depth
adjustment can be “oversteered”. That is to say
that the sensor activator “D” can pass the sensor
“A” and a deeper work is possible e.g. on the
headland.
1
B
A
D
C
E

Euro-Tiller 23-05-2016
14
Locking device
Make sure that the wing sections are locked before transport.

Euro-Tiller 23-05-2016
15
Spare parts list
Drawbar

Euro-Tiller 23-05-2016
16
Pos.
Item no.
Designation
Number
1
1170563
Drawbar
1
2
630757028
Complete draw unit with pivotal towing eye Ø50
1
3
690141211
Towing eye Ø50
4
0235860
Bolt M16x70 mm 8.8
5
0272290
Facet plate Ø16
6
0264090
Self-locking nut M16
7
1170303
Support leg with spindle
1
8
0432500
Lubricating nipple M8
1
9
1030280
Pin Ø16x150 mm
1
10
0377400
R-clip Ø4
1
11
630771200
Hose clamp
1
12
0449650
Tube-support double Ø15-Ø15
2
13
0449600
Tube-support double Ø18-Ø18
1
14
0449610
Top plate
1
15
0234990
Bolt M8x120mm
16
0264050
Self-locking nut M8
17
0235050
Bolt M10x30mm
18
0237010
Bolt M30x120mm. 8.8
19
0272350
Facet plate Ø30
20
0475307
I-Bush EG Ø40/Ø30x25 mm
2
21
0264155
Self-locking nut M30
22
1170262
Top link
1
23
1170296
Nut (right thread)
1
24
1170300
Threaded rod with right-thread
1
25
1170299
Threaded rod with left-thread
1
26
0432120
Lubricating nipple M6 - 45º
1
27
0475300
I-Bush EG Ø30/Ø24x30 mm (been discontinued)
2
1170683
Bushing
1
28
0272330
Facet plate Ø24
29
0264130
Self-locking nut M24
30
0236470
Bolt M24x160mm. 8.8
31
0432100
Lubricating nipple M6
1
32
69430130G
Pin Ø30 L=130mm
1
33
630532600
Bush for M12
1
34
0235330
Set screw M12x25 mm
35
1170295
Nut ( left thread )
1
36
1170734
Cross bar
1
37
0235850
Bolt M16x65

Euro-Tiller 23-05-2016
17
Middle frame

Euro-Tiller 23-05-2016
18
Pos.
Item no.
Designation
3 m
Middle frame
4 m
Middle frame
1
1170603
Middle frame
1
1170650
Middle frame
1
2
1170022
Wheel frame
1
1170233
Wheel frame
1
3
0235820
Set screw M16x45 mm 8.8
4
0272290
Facet plate Ø16
5
0264090
Self-locking nut M16
6
0432100
Lubricating nipple M6
6
8
7
0236210
Bolt M20x120 mm 8.8
8
0272310
Facet plate Ø20
9
0264110
Self-locking nut M20
10
1170024
Bearing
2
2
11
0235900
Bolt M16x100 mm 8.8
12
0483380
Sealing disc Z011
2
2
13
0483590
Sealing ring Ø90/Ø55x10 mm
2
2
14
0479000
Roller bearing
4
4
15
0483750
O-ring Ø91, 67x3.,53
2
2
16
0262480
Castellated nut M36x1.5
2
2
17
0373350
Split-pin Ø5x50
2
2
18
1113400
Bearing cover
2
2
19
0234280
Set screw M6x16 mm 8.8
20
1170015
Boogie hub
(for machine No 30915)
2
2
1170727
Boogie hub (R)
(from machine No 30916)
1
1
1170728
Boogie hub (L)
(from machine No 30916)
1
1
21
0395400
Hub (long shaft)
(for machine No 30915)
0395300
Hub (short shaft)
(for machine No 30915)
0395430
Hub (long shaft)
(from machine No 30916)
0395425
Hub (short shaft)
(from machine No 30916)
21a
0395438
Steel sealing
(from machine No 30916)
21b
0395230
Sealing disc Ø85/45
(for machine No 30915)
0395230
Sealing disc Ø90/55
(from machine No 30916)
21c
0395220
Bearing 30209
(for machine No 30915)
0479010
Bearing 30210
(from machine No 30916)
21d
0395210
Bearing 30206
(for machine No 30915)

Euro-Tiller 23-05-2016
19
Pos.
Item no.
Designation
3 m
Middle frame
4 m
Middle frame
0478900
Bearing 30207
(from machine No 30916)
21e
0395240
Castellated nut m24x1,5mm
(for machine No 30915)
0395242
Castellated nut m27x1,5mm
(from machine No 30916)
21f
0395250
Split ø5x35
(for machine No 30915)
21g
0395260
Hubcap Ø62
(for machine No 30915)
0395436
Hubcap Ø72
(from machine No 30916)
22
1170497
console (bottom)
2
2
23
1170441
Konsol (top)
2
2
24
0272270
Facet plate Ø12
25
0264070
Self-locking nut M12
26
0235330
Set screw M12x25 mm 8.8
27
1170188
Scraper f/left buggy wheels
1
1
1170319
Scraper f/right buggy wheels
1
1
28
0395650
Complete wheel Ø300/65-12/8
2
2
29
0261390
Nut M16 8.8
30
1170534
Support leg
2
2
31
1030280
Pin Ø16x150 mm
2
2
32
0378200
Ring split Ø4.5
2
2
33
69430200g
Pin Ø30x200
2
2
34
630532600
Bush for M12
2
2
35
0468600
Hydr. cylinder Ø85/75
length of stroke: Ø35x328 mm.
(for machine No 28966)
1
2
0468600
Hydr. cylinder Ø85/75
length of stroke: Ø35x312 mm.
(from machine No 28967 to 30216)
1
2
0468603
Hydr. cylinder Ø85/75
length of stroke : Ø35x312mm.
(from machine No 30217)
1
2
0468670
Gasket kit (0468600, 0468602 og 0468603)
36
1170531
Holder for warning triangle
1
1
37
0521010
Warning triangle
1
1
38
0234760
Set screw M8x25 mm 8.8
39
0264050
Self-locking nut M8
40
0382130
U-bolt M12 for 60x60
1
1
41
0236210
Bolt M20x120 mm st 8.8
42
0236190
Bolt M20x100 mm st 8.8
43
0489060
Handle
2
2
44
1105450
Bush
2
2
45
0235370
Bolt M12x45 mm
46
1170607
Bar behind middle frame
1

Euro-Tiller 23-05-2016
20
Pos.
Item no.
Designation
3 m
Middle frame
4 m
Middle frame
1170649
Bar behind middle frame
1
47
0235800
Bolt M16 x 45
48
1170675
Head for cylinder (from machine No 30217)
1
2
49
1170679
Bushing (from machine No 30217)
1
2
50
0261452
Lock-nut M30x2mm (from machine No 30217)
1
2
51
1115360
Mounting plate
1
1
52
0233870
Bolt M5x30
53
0272230
Facet plate Ø5
54
0264030
Self-locking nut M5
55
1170767
Flange
2
2
56
0235460
Bolt M12x100
57
1170768
Light bracket
2
2
58
1170771
Light bracket
2
2
59
690109209
Pvc cap
2
2
60
0234580
Bolt M6x70
61
0272240
Facet plate Ø6
62
0264040
Self-locking nut M6
/