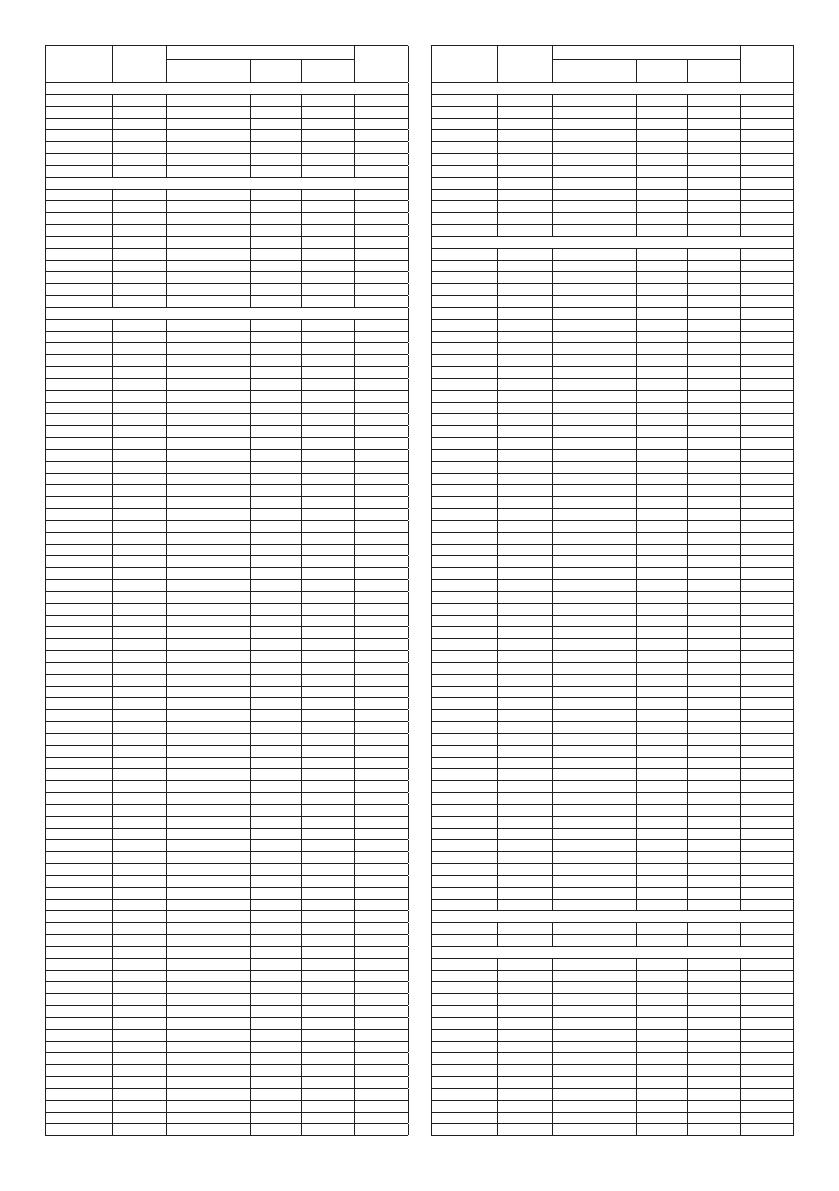
Bosch MMBV625M/01 Owner's manual

Category
Blenders
Type
Owner's manual
16
en Intended use
Intended use
This appliance is intended for domestic use and the household
environment only. Use the appliance only for processing normal
amounts of food and for normal amounts of time in domestic use.
Do not exceed the permitted maximum quantities.
This appliance is suitable for blending liquids (smoothies,
drinks, …), for pureeing warm and cold food and crushing frozen
fruits or ice cubes. This appliance is suitable for applying a vacuum
for processing or storage purposes. The appliance must not be used
for processing other substances or objects.
Only use the appliance indoors at room temperature and up to
2000 m above sea level.
Important safety notices
Read and follow the instruction manual carefully and keep for later
reference! Enclose these instructions when you give the appliance
to someone else.
If the instructions for correct use of the appliance are not observed,
the manufacturer’s liability for any resulting damage will be
excluded.
This appliance can be used by persons with reduced physical,
sensory or mental capabilities or lack of experience and/or
knowledge if they are given supervision or instruction concerning
safe use of the appliance and if they understand the hazards
involved. Keep children away from the appliance and connecting
cable and do not allow them to use it. Do not let children play
with the appliance. Cleaning and user maintenance must not be
performed by children.
W Risk of electric shock and fire!
Connect and operate the appliance only in accordance with the
specifications on the rating plate. Do not use the appliance if the
power cord and/or appliance are damaged. Only our customer
service may repair the appliance, e.g. by replacing a damaged
power cord, in order to avoid hazards.
Never connect the appliance to timer switches or remote-
controllable sockets. Never leave the appliance unattended while
it is switched on!
Do not place the appliance on or near hot surfaces, e.g. hobs.
The power cord must not come into contact with hot parts or be
pulled across sharp edges.
Never immerse the base unit in water or place it in the
dishwasher. Do not steam-clean the appliance. Do not use the
appliance with damp hands.
17
en
Important safety notices
It must always be disconnected from the mains after each use,
whenever the appliance is unsupervised, prior to assembly,
disassembly or cleaning and in the event of an error.
W Risk of injury!
Before replacing accessories or additional parts which move
during operation, the appliance must be switched off and
disconnected from the power supply.
Care should be taken when handling the sharp cutting blades,
emptying the container and during cleaning.
To switch off the appliance, set the rotary selector to 0.
After switching off, the drive continues running for a short time.
Wait until the drive has come to a standstill.
The appliance must be completely assembled before use.
The blender jug, ToGo bottle and vacuum container should only
be used with this appliance.
W Risk of suffocation!
Do not allow children to play with the packaging material.
W Warning!
Do not add liquids or foods above 60 °C.
Check that there are no foreign objects in the blender jug.
We recommend that the appliance is never switched on for longer
than necessary to process food. Do not operate at no-load.
Do not exceed the maximum permitted capacities.
Only use the appliance with approved genuine parts and
accessories.
W Important!
It is essential to clean the appliance thoroughly after each use
or after it has not been used for a long period. X

18
en Contents
Congratulations on the purchase of
your new Bosch appliance. You can find
further information about our products
on our website.
www.bosch-home.com
When using this instruction manual, you can
unfold the cover pages of these instructions.
There you will find illustrations marked with
letters and numbering. Reference will be
made to these illustrations throughout the
manual (e.g. X Image sequence B).
Contents
Intended use ............................................. 16
Important safety notices ...........................16
Overview...................................................18
Before using for the first time....................18
Parts and controls.....................................19
Preparation ...............................................21
Use ...........................................................21
Cleaning and maintenance ....................... 23
Accessories ..............................................25
Safety systems .........................................25
Recipes.....................................................25
Disposal .................................................... 26
Guarantee.................................................26
Troubleshooting ........................................ 27
3 Control panel
a button (On/Off)
b Rotary selector with marking
c button
d button
e button
f button
g Marking
h 0 zero position
i Marking /
4 Display panel
a Status display
b Symbols
5 Blender jug
a Container made of Tritan
b Scale with 3 markings
c Marking
d Recess for lid lug
e Blade insert with blender knife
6 Lid
a Vacuum seal
b Lug
7 ToGo bottle *
a Container
b Drinking cap
c Lid
d Vacuum seal
8 Storage container (0.75 l / 1.5 l) *
a Bowl
b Lid
c Vacuum seal
d Setting rings for date (day/month)
9 Vacuum hose
a Connection to vacuum valve
b Connection to container
* Depending on model
Before using for the first time
Before the new appliance can be used,
it must be fully unpacked, cleaned and
checked.
Warning!
Never operate a damaged appliance!
Remove the base unit and all
accessories from the packaging and
dispose of the packing materials.
Overview
X Fig. A
1 Base unit / Motor block
a Drive
b Marking
c Outlet opening
d Cord tidy
e Cord fastening
f Supporting feet (4)
2 Vacuum unit
a Cap
b Clip for vacuum hose
c Moisture sensors
d Vacuum valve
e Filter
19
en
Parts and controls
Illuminated symbols also show other
information.
Display Meaning
programme running.
Vacuum is being applied.
Food is being blended
manually.
programme running.
Vacuum is being applied,
followed by automatic
blending.
programme running.
programme running.
Fault in appliance
X

Symbols and markings
Symbol Meaning
Max 60°C
Warnings on lid
Do not process ingredients
hotter than 60 °C.
Marking for positioning
blender jug.
Position blender jug
a
nd
screw on securely
.
Marking on cap.
Marking on vacuum valve.
Position vacuum valve and
screw on securely .
Check that all parts are present and
examine them for obvious damage.
X Fig. A
Thoroughly clean and dry all parts
before using for the first time.
X

Note: There may be a slight foreign smell
when using the new blender for the first
or second time. This is not a sign of any
malfunction.
Parts and controls
High-performance motor block
The blender is equipped with a high-
performance motor, enabling up to 37000
revolutions per minute.
On/off switch
To switch the appliance on and off.
Vacuum unit with cap
The blender is equipped with a vacuum
pump that can apply a vacuum to the
blender jug before processing. This
reduces the oxidation of food during and
after processing. The result is a more
homogeneous consistency and a more
natural colour to food while preserving
vitamin C and other nutrients that react
to oxygen for longer. A vacuum can also
be applied to the ToGo bottle and storage
containers to maintain freshness and
extend the shelf life of food contained in
them.
The cap is used to apply a vacuum to the
blender jug.
Status display and symbols
The status display indicates the manually
selected speed or the progress of the
vacuum application process or of an
automatic programme by means of several
LEDs. The higher the speed, or the more
advanced the vacuum application process
or a programme, the more LEDs will light
up. When all LEDs light up, the maximum
speed has been reached or the selected
programme completed.
20
en Parts and controls
Rotary selector
For continuous adjustment of the blender
knife speed.
Settings
0 Zero position - Blender will not
start.
Lowest speed
Highest speed
Highest speed, as long as rotary
selector is held in this position.
Note: If the rotary selector is not set to zero
when switched on, the appliance cannot be
operated. First turn the rotary selector to the
zero setting.
Programme selection buttons
The appliance has 4 automatic
programmes. The following programmes
can be selected:
Programmes
Automatic blending with
vacuum applied
To apply vacuum (for blender
jug, ToGo bottle and storage
containers)
Cleaning programme
For crushed ice
Please note:
To use the programmes, the rotary
selector must be set to zero.
Turning the rotary selector while using
, or will stop the relevant
programme.
Pressing another programme selection
button will stop the current programme.
Briefly pressing the programme
selection button will pause a
programme. Press briefly again to
restart.
Pressing and holding or
(approx. 2 seconds) will stop
the relevant programme. To start the
programme again, switch the appliance
off and back on.
Blender jug
For processing up to 1.5 litres of food. The
blender jug is made of Tritan. Tritan is an
unbreakable plastic with no discernable
taste or smell.
Warning!
Do not add liquids or foods above 60 °C.
Do not blend solid food without adding
sufficient liquid.
Mix powdered food (e. g. icing sugar,
cocoa powder, roasted soybeans,
flour or protein powder) with sufficient
liquid or fully dissolve it in liquid before
blending it.
When adding ingredients, observe the
following values and markings on the
blender jug.
Maximum processing quantities
X
Liquids
max. 1.5 l
X
Ingredients such as milk
and dairy products liable
to froth up with other
ingredients
max. 1.0 l
X
Ingredients such as milk
and dairy products liable to
froth up
max. 0.75 l
ToGo bottle and storage
containers
To store food with vacuum applied.
Capacities
ToGo bottle * 0.5 l
Container, small * 0.75 l
Container, large * 1.5 l
* Depending on model X

21
en
Preparation
Lid with vacuum seal
For an air-tight seal on the blender jug,
ToGo bottle and storage containers. To
remove a lid with vacuum applied, first
grip the vacuum seal at one end and pull
it up. Sufficient air has to get inside for the
lid to be removed. The lids of the storage
containers are equipped with a date
indicator. Turn the two rings to set the day
and month when the food was added.
Safety systems
The appliance has various safety systems.
X
Preparation
W Risk of injury
Do not reach into the blender knife. Grip
the blade insert by the plastic only.
Do not insert the mains plug until
all preparations for working with the
appliance are complete and the blender
jug has been correctly positioned on the
base unit.
Warning!
When the blender is assembled, do not lift
it by the handle of the blender jug. To lift
the blender, always grip it by the base unit/
motor block.
X Image sequence B
1. Unwind the power cord to the required
length.
Important: Make sure that the power cord
runs through the cable opening on the
underside of the appliance.
2. Place the base unit on a stable and level
work surface. Open the cap completely.
3. Turn the blender jug upside down and fit
the blade insert with the sealing ring in it
as shown.
4. Fit the lid of the blender jug onto the
blade insert.
5. Rotate the blade insert clockwise to the
stop with the help of the lid.
6. Remove the lid.
Important: The recesses on the blade
insert must be aligned with those on the
blender jug.
7. Turn the blender jug up the right way
and position on the drive as shown.
Marking pointing to .
8. Rotate the blender jug clockwise to the
stop. Marking pointing to .
9. Prepare the food and add to the blender
jug. Do not exceed the marking .
Note: Always blend food with sufficient
liquid as this will produce a better result.
When adding ingredients liable to froth up
such as milk and dairy products, do not
exceed the marking
.
10. Fit the lid and press on firmly. Observe
the recess on the handle when doing so.
Note: The lid can only be fitted in this
position.
11. Close the cap and press down to the
stop.
12. Insert the mains plug.
Note: The blender can only be used if the
following conditions are met.
The blade insert and lid must be
properly connected to the blender jug.
The blender jug must be properly
connected to the base unit.
The cap must be completely closed.
Use
Note: Table K shows further examples
of application. The preparation can be
carried out with an automatic programme or
manually in single steps (1, 2, 3).
Usage informations:
This appliance is not suitable for making
mayonnaise.
This appliance is not suitable for
cutting and chopping semi-solid or
solid food (parsley, onion, meat, nuts,
parmesan cheese), but could be used in
combination with liquids. X Table K
This appliance is not suitable for
making nuts spreads (hazelnut cream,
nutella, …).
22
en Use
Blending with automatic
programme
X Image sequence C
1. Set the rotary selector to 0. Switch
on the appliance with button. All
indicators light up briefly once and a
short signal tone sounds. The button
lights up.
2. Press button. The and
symbols light up.
3. The vacuum pump draws the air out of
the blender jug. The status display LEDs
light up one by one.
Note: If the preset vacuum level is
not reached, the symbol then lights
up and 2 short signal tones sound.
X
4. The status display lights up halfway. The
preset vacuum level is reached.
5. The blender starts processing
automatically and blends the ingredients
in a pulsing rhythm. The second half of
the status display gradually lights up.
6. The blender ends processing
automatically. Wait until the appliance
comes to a standstill.
7. Switch off the appliance using button.
Disconnect the mains plug.
8. Open the cap completely.
9. Turn the blender jug anticlockwise and
remove.
10. Grip the vacuum seal at one end and
pull it up. Sufficient air has to get inside
the blender jug for the lid to be removed.
11. Pull the lid by the lug to remove.
12. Pour the blended food into another
container.
Clean all parts. X

Note: To keep the food fresh, put it in the
ToGo bottle or storage containers after
processing and apply a vacuum again.
X
Manual blending with vacuum
function
X Image sequence D
1. Set the rotary selector to 0. Switch
on the appliance with button. All
indicators light up briefly once and a
short signal tone sounds. The button
lights up.
2. Press button. The symbol
lights up.
3. The vacuum pump draws the air out of
the blender jug. The status display LEDs
light up one by one.
Note: If the preset vacuum level is
not reached, the symbol then lights
up and 2 short signal tones sound.
X
4. All status display LEDs are lit. The
preset vacuum level is reached.
5. Set the rotary selector to the required
level or . The higher the speed, the
more status display LEDs are lit.
6. Process the ingredients until the desired
consistency is achieved.
7. Set the rotary selector to 0. Wait until
the appliance comes to a standstill.
Switch off the appliance using button.
Disconnect the mains plug.
Perform steps from 8. as described.
X

Using the Pulse function
Turn the rotary selector anticlockwise to
the position and hold.
The appliance will run at maximum
speed for as long as the rotary selector
is held.
Release the rotary selector.
Blending without vacuum
function
Prepare blender as described.
X
X Image sequence E
1. Set the rotary selector to 0. Switch on
the appliance with
button.
23
en
Cleaning and maintenance
2. Set the rotary selector to the required
level or
. The symbol lights up.
The higher the speed, the more status
display LEDs are lit.
Note: During processing hold the blender
securely by putting one hand on the cap.
3. Process the ingredients until the desired
consistency is achieved.
4. Set the rotary selector to 0. Wait until
the appliance comes to a standstill.
5. Switch off the appliance using button.
Disconnect the mains plug.
6. Open the cap completely.
7. Turn the blender jug anticlockwise and
remove.
8. Pull the lid by the lug to remove. Pour
the blended food into another container.
Clean all parts. X

Making crushed ice
Prepare the blender as described and add
ice cubes. X
Set the rotary selector to 0. Switch on
the appliance with button.
Press button. The symbol lights
up.
The blender automatically starts
processing and crushes the ice cubes
in a pulsing rhythm. The status display
LEDs light up one by one.
The blender ends processing
automatically. Wait until the appliance
comes to a standstill.
Switch off the appliance using button.
Disconnect the mains plug.
Perform steps from 8. as described.
X

Storage with vacuum
A vacuum can be applied to the ToGo bottle
and storage containers with the blender to
preserve the freshness and extend the shelf
life of food contained in them.
W Warning!
No antibacterial effect results from vacuum
application. Keep such food in the refrigerator
and regularly check that it is still fresh!
X Image sequence F
1. Add prepared or cooked food to the
container required.
2. ToGo bottle: Fit the lid with the drinking
cap and close securely. Fold up the lid.
3. Containers: Fit the lid and close
securely. Set the date using the two
rings on the lid.
4. Open the cap completely.
5. Fit the vacuum hose onto the vacuum
valve.
6. Close the cap. Fit the hose onto the
ToGo bottle or the lid of the container.
7. Set the rotary selector to 0. Switch on
the appliance with button.
8. Press button.
9. The vacuum pump draws the air out of
the container. The symbol lights up.
The status display LEDs light up one by
one.
Note: If the preset vacuum level is
not reached, the
symbol then lights
up and 2 short signal tones sound.
X
10. All status display LEDs are lit. The
preset vacuum level is reached.
11. Switch off the appliance using
button.
Disconnect the mains plug.
12. Remove the hose from the ToGo bottle
or container. Hold the cap securely and
remove the hose from the vacuum valve.
Grip the vacuum seal at one end and
pull it up. Sufficient air has to get inside
the blender jug for the lid to be removed.
Open the drinking cap or lid.
Cleaning and maintenance
The appliance and the individual parts used
must be thoroughly cleaned after each use.
W Risk of electric shock!
Unplug the appliance before cleaning it.
Never immerse the base unit in liquids
and do not clean it in the dishwasher.
Do not use a steam cleaner.
W Risk of injury!
Do not touch the blender knife with your
bare hands. Use a brush.
24
en Cleaning and maintenance
Warning!
Do not use cleaning agents containing
alcohol or spirits.
Do not use any sharp, pointed or metal
objects.
Do not use abrasive cloths or cleaning
agents.
Notes:
Clean all parts immediately after use.
This will prevent residues from drying on
and possibly attacking the plastic (e.g.
essential oils in herbs).
When processing food such as carrots,
plastic parts may become discoloured,
but this can be removed with a few
drops of cooking oil.
In Fig. J you will find a summary of how to
clean the individual parts.
Using cleaning programme
For quick and easy precleaning.
Fit the empty blender jug onto the
appliance.
Fill with 0.25 litres of warm water and
2 drops of washing-up liquid.
Warning!
The specified quantity of 0.25 litres must
not be exceeded.
Fit the lid and press on firmly.
Close the cap and press down to the
stop.
Set the rotary selector to 0. Switch on
the appliance with button.
Press button. The symbol lights
up. The status display LEDs light up one
by one.
The appliance runs through automatic
precleaning including a brief vacuum
application phase at the start of the
programme. The programme ends
automatically.
Switch off the appliance using button.
Disconnect the mains plug.
Remove the blender jug with the lid.
Grip the vacuum seal at one end and
pull it up. Sufficient air has to get inside
the blender jug for the lid to be removed.
Rinse all parts thoroughly and clean
again if necessary.
To make cleaning the blender jug easier,
remove the cover from the handle and
replace once dry.
Clean the base unit.
Removing the blade insert
X Image sequence G
1. Remove the lid. Turn the blender jug
over.
2. Fit the lid onto the blade insert.
3. Rotate the lid anticlockwise and remove.
4. Remove the blade insert.
Removing the vacuum valve
X Image sequence H
The vacuum valve can be removed for
cleaning.
1. Rotate the vacuum valve anticlockwise
and remove.
2. Thoroughly clean the cap, the two
moisture sensors, the valve and the filter
on the valve.
3. Make sure you dry all parts thoroughly.
4. Fit valve as shown. Marking pointing
to . Rotate the valve clockwise to the
stop. Marking pointing to .
Removing the setting rings
X Image sequence I
In order to clean them thoroughly, the
setting rings in the lid of the vacuum
container can be removed.
1. Insert a small screwdriver into one of
the two recesses of the safety ring and
carefully lever out the ring by applying
slight pressure.
2. Remove the safety ring and setting rings as
shown. Thoroughly clean and dry all parts.
3. Insert the setting rings in the order
shown. Insert the safety ring by applying
slight pressure until it clicks into place.
25
en
Accessories
Accessories
Accessories and spare parts can be
purchased via trade stockists or customer
service. As the product range is being
constantly extended, it is possible that
there are meanwhile other accessories
that are not listed here. In this case, go to
www.bosch-home.com to see the latest
accessories available.
Accessories
MMZV0BT1 ToGo bottle (0.5 l)
MMZV0SB0 1 container (0.75 l)
MMZV0SB1 1 container (1.5 l)
MMZV0SB2 2 containers
(0.75 l and 1.5 l)
Safety systems
Start lock-out / automatic cut-out
The appliance can only be used with the
blender jug if it has been fitted properly
with the lid and the cap has been closed
completely and properly. The appliance
switches off automatically if the cap is
opened during use.
Moisture protection
The vacuum seal contains two moisture
sensors. If moisture gets into the vacuum
unit, the vacuum pump switches off
automatically. X

Overload protection
The motor switches off automatically if the
appliance overheats. X

Note: A slightly strange smell may occur if
overload protection is activated. This is not
a sign of any malfunction.
Recipes
Notes:
Table K shows further examples
of application. The preparation can
be carried out with an automatic
programme or manually in single
steps (1, 2, 3).
Clean and chop food before processing.
Remove hard components such as
cores and peel.
The recipes and application examples
can also be carried out without an
automatic programme. To do so, use
the rotary selector to increase the
speed from
to and blend
all ingredients until the required
consistency is reached.
Strawberry-mint smoothie
650 g strawberries
6 sprigs mint
300 ml apple juice
100 ml water
Wash the strawberries, remove the
stalks and cut in half. Wash the mint,
shake dry and remove the leaves.
Place all ingredients in the blender jug.
Fit the lid. Close the cap and press right
down.
Press button. The automatic
programme applies a vacuum to the
blender jug and blends all ingredients
automatically.
The automatic programme ends
automatically after preparation. Pour the
finished fruit smoothie into four glasses
and serve.
Tip: Depending on the ripeness of the
strawberries, lightly sweetened fruit juices
or sugar-free coconut water can also be
used for making the smoothie.
Pineapple-mango smoothie
300 g peeled pineapple
1/2 mango
150 ml cold coconut water
150 g ice cubes
1 banana
26
en Disposal
Cut the pineapple into small cubes. Peel
the mango. Cut the flesh from the stone
and chop into small pieces. Peel and
dice the banana.
Place all ingredients in the blender jug.
Fit the lid. Close the cap and press right
down.
Press
button. The automatic
programme applies a vacuum to the
blender jug and blends all ingredients
automatically.
The automatic programme ends
automatically after preparation. Pour the
finished fruit smoothie into four glasses
and serve.
Tip: Spices such as cinnamon, cardamom,
mace or allspice can be used to give this
exotic fruit smoothie extra flavour.
Green kiwi smoothie
1 avocado
5 kiwis
200 g young spinach leaves
400 ml water
4 tbsp maple syrup
Wash, drain and coarsely chop the
spinach. Halve the avocado, remove
the stone and spoon the flesh out of the
shell. Peel and dice the kiwis.
Place all ingredients in the blender jug.
Fit the lid. Close the cap and press right
down.
Press button. The automatic
programme applies a vacuum to the
blender jug and blends all ingredients
automatically.
The automatic programme ends
automatically after preparation. Pour the
finished fruit smoothie into four glasses
and serve.
Tip: Serve the smoothie on crushed ice.
Disposal
J
Dispose of packaging in an environ-
mentally-friendly manner. This
appliance is labelled in accordance
with European Directive 2012/19/EU
concerning used electrical and
electronic appliances (waste electrical
and electronic equipment – WEEE).
The guideline determines the frame-
work for the return and recycling
of used appliances as applicable
throughout the EU. Please ask your
specialist retailer about current
disposal facilities.
Guarantee
The guarantee conditions for this appliance
are as dened by our representative in the
country in which it is sold. Details regarding
these conditions can be obtained from
the dealer from whom the appliance was
purchased. The bill of sale or receipt must
be produced when making any claim under
the terms of this guarantee.
Changes reserved.
27
en
Troubleshooting
Troubleshooting
In the following table you will find solutions for problems or faults which you can easily
rectify yourself. If a fault cannot be eliminated, please contact customer service.
Problem Possible cause Remedial action
Appliance fails to
start up or switches
off while in use. The
symbol lights up.
Blender jug is not
correctly positioned
or has become
detached.
Fit the blender jug and lid properly.
The cap is not closed
properly.
Press cap right down.
Vacuum pump is
running but the
preset vacuum level
is not reached. The
symbol lights up
and 2 short signal
tones sound.
Lid or vacuum seal is
soiled or damaged.
Switch off the appliance.
Check lid, vacuum seal and seal of
blade insert for damage.
Clean and dry thoroughly and then
replace.
Rotate the blade insert in the blender
jug to the stop. Observe the marking.
Fit the lid correctly and press on firmly.
Observe the recess on the handle when
doing so.
Press cap right down.
Switch on the appliance and try again.
Lid is not fitted
properly / completely.
The cap is not closed
properly.
Seal of blade
insert is soiled or
damaged.
Blade insert is not
fitted properly /
completely.
Vacuum pump not
running or switches
off while in use. The
symbol lights up.
Moisture in vacuum
unit
Remove vacuum valve. Clean and dry the
vacuum valve and cap thoroughly.
Max. capacity
exceeded
Depending on the ingredients, do not fill
beyond the relevant
marking on the
blender jug when filling.
Appliance fails to
start up or switches
off while in use.
The overload
protection device is
activated.
Set the rotary selector to 0. Wait until
the appliance comes to a standstill.
Switch off the appliance using
button.
Disconnect the mains plug.
Let the appliance cool down for approx.
15-20 minutes and then switch it on
again.
If the appliance still does not start, leave
the appliance to cool down further and
try it again later.
FB5192 03/2017
Торговое
обозначе-
ние
Апроба-
ционный
тип
Сертификат соответствия
Страна-
изготови-
тель
Регистрацион-
ный номер
Дата
выдачи
Действует
до
Соковыжималки
MCP3000 CNZP3 C-DE.АЯ46.B.73451 08.02.2016 07.02.2021 Словения
MES25A0 CNCJ03 C-DE.АЯ46.B.73451 08.02.2016 07.02.2021 Китай
MES25C0 CNCJ03 C-DE.АЯ46.B.73451 08.02.2016 07.02.2021 Китай
MES25G0 CNCJ03 C-DE.АЯ46.B.73451 08.02.2016 07.02.2021 Китай
MES3500 CNCJ03 C-DE.АЯ46.B.73451 08.02.2016 07.02.2021 Китай
MES4000 CNCJ04 C-DE.АЯ46.B.73451 08.02.2016 07.02.2021 Китай
MES4010 CNCJ05 C-DE.АЯ46.B.73451 08.02.2016 07.02.2021 Китай
Резки
MAS4000W CNAS11ST1 C-DE.АЯ46.B.73634 19.02.2016 18.02.2021 Словения
MAS4104W CNAS11EV1 C-DE.АЯ46.B.73634 19.02.2016 18.02.2021 Словения
MAS4201N CNAS11ST1 C-DE.АЯ46.B.73634 19.02.2016 18.02.2021 Турция
MAS4601N CNAS11EV1 C-DE.АЯ46.B.73634 19.02.2016 18.02.2021 Турция
MAS6151M CNAS12 C-DE.АЯ46.B.73634 19.02.2016 18.02.2021 Словения
MAS6151R CNAS12 C-DE.АЯ46.B.73634 19.02.2016 18.02.2021 Словения
MAS6200N CNAS12 C-DE.АЯ46.B.73634 19.02.2016 18.02.2021 Турция
MAS9101N AS9ST C-DE.АЯ46.B.73634 19.02.2016 18.02.2021 Турция
MAS9454M AS9ST C-DE.АЯ46.B.73634 19.02.2016 18.02.2021 Словения
MAS9555M AS10EH C-DE.АЯ46.B.73634 19.02.2016 18.02.2021 Словения
Миксеры, блендеры, измельчители
MFQ22100 CNHR30 C-DE.АЯ46.B.76049 17.08.2016 16.08.2021 Словения
MFQ2210D CNHR30 C-DE.АЯ46.B.76049 17.08.2016 16.08.2021 Словения
MFQ2210P CNHR30 C-DE.АЯ46.B.76049 17.08.2016 16.08.2021 Словения
MFQ2210Y CNHR30 C-DE.АЯ46.B.76049 17.08.2016 16.08.2021 Словения
MFQ24200 CNHR30 C-DE.АЯ46.B.76049 17.08.2016 16.08.2021 Словения
MFQ2420B CNHR30 C-DE.АЯ46.B.76049 17.08.2016 16.08.2021 Словения
MFQ3010 CNHR19 C-DE.АЯ46.B.73034 30.12.2015 29.12.2020 Словения
MFQ3020 CNHR19 C-DE.АЯ46.B.73034 30.12.2015 29.12.2020 Словения
MFQ3030 CNHR19 C-DE.АЯ46.B.73034 30.12.2015 29.12.2020 Словения
MFQ3520 CNHR17 C-DE.АЯ46.B.73034 30.12.2015 29.12.2020 Словения
MFQ3555 CNHR18 C-DE.АЯ46.B.73034 30.12.2015 29.12.2020 Словения
MFQ36300D CNHR27 C-DE.АЯ46.B.73034 30.12.2015 29.12.2020 Словения
MFQ36300I CNHR27 C-DE.АЯ46.B.73034 30.12.2015 29.12.2020 Словения
MFQ36300Y CNHR27 C-DE.АЯ46.B.73034 30.12.2015 29.12.2020 Словения
MFQ36440 CNHR27 C-DE.АЯ46.B.73034 30.12.2015 29.12.2020 Словения
MFQ36460 CNHR27 C-DE.АЯ46.B.73034 30.12.2015 29.12.2020 Словения
MFQ36480 CNHR27 C-DE.АЯ46.B.73034 30.12.2015 29.12.2020 Словения
MFQ36GOLD CNHR27 C-DE.АЯ46.B.73034 30.12.2015 29.12.2020 Словения
MFQ4020 CNHR22 C-DE.АЯ46.B.73034 30.12.2015 29.12.2020 Словения
MFQ40301 CNHR22 C-DE.АЯ46.B.73034 30.12.2015 29.12.2020 Словения
MFQ40302 CNHR22 C-DE.АЯ46.B.73034 30.12.2015 29.12.2020 Словения
MFQ40303 CNHR22 C-DE.АЯ46.B.73034 30.12.2015 29.12.2020 Словения
MFQ4070 CNHR22 C-DE.АЯ46.B.73034 30.12.2015 29.12.2020 Словения
MFQ4080 CNHR22 C-DE.АЯ46.B.73034 30.12.2015 29.12.2020 Словения
MMB21P0R CNSM10 C-DE.АЯ46.B.73592 17.02.2016 16.02.2021 Китай
MMB21P1W CNSM10 C-DE.АЯ46.B.73592 17.02.2016 16.02.2021 Китай
MMB42G0B CNSM11 C-DE.АЯ46.B.73592 17.02.2016 16.02.2021 Китай
MMB42G1B CNSM11 C-DE.АЯ46.B.73592 17.02.2016 16.02.2021 Китай
MMB43G2B CNSM12 C-DE.АЯ46.B.73592 17.02.2016 16.02.2021 Китай
MMB64G3M CNSM13 C-DE.АЯ46.B.73592 17.02.2016 16.02.2021 Китай
MMB65G0M CNSM13 C-DE.АЯ46.B.73592 17.02.2016 16.02.2021 Китай
MMR08A1 CNCM13ST1 C-DE.АЯ46.B.73343 29.01.2016 28.01.2021 Словения
MMR15A1 CNCM13ST2 C-DE.АЯ46.B.73343 29.01.2016 28.01.2021 Словения
MSM14000 CNHR12C C-DE.АЯ46.B.73592 17.02.2016 16.02.2021 Словения
MSM14100 CNHR12C C-DE.АЯ46.B.73592 17.02.2016 16.02.2021 Словения
MSM14200 CNHR12C C-DE.АЯ46.B.73592 17.02.2016 16.02.2021 Словения
MSM14500 CNHR12C C-DE.АЯ46.B.73592 17.02.2016 16.02.2021 Словения
MSM2410D CNHR12C C-DE.АЯ46.B.73592 17.02.2016 16.02.2021 Словения
MSM2410P CNHR12C C-DE.АЯ46.B.73592 17.02.2016 16.02.2021 Словения
MSM2410Y CNHR12C C-DE.АЯ46.B.73592 17.02.2016 16.02.2021 Словения
MSM2413V CNHR12C C-DE.АЯ46.B.73592 17.02.2016 16.02.2021 Словения
MSM24500 CNHR12C C-DE.АЯ46.B.73592 17.02.2016 16.02.2021 Словения
MSM2610B CNHR15 C-DE.АЯ46.B.73592 17.02.2016 16.02.2021 Словения
MSM2620B CNHR15 C-DE.АЯ46.B.73592 17.02.2016 16.02.2021 Словения
MSM2623G CNHR15 C-DE.АЯ46.B.73592 17.02.2016 16.02.2021 Словения
MSM2650B
CNHR15 C-DE.АЯ46.B.73592 17.02.2016 16.02.2021 Слов
ения
MSM64035 CNHR24 C-DE.АЯ46.B.73592 17.02.2016 16.02.2021 Словения
MSM64120 CNHR24 C-DE.АЯ46.B.73592 17.02.2016 16.02.2021 Словения
MSM64155RU CNHR24 C-DE.АЯ46.B.73592 17.02.2016 16.02.2021 Словения
MSM66020 CNHR25 C-DE.АЯ46.B.73592 17.02.2016 16.02.2021 Словения
MSM66050RU CNHR25 C-DE.АЯ46.B.73592 17.02.2016 16.02.2021 Словения
MSM66110 CNHR25 C-DE.АЯ46.B.73592 17.02.2016 16.02.2021 Словения
MSM66110D CNHR25 C-DE.АЯ46.B.73592 17.02.2016 16.02.2021 Словения
MSM66110I CNHR25 C-DE.АЯ46.B.73592 17.02.2016 16.02.2021 Словения
MSM66110Y CNHR25 C-DE.АЯ46.B.73592 17.02.2016 16.02.2021 Словения
MSM66130 CNHR25 C-DE.АЯ46.B.73592 17.02.2016 16.02.2021 Словения
MSM66150RU CNHR25 C-DE.АЯ46.B.73592 17.02.2016 16.02.2021 Словения
MSM66155 CNHR25 C-DE.АЯ46.B.73592 17.02.2016 16.02.2021 Словения
MSM67140RU CNHR26 C-DE.АЯ46.B.73592 17.02.2016 16.02.2021 Словения
MSM67150RU CNHR26 C-DE.АЯ46.B.73592 17.02.2016 16.02.2021 Словения
MSM67160RU CNHR26 C-DE.АЯ46.B.73592 17.02.2016 16.02.2021 Словения
MSM67165RU CNHR26 C-DE.АЯ46.B.73592 17.02.2016 16.02.2021 Словения
MSM67166 CNHR26 C-DE.АЯ46.B.73592 17.02.2016 16.02.2021 Словения
MSM67190 CNHR26FP C-DE.АЯ46.B.73592 17.02.2016 16.02.2021 Словения
MSM671X0 CNHR26FP C-DE.АЯ46.B.73592 17.02.2016 16.02.2021 Словения
MSM671X1 CNHR26FP C-DE.АЯ46.B.73592 17.02.2016 16.02.2021 Словения
MSM67SPORT CNHR26 C-DE.АЯ46.B.73592 17.02.2016 16.02.2021 Словения
MSM6B100 CNHR11 C-DE.АЯ46.B.73592 17.02.2016 16.02.2021 Словения
MSM6B150 CNHR11 C-DE.АЯ46.B.73592 17.02.2016 16.02.2021 Словения
Торговое
обозначе-
ние
Апроба-
ционный
тип
Сертификат соответствия
Страна-
изготови-
тель
Регистрацион-
ный номер
Дата
выдачи
Действует
до
Миксеры, блендеры, измельчители
MSM6B250 CNHR11 C-DE.АЯ46.B.73592 17.02.2016 16.02.2021 Словения
MSM6B300 CNHR12 C-DE.АЯ46.B.73592 17.02.2016 16.02.2021 Словения
MSM6B500 CNHR12 C-DE.АЯ46.B.73592 17.02.2016 16.02.2021 Словения
MSM6B700 CNHR12 C-DE.АЯ46.B.73592 17.02.2016 16.02.2021 Словения
MSM87130 CNHR28 C-DE.АЯ46.B.73592 17.02.2016 16.02.2021 Словения
MSM87140 CNHR28 C-DE.АЯ46.B.73592 17.02.2016 16.02.2021 Словения
MSM87160 CNHR28 C-DE.АЯ46.B.73592 17.02.2016 16.02.2021 Словения
MSM87165 CNHR28 C-DE.АЯ46.B.73592 17.02.2016 16.02.2021 Словения
MSM87180 CNHR28 C-DE.АЯ46.B.73592 17.02.2016 16.02.2021 Словения
MSM88190 CNHR29 C-DE.АЯ46.B.73592 17.02.2016 16.02.2021 Словения
MSM881X1 CNHR29 C-DE.АЯ46.B.73592 17.02.2016 16.02.2021 Словения
MSM881X2 CNHR29 C-DE.АЯ46.B.73592 17.02.2016 16.02.2021 Словения
Кухонные комбайны
MCM3100W CNCM12 C-DE.АЯ46.B.73522 12.02.2016 11.02.2021 Словения
MCM3110W CNCM12 C-DE.АЯ46.B.73522 12.02.2016 11.02.2021 Словения
MCM3200W CNCM12 C-DE.АЯ46.B.73522 12.02.2016 11.02.2021 Словения
MCM3201B CNCM12 C-DE.АЯ46.B.73522 12.02.2016 11.02.2021 Словения
MCM3401M CNCM12 C-DE.АЯ46.B.73522 12.02.2016 11.02.2021 Словения
MCM3501M CNCM12 C-DE.АЯ46.B.73522 12.02.2016 11.02.2021 Словения
MCM4000 CNCM20 C-DE.АЯ46.B.73522 12.02.2016 11.02.2021 Словения
MCM4100 CNCM20 C-DE.АЯ46.B.73522 12.02.2016 11.02.2021 Словения
MCM4250 CNCM21 C-DE.АЯ46.B.73522 12.02.2016 11.02.2021 Словения
MCM62020 CNCM30 C-DE.АЯ46.B.73522 12.02.2016 11.02.2021 Словения
MCM64051 CNCM30 C-DE.АЯ46.B.73522 12.02.2016 11.02.2021 Словения
MCM64085 CNCM30 C-DE.АЯ46.B.73522 12.02.2016 11.02.2021 Словения
MCM68840 CNCM30 C-DE.АЯ46.B.73522 12.02.2016 11.02.2021 Словения
MCM68885 CNCM30 C-DE.АЯ46.B.73522 12.02.2016 11.02.2021 Словения
MUM4406 CNUM5ST C-DE.АЯ46.B.73522 12.02.2016 11.02.2021 Словения
MUM4426 CNUM5ST C-DE.АЯ46.B.73522 12.02.2016 11.02.2021 Словения
MUM4657 CNUM5ST C-DE.АЯ46.B.73522 12.02.2016 11.02.2021 Словения
MUM4855 CNUM5ST C-DE.АЯ46.B.73522 12.02.2016 11.02.2021 Словения
MUM4875EU CNUM5ST C-DE.АЯ46.B.73522 12.02.2016 11.02.2021 Словения
MUM4880 CNUM5ST C-DE.АЯ46.B.73522 12.02.2016 11.02.2021 Словения
MUM52131 CNUM50 C-DE.АЯ46.B.73522 12.02.2016 11.02.2021 Словения
MUM54020 CNUM51 C-DE.АЯ46.B.73522 12.02.2016 11.02.2021 Словения
MUM54240 CNUM51 C-DE.АЯ46.B.73522 12.02.2016 11.02.2021 Словения
MUM54620 CNUM51 C-DE.АЯ46.B.73522 12.02.2016 11.02.2021 Словения
MUM54720 CNUM51 C-DE.АЯ46.B.73522 12.02.2016 11.02.2021 Словения
MUM54920 CNUM51 C-DE.АЯ46.B.73522 12.02.2016 11.02.2021 Словения
MUM54D00 CNUM51 C-DE.АЯ46.B.73522 12.02.2016 11.02.2021 Словения
MUM54G00 CNUM51 C-DE.АЯ46.B.73522 12.02.2016 11.02.2021 Словения
MUM54I00 CNUM51 C-DE.АЯ46.B.73522 12.02.2016 11.02.2021 Словения
MUM54P00 CNUM51 C-DE.АЯ46.B.73522 12.02.2016 11.02.2021 Словения
MUM54Y00 CNUM51 C-DE.АЯ46.B.73522 12.02.2016 11.02.2021 Словения
MUM56S40 CNUM51 C-DE.АЯ46.B.73522 12.02.2016 11.02.2021 Словения
MUM57830 CNUM51 C-DE.АЯ46.B.73522 12.02.2016 11.02.2021 Словения
MUM57860 CNUM51 C-DE.АЯ46.B.73522 12.02.2016 11.02.2021 Словения
MUM58020 CNUM51 C-DE.АЯ46.B.73522 12.02.2016 11.02.2021 Словения
MUM58225 CNUM51 C-DE.АЯ46.B.73522 12.02.2016 11.02.2021 Словения
MUM58243 CNUM51 C-DE.АЯ46.B.73522 12.02.2016 11.02.2021 Словения
MUM58244 CNUM51 C-DE.АЯ46.B.73522 12.02.2016 11.02.2021 Словения
MUM58252RU CNUM51 C-DE.АЯ46.B.73522 12.02.2016 11.02.2021 Словения
MUM58420 CNUM51 C-DE.АЯ46.B.73522 12.02.2016 11.02.2021 Словения
MUM58720 CNUM51 C-DE.АЯ46.B.73522 12.02.2016 11.02.2021 Словения
MUM58920 CNUM51 C-DE.АЯ46.B.73522 12.02.2016 11.02.2021 Словения
MUM58K20 CNUM51 C-DE.АЯ46.B.73522 12.02.2016 11.02.2021 Словения
MUM58L20 CNUM51 C-DE.АЯ46.B.73522 12.02.2016 11.02.2021 Словения
MUM59343 CNUM51 C-DE.АЯ46.B.73522 12.02.2016 11.02.2021 Словения
MUM59363 CNUM51 C-DE.АЯ46.B.73522 12.02.2016 11.02.2021 Словения
MUM59M55 CNUM51 C-DE.АЯ46.B.73522 12.02.2016 11.02.2021 Словения
MUM9A32S00 CNUM60A C-DE.АЯ46.B.77956 21.12.2016 20.12.2021 Словения
MUM9AD1S00 CNUM61A C-DE.АЯ46.B.77956 21.12.2016 20.12.2021 Словения
MUM9AE5S00 CNUM61B C-DE.АЯ46.B.77956 21.12.2016 20.12.2021 Словения
MUM9AX5S00 CNUM61B
C-DE.АЯ46.B.77956 21.12.2016 20.12.2021 Слов
ения
MUM9YT5S24 CNUM61B C-DE.АЯ46.B.77956 21.12.2016 20.12.2021 Словения
MUM9YX5S12 CNUM61B C-DE.АЯ46.B.77956 21.12.2016 20.12.2021 Словения
MUMXL20C CNUM70 C-DE.АЯ46.B.73522 12.02.2016 11.02.2021 Словения
MUMXL40G CNUM70 C-DE.АЯ46.B.73522 12.02.2016 11.02.2021 Словения
MUMXX40G CNUM70 C-DE.АЯ46.B.73522 12.02.2016 11.02.2021 Словения
Кофемолки
MKM6003 KM13 C-DE.АЯ46.B.73558 16.02.2016 15.02.2021 Словения
MKM6000 KM13 C-DE.АЯ46.B.73558 16.02.2016 15.02.2021 Словения
Мясорубки
MFW3520G CNFW3A C-DE.АЯ46.B.72617 03.12.2015 02.12.2020 Польша
MFW3520W CNFW3A C-DE.АЯ46.B.72617 03.12.2015 02.12.2020 Польша
MFW3540W CNFW3A C-DE.АЯ46.B.72617 03.12.2015 02.12.2020 Польша
MFW3630A CNFW3B C-DE.АЯ46.B.72617 03.12.2015 02.12.2020 Польша
MFW3630I CNFW3B C-DE.АЯ46.B.72617 03.12.2015 02.12.2020 Польша
MFW3640A CNFW3B C-DE.АЯ46.B.72617 03.12.2015 02.12.2020 Польша
MFW3850B CNFW3B C-DE.АЯ46.B.72617 03.12.2015 02.12.2020 Польша
MFW45020 CNFW5 C-DE.АЯ46.B.72617 03.12.2015 02.12.2020 Китай
MFW45120 CNFW5 C-DE.АЯ46.B.72617 03.12.2015 02.12.2020 Китай
MFW66020 CNFW6 C-DE.АЯ46.B.72617 03.12.2015 02.12.2020 Китай
MFW67440 CNFW7 C-DE.АЯ46.B.72617 03.12.2015 02.12.2020 Китай
MFW67600 CNFW7 C-DE.АЯ46.B.72617 03.12.2015 02.12.2020 Китай
MFW68640 CNFW8 C-DE.АЯ46.B.72617 03.12.2015 02.12.2020 Китай
MFW68660 CNFW8 C-DE.АЯ46.B.72617 03.12.2015 02.12.2020 Китай
MFW68680 CNFW8 C-DE.АЯ46.B.72617 03.12.2015 02.12.2020 Китай
Информация о бытовой технике, произведенной под контролем концерна
БСХ Хаусгерете ГмбХ, Карл-Вери-Штр. 34, 81739 Мюнхен, Германия
в соответствии с требованиями Федерального Закона РФ от 23 ноября 2009 г.
№ 261-ФЗ, законодательства о техническом регулировании
и законодательства о защите прав потребителей Российской Федерации
Продукция: cоковыжималки, миксеры, блендеры, резки,
кухонные комбайны, кофемолки, мясорубки, измельчители
Товарный знак:
Bosch
ВНИМАНИЕ! Ассортимент продукции постоянно обновляется. Технические характеристики продукции, в том числе энергоэффективности,
постоянно совершенствуются. Продукция регулярно проходит обязательную процедуру подтверждения соответствия согласно действующе-
му законодательству. Информацию о реквизитах актуальных сертификатов соответствия и сроках их действия, актуальную информацию о
классе и характеристиках энергоэффективности продукции, информацию об актуальном ассортименте продукции можно получить у орга-
низации, выполняющей функции иностранного изготовителя на территории Российской Федерации ООО «БСХ Бытовые Приборы», 198515,
Санкт-Петербург, г. Петергоф, ул. Карла Сименса, д.1 лит. А, филиал в г. Москва, 119071, ул. Малая Калужская, д.15, телефон (495) 737-2777,
факс (495) 737-2798.
Компания ООО «БСХ Бытовые Приборы», 198515, Санкт-Петербург, г. Петергоф, ул. Карла Сименса, д.1 лит. А, филиал в г. Москва, 119071,
ул. Малая Калужская, д.15, телефон (495) 737-2777, факс (495) 737-2798 осуществляет свою деятельность по подтверждению соответствия
продукции от имени производителя на единой таможенной территории Евразийского экономического союза в соответствии с действующими
техническими регламентами, в качестве уполномоченного Изготовителем лица, а также выполняет требования, предусмотренные Законом
РФ №184-ФЗ «О техническом регулировании» для лица, выполняющего функции иностранного изготовителя на территории Российской
Федерации.
Импортером в Российскую Федерацию продукции, сертифицированной в качестве серийно производимой, является ООО «БСХ Бытовые
Приборы», 198515, Санкт-Петербург, г. Петергоф, ул. Карла Сименса, д.1 лит. А, филиал в г. Москва, 119071, ул. Малая Калужская, д.15,
телефон (495) 737-2777.
Организацией, указываемой на продукции в целях идентификации продукции и осуществляющей первичное размещение продукции на
рынке Европейского союза, является Роберт Бош Хаусгерете ГмбХ Карл-Вери-Штр. 34, 81739 Мюнхен, Германия (Robert Bosch Hausgeräte
GmbH, Carl-Wery-Str. 34, 81739 München, Germany).
Юридическим лицом (изготовителем), осуществляющим от своего имени изготовление продукции и ответственным за ее соответствие
требованиям применимых технических регламентов, является БСХ Хаусгерете ГмбХ, Карл-Вери-Штр. 34, 81739 Мюнхен, Германия (BSH
Hausgeräte GmbH, Carl-Wery-Str. 34, 81739 München, Germany).
При перевозке, погрузке, разгрузке и хранении продукции следует руководствоваться, помимо изложенных в инструкции по эксплуатации,
следующими требованиями:
Запрещается подвергать продукцию существенным механическим нагрузкам, которые могут привести к повреждению продукции и/или
нарушению ее упаковки.
Необходимо избегать попадания на упаковку продукции воды и других жидкостей.
Перед перевозкой или передачей на хранение бывшей в эксплуатации продукции при отрицательной температуре необходимо убедиться в
отсутствии в продукции воды.
Продукция предназначена к использованию в условиях температуры выше 0°С и относительной влажности, не превышающей 93%.
Перед началом эксплуатации продукции, длительное время находившейся под воздействием отрицательной температуры, необходимо
выдержать ее в условиях комнатной температуры несколько часов.
Правила реализации продукции определяются предприятиями розничной торговли в соответствии с требованиями действующего законо-
дательства.
Указания по утилизации продукции содержатся в инструкции по эксплуатации и могут быть уточнены у муниципальных органов исполни-
тельной власти.
Для продукции, реализованной изготовителем в течение срока действия сертификата соответствия, этот сертификат действителен при ее
поставке, продаже и использовании (применении) в течение срока службы, установленного в соответствии со статьей 18 Закона РФ о защите
прав потребителей. Срок службы на продукцию указан производителем в листовке «Информация изготовителя о гарантийном и сервисном
обслуживании».
Продукция может быть идентифицирована по модельному обозначению (поле «E-Nr.»), апробационному типу (поле «Type») и товарному
знаку Bosch, нанесенным на продукцию, упаковку и (или) содержащихся в эксплуатационных документах. В соответствии с внутренним
стандартом изготовителя бытовая техника идентифицируется по следующей схеме:
E-Nr. <материальный номер> / <индекс сервисной службы>
Материальный номер представляет собой буквенно-цифровое обозначение продукции длиной не более 10 символов, используемое при
продаже (именуемое модельным обозначением или моделью бытового прибора) торговой марки Bosch. Материальный номер (модель)
указывается между кодовым словом «E-Nr.» и косой чертой «/».
Индекс сервисной службы – двузначное цифровое обозначение, присваиваемое единице продукции в процессе производства и используе-
мое сервисной службой.
Эксплуатационные документы разрабатываются в унифицированной форме для широкого ассортимента продукции, поэтому изготовителем
предусмотрено указание торгового обозначения прибора в эксплуатационных документах как полностью, так и частично, при условии, что
это позволяет определить принадлежность данного эксплуатационного документа к бытовому прибору, сопровождаемому этим эксплуатаци-
онным документом. Установление в процессе идентификации соответствия характеристик бытового прибора положениям, содержащимся в
прилагаемых к нему эксплуатационных документах, проводится путем анализа информации, изложенной в эксплуатационных документах.
В состав эксплуатационных документов, предусмотренных изготовителем для продукции, могут входить настоящая информация, инструкция
(руководство) по эксплуатации, информация об условиях гарантийного и сервисного обслуживания.
Маркирование продукции осуществляется изготовителем на типовой табличке прибора, на упаковочной этикетке, непосредственно на упа-
ковке прибора, а также может производиться иными способами, обеспечивающими доступное и наглядное представление информации о
приборе в местах продаж.
Продукция, которая прошла процедуру подтверждения соответствия согласно требованиям технических регламентов Таможенно-
го союза и/или технических регламентов Евразийского экономического союза, маркируется единым знаком обращения продукции
на рынке государств-членов Таможенного союза (Евразийского экономического союза).
Продукция соответствует следующим техническим регламентам Таможенного союза:
ТР ТС 020/2011 Электромагнитная совместимость технических средств
ТР ТС 004/2011 О безопасности низковольтного оборудования
ТР ЕАЭС 037/2016 Об ограничении применения опасных веществ в изделиях электротехники и радиоэлектроники с даты вступления
его в силу
Эксплуатационные документы на продукцию выполняются на русском языке. Эксплуатационные документы на государственных языках госу-
дарств-членов Евразийского экономического союза, отличных от русского, при наличии соответствующих требований в законодательстве мож-
но безвозмездно получить у торгующей организации-резидента соответствующего государства-члена Евразийского экономического союза.
Информация о комплектации продукции представлена в торговых залах, может быть запрошена по телефону бесплатной «горячей линии»
(800) 200-2961, а также доступна в интернете на сайте производителя http://www.bosch-home.ru
Robert Bosch Hausgeräte GmbH
Carl-Wery-Straße 34
81739 München
GERMANY
www.bosch-home.com
Register your new device on MyBosch now and profit directly from:
• Expert tips & tricks for your appliance
• Warranty extension options
• Discounts for accessories & spare-parts
• Digital manual and all appliance data at hand
• Easy access to Bosch Home Appliances Service
Free and easy registration – also on mobile phones:
www.bosch-home.com/welcome
Expert advice for your Bosch home appliances, need help with problems
or a repair from Bosch experts.
Find out everything about the many ways Bosch can support you:
www.bosch-home.com/service
Contact data of all countries are listed in the attached service directory.
Thank you for buying a
Bosch Home Appliance!
Looking for help?
You´ll find it here.
8001129394
*8001129394*
(990228)
  • Page 1 1
  • Page 2 2
  • Page 3 3
  • Page 4 4
  • Page 5 5
  • Page 6 6
  • Page 7 7
  • Page 8 8
  • Page 9 9
  • Page 10 10
  • Page 11 11
  • Page 12 12
  • Page 13 13
  • Page 14 14
  • Page 15 15
  • Page 16 16
  • Page 17 17
  • Page 18 18
  • Page 19 19
  • Page 20 20
  • Page 21 21
  • Page 22 22
  • Page 23 23
  • Page 24 24
  • Page 25 25
  • Page 26 26
  • Page 27 27
  • Page 28 28
  • Page 29 29
  • Page 30 30
  • Page 31 31
  • Page 32 32
  • Page 33 33
  • Page 34 34
  • Page 35 35
  • Page 36 36
  • Page 37 37
  • Page 38 38
  • Page 39 39
  • Page 40 40
  • Page 41 41
  • Page 42 42
  • Page 43 43
  • Page 44 44
  • Page 45 45
  • Page 46 46
  • Page 47 47
  • Page 48 48
  • Page 49 49
  • Page 50 50
  • Page 51 51
  • Page 52 52
  • Page 53 53
  • Page 54 54
  • Page 55 55
  • Page 56 56
  • Page 57 57
  • Page 58 58
  • Page 59 59
  • Page 60 60
  • Page 61 61
  • Page 62 62
  • Page 63 63
  • Page 64 64
  • Page 65 65
  • Page 66 66
  • Page 67 67
  • Page 68 68
  • Page 69 69
  • Page 70 70
  • Page 71 71
  • Page 72 72
  • Page 73 73
  • Page 74 74
  • Page 75 75
  • Page 76 76
  • Page 77 77
  • Page 78 78
  • Page 79 79
  • Page 80 80
  • Page 81 81
  • Page 82 82
  • Page 83 83
  • Page 84 84
  • Page 85 85
  • Page 86 86
  • Page 87 87
  • Page 88 88
  • Page 89 89
  • Page 90 90
  • Page 91 91
  • Page 92 92
  • Page 93 93
  • Page 94 94
  • Page 95 95
  • Page 96 96
  • Page 97 97
  • Page 98 98
  • Page 99 99
  • Page 100 100
  • Page 101 101
  • Page 102 102
  • Page 103 103
  • Page 104 104
  • Page 105 105
  • Page 106 106
  • Page 107 107
  • Page 108 108
  • Page 109 109
  • Page 110 110
  • Page 111 111
  • Page 112 112
  • Page 113 113
  • Page 114 114
  • Page 115 115
  • Page 116 116
  • Page 117 117
  • Page 118 118
  • Page 119 119
  • Page 120 120
  • Page 121 121
  • Page 122 122
  • Page 123 123
  • Page 124 124
  • Page 125 125
  • Page 126 126
  • Page 127 127
  • Page 128 128
  • Page 129 129
  • Page 130 130
  • Page 131 131
  • Page 132 132
  • Page 133 133
  • Page 134 134
  • Page 135 135
  • Page 136 136
  • Page 137 137
  • Page 138 138
  • Page 139 139
  • Page 140 140
  • Page 141 141
  • Page 142 142
  • Page 143 143
  • Page 144 144
  • Page 145 145
  • Page 146 146
  • Page 147 147
  • Page 148 148
  • Page 149 149
  • Page 150 150
  • Page 151 151
  • Page 152 152
  • Page 153 153
  • Page 154 154
  • Page 155 155
  • Page 156 156
  • Page 157 157
  • Page 158 158
  • Page 159 159
  • Page 160 160
  • Page 161 161
  • Page 162 162
  • Page 163 163
  • Page 164 164
  • Page 165 165
  • Page 166 166
  • Page 167 167
  • Page 168 168
  • Page 169 169
  • Page 170 170
  • Page 171 171
  • Page 172 172
  • Page 173 173
  • Page 174 174
  • Page 175 175
  • Page 176 176
  • Page 177 177
  • Page 178 178
  • Page 179 179
  • Page 180 180
  • Page 181 181
  • Page 182 182
  • Page 183 183
  • Page 184 184
  • Page 185 185
  • Page 186 186
  • Page 187 187
  • Page 188 188
  • Page 189 189
  • Page 190 190
  • Page 191 191
  • Page 192 192
  • Page 193 193
  • Page 194 194
  • Page 195 195
  • Page 196 196
  • Page 197 197
  • Page 198 198
  • Page 199 199
  • Page 200 200
  • Page 201 201
  • Page 202 202
  • Page 203 203
  • Page 204 204
  • Page 205 205
  • Page 206 206
  • Page 207 207
  • Page 208 208
  • Page 209 209
  • Page 210 210
  • Page 211 211
  • Page 212 212
  • Page 213 213
  • Page 214 214
  • Page 215 215
  • Page 216 216
  • Page 217 217
  • Page 218 218
  • Page 219 219
  • Page 220 220
  • Page 221 221
  • Page 222 222
  • Page 223 223
  • Page 224 224
  • Page 225 225
  • Page 226 226
  • Page 227 227
  • Page 228 228
  • Page 229 229
  • Page 230 230
  • Page 231 231
  • Page 232 232
  • Page 233 233
  • Page 234 234
  • Page 235 235
  • Page 236 236

Bosch MMBV625M/01 Owner's manual

Category
Blenders
Type
Owner's manual

Ask a question and I''ll find the answer in the document

Finding information in a document is now easier with AI