Varathane 242174H Operating instructions

Type
Operating instructions
ITEMS
• Crates
Varathane 3X Wood Stain
• Varathane Triple Thick Polyurethane
• Sandpaper (#120, #150, & #180 Grits)
• Drop Cloth
• Tack Cloth
• Lint-Free Cloth
• Synthetic Bristle Paint Brush
• Stir Stick
1.PREPARE: Always work in a well-ventilated area, like your garage, and use a drop cloth to protect
from stain. Before you begin, sand the crates with sandpaper in the direction of the wood grain,
working your way up through #120, #150, and #180 grits. Use a tack cloth to wipe away the sanding
dust in between each grit.
2.STAIN: Stir or shake your Varathane 3X Wood Stain thoroughly. Then, use a lint-free cloth or brush
to apply a generous amount of stain to the crates, working in manageable sections. Let the stain sit
for a few minutes and then wipe away the excess with a clean rag. Always wipe in the direction of
the wood grain. Once the crates are completely stained, set it aside to dry for one hour.
3.POLYURETHANE: Once your crates are dry, stir your Varathane Triple Thick Polyurethane with a
stir stick. Then, apply the polyurethane with a brush in one smooth, even coat. Be sure to brush in
the direction of the wood grain.
4.FINISH: Let the polyurethane cure for 48 hours before attaching crates to the wall with screws or
nails. For extra strength make sure to attach directly to a stud in the wall.
STAINED BRIARSMOKE CRATE SHELVES
Keep a kids room organized on a budget with these stained crate shelves.
A messy kids playroom can be a challenge to organize. Keep it all
together with these simple and stylish crate shelves stained with
Varathane 3X Wood Stain.
Visit www.homedepot.com/rustoleum
for other great ideas, products and inspiration.
As shown Varathane
3X Wood Stain in Briarsmoke &
Triple Thick Polyurethane in Satin
ITEMS
• Crate
Varathane 3X Wood Stain
• Varathane Triple Thick Polyurethane
• Sandpaper (#120, #150, & #180 Grits)
• Drop Cloth
• Tack Cloth
• Lint-Free Cloth
• Synthetic Bristle Paint Brush
• Stir Stick
1.PREPARE: Always work in a well-ventilated area, like your garage, and use a drop cloth to protect
from stain. Before you begin, sand the crate with sandpaper, working your way up through #120,
#150, and #180 grits. Use a tack cloth to wipe away the sanding dust in between each grit.
2.STAIN: Stir or shake your Varathane 3X Wood Stain thoroughly. Then, use a lint-free cloth or
brush to apply a generous amount of stain to the crate, working in manageable sections. Let the
stain sit for a few minutes and then wipe away the excess with a clean rag. Always wipe in the direc-
tion of the wood grain. Once the crate is completely stained, set it aside to dry for one hour.
3.POLYURETHANE: Once your crate is dry, stir your Varathane Triple Thick Polyurethane with a
stir stick. Then, apply the polyurethane with a brush in one smooth, even coat. Be sure to brush in
the direction of the wood grain.
4.FINISH: Let the polyurethane cure for 48 hours before using the crate.
STAINED NAVY WOODEN CRATE
This stained crate will be a life-saver at your next party.
Wooden crates make a great cost-eective storage solution for your home. But, did you
know you can also use them for parties? Whether it’s holding paper plates and utensils
or serving as a cute refreshment station, a stained crate can be a party life-saver. Here’s
how to make this blue crate for your next party.
Visit www.homedepot.com/rustoleum
for other great ideas, products and inspiration.
As shown Varathane
3X Wood Stain in Worn Navy &
Triple Thick Polyurethane in Satin
ITEMS
• (2) Wood Sawhorses
• Large Piece of Plywood (For the Tabletop)
• Varathane 3X Wood Stain
• Varathane Triple Thick Polyurethane
• Chalkboard Brush-On
• Sandpaper (#120, #150, & #180 Grits)
• Tack Cloth
• Drop Cloth
• Drill & Screws (Optional)
• Stir Sticks
• Lint-Free Cloth
• Synthetic Bristle Paint Brush
1.PREPARE: Always work in a well-ventilated area and use a drop cloth to protect from drips, spills, and splatter. Sand
each sawhorse thoroughly, working your way up through #120, #150, and #180 grit sandpaper. Wipe away the sanding
dust with a tack cloth after nishing with each grit.
2.STAIN: Stir or shake your Varathane 3X Wood Stain thoroughly. Working in manageable sections, use a lint-free
cloth or brush to apply a generous amount of stain onto the rst sawhorse. Let the stain sit on the surface for a few
minutes, and then wipe away the excess with a clean cloth in the direction of the wood grain. Repeat this step on the
second sawhorse, then set them aside to dry for at least one hour.
3.POLYURETHANE: Once the sawhorses are dry, stir (do not shake) your can of Varathane Triple Thick Polyurethane.
Use a brush to apply an even coat of poly to both sawhorses. Be sure to apply the polyurethane in the direction of the
wood grain and in one thick, uniform coat. Set the sawhorses aside to dry completely for 48 hours.
4.PAINT: Stir the Chalkboard Brush-On paint thoroughly with a stir stick. Then, use a foam roller to apply the paint to
the plywood. Avoid excessive rolling and use light, even strokes for an even and smooth nish. Wait 2-4 hours, and then
apply a second coat. Repeat once more, so you have three solid coats of paint on the table.
Tip: Prop the tabletop up on two buckets to make it easier to paint.
5.CONDITION: Let the chalkboard paint cure completely for three days. Then, rub the side of a piece of chalk over the
entire surface and erase with a chalkboard eraser or dry cloth. This will condition the surface so its ready for use.
6.FINISH: Now that the sawhorses and tabletop are completely dry, simply slide the tabletop on top of the sawhorse to
complete the table. If you want to secure the table-top, use a drill and screws to attach it to the sawhorses.
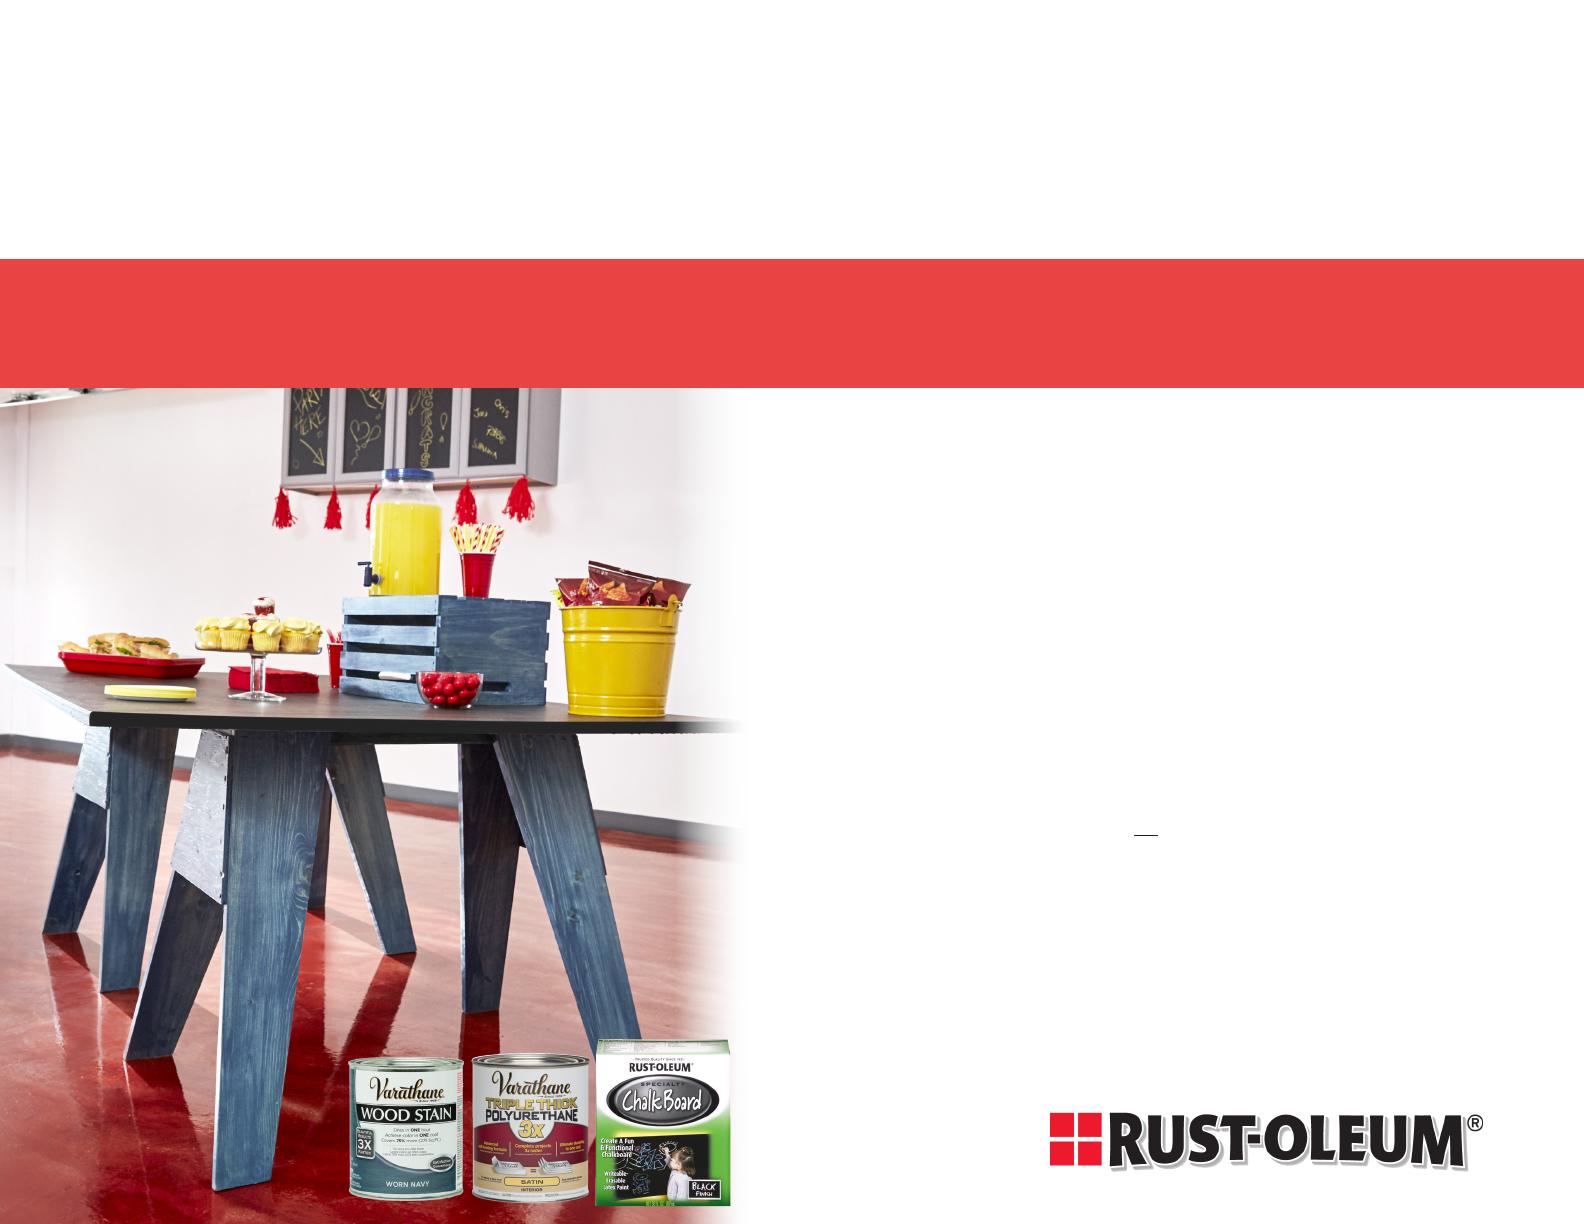
MAKE THIS CHEAP CHALKBOARD
PARTY TABLE FROM SCRATCH
This large chalkboard table is the perfect way to display treats at your next party!
When hosting a party, there’s never enough table space for all the food and drinks. Here’s a cheap chalk-
board-top table that you can make in a few steps so you’ll never have to stress over table space again.
Plus, when the partys over, you can break it down for easy storage.
Visit www.homedepot.com/rustoleum
for other great ideas, products and inspiration.
As shown Specialty
Chalkboard Brush-On Paint in Black,
Varathane Triple Thick Polyurethane in
Satin & 3X Wood Stain in Worn Navy
ITEMS
Varathane 3X Premium Wood Stain – Cognac • Latex Gloves
Varathane 3X Premium Wood Stain - Weathered Gray
• Tack Cloth
Varathane Matte Soft Touch Polyurethane
• Drop Cloth
• Piece of Plywood (Cut to Size to Fit Base of Organizer)
• Casters
Various Sized Wooden Crates
• Drill
• Sandpaper (#120, #150, & #180 Grits)
• Screws
• High Quality Synthetic Bristle Brush
• Drill Bits
• Sanding Sponge • Adjustable Wrench
• Lint-Free Rags • Stir Stick
1. PREPARE: Setup your workspace in a well-ventilated area and use a drop cloth to
protect the oor from stain. When staining, always follow the directions on the can to
properly dispose of your rags and brushes.
2. SAND: Sand each crate thoroughly, working your way up through #120, #150, and
#180 grit sandpaper. Wipe away the sanding dust with a tack cloth in between each grit.
Once you’ve nished sanding, use your tack cloth to give the crate one last wipe-down.
3. STAIN: Shake or stir your can of Varathane 3X Premium Wood Stain in Cognac
thoroughly. Then, use your brush or lint-free rag to apply a liberal amount of stain onto
the rst crate. Working in manageable sections, let the stain sit on the wood for a few
minutes, and then wipe it away with a clean rag. Finish staining half of your crates in
Cognac, then repeat this step on the other crates with Varathane 3X Premium Wood
Stain in Weathered Gray. Remember to also stain your piece of plywood. Then, let
everything dry for at least an hour.
HOW TO MAKE A
BATHROOM ORGANIZER WITH CRATES
You can make this chic bathroom organizer for a fraction of what youd pay at a home store!
The bathroom is one place that can always use more storage space. Luckily, this
bathroom organizer has lots of room to store all of your towels, toiletries, and
more. Here’s how you can make it:
continued on next page
HOW TO MAKE A
BATHROOM ORGANIZER WITH CRATES
4. PROTECT: Now that your crates are dry, you can add a protective nish with
Varathane Matte Soft Touch Polyurethane. Stir your polyurethane thoroughly with a
stir stick. Then, use a clean high quality brush to apply a uniform coat to the crates, work-
ing in the direction of the wood grain. Do not over brush. Let the nish dry for two hours
(it should be clear), and then apply a second coat. Let the crates dry for at least 48 hours
before moving to the next step.
5. BUILD: Stack the crates in the desired pattern upside down (so that the base of the
organizer is facing up). Then, secure your crates together one at a time with a drill.
Tip: Its easiest to rst secure the crates together vertically, and then secure the left and
right columns together.
6. FINISH: Now that your crates are secured, place the piece of plywood on top of the
crates (this will be the bottom once theyre ipped right-side up) and secure it to the
crates with a drill. Fasten casters to each of the four corners of the base. Then, ip your
organizer back over and enjoy!
ITEMS
Varathane 3x Premium Wood Stain – Kona
• Lint-Free Cloth
Varathane Spar Urethane
• Drop Cloth
• 5 Dog-Eared Fence Pickets
• Saw
• Sandpaper (#120, #150, & #180 Grits)
• Drop Cloth
• (1) 12” x 12” Square of Luan Wood
• Tack Cloth
• (1) 8” x 8” Square of Luan Wood
• Wood Glue
• High Quality Synthetic Bristle Brush
• Drill & 1” Screws
1. PREPARE: Always work in a well-ventilated area and cover your workspace with a drop cloth to protect it from
drips. Sand your fence pickets with sandpaper, working your way up through #120, #150, and #180 grits. Wipe
away the sanding dust with a tack cloth after each grit of sandpaper.
2. CUT: Use the saw to cut four pickets down to 36” in length. Then, cut your last picket into two pieces, each long
enough to span horizontally across the rst four pickets.
3. STAIN: Stir or shake your Varathane 3x Premium Wood Stain in Kona thoroughly. Then, use your brush or lint-
free cloth to apply a generous amount of stain to the rst picket. Let the stain sit for a few minutes and then wipe
it away with a lint-free cloth. Always apply and wipe away stain in the direction of the wood grain. Repeat this step
on each of the remaining pickets. Let the pickets dry for at least two hours.
4. ATTACH: Next, line up your four 36” pickets side-by-side (vertically). Then, use the drill and screws to attach the
two smaller pickets horizontally to the back of the other four (the rst picket should be 8” from the top, the second
picket should be 8” from the bottom), creating a fence panel.
5. TOPCOAT: To protect your deck art from the elements, you’ll want to add a topcoat of Varathane Spar Urethane.
Stir the urethane thoroughly with a stir stick, then use a brush to apply a thick even coat to the fence panel and
both luan wood squares. Set everything aside to dry for 24 hours.
6. FINISH: Once everything is dry, attach your 12” luan wood square (in diamond orientation) toward the top of
the fence panel with a drill and screws. Next, center the 8” square on top of the 12” square and attach it with wood
glue. Let the glue dry according to its label’s instructions. Then, display your new reclaimed art on your deck and
enjoy!
DIY RECLAIMED
FENCE PANEL DECK ART
Give your deck a touch of character with this reclaimed deck art.
This unique piece of reclaimed art is the perfect way to adorn your deck for the spring. Heres how to get this look
in a few steps.
CRAFTY CRATE
GET YOUR CREATIVE JUICES FLOWING
BEFORE
AFTER
Always thoroughly review directions on the package before using any product.
ITEMS
Drop Cloth
• Gloves
Painter’s Tape
High Quality Synthetic Bristle Brush
Clean Lint Free Rags
Sandpaper (120, 180,
and 220-grit)
Tack Cloth
Varathane 3X Wood Stain
Varathane Triple Thick Polyurethane
Wood Crate
STEPS
1. PREPARE: Always work in a well-ventilated area.
Cover the floor and nearby items with drop cloths.
2. SAND: Sand the surface of the crate lightly,
progressing through 120, 180, and 220-grit
sandpaper. Always sand in the direction of the
grain. Remove sanding dust between each grit of
sandpaper by lightly dragging the tack cloth across
the surface.
3. STAIN: Start with the inside of the crate. Tape off
the outside wood panels. Using a clean, lint-free
rag, generously cover the desired crate areas with
wood stain. Let the stain sit for 3-5 minutes (or as
instructed on the label) then wipe off any excess
using a clean rag. Tip: Wipe in the direction of the
wood grain. Let dry for 1 hour. Remove tape from
outside wood panels. Tape off the wood panels on
the inside of the crate. Following the same steps,
apply stain to the outside panels. Let dry for 1
hour. Remove tape from inside crate.
4. PROTECT:
Protect your crate by applying 1 coat of
Varathane Triple Thick Polyurethane using a high quality
synthetic bristle brush. Allow approximately 2 hours to
dry to touch. Allow 48 hours to cure before moderate
use of project and 7 days for total cure.
Options are endless when it comes to uses for a wooden crate. Use a variety of
Varathane 3X Wood Stain colors to personalize your project.
As shown Varathane 3X Wood Stain in Vintage Aqua, Worn Navy, Rustic Sage,
Bleached Blue and Varathane Triple Thick Satin Polyurethane
Visit www.homedepot.com/rustoleum
for other great ideas, products and inspiration.
STEP STOOL
TRANSFORM YOUR PROJECT FROM DULL TO VIBRANT
BEFORE
AFTER
Always thoroughly review directions on the package before using any product.
In a few simple steps, you can add a pop of color to your home with the newest trendy
colors of Varathane 3X Wood Stain.
As shown Varathane 3X Wood Stain in Vintage Aqua,
Weathered Gray and Varathane Triple Thick Satin Polyurethane
ITEMS
Drop Cloth
• Gloves
Clean Lint Free Rags
High Quality Synthetic Bristle Brush
Sandpaper (120, 180,
and 220-grit)
Tack Cloth
Painter’s Tape
Varathane Triple Thick Satin
Polyurethane
• Varathane 3X Wood Stain
(Vintage Aqua and Weathered
Gray pictured)
Wood Step Stool
STEPS
1. PREPARE: Always work in a well-ventilated area.
Cover the floor and nearby items with drop cloths.
2. SAND: Sand the surface of the stool lightly,
progressing through 120, 180, and 220-grit
sandpaper. Always sand in the direction of the
grain. Remove sanding dust between each grit of
sandpaper by lightly dragging the tack cloth across
the surface.
3. STAIN: Tape off legs of step stool. Using a clean,
lint-free rag, generously cover the stool top
with Vintage Aqua stain. Let the stain sit for 3-5
minutes (or as instructed on the label) then wipe
off any excess stain using a clean rag. Wipe in
the direction of the wood grain. Ensure that all
excess stain is removed from the surface. Remove
tape from legs. Following the same steps, apply
Weathered Gray stain to the legs. Let dry for 1
hour.
4. PROTECT: Protect your step stool by applying 1
coat of Varathane Triple Thick Polyurethane. Allow
approximately 2 hours to dry to touch. Allow 48
hours to cure before moderate use of project and
7 days for total cure
.
Visit www.homedepot.com/rustoleum
for other great ideas, products and inspiration.
TRENDY TRAY
IMPRESS YOUR GUESTS WITH A CHIC SERVING TRAY
BEFORE
AFTER
ITEMS
Drop Cloth
• Gloves
Clean Lint Free Rags
Sandpaper (120, 180,
and 220-grit)
Tack Cloth
Varathane 3X Wood Stain
Varathane Triple Thick
Polyurethane
Wood Tray
High Quality Synthetic Bristle Brush
STEPS
1. PREPARE: Always work in a well-ventilated area.
Cover the floor and nearby items with drop cloths.
2. SAND: Sand the surface of the tray lightly,
progressing through 120, 180, and 220-grit
sandpaper. Always sand in the direction of the
grain. Remove sanding dust between each grit of
sandpaper by lightly dragging the tack cloth across
the surface.
3. STAIN: Using a clean, lint-free rag, generously
cover the tray with wood stain. Let the stain sit for
2-3 minutes (or as instructed on the label) then
wipe off any excess using a clean rag. Tip: Wipe in
the direction of the wood grain. Let dry for 1 hour.
4. PROTECT:
Protect your tray by applying 1 coat of
Varathane Triple Thick Polyurethane using a high quality
synthetic bristle brush. Allow approximately 2 hours to
dry to touch. Allow 48 hours to cure before moderate
use of project and 7 days for total cure.
Trays can be used for serving or as décor. Use the Varathane 3X Wood Stain color of your
choice to create a trend forward piece in a few easy steps.
As shown Varathane 3X Wood Stain in Kona,
and Varathane Triple Thick Semi-Gloss Polyurethane
Always thoroughly review directions on the package before using any product.
Visit www.homedepot.com/rustoleum
for other great ideas, products and inspiration.
WINE RACK
ADD CHIC DÉCOR TO YOUR WINE COLLECTION
BEFORE
AFTER
Always thoroughly review directions on the package before using any product.
All it takes is one coat of stain to create a fabulous display for your bottles. Choose from any
color in the Varathane 3X Wood Stain Palette.
As shown Varathane 3X Wood Stain in Black Cherry,
and Varathane Triple Thick Satin Polyurethane
ITEMS
Drop Cloth
• Gloves
Clean Lint Free Rags
Sandpaper (120, 180,
and 220-grit)
Tack Cloth
Varathane 3X Wood Stain
Varathane Triple Thick
Polyurethane
Wine Rack
High Quality Synthetic Bristle Brush
STEPS
1. PREPARE: Always work in a well-ventilated area.
Cover the floor and nearby items with drop cloths.
2. SAND: Sand the surface of the wine rack
lightly, progressing through 120, 180, and 220-grit
sandpaper. Always sand in the direction of the
grain. Remove sanding dust between each grit of
sandpaper by lightly dragging the tack cloth across
the surface.
3. STAIN: Using a clean, lint-free rag, generously
cover the wine rack with wood stain. Let the stain
sit for 2-3 minutes (or as instructed on the label)
then wipe off any excess using a clean rag. Tip:
Wipe in the direction of the wood grain. Let dry
for 1 hour.
4. PROTECT:
Protect your wine rack by applying 1 coat
of Varathane Triple Thick Polyurethane using a high
quality synthetic bristle brush. Allow approximately 2
hours to dry to touch. Allow 48 hours to cure before
moderate use of project and 7 days for total cure.
Visit www.homedepot.com/rustoleum
for other great ideas, products and inspiration.
VINTAGE COAT HANGER
GIVE YOUR ENTRYWAY STORAGE AND STYLE
BEFORE
AFTER
Organizing has never looked so good. In a few simple steps, give your home a trendy,
vintage feel with the Varathane 3X Wood Stain color of your choice.
Always thoroughly review directions on the package before using any product.
As shown Varathane 3X Wood Stain in Worn Navy,
and Varathane Triple Thick Semi-Gloss Polyurethane
ITEMS
Drop Cloth
• Gloves
Clean Lint Free Rags
Sandpaper (120, 180, and 220-grit)
Tack Cloth
Varathane 3X Wood Stain
Varathane Triple Thick Polyurethane
Wood Coat Hanger
High Quality Synthetic Bristle Brush
STEPS
1. PREPARE: Always work in a well-ventilated area.
Cover the floor and nearby items with drop cloths.
2. SAND: Sand the surface of the coat hanger
lightly, progressing through 120, 180, and 220-grit
sandpaper. Always sand in the direction of the
grain. Remove sanding dust between each grit of
sandpaper by lightly dragging the tack cloth across
the surface.
3. STAIN: Using a clean, lint-free rag, generously
cover the coat hanger with wood stain. Let the
stain sit for 3-5 minutes (or as instructed on the
label) then wipe off any excess using a clean rag.
Tip: Wipe in the direction of the wood grain.
4. DISTRESS:
After stain dries, sand corners and
desired areas to give your project a vintage inspired
look.
5. PROTECT:
Protect your coat hanger by applying
1 coat of Varathane Triple Thick Polyurethane using a
high quality synthetic bristle brush. Allow approximately
2 hours to dry to touch. Allow 48 hours to cure before
moderate use of project and 7 days for total cure.
6. FINISH:
Mount on your wall and enjoy!
Visit www.homedepot.com/rustoleum
for other great ideas, products and inspiration.
3. STAIN: Wipe one coat of Varathane Wood stain all
over the boards with lint-free rag. Wait 2-3 minutes
and wipe excess stain away with a clean rag. Allow
stain to dry for 1 hour. For the best protection, finish
with any Varathane Polyurethane.
4. FINISH: Place boards on top of the stools, leaving
approximately a 1” overhang on each side. Nail
each board to the top of the stool, ensuring boards
fit snugly together to create a flat work surface. For
added storage, you can also create a shelf on the
bottom rungs of the stool using the same technique.
Allow your project to dry overnight before use.
UPCYCLE DESK
CREATE A FUNCTIONAL SPACE WITH A POP OF COLOR
1
3
4
With spray paint, stain and a few simple supplies, you can create a stylish work space in one afternoon. Select
your favorite color of Varathane Wood Stain and Painter’s Touch Ultra Cover 2X spray paint and get started!
ITEMS
Drop cloth
2 stools
4 wood planks at 15”x 4”
Sandpaper (120, 180, and 220-grit)
Varathane Wood Stain
Clean lint-free rags
Painter’s Touch Ultra
Cover 2X spray paint
Finishing nails and
hammer
Varathane Polyurethane
STEPS
1. PREPARE: Always work in a well-ventilated
area. Lightly sand all wood surfaces in the
direction of the grain progressing from 120-grit,
to 180-grit, finishing with 220-grit sandpaper.
Wipe clean with tack cloth, removing all dust.
2. PAINT: Shake can for 1 minute after the ball
begins to rattle. Hold can 10-16” from the
surface and spray in a steady back and forth
motion. For best results, apply 2 or more light
coats a few minutes apart. Allow to dry for 1 hour.
2
As shown Varathane Wood Stain in Kona; Painter’s
Touch Ultra Cover 2X Gloss Berry Pink; Varathane
Soft-Touch Polyurethane Matte Finish
Always thoroughly
review directions on
the package before
using any product.
Visit www.homedepot.com/rustoleum
for other great ideas, products and inspiration.
ITEMS
Drop cloth
Sandpaper (120, 180, and 220-grit)
Wooden board (12” x 36”)
Varathane Wood Stain
Clean lint-free rags
Painter’s tape
Foam roller
Rust-Oleum Chalk Board Paint
Superglue or hardware
• Handles
• Chalk
• Varathane Polyurethane
STEPS
1. PREPARE: Lightly sand all surfaces in the
direction of the grain progressing from
120-grit, to 180-grit, finishing with 220-grit
sandpaper. Wipe clean with tack cloth,
removing all dust.
2. STAIN: Wipe one coat of Varathane Wood
Stain all over the board with lint-free rag. Wait
2-3 minutes and wipe excess stain away with
clean rag. Allow stain to dry for 1 hour.
3. PAINT: Tape off the edges with painter’s tape.
Brush on one coat of Chalkboard Paint. Wait
one hour and apply a second coat. Repeat
process with a third coat.
4. FINISH:
Allow paint to dry for at least 4 hours
before adding handles (securing with glue or
hardware). Then, allow paint to dry for 3 days.
Once dry, condition your surface by rubbing the
side of a piece of chalk over the entire surface and
erasing. For best protection, finish only stained
surfaces with any Varathane Polyurethane.
CHALKBOARD PARTY TRAY
2 31
NOTE YOUR NIBBLES ON A HANDMADE TRAY
Personalize with any Varathane Wood Stain, easy to apply Chalkboard brush paint and
stylish hardware. The perfect gift or addition to your party!
As shown Varathane Wood Stain in Early American,
Rust-Oleum Chalkboard Brush Paint and Varathane Satin Polyurethane.
Always thoroughly review directions on the package before using any product.
Visit www.homedepot.com/rustoleum
for other great ideas, products and inspiration.
  • Page 1 1
  • Page 2 2
  • Page 3 3
  • Page 4 4
  • Page 5 5
  • Page 6 6
  • Page 7 7
  • Page 8 8
  • Page 9 9
  • Page 10 10
  • Page 11 11
  • Page 12 12
  • Page 13 13

Varathane 242174H Operating instructions

Type
Operating instructions

Ask a question and I''ll find the answer in the document

Finding information in a document is now easier with AI