Page is loading ...

3516526A32 Ed. 02
en
AKO-16526A V2
Advanced temperature and electronic expansion
controller for cold room store
User manual

3516526A32 Ed. 02
2
AKO Electromecánica thanks you and congratulates you on the purchase of our product, the development and manufacture of which involved
the most innovative technologies, as well as rigorous production and quality control processes.
Our commitment to achieving customer satisfaction and our continuous efforts to improve day by day are confirmed by the various quality
certificates obtained.
This is a high performance, technologically advanced product. Its operation and the final performance achieved will depend, to a great extent,
on correct planning, installation, configuration and commissioning. Please read this manual carefully before proceeding to install it and respect
the instructions in the manual at all times.
Only qualified personnel may install the product or provide technical support.
This product has been developed for use in the applications described in the manual. AKO Electromecánica does not guarantee its operation in
any use not foreseen in this document and accepts no liability in the case of damage of any type which may result from incorrect use, config-
uration, installation or commissioning.
Complying with and enforcing the regulations applying to installations where our products are destined to be used is the responsibility of the
installer and the customer. AKO Electromecánica accepts no liability for damage which may occur due to failure to comply with these regulations.
Rigorously follow the instructions described in this manual.
In order to extend the lifetime of our products to the maximum, the following points must be observed:
Do not expose electronic equipment to dust, dirt, water, rain, moisture, high temperatures, chemical agents or corrosive substances of
any type.
Do not subject equipment to knocks or vibrations or attempt to handle them in any way differently to that indicated in the manual.
Do not under any circumstances exceed the specifications and limitations indicated in the manual.
Respect the indicated environmental conditions for operation and storage at all times.
During installation and on completion of this, avoid the presence of loose, broken or unprotected cables or cables in poor condition.
These may constitute a risk for the equipment and its users.
AKO Electromecánica reserves the right to make any modification to the documentation and the product without prior notification.
Index Page
Warnings ............................................................................................................................................. 3
Maintenance ........................................................................................................................................ 3
Presentation ......................................................................................................................................... 4
Description ........................................................................................................................................... 5
Installation .......................................................................................................................... 7
Wiring .................................................................................................................................................. 9
Initial configuration ............................................................................................................................. 10
Superheating SET POINT ...................................................................................................................... 11
Assistant ............................................................................................................................................ 11
Operation ............................................................................................................................................ 13
SELFDRIVE mode ................................................................................................................................. 16
Cold regulation ................................................................................................................................... 17
Compressor protection timing .............................................................................................................. 21
Door management .............................................................................................................................. 22
Management of door frame resistor ..................................................................................................... 22
Defrost ................................................................................................................................................ 23
Management of the drainage resistor .................................................................................................. 27
Evaporator fans ................................................................................................................................... 27
Alarms ................................................................................................................................................ 28
Alerts .................................................................................................................................................. 30
Light control ........................................................................................................................................ 31
Password ............................................................................................................................................ 31
Remote Stand-by mode ....................................................................................................................... 31
Operation of the auxiliary relays........................................................................................................... 31
Configuration ...................................................................................................................................... 33
Extended programming menu .............................................................................................................. 34
Parameters .......................................................................................................................................... 35
Connectivity ........................................................................................................................................ 41
Technical specifications........................................................................................................................ 42

3516526A32 Ed. 02
3
Warnings
-If the device is used without adhering to the manufacturer's instructions, the device safety require-
ments could be compromised. Only probes supplied by AKO must be used for the unit to operate
correctly.
-From -40 °C to +20 °C, if the NTC sensor is extended to 1000 m with at least a 0.5 mm2 cable, the maximum
deviation will be 0.25 °C (cable for sensor extension ref. AKO-15586 / AKO-15586H. Earth the cable mesh at
one end only).
-Pt1000 sensors can be extended up to 25m using the AKO-15586/AKO-15586H sensor extension cable.
-The product should be installed in a place protected from vibrations, water and corrosive gases, where the
ambient temperature does not exceed the value indicated in the technical data.
-For the reading to be correct, the sensor should be used in a place without heat influences apart from the tem-
perature you want to measure or control.
- The IP65 protection degree is only valid with the protection cover closed.
- The IP65 protection degree is only valid if the cables enter the device using a tube for electric conductions +
gland with IP65 or above. The gland should be the right size for the diameter of the tube used.
-Do not spray the unit directly with high-pressure hoses, as this could damage it.
IMPORTANT:
- The AUXILIARY relays are programmable, and their operation depends on the configuration.
- The function of the digital inputs depends on the configuration.
- The recommended currents and powers are the maximum working currents and powers.
Maintenance
Clean the surface of the unit with a soft cloth, water and soap.
Do not use abrasive detergents, petrol, alcohol or solvents, as this might damage the unit.

3516526A32 Ed. 02
4
Presentation
The AKO-16526A advanced controller for cold room stores has a SELFDRIVE operating mode that automatically
controls (without parametrisation) the fans and adaptively minimises defrosts to optimise the performance of the
cold room store: maximising time in set point and minimising costs linked to energy consumption and wear of
components.
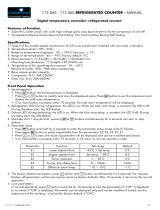
It has an output to regulate the electronic expansion valve. It can be configured so it can control superheating, as
well as adjust the cold in the store.
The different options are:
Temperature control + EEV controlled by PWM
Temperature control + Stepper EEV*
LIQUID
CONTAINER COMPRESSOR
PWM
VALVE
CONDENSER
EVAPORATOR S1
S2
S5S6
FAN
COOL
D1
AUX 1
PARÁMETROS
Tipo de válvula (u00): Válvula PWM (1)
Regulación ventiladores (F10): ON/OFF (0)
Sondas conectadas (I00): Temp. cámara + temp. Evap. (2)
Configuración D1/S3 (I10): Presostato de baja (7)
Configuración D3/S5 (I30): Temperatura superheating (9)
Tipo de sonda S6 (I61): 1, 2, 3 o 4
Relé AUX 1 (o00): Compresor / Res. cárter (1)
* Requires the use of an external driver controlled by a 0-10 V or 4-20 mA signal. For more information on this
option, please see the application note available on our website: 351652632
LIQUID
CONTAINER COMPRESSOR
ELECTRONIC
EXPANSION
VALVE
DRIVER
EEV
CONDENSER
EVAPORATOR S1
S2
S5S6
FAN
AUX 3
AN OUT
D1
AUX 1
ON/OFF
Reg (4-20 mA / 0-10 V)
PARÁMETROS
Tipo de válvula (u00): EEV (Stepper) (2)
Regulación ventiladores (F10): ON / OFF (0)
Sondas conectadas (I00): Temp. cámara + temp. Evap. (2)
Configuración D1/S3 (I10): Presostato de baja (7)
Configuración D3/S5 (I30): Temperatura superheating (9)
Tipo de sonda S6 (I61): 1, 2, 3 o 4
Relé AUX 1 (o00): Compresor / Res. cárter (1)
LIQUID
SOLENOID

3516526A32 Ed. 02
5
21
Constant: Stand-By Mode activated. Regulation
is paused.
Flashing: Controlled stop process for the regu-
lation in progress.
Constant: Cold room door open.
Flashing: The door has been open for a longer
time than defined in parameter A12.
There is an active alarm (No HACCP or temper-
ature).
Constant: HACCP alarm active.
Flashing: HACCP alarm recorded and
unconfirmed To acknowledge an HACCP alarm,
press the key.
The temperature alarm is active.
Constant: Evaporator fans active.
Flashing: The evaporator fans
should be active but something is
preventing them from activating.
Constant: The COOL relay is active.
Flashing: The COOL relay should be active but a
delay or protection is preventing this.
Pulsing: Expansion valve regulated.
Constant: The SELFDRIVE mode is active.
Flashing: An error has been detected in SELF-
DRIVE mode. To view it, press the key.
Constant: Compressor active.
Flashing: The compressor should be active but
a delay or protection is preventing this.
Defrosting active.
Continuous cycle mode active.
Cold room light active.
Alarm in progress muted.
Temperature displayed in ° Fahrenheit / ° cen-
tigrade.
Programming mode active.
Lower display showing the real time superheat-
ing value.
Lower display showing percentage of EEV
opening.
Lower display showing low pressure in psi / bar.
1: Display
2: Keypad
Description

3516526A32 Ed. 02
6
Keypad
Press and hold for 3 seconds to activate/deactivate the Stand-By mode. In this mode, regulation is
paused and the m icon is displayed..
In the programming menu, it exits the parameter without saving changes and returns to the previous
level, or exits programming.
Pressing once without holding displays the temperature of sensor S2 for 10 seconds (if it is enabled).
Pressing it for 3 seconds starts/stops the defrost.
In the programming menu, it allows you to scroll through the different levels, or when setting a
parameter to change its value.
A brief press shows the SELFDRIVE mode errors.
Pressing it for 3 seconds activates/deactivates the continuous cycle mode.
In the programming menu, it allows you to scroll through the different levels, or when setting a
parameter to change its value.
Pressing once without holding activates/deactivates the cold room light.
Pressing it for 3 seconds accesses the condensed programming menu.
Pressing it for 6 seconds accesses the expanded programming menu.
In the programming menu, it accesses the level shown on the display or, during the setting of a
parameter, accepts the new value.
Pressing it once without holding it down displays the current effective value of the temperature Set
Point in the upper display and the superheating set point in the lower display, taking into considera-
tion temporary changes due to other parameters.
When an alarm is in progress, pressing once without holding mutes the acoustic alarm.
Pressing for 3 seconds accesses the temperature Set Point setting.
STAND-BY
If the regulation cannot be stopped immediately due to its configuration, a controlled stop process starts
and the m icon flashes. To stop the controlled stop process and force Stand-by, press the Stand-by key
again for 3 seconds.

3516526A32 Ed. 02
7
Installation
- Remove the bezels (1)
- Make a 1/4 turn of the screws (2) anti-clockwise and
open the door (3).
- Install the necessary glands (4 / 5) by drilling holes in the
points indicated on the box.
- Mark and make the holes in the wall with the aid of the
template included.
- Fix the device to the wall. If it is a brick wall, use the screws and plugs supplied; if the wall is made of sheet
metal (cold room store), use the screws provided without plugs (6).
- Wire the device by following the recommendations indicated on pagepage 9.
- Close the cover (3), tighten the screws (2) and replace the bezels (1).
5
2
1
4
3

3516526A32 Ed. 02
8
Installation of the probes
To achieve maximum performance from the advanced controller, correct installation of the probes is key as they are
responsible for calculating the evaporator’s thermal transfer coefficient, evaluating the start and end of the defrosts
and diagnosing problems in the evaporator.
Material included
• One 4 mm hermetic evaporator probe, 1.5 m of cable.
• Two NTC probes, 1.5 m of cable
• Mounting clips for 10-13 / 14-18 / 19-21 / 22-25 mm coil
Location of the ambient probe
The probe should be located in a place that does not directly receive the flow of cold air from the evaporator. Pref-
erably in its air aspiration area.
Location of the evaporator probe
The probe must be located as near as possible to the inlet of refrigerant from the evaporator (close to the expansion
valve) in the finned area.
In certain evaporators, for example cubic ones, this inlet may be located on the front part of the battery, just behind
the fan.
If defrost is done by electric heat, the probe must be located far away from them and, if possible, in the area of the
evaporator where defrosting is slower, in other words, in the last area to defrost.
If the two conditions are not possible, the best possible compromise must be looked for.
Select the appropriate clip de-
pending on the size of its evap-
orator pipe.
Attach the probe to the pipe
using the clip, making sure that
its end is in direct contact with
the tube.
Bend the fins of both ends of the
probe to increase the fixing and
contact surface.

3516526A32 Ed. 02
9
Wiring
Always disconnect the power supply to do the wiring.
The probes and their cables must NEVER be installed in a conduit together with power, control or power
supply cables.
For disconnection, the power supply circuit must be equipped with at least a 2 A, 230 V switch, located near the
device. The power supply cable shall be of the H05VV-F or NYM 1x16/3 type. The section to be used will depend
on current local regulations, but should never be less than 1.5 mm2.
Cables for relay or contactor outputs should have a section of 2.5 mm2, allow working temperatures equal to or
over 70ºC, and be installed with as little bending as possible.
The 120 / 230 V~ wiring area must be kept clear of any other external element.
The wiring setup depends on the options selected in the set-up wizard (See page 11) and on
the input and output configurations (See page 39).
Check the enclosed schematic and the defined configuration before wiring.
The parameter St (Type of connected probes) affects all probe inputs. Therefore all connected
probes (NTC or Pt1000) must be the same.
IMPORTANT:
• AUXILIARY relays are programmable, and their operation depends on the configuration.
• The function of the digital inputs depends on the configuration.
• The recommended currents and powers are the maximum working currents and powers.

3516526A32 Ed. 02
10
Initial configuration
The AKO-16526 controller can be adapted to different types of installation according to the different options chosen
in the set-up wizard.
Before completing the wiring, make sure you are familiar with the details of the installation in order to configure it
correctly.
It is advisable to note the following points:
Compressor
Whether the controller should switch the compressor on and off (InI= 2, 3, 5, 6, 7 or 8) or whether the compressor
is switched on and off by the low pressure switch (InI=1 or 4).
Defrost
Defrosting method used:
Electric (InI= 1, 2 or 3) Air (evaporator fans) (InI= 4, 5 or 6)
Hot gas valve (Condensing unit) (InI= 7 or 8)
Solenoid/EEV
Type of solenoid/EEV used:
• PWM-controlled EEV (without liquid solenoid) (u00= 1)
• Stepper-controlled EEV (u00= 2). Requires an external controller for the EEV. For more information, please refer
to the application note available on our website.
Options u00= 1 and u00=2 require the use of a superheating temperature sensor (S5) and an evaporator pressure
sensor (S6).
Analogue outputs
The analogue output (ANALOG OUT) enables communication between the controller and the external controller of
the electronic expansion valve (if u00=2) and can be configured as 4-20 mA output (o30=0) or as 0-10 V output
(o30=1).
Consult the specifications of the external controller or drive before setting this option.
SET POINT (temperature)
Make a note of the desired set temperature value.
Type of gas
Type of gas used in the installation.
u02=0 R404A u02=1 R134A u02=2 R407A u02=3 R407F u02=4 R410A u02=5 R450A
u02=6 R513A u02=7 R744 u02=8 R449A u02=9 R290 u02=10 R32 u02=11 R448A
u02=12 R1234ze u02=13 R23 u02=14 R717 u02=15 R407C u02=16 1234yf u02=17 R22
u02=18 R454C u02=19 R455A u02=20 R507A u02=21 R515B u02=22 R452A u02=23 R452B
u02=24 R454A
Pressure sensor type
Type of evaporator pressure sensor installed:
4-20 mA (I61=1) 0-5 V (I61=2) 0.5-4.5 V (I61=3) 0-10 V (I61=4) 1-5 V(I61=5)
Note also the maximum and minimum values of the pressure sensor as well as the units of pressure used (bar or Psi).

3516526A32 Ed. 02
11
Superheating SET POINT
Enter the desired optimum superheating value.
Assistant
The first time the unit receives the power supply, it will enter into ASSISTANT
mode. The display will show the message In{ flashing at 0.
The buttons and change the value, the SET button accepts the
value and moves on to the next step.
Step 1:
Select the most suitable InI option based on the type of installation to be carried out and press SET.
The available options will be shown in the following table:
InI
Type of installation Parameters
Control of
the compressor
Pump
Down Defrost Vent.
Evap. Pd o00o20 I00 I10 I11 I20 I21 d1 D7 F3
0Demo mode: it displays the temperature but does not regulate the temperature
1No No Electric Yes 00*200002000
2Yes Yes Electric Yes 11*271002000
3Yes No Electric Yes 01*200002000
4No No Air Yes 00*100002011
5Yes Yes Air Yes 11*171002011
6Yes No Air Yes 01*100002011
7Yes Yes Hot gas Yes 11*27171520
8Yes No Hot gas Yes 01*20071520
* If u00=2: o20=3
If u00≠2: o20=0
If options 2, 5 or 7 are chosen, check the configuration of parameter I11 according to the pressure switch
type used.
Step 2:
Choose the type of expansion valve to be used:
u00=1 PWM-controlled solenoid valve
u00=2
Electronic expansion valve (Requires an external controller for
the EEV. For more information, please refer to the application
note available on our website)
If u00=2 is chosen, step 3 is not displayed.
1
/
/ SET
2
/
/ SET

3516526A32 Ed. 02
12
Step 3:
Define the type of refrigerant gas used.
u02=0 R404A u02=1 R134A u02=2 R407A
u02=3 R407F u02=4 R410A u02=5 R450A
u02=6 R513A u02=7 R744 u02=8 R449A
u02=9 R290 u02=10 R32 u02=11 R448A
u02=12 R1234ze u02=13 R23 u02=14 R717
u02=15 R407C u02=16 R1234yf u02=17 R22
u02=18 R454C u02=19 R455A u02=20 R507A
u02=21 R515B u02=22 R452A u02=23 R452B
u02=24 R454A
Step 4:
Define the pressure units to be used.
I60=0 Bar
I60=1 Psi
Step 5:
Define the type of pressure sensor used.
I61=0 Deactivated I61=1 4 - 20 mA I61=2 0 - 5 V
I61=3 0.5 - 4.5 V I61=4 0 - 10 V I61=5 1 - 5 V
Step 6:
Define the minimum value of the pressure sensor (I62) (Value at 4 mA, 0 V, 0.5 V
or 1 V according to I61).
Step 7:
Define the maximum value of the pressure sensor (I63) (Value at 20 mA, 5 V, 4.5 V or 10 V according to I61).
Step 8:
Select the analogue output for EEV control.
o30=0 4 - 20 mA
o30=1 0 - 10 V
Step 9:
Select the temperature set point.
3
/
/ SET
4
/
/ SET
5
/
/ SET
8
/
/ SET
9
/
/ SET

3516526A32 Ed. 02
13
Step 11:
Select the superheating set point (See page 18)
Step 12:
Set all other parameters to default?
dFP=0 No, the other parameters do not need to be changed.
dFP=1 Yes, set all other parameters to their default values.
This option only appears if this is not the first time the set-up wizard has been run.
The initial configuration is now complete, and the device will start to regulate the temperature.
The configuration wizard will not reactivate. To reactivate it, activate the stand-by mode (by pressing the
m key for 3 seconds) and wait until the unit completely halts regulation (the m indicator will light up
permanently) and press the , , SET buttons in this order in sequence, not at the same time.
If the Pump Down function is active, there may be a delay between the initiation of the Stand-by function
and the moment the controller stops (See page 19).
Operation
Messages
Pump down malfunction error (Stop). The time configured in parameter C20 has been
exceeded (See page 19). Only displayed on screen.
Pump down malfunction error (Start). The time configured in parameter C19 has been
exceeded (See page 19). Only displayed on screen.
Sensor 1, 2, 3, 4, 5 or 6 is faulty (open circuit, crossed circuit, or value outside
sensor limits). Activates the alarm relay and the audible alarm.
Open door alarm. Only if the door stays open for a longer time than defined in parameter
A12 (See page 29). Activates the alarm relay and the audible alarm.
Maximum temperature in control sensor alarm. The temperature value programmed in A1
has been reached (See page 28). Activates the alarm relay and the audible alarm.
Minimum temperature in control sensor alarm. The temperature value programmed in A2
has been reached (See page 28). Activates the alarm relay and the audible alarm.
External alarm activated (by digital input) (See page 28). Activates the alarm relay and
the audible alarm.
10
/ / SET

3516526A32 Ed. 02
14
Severe external alarm activated (by digital input) (See page 28). Activates the alarm
relay and the audible alarm.
Defrost time-out alert. The time set in d1 has been exceeded (See page 30). Activates
the alarm relay and the audible alarm.
HACCP alarm. The temperature has reached the value of parameter h1 for a longer period
than established in h2 (See page 29). Activates the alarm relay and the audible alarm.
HACCP alarm due to a fault in the electric supply. The temperature set in h1 has been
reached following a fault in the electric supply. Activates the alarm relay and the audible
alarm.
Minimum superheat alarm. The value set in A20 has been reached (See page 29). Acti-
vates the alarm relay and the audible alarm.
Minimum superheat alert. The value defined in A23 has been reached (See page 30).
Only displayed on screen.
Maximum evaporating pressure alarm. The value defined in A26 has been reached (See
page 29). Activates the alarm relay and the audible alarm.
Minimum evaporating pressure alarm. The value defined in A29 has been reached (See
page 29). Activates the alarm relay and the audible alarm.
Indicates that a defrost is being performed (See page 23). Only displayed on screen.
Password request. See parameters b10 and PAS (See page 34). Only displayed on screen.
Shown sequentially with the temperature: The controller is in demo mode,
the configuration has not been made.

3516526A32 Ed. 02
15
Calibration ongoing, therefore, avoid, as far as possible, opening the cold room during the
process. For more information, s(See page 16).
Flashing light with temperature: Configuration has been changed from 1 to 2 evaporators
or vice versa.
Excessive door openings have been detected during calibration and it has not been pos-
sible to calibrate.
Excessive door openings have been detected and the device cannot regulate in SELFDRIVE
mode.
Defrost end error in 1/2 evaporator during the calibration, defrost has not
ended due to temperature.
Error during calibration in 1/2 evaporator. There is not enough difference in
temperature between the cold room probe and the evaporator probe.
It has not been possible to carry out the calibration due to a lack of stability
in the system (Excessive door opening, excessive oscillations in the lower
pressure, etc.).
Error during normal operation (SELFDRIVE Mode active) in 1/2 evaporator.
There is not enough difference in temperature between the cold room probe
and the evaporator probe.
A lack of stability has been detected in the system (Excessive door open-
ing, excessive oscillations in the low pressure, etc.) during normal operation
(SELFDRIVE Mode active).
The persistent lack of stability has led to the deactivation of the SELFDRIVE
mode.
SELFDRIVE mode alert messages (Only shown by pressing the key)

3516526A32 Ed. 02
16
SELFDRIVE mode
If the SELFDRIVE mode is activated (default configuration), the device periodically evaluates the evap-
orator’s heat transfer, managing the available resources to maximise it.
The defrosts are minimised, adapting to the changing conditions of the cold room, reducing heat input
into the refrigerated space, thermal stress in the evaporator and energy consumption.
Operation of the evaporate fans is optimised taking into account the compressor status, evaporate temperature, frost
level, opening of the door, etc.
The control function of the drainage resistor minimises its activation (moments before starting a defrost), thereby
reducing energy consumption.
To achieve correct operation of the SELFDRIVE mode, it is very important for the probes to be correctly installed, as
described on page 8.
Calibration
During the first hours of operation, the device performs two calibrations automatically, during
which the display shows the CAL message.
Calibration may take several hours and include several refrigeration and defrost cycles
.
IMPORTANT:
During the calibration processes, the following should be avoided:
- Opening the cold room door
- Turning the controller off or putting it on stand-by
- Changing controller parameters, including the set point
While the calibration process is active:
- Manual defrost cannot be activated (H key)
- The continuous cycle cannot be activated
- The set point change function cannot be activated
If calibration cannot be performed, or if an important part of the installation is replaced (compressor, evaporator, etc.)
it is advisable to perform a manual calibration.
It is also recommended (not essential) to perform a manual calibration, once the installation has completed its
commissioning, with a load inside it and when its operating temperature has been stabilised, after several days of
operation, in this way calibration is optimal.
In the event of changing the set point or hysteresis, the device performs a calibration again automatically, except if
the set point change is made using the “set point change mode” function (See page 21).
To perform a manual calibration, access the parameter menu (See page 35) and follow this sequence:
• Access parameter b30
• A security code is requested, enter code 63
• Using keys and , select option 1 and press SET

3516526A32 Ed. 02
17
Cold regulation
Solenoid control (COOL Relay)
If u00=0 is selected in the wizard, coolant
production is regulated by opening/closing the solenoid
valve, which sends liquid to the thermostatic expansion
valve.
If u00=1 is selected in the wizard, coolant
production is regulated by controlling the opening and
closing of the expansion valve (PWM control).
If u00=2 is selected in the wizard, coolant
production is regulated by controlling the opening degree of the expansion valve (stepper control). For more
information on this type of regulation, please consult the application note available on our website.
When the temperature in sensor S1 reaches the set point value (SP) plus the sensor differential (C1), coolant
production is activated and the temperature drops. Once the set point (SP) value is reached, the solenoid closes.
Compressor control (Relay AUX 1)
With Pump Down (Inl: 2, 5, 7)
Requires the connection of a low pressure switch in digital input 1.
When the temperature in sensor S1 reaches the set point (SP) value plus the sensor’s differential (C1), the solenoid
opens, causing the pressure in the evaporator to increase and, therefore, the low pressure switch deactivates and
the compressor starts up.
Once the set point (SP) value is reached, the solenoid closes, causing the pressure in the evaporator to decrease,
triggering the low pressure switch and stopping the compressor.
For further details of the process, see the next page.
Without Pump Down (Inl: 3, 6, 8)
The compressor operates simultaneously with the solenoid valve, starting up when the latter opens and stopping
when it closes.
Operation in the event of a fault in sensor S1
If sensor S1 fails (fault, disconnection, etc. ), compressor behaviour will depend on parameter C6, with one of 3
options available:
C6=0: The compressor is stopped until sensor S1 begins to operate again.
C6=1: The compressor is started-up until sensor S1 begins to operate again
C6=2: The compressor operates in line with the average operation during the 24 hours prior to the error, taking
into account the number of start-ups and stops and the average time in each state (stop-start). If 24 hours have
not elapsed without a sensor error, the device moves to C6=3 mode.
C6=3: The compressor operates according to the times programmed in C7 (ON) and C8 (OFF).
Solenoid
SP+C1
SP
S1
ON
Compressor
C7 C7C8
ON ON

3516526A32 Ed. 02
18
Control of superheating
Superheating (SH) is the temperature difference between the temperature at the evaporator outlet and the evaporat-
ing temperature. To obtain the SH value, sensors S5 (evaporator outlet temperature) and S6 (pressure sensor) are re-
quired. The pressure is converted to temperature according to the refrigerant gas used, so that the SH is obtained as:
SH (K) = Temperature S5 - Temperature S6
A low superheat allows for better evaporator efficiency, but too low a value may cause liquid to enter the compres-
sors because the liquid in the evaporator is not completely evaporated.
The AKO-16526 provides stable superheat regulation and a fast response to pressure or load fluctuations, thus
ensuring a high level of system safety.
When the EEV is regulating, the cold icon on the display performs a dimming sequence, indicating that
the expansion regulation is electronic and is therefore constantly being adjusted.
The superheat value is shown on the bottom line of the display by default. Parameter b23 defines which
value is displayed on that line.
When there is no cooling required, the superheat value is not updated, as the regulation is stopped.
When the controller does not generate coolant, the display shows the last superheat value reached
before cooling was required, for the user's information.
IMPORTANT
Install sensors S5 and S6 at the evaporator outlet.
The parameters must be set correctly in the set-up wizard to ensure correct regulation of superheating.
Incorrect configuration can lead to problems in the refrigeration system.
Manual opening of the EEV valve
Using parameter U11, a fixed opening value can be set for the EEV valve. The equipment will perform ON/OFF cycles
according to U03 but always in line with the selected opening percentage.
This function should only be used by qualified personnel and in exceptional circumstances.
• Access parameter U11; the equipment will request a security code.
• Enter code 63
• Enter the opening percentage and press SET
The equipment will not readjust the valve opening until U11=0 is configured again (man-
ual opening disabled).
The valve will remain closed while there is no cold demand.

3516526A32 Ed. 02
19
Pump down function
This function foresees problems in the compressor caused by movements of coolant, using a stop/start technique for
the installation, controlled via the liquid solenoid, the low pressure switch and the compressor itself.
This function is only available for Inl 2, 5, and 7 and requires the connection of a low pressure switch in digital input
1. (I10=7)
STOP
When the temperature in sensor S1 reaches the set point (SP) value, the COOL relay deactivates, closing the solenoid
valve.
Because the compressor continues to operate, pressure in the evaporator quickly drops. Upon reaching a given value,
the low pressure switch activates, changing the status of digital input 1, which stops the compressor (relay AUX 1).
This manoeuvre isolates all of the coolant in the high-pressure line, far from the compressor crankcase, preventing
serious faults upon start-up.
Should the low pressure switch fail, the controller stops the compressor once the safety interval defined in C20 has
elapsed, displaying the message “Pd” (an informative message that does not affect the unit's operation).
If C20 time is 0 (default value), the compressor will not stop until the low pressure switch is activated, but it will
display the “Pd” message after 15 minutes.
START
When the temperature in sensor S1 reaches the set point value plus the differential (SP+C1), the COOL relay acti-
vates, opening the liquid solenoid. This increases the pressure in the evaporator, deactivating the low pressure switch,
which turns the compressor on.
If, some time (determined by C19) after the liquid solenoid is opened (COOL relay set to ON), the low pressure switch
does not deactivate, the controller will once again close the solenoid (COOL relay set to OFF) and the “LP” message
will be displayed. This manoeuvre will be repeated every 2 minutes, indefinitely, until the pressure switch is deacti-
vated and the installation reverts to its normal operation.
If C19 time is 0 (default value), the solenoid will remain open until the low pressure switch deactivates, but it will
display the “LP” message after 5 minutes.
STAND-BY
If the pump down function is active, there may be a delay between starting the stand-by function and the
controller stopping; this is because certain installation control phases cannot be interrupted.
To force the stop of the controller, press the Stand-by key again for 3 seconds.
Liquid solenoid
Pressure switch failure
Pressure switch failure
C19C20
SP SPSP+C1 SP+C1
ON
COOL
D1
AUX 1
OFF
ON
OFF
ON
OFF
Low pressure
switch
Pressure in
evaporator
Compressor

3516526A32 Ed. 02
20
Regulation of cold with two temperature probes (S1 + S3)
This requires configuration of input D2/S4 as a second cold room store temperature probe (l120=10).
The device regulates the temperature of the cold room store taking into account the reading of both probes. Using
parameter C25, the influence of probe S3 is determined in the settings.
Examples: C25=0 (S1: 100% S3: 0%) C25=75 (S1: 25% S3: 75%)
C25=60 (S1: 40% S3: 60%) C25=95 (S1: 5% S3: 95%)
This mode is particularly useful in large volume cold room stores, where there may be significant variations of
temperature.
In the event of an error in probe 3 (E3), the controller only uses the reading of probe 1. If both probes break down
(E1 + E3), the controller acts according to parameter C6.
Continuous cycle mode
This is used to quickly cool the cold room stores before
products are loaded and is activated by pressing the
key for 3 seconds.
Upon activating this mode, the compressor begins to
operate until the temperature in sensor S1 reaches the
set point value, minus the variation indicated in param-
eter C10. The value of C10 is always negative, unless
it is 0.
The unit will immediately return to normal operation.
Should it not be possible to reach this point, the de-
vice will return to normal operation once the time con-
figured in C9 has elapsed, or by pressing the key
again for 5 seconds.
Calibration of sensor 1
Parameter C0 allows for correction of the temperature detected by sensor 1; this is particularly useful when the
sensor cannot be located in the ideal place.
Set Point locking
Parameters C2 and C3 allow for an upper and lower limit to be established for the set point (SP), to protect the
product or installation from Set Point manipulation.
Product temperature
This function allows using a temperature probe to display the product temperature.
To activate it, input 2 must be configured as “Product temperature” (I20=11), and the display of all the probes
activated sequentially (C21=0).
Solenoid ON
SP+C1
S1
SP
SP+C10
ON
/