
NTS-pico
Miniature NTP Time Server for Small Networks

Table of Contents
Introduction ................................................................................................................................ 3
Safety instructions ................................................................................................................................ 3
What is NTS-pico? ................................................................................................................................. 3
Installation .................................................................................................................................. 4
Hardware ............................................................................................................................................. 4
General presentation ............................................................................................................................ 4
Antenna Mounting ...................................................................................................................... 6
Additional lightning protection considerations ...................................................................................... 7
Powering up ...............................................................................................................................10
Basic SETUP ................................................................................................................................10
IP addressing ...................................................................................................................................... 10
Monitoring GNSS satellite signals ON-LINE ..................................................................................12
Running NTP (Network Time Protocol) ........................................................................................13
Configuring NTP .................................................................................................................................. 13
Monitoring NTP on-line ...................................................................................................................... 14
Synchronizing Microsoft Windows clcok .............................................................................................. 15
Synchronizing Linux & Mac OSX clock .................................................................................................. 15
Running PTP (Precision Time Protocol) ........................................................................................16
APPENDIX ...................................................................................................................................18
Technical Specification ................................................................................................................18
GNSS Antenna .................................................................................................................................... 18

Introduction
Safety instructions
Except external power supply (230VAC), this equipment contains DC (3-12VDC) voltages.
Do not handle any metallic part until the 230VAC power supply has been disconnected! Do
not assemble, disassemble set when the power reminds switched ON. Making wiring and
touching cables is strongly prohibited when power is ON. Never work alone under hazardous
voltage conditions. Always check that the power cord(s), plug(s), and sockets are in good
conditions. Always use qualified service personnel to install permanently wired equipment
and surge antenna arrestors.
What is NTS-pico?
NTS-pico is a complete, stand-alone, miniature NTP Time Server. Optionally it supports PTP
too. It works in Ethernet TCP/IP environment. It has been designed to provide a stable UTC
(Coordinated Universal Time) synchronization, which possesses the long-term stability of
GNSS (Global Navigation Satellite System) to small industrial local networks up to 10 PC.
The standard synchronization accuracy is level of hundreds of millisecond [ms] for LAN and
it is sub-tens of second [s] for Internet. Therefore, NTS-pico is not time instrument and should
not be use at scientific, laboratory or advanced IT synchronization environments.
NTS-pico id dedicated for up 10 pcs networks
The NTS-pico GNSS receiver is designed for automatic operation without the need for user
intervention. It can however, be accessed via a serial port (rs232 or USB) for configuration
and debug purposes. If the satellite signal is interrupted, the NTS-pico enters a FREE RUN
mode. NTS-pico is not including internal OSC and therefore it is not supporting HOLDOVER
mode. When the GNSS signal is restored, the GNSS receiver automatically reverts to normal
operation mode. For this reason, it is important to continuously trace the performance of
GNSS signals and synchronization process. Following synchronization Ethernet protocols are
supported:
• NTP Network Time Protocol (rfc5905)
• SNTP Simple NTP (rfc 4330)
• PTP Precision Time Protocol IEEE1588:2008 /extra option/
Referential UTC is drawn from GPS & Glonass via built-in Telit GNSS receiver, using
NMEA183 frame. NTS-pico does not support 1PPS frequency reference.

Installation
Hardware
The NTS-pico box on arrive includes:
1. NTS-pico miniature time server (pcs 1)
2. Power supply 12VDC/230VAC (pcs 1)
3. Indoor GSM antenna (pcs 1)
4. Outdoor active GPS antenna w/ 30m coax H-155 and accessories (pcs 1)
Options (not included in standard set):
5. Ethernet cable 1m RJ45/RJ45 (pcs 1)
6. RS232 cable 1m DB-9/RJ45 (pcs 1)
7. CD with PDF manual (pcs 1)
NTS-pico set
Note! Set does not include antenna mast, but antenna can be mounted directly using
attached accessories: claps, bracket, nuts etc. - they are included.
General presentation
NTS-pico includes:
• 1x GPS (SMA)
• 1x Pwr (VDC)
• 1x LAN (RJ45)
• 1x RS232 (RJ45)
• 1x USB
• 1x GSM (SMA)
• 1x SIM socket

NTS-picture view
Special version of NTS-pico can include extra:
• 1x Wi-Fi(SMA)
• 1x SIM socket #2
• 1x CAN-bus I/O
antenna mounting accessories

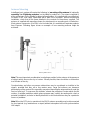
Antenna Mounting
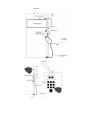
Installing a basic system will require the following (a) mounting of the antenna (b) optionally
mounting 1 or 2 lightning arrestors (not included to product set). The antenna supplied is
of the active type, and is suitable for almost all applications. It is supplied with a pre-attached,
30-meter H-155 coax cable, terminated with a male SMA connector. Before commencing
installation, check that all the items detailed in the contents list have been supplied. The
antenna is supplied with mounting clamps for attachment to a mounting pole, included too.
Mast antenna suspension (H=0.5m) is not included but it is available as separate products
from Elproma. Following figure shows an example of how mounting antenna might be
achieved.
Mounting GNSS antenna
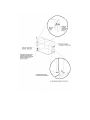
Note! The most important consideration in selecting a position for the antenna is the presence
of objects which obscure the sky or horizon. Where possible, there should be no obstruction
to a full view of the sky.
Overhead wires and other very narrow obstructions may be considered as invisible to the
signals, provided that they are a few meters away. Large flat surfaces can decrease
performance of the receiver. Be especially wary about mounting the antenna directly onto the
fascia of a flat roof. To overcome this situation, elevate the pole about 1 meter above the flat
surface. A satellite prediction mobile phone program may usefully be employed to check a
potential installation, and also to identify directions in which obstructions may be a particular
source of problems.
Note! When the NTS-pico is operational, the GNSS antenna assembly may be disconnected
for short periods (e.g. maintenance or repair) without interruption to the unit synchronization
LAN output.

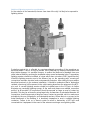
Additional lightning protection considerations
As the antenna is roof mounted (to have a clear view of the sky) it is likely to be exposed to
lightning strikes.
Protection against this is afforded by ensuring adequate grounding of the mountings as
described below. There is no way to provide 100% protection for electronic equipment from
direct strike damage. It is possible however, to reduce the likelihood of damage from near
strike induced fields by ensuring the installation obeys some fundamental rules. A proprietary
lightning arrestor should be installed, of a type which does not reduce GNSS signal transfer.
Install the lightning arrestor near to the antenna (e.g. on the mounting pole), ensuring all
connections maintain electrical and environmental protection. After taking the precautions
described previously in the antenna installation, it should be understood that a destructive
residual current may still be present in the cable coming down from the antenna to the NTS-
pico unit. A second lightning arrestor should be installed near to the NTS-pico to further
dissipate any remaining lightning energy. At the earth end please use multiple connection
points if at all possible. All connections should incorporate as large an area of contact as
possible. This may be achieved by using large bolts, and washers of substantial diameter. All
connections should incorporate as large an area of contact as possible, which is made more
probable by the use of large bolts, and substantial washers. Where there is no access to the
metal framework of the building, it is absolutely imperative to erect a suitable lightning
conductor. Failure to do so is almost certain to result in destruction of NTS-pico and
connected into it equipment in the event of the antenna receiving a near lightning strike.

Grounding system

NTS-pico surge protection

Powering up
1. Connect GNSS antenna to SMA connector at NTS-pico
2. Connect Ethernet LAN cable to RJ45 connector
3. Plug-in DC power supply to power input and turn power ON
Basic SETUP
Go to your web browser and put IP address 192.168.1.234/255.255.255.0.
You will be asked for username and password. By defaults are:
Username: admin
Password: 12345
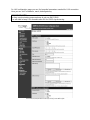
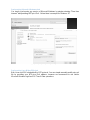
IP addressing
Minimum configuration requires setup IPv4

On LAN configuration page you can find essential parameters needed for LAN connection.
Here you can set IPv4 address, mask, default gateway.
IMPORTANT NOTE!
For time synchronization purpose please do not use DHCP/DNS.
You will need to keep SSH communication ON for GNSS signals tracing.
SSH enable (ON) and password is necessary for tracing on-line GNSS signals

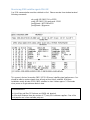
Monitoring GNSS satellite signals ON-LINE
You SSH communication must be switched on first. Please execute from window terminal
following commands:
ssh [email protected] -p 65535
[email protected]'s password: 12345
[root@rbmtx ~]# TERM=vt220
[root@rbmtx ~]# gpsmon
GPSmon tool let you trace satellite signals on-line
This screen is the tool to monitor GNSS (GPS & Glonass) satellite signal performance. You
should be able to receive signals from at least not less than 4 satellites. Well done
installation mostly let view 10-20 GNSS satellites in view. It takes approx. 5-10 minutes
since power on to get minimum #sats in view.
Recommendation!
For Linux/Unix and Mac OSX please use BASH std. terminal.
For Microsoft Windows there are various of 3
rd
party SSH software suppliers. One of the
most popular one is free available putty.exe

Running NTP (Network Time Protocol)
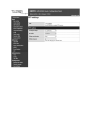
Configuring NTP
To start operate NTS-pico as NTP server, just simple run web setup again, and select in Time
menu option NTP Peer 1 preferred server to be set (ON). In addition, please provide any
random (not used by any other device) IPv4 address that corresponds to NTS-pico IP class
of IPv4 address. Please note, NTS-pico requires to fill this IPv4 data field in to start acting
NTP server. Once all is done you are ready to use NTS-pico Time Server with NTP.

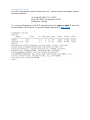
Monitoring NTP on-line
You SSH communication must be switched on first. Please execute from window terminal
following commands:
ssh [email protected] -p 65535
[email protected]'s password: 12345
[root@rbmtx ~]# ntpq
You can use full spectrum of std. NTP monitoring tools incl. ntpq and ntpdc to trace and
monitor Network Time Protocol. For more information please ref. to www.ntp.org
ntpq debugging tool for NTP

Synchronizing Microsoft Windows clcok
You simply synchronize any version of Microsoft Windows by simple selecting “Time from
Internet” and providing NTP-pico IPv4 . Below there is example for Windows 10.
Using NTS-pico as primary source of NTP time for Microsoft Windows
Synchronizing Linux & Mac OSX clock
Both Linux and OSX included built-in NTP protocol. You can simple manually modify ntp.conf
file by providing your NTS-pico IPv4 address, however we recommend to use similar
Microsoft Windows high level OS Time & Date operations.

Running PTP (Precision Time Protocol)
PTP settings:
• PTP Enabled
Enables PTP grandmaster daemon
• PTP options:
• Transport layer
• L2 (Ethernet): PTP packets are encapsulated directly in Ethernet
frames (IEEE 802.3 network transport)
• L4 (UDP): PTP packets are exchanged over UDP/IPv4
• IP mode
The option available for L4 (UDP) transport layer only.
• multicast (default)
• unicast
• hybrid mode
Multicast for SYNC and announce packets, unicast for delay request and response packets.
• Delay mechanizm
• E2E (default)
Delay is measured end-to-end. Delay is calculated for the whole path:
grandmaster/master/boundary clock - transparent clocks - slave ordinary clock (GM/MC/BC
- TC - OC/SC).
• P2P
Delay is measured peer-to-peer. If transparent clocks are present in a network they need to
support peer-delay mechanizm (and be configured to enable it).
• SYNC interval (default 1)
SYNC packet interval value must be in range -7....7 (recommended limits are -3...3).
• -4: 62.5ms (1/16 s)
• -3: 125ms (1/8 s)
• -2: 250ms (1/4 s)
• -1: 0.5s (1/2 s)
• 0: 1 second (typical interval)
• 1: 2 seconds (default)
• 2: 4 seconds
• 3: 8 seconds
• 4: 16 seconds


APPENDIX
Technical Specification
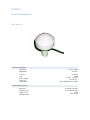
GNSS Antenna
E
l
e
c
t
r
i
c
a
l
p
r
o
p
e
r
t
i
e
s
F
r
e
qu
e
n
c
y
1575.42
M
H
z
I
m
p
e
d
a
n
c
e
50
O
h
m
V.S.W.R
<2.0
M
a
x
Gain
38
d
B
Power
s
upp
l
y
3-5VDC (10
m
A
)
Noise fig.
<1.5 dB
T
y
p.
P
o
l
a
r
i
s
a
t
i
o
n
RHC
(Right Hand
C
i
rc
u
l
a
r
)
M
e
c
h
a
n
i
c
a
l
p
r
o
p
e
r
t
i
e
s
Dimensions H=120mm (
=10mm)
A
n
t
e
nn
a
type
A
c
t
i
v
e
M
a
r
i
n
e
G
P
S
C
a
b
l
e
c
o
v
e
r
A
n
t
e
nn
a
c
a
b
l
e
b
l
a
c
k
30m H-155

-
 1
1
-
 2
2
-
 3
3
-
 4
4
-
 5
5
-
 6
6
-
 7
7
-
 8
8
-
 9
9
-
 10
10
-
 11
11
-
 12
12
-
 13
13
-
 14
14
-
 15
15
-
 16
16
-
 17
17
-
 18
18
-
 19
19


Ask a question and I''ll find the answer in the document
Finding information in a document is now easier with AI
Other documents
-
Disc Makers How can I install the drivers for my PICO? User manual
-
 Precision Plumbing Products SC-750B Installation guide
-
Meinberg IMS LANTIME M1000S User manual
-
Meinberg LANTIME M600 User manual
-
-
 Omicron Lab OTMC 100 User manual
-
-
Microsemi SyncServer S600 User manual
-
 Orolia NetClock 9400 Series Time Server User manual
-
 Orolia SecureSync 2400 Time and Frequency Synchronization System User manual


