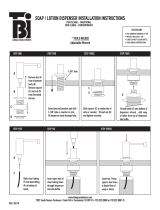
FILTRATION FAUCET INSTALLATION INSTRUCTIONS
ITEM C2100
ITEM C2200
ITEM C2400
ITEM H2100
ITEM H2200
ITEM H2400
ITEM HC2100
ITEM HC2200
ITEM HC2400
SHUT OFF WATER SUPPLY
BEFORE INSTALLATION
Drill 3/4” to 1” in diameter hole in
countertop. Maximum counter
thickness is 2”
Center the base plate with built-in
O-ring over the mounting hole on
the top of the countertop. Center the
faucet body on the base plate.
If desired, apply a thin bead of silicone
seal under the base plate for added
sealing.
DO NOT USE PLUMBERS’ PUTTY
Place faucet handle in desired position.
Fasten the faucet from under the
countertop, sliding large rubber wash-
er, then metal washer, then smaller
rubber washer, then 5/8” diameter
serrated lock washer on the faucet
stem, and secure with the lock nut so
the faucet does not move/spin.
DO NOT OVER TIGHTEN
COLD ONLY FILTRATION FAUCET W/ FILTRATION SYSTEM
ITEMS: C2100, C2200, C2400
1 2 3
www.btiaquasolutions.com • 7022 S. Revere Parkway Suite 240 • Centennial, CO 80112 • 720.322.0800 (o) 720.322.0801 (f)
9-1/2”
7-1/2”
5-3/8”
3-1/4”
2-1/8”
9-1/2”
7-1/2”
5-3/8”
6-1/2”
2-1/8”
9-11/16”
4”
2-3/4”
2-1/8”
6-1/4”
3-1/4”
4-1/4”
9-11/16”
4”
2-3/4”
2-1/8”
6-1/4”
6-5/8”
9-3/4”
2-1/8”
2-3/4”
4”
6-3/4”
9-3/4”
2-1/8”
5-1/2”
4”
6-3/4”
C2100 / H2100 HC2100 C2200 / H2200 HC2200 C2400 / H2400 HC2400
REV. 11/19/18
TOOLS REQUIRED
ADJUSTABLE WRENCH • DRILL • PLUMBERS’ TAPE
PHILLIPS HEAD SCREWDRIVER
Faucet Stem
Base Plate
Rubber Washer
Metal Washer
Lock Washer
Lock Nut
Tube Insert
Ferrule
Compression Nut
1/4” Water Inlet
Tubing
(supplied
with BTI Filtration
System FL1000)
Rubber Washer

FILTRATION FAUCET INSTALLATION INSTRUCTIONS, page 2 of 4
TIGHTEN SECURELY WITH WRENCH.
COLD ONLY FILTRATION FAUCET W/ FILTRATION SYSTEM
ITEMS: C2100, C2200, C2400
Once a clean flow of water is achieved, check for leaks, ESPECIALLY at the water supply and connection points. If leak(s) are
present, shut off the water supply, repair the leak and re-test the system as previously described.
4
Slide the metal 1/4” compression nut
over the supply tubing (provided with
the filtration system). Next, place the
plastic ferrule (large end first) over
the supply tubing into the compres-
sion nut.
If you are using the BTI Filtration
System ITEM FL1000, you have ample
tubing to connect to the faucet and
still leave 4"-6” of extra tubing before
the connection point.
5
Place the 1/2” long plastic insert into
the end of the tubing and tighten the
compression nut on the faucet stem.
6
* COMPLETE FILTRATION SYSTEM
INSTALLATION USING INSTALLATION
GUIDE INCLUDED WITH YOUR SPECIFIC
BRAND OF FILTRATION SYSTEM.
Then, open the handle on the filtration
faucet and turn on the water supply.
Allow the water to run for 1-2 minutes
to clear any debris that might be present
in the water line.
7
FILTRATION SYSTEM INSTALLATION WITH BTI AQUA-SOLUTIONS HOT/COLD FILTRATION FAUCET
ITEMS: HC2100, HC2200, HC2400
A
B
C
D
E
F
F
G
(A) FILTRATION FAUCET
(B) BTI FILTRATION SYSTEM-FL1000
(C) LINE/HOSE TO KITCHEN FAUCET
(D) ANGLE SHUT-OFF VALVE (supplied)
(E)
COLD-WATER SUPPLY SHUT-OFF VALVE
(F) 1/4” O.D. TUBING (supplied)
(G) 3/8” / 1/4” ADAPTER (supplied w/faucet)
Install angle shut-off valve (D) supplied with BTI
Filtration System.
Shut-off cold-water supply (E). Disconnect line/
hose (C) to kitchen faucet from cold-water
supply shut-off valve (E).
Connect angle shut-off valve (D) to cold-water
supply shut-off valve (E). Connect line/hose from
kitchen faucet (C) to angle shut-off valve (D).
Cut the 1/4” O.D. inlet/outlet tubing (supplied) to
the correct lengths, ensuring the cut ends are
square and clean.
Push one end of tubing (F) into angle shut-off
valve (D). Push other end of tubing into
“L-Fitting”, pre-installed in the “inlet” on top
of filter.
Connect 3/8” Female-Side of adapter (G)
(supplied) to braided blue label
cold-water in hose. Push one end of tubing
(F) into 1/4” Push-Fit Side of adapter (G).
Push other end of tubing (F) into “outlet”
connector on top of filter.
To remove a tube, push down on the collet
while pulling on the tube.
Turn on the water supply and check for
leaks. Flush at least one gallon of water
through the system before use.
Write the installation and filter change
dates on the label for future reference.

FILTRATION FAUCET INSTALLATION INSTRUCTIONS, page 3 of 4
Drill 1-3/8” hole in countertop.
(Maximum counter thickness is 2”)
Center the base plate with built-in
O-ring over the mounting hole on
the top of the countertop. Center the
faucet body on the base plate.
If desired, apply a thin bead of silicone
seal under the base plate for added
sealing.
DO NOT USE PLUMBERS’ PUTTY
For Hot Only Faucet: Place faucet
handle in desired position.
Fasten the faucet from under the
countertop by rst sliding the rubber
washer, then the metal washer onto
the faucet stem.
Make sure to place the 3 screws on
the metal washer through the match-
ing holes of the rubber washer and
slide both washers up to the bottom of
the countertop.
HOT ONLY and HOT/COLD FILTRATION FAUCET W/ BTI AQUA-SOLUTIONS DIGITAL INSTANT HOT WATER DISPENSER
ITEMS: H2100, H2200, H2400, HC2100, HC2200, HC2400, HT4105
1
2
3
Hoses are attached to faucet body as
shown in diagram.
A - Blue Label Cold Water-In Hose
B - Faucet Stem
C - Hot Only Faucet, Hot Handle
D - Black Label Pressure Tank Hose
E - Hot & Cold Faucet, Cold Handle
F - Blue Label Cold Water-In Hose
G - Faucet Stem
H - Black Label Pressure Tank Hose
I - Hot & Cold Faucet, Hot Handle
A
C
D
E
F
G
H
I
B
4
Place a metal pinch-clamp on one
end of the clear hose and attach the
clear hose to faucet stem end.
Secure with pinch-clamp.
5
Attach the braided blue label cold-
water-in hose to cold-water supply
line.
Use plumbers’ tape on the outside
threads to provide a good seal.
6
Thread the mounting nut to the top
of the faucet stem and hand tighten.
Once the faucet is secure, tighten the
3 screws against the underside of the
countertop. This will prevent the faucet
from moving/spinning.
7

FILTRATION FAUCET INSTALLATION INSTRUCTIONS, page 4 of 4
Attach the braided black label
pressure tank hose to the blue
cold-water inlet on the dispenser.
Screw the tapered adapter onto the
red hot-water outlet. Use plumbers’
tape on the outside threads of the
outlet for a good seal.
Make sure that all lines are as straight
as possible and not kinked, as this
may adversely affect the performance
of the dispenser.
HOT ONLY and HOT/COLD FILTRATION FAUCET W/ BTI AQUA-SOLUTIONS DIGITAL INSTANT HOT WATER DISPENSER
ITEMS: H2100, H2200, H2400, HC2100, HC2200, HC2400, HT4105
8
Place the remaining metal pinch-
clamp on the open end of the clear
hose. Push the clear hose onto the
tapered adapter previously installed
on the red hot-water outlet. Secure
with pinch-clamp.
9 10
Turn on the water supply and check for
leak(s), ESPECIALLY at the water supply
and connection points. If leak(s) are
present, shut off the water supply, repair
the leak and re-test the system as
described.
Open the hot handle of the faucet and
turn on the water supply. Water will ow
from the faucet when the dispenser is
full.
ENJOY YOUR BTI FIL
TRATION
FAUCET AND DIGITAL INSTANT HOT WATER
DISPENSER!
www.btiaquasolutions.com • 7022 S. Revere Parkway Suite 240 • Centennial, CO 80112 • 720.322.0800 (o) 720.322.0801 (f)
FILTRATION FAUCET PRODUCT WARRANTY
BTI Aqua-Solutions provides warranties against functional and nish defects in material or workmanship for all Filtration Faucets, to the
original purchaser, in residential applications. Filtration Faucets are warrantied for FIVE YEARS for functional defects, for SEVEN YEARS for
Brushed Nickel and Polished Nickel nish defects, and LIFETIME for Chrome nish defects.
To le a warranty claim for a functional or nish defect, a dated receipt of purchase of the product from an Authorized BTI Dealer must accom-
pany the warranty request. To submit a warranty claim, contact: [email protected]
Improper installation, the failure to perform proper maintenance, or uses for which the products were not designed are not warrantied. The
warranty will be void if the nish has been improperly cared for due to lack of cleaning or cleaning with improper cleaning materials which
result in damage. BTI Aqua-Solutions has no liability for indirect or consequential damages to its products. The nish warranty is for normal
wear and tear of the nished surface.
BTI Aqua-Solutions will repair or replace, at its option, any of the products listed above that BTI has determined to have a manufacturing de-
fect. BTI Aqua-Solutions is not responsible for any installation or labor charges and will not pay for any repair cost performed on its products
without prior written consent by a BTI Aqua-Solutions authorized representative.
CARE INSTRUCTIONS FOR CHROME, BRUSHED NICKEL AND POLISHED NICKEL FINISHES
IMPORTANT: It is the customer’s responsibility to check for any material nish defects BEFORE installation.
The best general maintenance is regular cleaning. Even though these nishes are considered durable, you CAN NEVER use any abrasive type
cleaners, sponges, cloths or pads to clean the xture. Always try to keep the nish clean and dry. Trapped moisture on the surface of the nish
can lead to staining. Astringent cleaners, chlorine, bleach, along with acidic based organic cleansers are potentially harmful to these nishes.
RECOMMENDED MAINTENANCE: Do not allow water spots to dry on the xture. Keep the surface dry and clean after use. All products should
be cleaned with a damp, clean, soft cloth and mild, nonabrasive soap to remove surface spots. Be gentle in your cleaning method. NEVER use
cleaners that contain bleach, abrasives or vinegar. NEVER use any type of abrasive sponge or pad.
/