En
3
Before start
Before start
What’s in the box
! USB cable
! Warranty (for some regions)
! Operating Instructions (Quick Start Guide)
! rekordbox dj license key card
Only for the product in the European region.
— For the North American region, the corresponding information is
provided on the last page of both the English and French versions
of the “Operating Instructions (Quick Start Guide).”
— For the Japanese region, the corresponding information is
provided on the back cover of the “Operating Instructions (Quick
Start Guide).”
Note
Please keep the license key because it cannot be provided again.
Viewing “rekordbox Introduction”
“rekordbox Introduction” explains through setting up rekordbox.
1 Launch a web browser on the PC/Mac and access
the “rekordbox.com”.
2 Click [Manual] under [Support].
3 Click a language of “rekordbox Introduction.”
About rekordbox
! rekordbox is comprehensive software which can manage audio
tracks and make DJ performances.
! rekordbox dj is a DJ performance function of rekordbox. You can use
this function after entering the license key which is shown on the
supplied license key card for rekordbox dj.
Minimum operating environment
Supported operating systems CPU and required memory
Mac: macOS High Sierra 10.13 / Sierra
10.12 / OS X 10.11 (latest version)
Intel® processor Core™ i7, i5, i3
4 GB or more of RAM
Windows: Windows® 10 /
Windows® 8.1 / Windows® 7
(latest service pack)
32 bit / 64 bit
Intel® processor Core™ i7, i5, i3
4 GB or more of RAM
Others
USB port
A USB 2.0 port is required to connect the PC/Mac with
this unit.
Display resolution Resolution of 1 280 × 768 or greater
Internet connection
An Internet connection is required for registering the
rekordbox user account and downloading the software.
! Operation is not guaranteed on all PC/Mac, even if all the required
operating environment conditions indicated here are fulfilled.
! Depending on power saving settings of PC/Mac, etc., the CPU
and hard disk may not provide sufficient processing capabilities.
For laptop in particular, make sure the PC/Mac is in the proper
conditions to provide constant high performance (for example by
keeping the AC power connected) when using rekordbox.
! Use of the Internet requires a separate contract with an internet
service provider and payment of provider fees.
! Operating System support assumes you are using the latest point
release for that version.
! To check the latest information on the operating environment and
compatibility, and to acquire the latest operating system, refer to
[System requirements] under [Support] of “rekordbox.com”.
Installing rekordbox
Getting started for rekordbox
If you are using rekordbox for the first time, or rekordbox Ver. 4.x or
lower is used currently, install rekordbox with the following procedure.
If rekordbox Ver.5.x is already installed, update rekordbox to the latest
version using the Update Manager which is shown when starting
rekordbox.
! The user is responsible for preparing the PC/Mac, network devices
and other elements of the Internet usage environment required for
a connection to the Internet.
Installing rekordbox
Depending on the Operating System (OS) of your PC/Mac, procedures
differ.
Installing (Mac)
Do not connect the unit to your Mac until the installation has
completed.
! If a program is opened on your Mac, close it.
1 Unzip the downloaded rekordbox software file.
2 Double-click the unzipped software file, and then
start the installer.
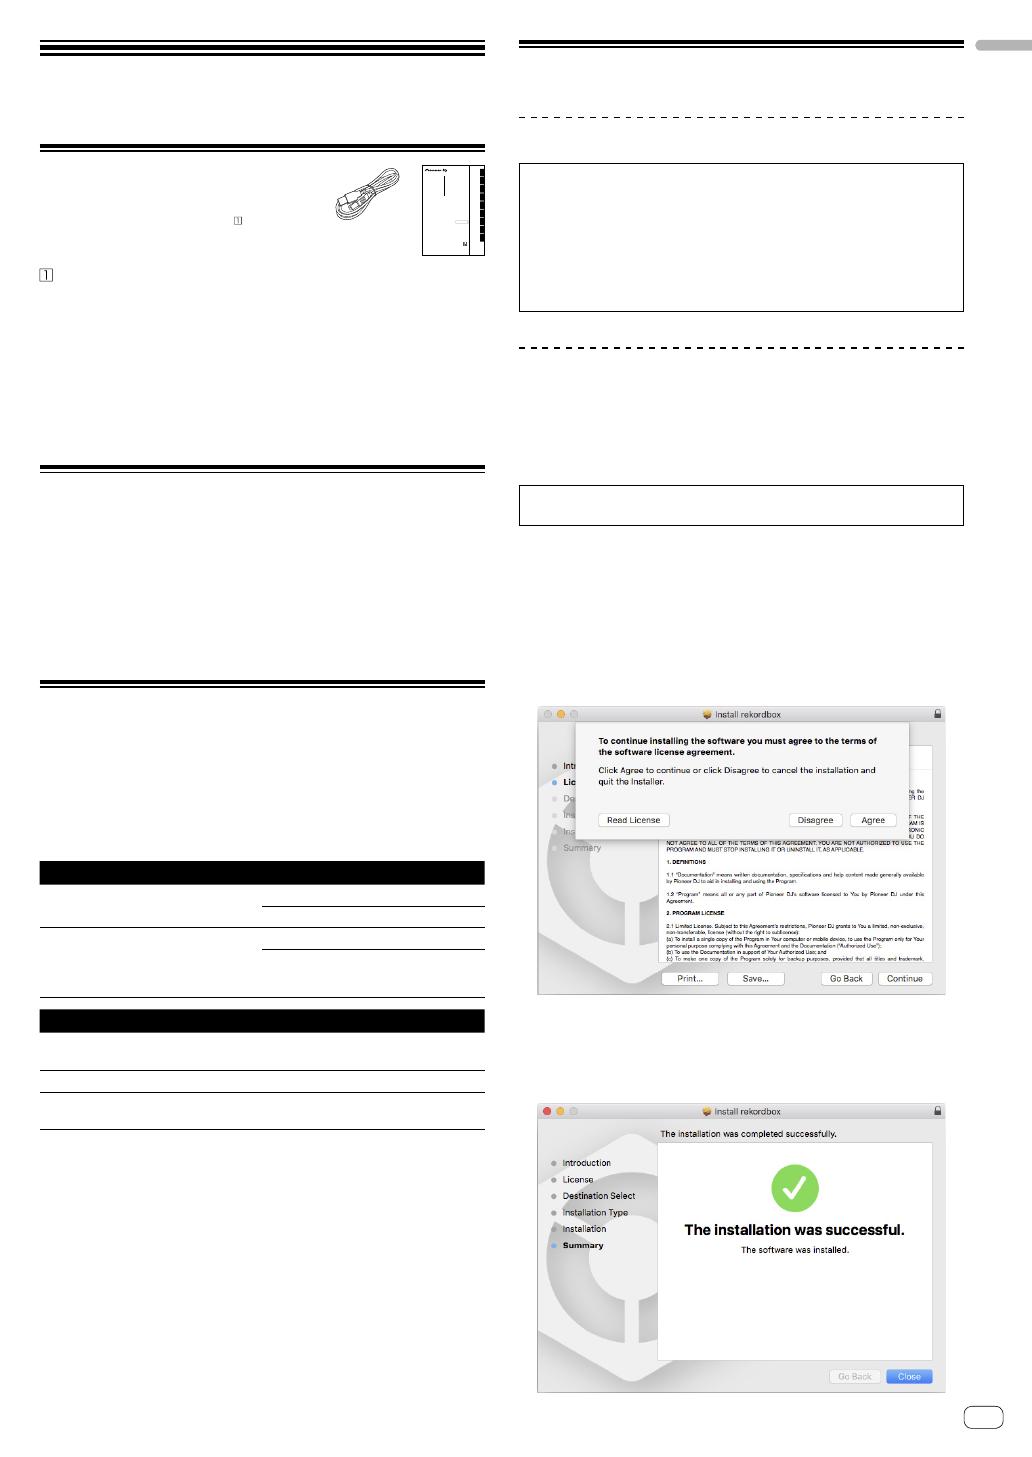
3 Read the terms of the license agreement carefully,
and then click [Agree] to continue.
! If you do not agree to the contents of the license agreement, click
[Disagree] to cancel the installation.
4 When the screen for completing the installation
appears, click [Close] to end the installation.
DDJ-400
DJ Controller
Contrôleur pour DJ
DJ Controller
DJ Controller
DJ Controller
Controlador DJ
Controlador para DJ
DJ Контроллер
pioneerdj.com/support/
rekordbox.com/
For FAQs and other support information for this product, visit the above site.
Concernant les questions les plus fréquemment posées et les autres informations de support à propos de ce
produit, veuillez vous rendre sur le site ci-dessus.
Besuchen Sie für FAQs und andere Support-Informationen die oben aufgeführte Website.
Per FAQ e altre informazioni di supporto per questo prodotto, visitare il sito sopra indicato.
Voor FAQ's en andere supportinformatie voor dit product, bezoek de bovengenoemde website.
Para consultar las preguntas frecuentes y otra información de soporte de este producto, visite el sitio de arriba.
Relativamente às FAQ e outras informações de apoio relacionadas com este produto, visite o site em cima.
Ответы на часто задаваемые вопросы и другую информацию о поддержке данного устройства см. на
приведенном выше веб-сайте.
Русский
PortuguêsEspañolNederlandsItalianoDeutschFrançaisEnglish
Operating Instructions (Quick Start Guide)
Mode d’emploi (Guide de démarrage rapide)
Bedienungsanleitung (Kurzanleitung)
Istruzioni per l’uso (Guida di avvio veloce)
Handleiding (Snelstartgids)
Manual de instrucciones (Guía de inicio rápido)
Manual de instruções (Guia de início rápido)
Инструкции по эксплуатации
(Краткое руководство пользователя)


