

IMPORTANT
I
Follow all warnings and instructions marked on this projection television.
[,&
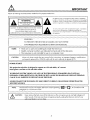
CAUTION: TO REDUCE THE RISK OF ELECTRIC SHOCK,
DO NOT REMOVE COVER {OR BACK)
NO USER SERVICEABLE PARTS INSIDE
RE,FER SERVlClNGTO QUALIFIED SERVlCE PERSONNEL.
The lightning flash with arrowhead symbol, within an equilateral
triangle, is inte_ded to alert the user to the presence of uninsulated
"dangerous w_hage" within the product's enclosure that may be of a
_ufficient magnitude to constitute a risk of electric shock to persons.
The (_xclamation point within an equilateral triangle, is intended to
alert the user to the presence of important operating and
maintenance Iservicing) instructions m the literature accompanying
the appliance.
I WARNING: I
TO PREVENT FIRE OR SHOCK HAZARD, DO NOT EXPOSE
THIS PROJECTION TELEVISION TO RAIN OR MOISTURE.
I NOTE: ,' There are no user serviceable parts inside the television. I
,, Model and serial numbers are indicated on back side of the television.
I
,, This television is not intended for use in a computer room.
CAUTION: Adjust only those controls that are covered in the instructions, as improper changes or modifications
not expressly approved by HITACHI could void the user's authority to operate the TV.
POWER SOURCE
This projection television is designed to operate on 120 volts 60Hz, AC current.
Insert power cord into a 120 volt 60Hz outlet.
TO PREVENT ELECTRIC SHOCK, DO NOT USE THE TELEVISION'S (POLARIZED) PLUG WITH AN
EXTENSION CORD, RECEPTACLE, OR OTHER OUTLET UNLESS THE BLADES AND GROUND TERMINAL
CAN BE FULLY INSERTEDTO PREVENT BLADE EXPOSURE.
NEVER CONNECT THE TELEVISION TO 50HZ, DIRECT CURRENT, OR ANYTHING OTHER THAN THE
SPECIFIED VOLTAGE.
NOTE: This television receiver will display television closed captioning, (r_ or _ ), in accordance with
paragraph 15.11 9 of the FCC rules.
I
/_ CAU'I'ION: Never remove the back cover of the television asthis can expose you to very high voltages and [
other hazards. If the television does not operate properly, unplug the television and call your
I
authorized dealer or service shop.
2

IMPORTANT
FCC REGISTRATION INFORMATION
Your HDTV is registered with the Federal Communications Commission and is in compliance with parts 15B and 68,
FCC Rules and Regulations.
1. Notification to the LocalTelephone Company.
On the back of thisequipment isa label indicating among other information, the FCC Registration number and
Ringer Equivalence Number (REN) for the equipment. You must, upon request, provide this information to your
telephone company.
The REN is useful to determine the number of devices you may connect to your telephone line and still have all these
devices ring when your telephone number is called. In most (but not all) areas, the sum of the RENs of all devices
connected to one line should not exceed 5. To be certain of the number of devices you may connect to your line as
determined by the REN, you should contact your local telephone company.
Note: This equipment may not be used on coin service provided by the telephone company. Party lines are subject to
statetariffs, and therefore you may not be able to use your own telephone equipment if you are on a party line.
Check with your local telephone company. Notice must be given to the telephone company upon permanent
disconnection of your equipment from your line.
2. Rights of the Telephone Company.
Should your equipment cause trouble on your line which may harm the telephone network, the telephone company
shall, where practicable, notify you that temporary discontinuance of service may be required. Where prior notice is
not practicable and the circumstances warrant such action, the telephone company may temporarily discontinue
service immediately. In case of such temporary discontinuance, the telephone company must: (1) promptly notify
you of such temporary discontinuance (2) afford you the opportunity to correct the situation and (3) inform you of
your right to bring a complaint to the Commission pursuant to procedures set forth in Subpart Eof Part68, FCC Rules
and Regulations.
The telephone company may make changes in its communications facilities, equipment, operations of procedures
where such action is required in the operation of its business and not inconsistent with FCC Rules and Regulations.
If these changes are expected to affect the use or performance of your telephone equipment, the telephone company
must give you adequate notice, in writing, to allow you to maintain uninterrupted service.
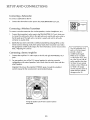
3. Federal Communications Commission Notice
This equipment has been tested and found to comply with the limits for a Class B digital device, pursuant to Part 15
of the FCC Rules. These limits are designed to provide reasonable protection against harmful interference in a
residential installation. This equipment generates, uses, and can radiate radio frequency energy and, if not installed
and used in accordance with the instructions, may cause harmful interference to radio communications. However,
there is no guarantee that interference will not occur in a particu]ar installation. If this equipment does cause harmful
interference to radio or television reception, which can be determined by turning the equipment off and on, the user
is encouraged to try to correct the interference by one or more of the following measures:
• Reorient or relocate the receiving antenna.
• Increase the separation between the equipment and the receiver.
• Connect the equipment into an outlet on a circuit different from that to which the receiver is connected.
• Consult the dealer or an experienced radio/television technician for help.
4. Modifications
The FCC requires the user to be notified that any changes or modifications made to this device that are not expressly
approved by Hitachi America, Ltd. Home Electronics Division may void the user's authority to operate the
equipment.
3

SAFETY TIPS
IMPORTANT SAFEGUARDS
CAUTION: • Read all of these instructions
• Save these instructions for later use.
• Follow all warnings and instructions marked
on the television.
SAFETY POINTS YOU SHOULD KNOW ABOUT
YOUR HITACHI PROJECTION TELEVISION
Our reputation has been built on the quality, performance, and ease of service of HITACHI televisions.
Safety is also foremost in our minds in the design of these units. To help you operate these products properly, this section illustrates salety tips which will
be of benefit to you Please read itcarefully and apply the knowledge you obtain from it to the proper operation of your HITACHI television.
Please fill out your warranty card and mail it to HITACHI. This will enable HITACHI to notify you promptly in the improbable event that a safety problem
should be discovered in your product model.
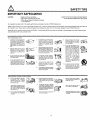
FORYOURPERSONALSAFETY
1 This television set is equipped with a
three-prong grounded, alternating-
current line plug This plug will fit 0nly
three terrr=nal receptacles This is a
safety feature DO not defeat 1he
safety purPOSe of the three terminal
plug
2 When the power cord or plug _S
damaged or frayed, unplug the
television set from the wall outle_ and
refer servicing to qualified sewice
personnel
3 DO not overload wall outlets and
extensiofl cor_5 as Ibis can result in
fire or eleCl#C shOCk.
4. DO not allow anything to rest on or
roll over the power cord. and do not
place the television where the power
cord is subiect to t raffpcor abuse. T_is
may resull in a shock or fire hazard
5. Co not ;lttempt to service the televlsion
yourself as opening or removing
COVersmay expose you Io dangerous
voltage or other hazards¸ Refer all
servicing to qualified service
personnel
6 Never push objects of any kind irlto the _ _O_
television's cabinet slots as they may _ _
touch dangerous voltage points or
short out parts that could result in a
fire or electric shock Never spill liquid
of any kind on the television
7 If the television has been dropped or
the cabinet has been damaged
unplug the television from the waft
outlet and refer servic}ng to qualified
service personnel
8 If liquid has been spilled into the o Ii
television set, unplug it from the wall
outtet and refer service to qualified
se_,'lce personnel
g DOnoJ subje,ct you r television toimpact
of any kind. Be careful not to damage ,e
the picture tube sudace
10 Unplug Ihe television from the wall
outle_ before cleaning. Use a damp
cloth for cleaning Oo not use liquid
or aerosol cleaners¸
11-1 Do not place the television On an
unstable cart, stand, table or other
fumiture item not recommended for
use by the TV manufacturer¸ The
television may fall, causing serious
injury to a child or an adult, and
serious damage to the appliance.
Use only wilh a cart or stand
recommended by the TV
manufacturer¸ or sold with the
television. Wall or shelf mounting
should follow the Wahl/Shelf
mounting m_nufacturet's
instructions, arid should use a
mounting kit approved by the
manufacturer
11 2 An a_liance and ca rt combination
should be mOved with care Quick
stops, excessive force, an(J uneven
surfaces may cause the appliance
and carl Gombination to overturn
PROTECTION AND LOCATION OF YOUR TELEVISION
12 Do not use the television near water,
for example, near a bathtub.
washbowl, kitchen sink, or laundry
lub, _n a wet basement, or near a
swimming pool, etc
Never expOSe the television to rain or
water If the set has been exposed to
ram or w_te_ unplug television from
wall curie1 and refer to qualified
service personnel.
13 Choose a place where light (artificial
or sunlight) does not shine d_reCtly on
the screen
14.
15
Avoid dusty places Accumulated dust ".:,
inside the chassis rc_ay ..... failure (_'._
el the Ielevision when high humidity
persisls
The television has slots or openings
in the cabinet for ventilation purposes
which provide relia_e Operation of the
receiver and protecI the television from
overheating These ope n_ng_,must not
be blocked or covered
Never cover the slots or openings with
cloth or other material
Never brock the bottom venlilation _ _t"3
srdts of lhe television by placing iton
a bed, so_a, rug, etc
Never place the television near or /._f._,:,_._
....... diat or or heat register _
Never plaCe the television in a built-
in er_losure unle3s p_3per ventilation
is provided¸
4

SAFETY TIPS
PROTECTION AND LOCATION OFYOUR TELEVISION
16-1 If an c_Jtsideantenna is connect_l to
the television, be sure the antenna
syslem is grounded so as to provide
some protection against voltage
surges and bui_l-up static charges
Section 310 of the National EleCtncal
Code, NFPA No 70-1975. provides
inlormation wilh respect to proper
grounding of the mast and supporting
structure, grounding of the lead-in
wire Io an antenna diSCharge unit. size
Of grounding conductors, _ocation of
antenna _scharoe unit conneclion to
grounding electrodel and
requiremenls 1o¢ the grounding
electrode
16-2 Note to CATV system installer:
(Only for television with CATV
reception) This ren_nder is provided
to call the CATV system installer's
atlention to Article 820-40 of the NEC
that provides guidelines for proper
grounding and, in particular, specifies
that the cable ground shall be
connected to the grounding system
of the building, as close to the point
of cable entry as practiCal.
EXAMPLE OF ANTENNA GROUNDING AS PER NATIONAL
ELECTRICAL COOE INSTRUCTIONS
PROTECTION AND LOCATION OFYOUR TELEVISION
19 This television should be operated
only from the type of power source
indicated on the marking labet If you
are not sure of the type of power
supply at your horr_e, consult your
dealer or local power company For
talevisions designed to operate from
batlery power, refer to the operating
instructions.
20 If the television does not operate
normally by following the operating
inst n_lioFs, unplu 3 the television from
the wall ouhet and rater servicing to
qualified service gersonnel AdlUSl
only those controls that are covered in
trle instructions as improper
adjust rc_nt ofOther controfs may t_suit
in damage and will often require
extensive work by a qualified service
technician Io restore d_e te_evialon 1o
normal operation.
17
An outside antenna system should
not be located in the vicinity of
overhead power i_nes or Other
alect ncal lights or power circuits, or
where rtcan fall _to such power lines
or circgits When instailing an outside
antenna system, extreme care
should be taken to keep f_om
touching such power lines or circuits
as contact wilh them rmght be fatal
13
For added protection for the
1elevation during a }ightning slorm, or
when it is unused for long podods Of
Iime, unplug itlrom the wall outlet and
diSConnect a_tentla This willprevent
damage due to lightning and power-
_ine surges
21. ff your television isto remain unused
for a podod of time, (such as when |
going on a holiday), turn the _(_ _
televalion OFF and unplug it from the _
_ _ wall outlet
IF THE TELEVISION DOES NOT OPERATE PROPERLY
22, If yo:J are unable to restore normal
operation by foltowing
the detailed procedure in your
operating instructions, do not a_empt
any furlher adjustments Unplug the
television and call you_ deaFer or
sea/ice technician
23 Whenever the television is _lamaged
or fails, or ff there is a distinct change
in pedomlance that indicates a need
for service, unplug the television and
have it checked by a qualified service
technician
24. I1 is nomlal for some televisions to
make occasional snapping or ",_,._'_"_"
popping sounds, particulady when -="..J_-_)._.=,'1
being ttJmed on or off If the stlapplng
or popping al CoednL_OUSor frequenl, _" _="
unplug 1he set and consult your
dealer or service techniCian
FOR SERVICING AND MODIFICATION
25 Do not use alt,achments hal
recommended by the television
manufacturer as they may cause
hazards
26. ff replacement parts are required, be
sure the serviCe technalian has used
replacement parle specified by the
mar_ufactu_er that h_tve the S_tme
characterlslics as the origlnal part¸
Unauthorized substitutions m_y result
in fire, elect nc shock, or other hazards¸
27
Upon completion of any service or
repairs to the lelevision, ask the IJ_ ,_ __k
sen/ice technician to perform routine
safety checks to determine that the
television is m safe operating
conditior3
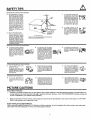
PICTURE CAUTIONS
Picture Burn Prevention
Continuous on-screen displays such as video games, stock market quotations, computer generated graphics, and other fixed (non-
moving) patterns can cause permanent damage to projection television receivers. Such "PATTERN BURNS" constitute misuse and
are NOT COVERED by your Hitachi Factory Warranty.
When using Picture-in-Picture function, the sub-picture should not be left permanently in one corner of the screen or a "PATTERN
BURN" may develop over a long period of time.
Public Viewing of Copyrighted Material
Public viewing of programs broadcast by TV stations and cable companies, as well as programs from other sources, may require prior
authorization from the broadcaster or owner of the video program material.

TABLE OF CONTENTS
IMPORTANT .............................................................................................. 2
FCC Registration Information ..................................................................... 3
Safety Tips .................................................................................................. 4
WELCOME TO HDTV ................................................................................ 9
Getting Started ........................................................................................... 9
SETUP AND CONNECTIONS .................................................................. 10
Step I: Unpack the System ....................................................................... 11
Step 2: Connect Your TV to Other Components ........................................ I I
Things to Know Before Connecting Components ........................................... I ]
Jacks and Cables ............................................................................................ 12
Front of the TV ............................................................................................... 13
Back of the TV ............................................................................................... 15
The Basic Connection .................................................................................... 17
The Advanced Connection ............................................................................. 18
Connecting Speakers to the TV ...................................................................... 19
Step 3: Place Batteries in the Remote Control ........................................... 21
Step 4: Plug in and Turn on the System ..................................................... 21
Step 5: Complete the System Setup .......................................................... 21
Step 6: Order Programming ...................................................................... 21
USING THE REMOTE ............................................................................... 22
Remote Control Buttons ........................................................................... 23
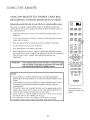
Using the Remote to Control a Cable Box/External Satellite Receiver ....... 25
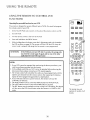
Using the Remote to Control a VCR .......................................................... 26
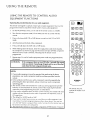
Using the Remote to Control Audio Equipment ........................................ 27
Remote Control Codes .............................................................................. 28
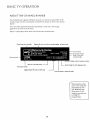
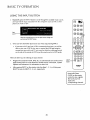
BASIC TV OPERATION ............................................................................ 29
About the Channel Banner ....................................................................... 30
Changing Between DIRECTV and TV Mode ............................................. 32
Changing Channels .................................................................................. 33
PIP (Picture-in-Picture) Operation ............................................................ 34
Using the INPUT Button ........................................................................... 36
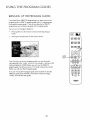
USING THE PROGRAM GUIDES ............................................................. 37
Bringing Up the Program Guides .............................................................. 38
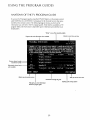
Anatomy of the TV Program Guide ........................................................... 39
6

TABLE OF CONTENTS
Anatomy of the DIRECTV Program Guide ................................................ 40
Getting Around in the Guides .................................................................. 41
Tuning to a Program ................................................................................. 41
Using the GUIDE Button .......................................................................... 42
The Other Guides Item ............................................................................. 42
Exiting A Program Guide .......................................................................... 43
Sorting the DIRECTV ® Programming Guide .............................................. 44
The Other Items ....................................................................................... 46
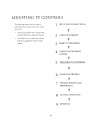
ADJUSTING TV CONTROLS ................................................................... 47
Picture Quality Controls ........................................................................... 48
Picture Settings .............................................................................................. 48
Auto Color ..................................................................................................... 49
Color Temp .................................................................................................... 49
Noise Reduction ............................................................ ................................ 49
Magic Focus .................................................................................................. 49
Theatre .......................................................................................................... 49
ResetControls ............................................................................................... 49
Audio Controls ......................................................................................... 50
Mute .............................................................................................................. 50
Equalizer ....................................................................................................... 50
Speakers ........................................................................................................ 50
Special Audio ................................................................................................ 53
Loudness ....................................................................................................... 54
SAP ............................................................................................................... 54
Alternate Audio ............................................................................................. 54
USING THE PROFILES ............................................................................. 55
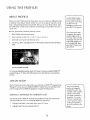
About Profiles .......................................................................................... 56
The SAT Setup .......................................................................................... 56
Editing Channels in a DIRECTV List .......... _.................................................... 56
Selecting or Deleting All DIRECTV Channels ................................................. 57
Setting the DIRECTV Spending Limit .............................................................. 57
Setting the DIRECTV Rating Limit .................................................................. 58
The TV Setup ............................................................................................ 59
Editing Channels in a TV List.......................................................................... 59
Selecting or Deleting All TV Channels ........................................................... 59
Setting theTV Rating ................................................................................ 60
The Rating Limit Screen ................................................................................. 61
7

TABLE OF CONTENTS
Blocking Age-Based Ratings ........................................................................... 62
Setting the Movie Rating ................................................................................ 64
Blocking Unrated TV Shows .......................................................................... 65
Choosing Your Profile ............................................................................... 66
Locking and Unlocking a User Profile ...................................................... 67
Locking the System .................................................................................. 68
Unlocking the System .................................................................................... 68
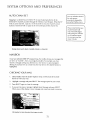
SYSTEM OPTIONS AND PREFERENCES .................................................. 69
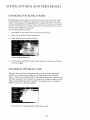
Changing the Signal Source ...................................................................... 70
Changing the Signal Type ......................................................................... 70
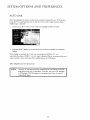
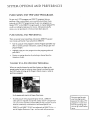
Auto Link ................................................................................................. 71
Auto Chan Set .......................................................................................... 72
Mailbox ................................................................................................... 72
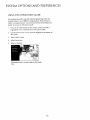
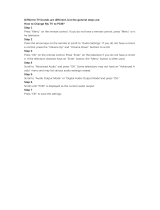
Purchases: Pay Per View Programs ............................................................ 73
Tuning to a PayPerView Program .................................................................. 73
Using the Program Guide for PayPerView Programs ..................................... 74
Reviewing and Canceling an
Upcoming Purchase ...................................................................................... 76
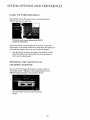
Setting theTime and Date ........................................................................ 77
Using the Preferences Menu ..................................................................... 77
GETTING ASSISTANCE ............................................................................ 80
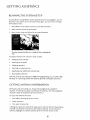
Running the System Setup ........................................................................ 8]
Getting Antenna Information .................................................................... 81
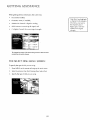
The Select Dish Menu Screen ................................................................... 82
Using the On-Screen Signal Meter ................................................................ 83
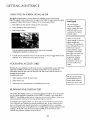
Your New Access Card ............................................................................. 83
Running the System Test ........................................................................... 83
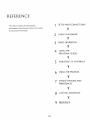
REFERENCE .............................................................................................. 84
Troubleshooting ....................................................................................... 85
Care and Cleaning ................................................................................... 86
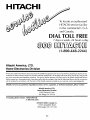
Hitachi Service Hotline ............................................................................ 87
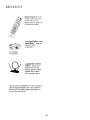
Accessory Information .............................................................................. 88
Index ........................................................................................................ 90
8

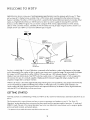
WELCOME TO HDTV
High Definition refers to a new way of sending programming information over the airwaves and into your TV. There
are two types of TV display formats available. One is ATSC format, which originated from the Advanced Television
SystemsCommittee. The other is NTSC format, which is named for the National Television Systems Committee. What
makes your High Definition Television (HDTV) special is that it has tuners capable of receiving ATSC and NTSC
formats as well as DIRECTV signals. You can receive: analog (in NTSC format), digital terrestrial (in ATSC format),
cable (in NTSC and ATSC formats), and DIRECTV. This TV makes receiving all types of signals seamless. Below is an
example of how your HDTV can receive the different types of signals.
SATELLITE
TOWER S_
DIGITAL SIGNALS
CABLE TV
SATELUTE
OISH ANTENNA"
So why is it called High E.4inition? Definition--commonly called resolution--refers to the sharpness of the image
and is determined by the number of dots, or pixels, your screen uses to create the image. The more pixels the sharper
the image. An HDTV normally has either 1080 or 720 rows and over 1,000 columns of pixels. This results in a
display of over one million pixels. Your HDTV also has a wide screen, or "wide aspect ratio" of 16:9 as opposed to
the common 4:3 ratio. It is normally capable of displaying both interlaced images (like today's analogTVs) and
progressive images (like a computer monitor).
What this all means is that while digital broadcasting will bring many new possibilities, only people with HDTVs like
yours will actually be capable of realizing many of them. A wide aspect ratio, one million pixel resolution, CD-
quality audio with Dolby Digital surround sound, and improved interactivity are features of many digital broadcasts,
and your HDTV will help bring it all into your home.
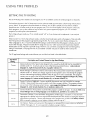
GETTING STARTED
Now that you have an understanding of what your HDTV can do, read on to find necessary information about how to use
the TV.
The first section of this manual shows you how to connect components and speakers to your TV. The "Basic TV
Operation" section describes how you receive the three signals and the important modes of operation: TV mode and
DIRECTV mode. The rest of this manual describes how to use your television's many features, such as program guides,
picture and audio controls, and system options.
• The appearance of your satellite dish antenna may differ from Ihat shown here.
9

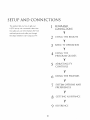
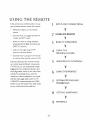
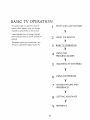
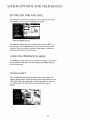
SETUP AND CONNECTIONS
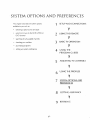
This section tells Xou how to get your
HDTV set up and connected. It describes
the cables 7ou will need, explains the front
and back panels, and walks 7ou through
the steps needed to start using your_
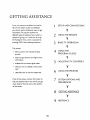
1 SETUP AND
CONNECTIONS
2 USING THE REMOTE
¥
3 BASIC TV OPERATION
V
4 USING THE
PROGRAM GUIDES
V
5 ADJUSTING TV
CONTROLS
V
6 USING THE PROFILES
7 SYSTEM OPTIONS AND
PREFERENCES
8 GETTING ASSISTANCE
V
9 REFERENCE
10

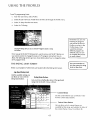
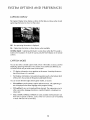
SETUP AND CONNECTIONS
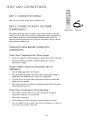
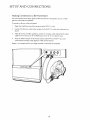
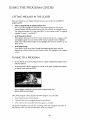
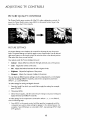
STEP 1" UNPACK THE SYSTEM
Make sure to locate the remote control and power cord.
STEP2: CONNECT YOUR TV TO OTHER
COMPONENTS
During the satellite dish antenna installation, the TV may have been connected
with just a coaxial cable for the system test. Depending on what components you
have, another connection may provide better picture and audio quality. The
following sections provide cable and connection information to help you decide
what connection is best for you.
BII_I
_o__.°L
Remote Control Power Cord
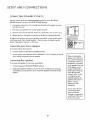
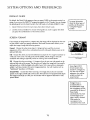
THINGS TO KNOW BEFORE CONNECTING
COMPONENTS
Protect Your Components from Power Surges
• Connect all components before plugging any power cords into the wall outlet.
• Always turn off the TV and other components before you connect or
disconnect any cables.
Position Cables Correctly to Avoid Audio Hum or
Interference
• Insert all cable pIugs firmly into their jacks.
• Place the audio/video cables to the sides of the TV's back panel instead of
straight down the middle after you connect your components.
• Try not to coil any twin-lead cables; keep them away from the audio/video
cables as much as possible.
• Make sure all antennas and cables are properly grounded. Refer to the safety
sheet packed with your unit.
Protect Your Components from Overheating
• Do not block ventilation holes in any of the components. Arrange the
components so that air can circulate freely.
• Do not stack components.
• Allow adequate ventilation when placing your components in a stand.
• Place an amplifier on the top shelf of the stand so that heated air rising from it
will not flow around other components.
11

SETUP AND CONNECTIONS
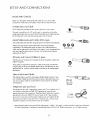
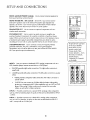
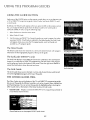
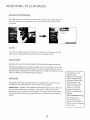
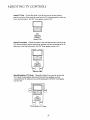
JACKS AND CABLES
Below is a description of the jacks and cables you can use to make
connections. Note that not all cables come with your television unit.
S-Video Jack and Cable
The S-Video jack provides the best picture quality for your system.
This jack is available on this TV and is used in conjunction with audio
cables. Remember also to connect the left and right audio cables because
the S-Video jack carries only the picture signal, not the sound.
Audio/Video Jacks and Cables (RCA-type)
The audio/video jacks provide very good picture and stereo sound quality.
Theses jacks are used for most audio/video connections between
components. The audio/video jacks are often color coded (yellow for
video, red for right audio, and white for left audio). If your component has
only one input for audio (mono), connect it to the left (white UMono)
audio jack on the TV.
RFJacks and Coaxial Cables (F-type)
The RFjacks are necessary for reception of off-air broadcasts, cable, and
DIRECTV signals.
These jacks are required for antenna or cable connections. The RFand
coaxial jacks on the TV are labeled SATELLITEIN, ANTENNA A IN, and
ANTENNA B IN. An RG-6 coaxial cable is advised for all satellite signal
distribution.
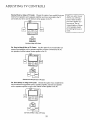
Optical Jack and Cables
The optical cable is used for connecting a Dolby Digital receiver. If you
own a Dolby* Digital receiver that usesan optical cable-type input, you
can use an optical cable to connect the TV to that receiver for the best
sound quality.
Telephone Jack and Cord
The telephone line cord isrequired to connect your TV to a phone line. If
you choose to subscribe to DIRECTV®Programming, some services
require this phone line connection. The phone line connection is used to
periodically call out to DIRECTV. You will need an RJ11type modular
jack, which is the most common type of phone jack and might look like
the one pictured here. If you don't have a modular jack, call your local
telephone company to find out how to get one installed.
®
S-VideoJack
)00
Audio/Video Jacks
9
RFJack
Digital Audio
Out Jacks
Phone Jacks
* Manufactured under license from Dolby Laboratories. "Do[by", "Pro Logic" and the double-D symbol are trademarks
of Dolby Laboratories. Confidential Unpublished Works. ©I992-1997 Do[by Laboratories, Inc. All rights reserved.
12

SETUP AND CONNECTIONS
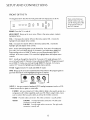
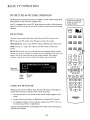
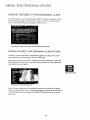
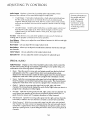
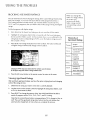
FRONT OFTHETV
The diagrams below describe the front panel and front input jacks on the TV.
0 O00 O O
pOWEH S_LECr _T _ lip
POWER Turns theTV on and off.
MENU/SELECT Brings up the main menu. When in the menu system, it selects
highlighted items.
VOL < Decreases the volume. When in the menu system, VOL < moves the
highlight ]eft and adjusts menu controls.
VOL > Increases the volume. When in the menu system, VOL > moves the
highlight right and adjusts menu controls.
CH v Scrolls down through the current channel list. If you are in TV mode and
press CHv, you scroll down through TV channels. If you subscribe to DIRECTV®
Programming and are in DIRECTV mode, you scroll down through DIRECTV
channels. In the menu system, CHv moves the highlight down and adjusts menu
controls.
CH ^ Scrolls up through the channel list. If you are in TV mode and press CH ^,
you scroll up through TV channels. If you subscribe to DIRECTV®Programming and
are in DIRECTV mode, you scroll up through DIRECTV channels. In the menu
system, CH ^ moves the highlight up and adjusts menu controls.
TV/SAT Toggles between TV mode and DIRECTV mode.
INI:O Brings up the on-screen channel banner. Presswhen in the program guide to
get more information on the highlighted program or channel.
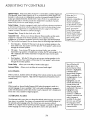
VIDEO
LAUD'OJ
INPUT 4 Lets you connect a baseband NTSC (analog) component such as aVCR,
Internet access device, game, or camcorder.
S-VIDEO Lets you connect an S-Video cable for better video quality picture to a
component with S-Video capability, such as aVCR. When using S-Video, make
sure to connect the two audio cables as well as the S-Video connector.
VIDEO Provides video connection. The video connector is usually yellow.
AUDIO LIMONO Provides left audio connection. The left audio
connector is usually white.
RAUDIO Provides right audio connection. The right audio
connector is usually red.
If you cannot find your
remote control, you can
use the front panel of the
TV to operate many of
the TV's features.
13

SETUP AND CONNECTIONS
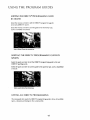
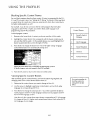
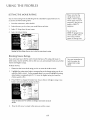
Making Connections to the Front Panel
You can connect one of many types of devices to the TV's front panel, such asa video
game or camcorder for playback.
To connect a device to the front panel:
1. Open the small front panel door protecting the INPUT 4 jacks.
2. Connect the device's audio/video outputs to the INPUT 4 audio and video jacks on
the TV.
3. If the device has S-Video capability, connect an S-Video cable (instead of the video
cable) from the device to the S VIDEO jack on the TV. If not, skip this step.
4. Pressthe INPUT button on the remote control until INP4 (or SINP4 if you have
connected an S-Video cable) appears in the channel banner.
Below is an example of how you might connect a camcorder for playback.
14

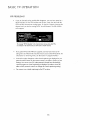
SETUP AND CONNECTIONS
BACK OFTHETV
The diagram below describes each of the back panel jacks found on the TV. When
connecting A/V cables, be sure to connect corresponding outputs and inputs (video
to video, right audio to right audio, etc.).
/ ",,,,
SATELLITE
DIGITAL
PHONE AUDIO OUT
JACK
ANTENNA B
IN
ANTENNA A
SATELLITEIN Use to connect the satellite dish antenna to the TV.
ACCESSCARD INTERFACE Insert the access card into the slot so your program
provider can identify you. Make sure the contacts on the access card are on the left
of the card while inserting. (Refer to "New Access Card" in this manual's
"Assistance" section for details.) The DIRECTV System requires a valid card.
PHONE JACK Use to connect a phone line to the TV. Forsome services, the
DIRECTV System requires a continuous phone line connection to periodically call
out to DIRECTV.
DIGITAL AUDIO OUT Use a digital optical cable (or SPDIF cable) to connect
your TV to a compatible Dolby Digital receiver or decoder. Dolby Digital offers
theatre-quality sound (six audio channels). You will not be able to use this jack and
the LFE/SUBWOOFER OUT simultaneously.
ANTENNA B IN Use to connect an off-air or terrestrial antenna or cable TV
signal to the TV.
ANTENNA A IN Use to connect a second off-air or terrestrial antenna or cable
TV signal to the TV.
You can also use the ANT B IN (or ANT A IN) for video games and switch between
the two inputs using the ANTENNA button on the remote control. When using TV
games, computers, and similar products with your TV, keep the contrast at a low
setting. If a fixed (non-moving) pattern is left on the screen for long periods of time
at a high contrast setting, the image can be permanently imprinted onto the picture
tubes. These types of imprints are not covered by your warranty because they are
the result of misuse.
SATELLITE
ACCESS
CARD
INTERFACE
PHONE DIGITAL
JACK AUDIO OUT
[] D
ANTENNAB
IN
ANTENNA A
IN
15

SETUP AND CONNECTIONS
FRONT and REARSPEAKERTerminals Use to connect external speakers for
front sound and rear surround sound.
FRONT SPEAKERINT. / EXT. (switch) Setto INT. if you want to use the
internal TV speakers only or the internal TV speakers plus separate rear
speakers. Set to EXT.if you want to use any combination of front external
speakers. This switch does not turn off the TV center speaker.
TRANSMrlq'ER OUT Use to connect an optional component such asa
wireless audio transmitter.
FIX/VARIABLE OUT Use to connect an audio receiver or amplifier (an
auxiliary baseband component) for variably-controlled or fixed level stereo
output. When set to fixed (via the Audio Output choice in the Speakers menu),
a fixed-level audio signal is provided, making these jacks ideal for audio
recording or for usewith an audio amplifier that has itsown remote control.
LEE/SUBWOOFER OUT Use to connect a LFE(Low Frequency Effects)
powered subwoofer. This jack is tailored for carrying low frequency
information. You will not be able to use this jack and the DIGITAL AUDIO
OUT (an optical output) simultaneously.
INPUT 1 Lets you connect a baseband NTSC (analog) component such as a
VCR, laserdisc player, Internet access device, or DVD player.
• RAUDIO provides right audio connection. The right audio connector is
usually red.
• LAUDIO provides left audio connection. The left audio connector is usually
white.
VIDEO provides composite video connection. The video connector is
usually yellow.
S-VIDEO lets you connect an S-Video cable for better video quality
picture to a component with S-Video capability, such as a VCR or DVD
player. When using S-Video, make sure to connect the two audio
cables, as well asthe S-Video connector.
INPUT 2 Provides connection to a second NTSC (analog) video component
such as aVCR or laserdisc player. Its jacks are the same asdescribed for INPUT
1, above.
INPUT 3 Provides connection to a third NTSC (analog) video component,
such as a VCR or laserdisc. Its jacks are the same asdescribed for INPUTS 1
and 2, except with no S-Video jack.
I TAKE°I
_To specify how you have
set up your speakers,
press MENU on the
remote control and
choose Audio. Then
choose Speakers... from
the menu. For details,
seethe section
"Adjusting TV Controls"
in this book.
S-VIDEO S-VIDEO
VIDEO VIDEO VIDEO
16

SETUP AND CONNECTIONS
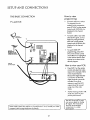
THE BASIC CONNECTION
TV and VCR
TV
\
CABLE OR
ANY ALTERNATE
RF SIGNAL SUCH AS
A DIGITAL _R ANALOG
TERRESTRIAL N4TENN_
CABLE OR
OFF.AJRANTENNA
How to view
programming:
• To watch cableTV or off-air
TV programs from an
antenna in this connection,
press DTV/SAT on the remote
control until ANTENNA A is
displayed in the channel
banner.
• To watch cable or any other
alternate RFsignal, such as
digital or analog terrestrial,
press ANT on the remote
control until ANTENNA B is
displayed in the channel
banner.
• To watch DIRECTV®
programming, press DTV/
SATon the remote control
until DIRECTV is highlighted
in the channel banner, then
channel up or down to the
desired program.
How to view your VCR:
• PressINPUT on the remote
control and select the video
input (in this example, VlD1)
in the channel banner.
Because the digital decoder
is in the TV, not theVCR,
digital channels cannot be
recorded. If an off-air
antenna is used, theVCR
output should be viewed
using one of the video
inputs.
• NOTE: Viewing a VCR in AIR
mode may result in poor
picture performance.
I Some cable systems may require a "conversion box." If so, consult your cable ]
company's box tuning instructions for details. )
"-The ANT Band ANT A jacks
can receive digital or analog
RF signals. The illustrations
here are recommended
connections in a cable
_ environment.
17

SETUP AND CONNECTIONS
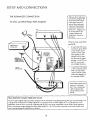
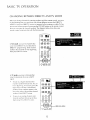
THE ADVANCED CONNECTION
TV, VCR, and DVD Player With Amplifier
SDATELLITE
ISH ANTENNA
DVD
I AMP_LIFIER WITH
OPTICAL INPUT ,,JJD=O_N
ANY ALTERNATE
RF S_GNAL_SUCH AS
A DIGITAL OR ANALOG
TERRESTRIAL ANTENNA
CABLE OR
OFF-AiR ANTENNA
• After you have made you/'
connections, program the
TV to tune to the correct
video input channel to
see and hear audio and
video from the attached
component (VCR, DVD
player, etc.). Program your
TV asdescribed in the
"System Options and
Preferences" section of
this book.
How to view your DVD
and VCR:
• To watch theVCR in this
connection, press INPUT
on the remote control
until the correct video
input appears (in this
example, VID1 ). Note
that because the digital
decoder is in the TV, not
theVCR, you cannot
record digital channels.
• To watch the DVD player
in this connection, press
INPUT on the remote
control until the correct
video input appears (in
this example, SINP2).
Some cable systems may •
require a "conversion
box." If so, consult your
cable company's box
tuning instructions for
details.
Please Read Before Using the Digital Audio Out Jack
This TV's optical digital output jack fully complies with the international standard governing this type of jack (IEC958), and
is designed for connection to a Dolby Digital (AC-3 or PCM) receiver or Dolby Digital (AC-3 or PCM) decoder. Older
equipment, some of which is not fully compliant with IEC958, may not be compatible with the Dolby Digital bitstream.
Such a connection using anything other than Dolby Digital AC-3 or PCM receiver or decoder could create a high noise
level, causing damage to headphones or speakers.
18

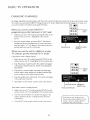
SETUP AND CONNECTIONS
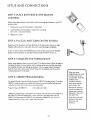
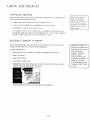
CONNECTING SPEAKERSTO THE TV
You can connect up to four additional speakers to the TV: two to the FRONT
SPEAKERterminal, and two to the REAR SPEAKERterminal.
1. If necessary, remove the vinyl covering from the ends of the speaker wire and
twist the wire core.
2. Pressdown and hold the lever on the speaker terminal.
3. Insert the wire core into the hole. Be sure to connect the (+) to (+} and (-) to (-).
4. Release the lever. Pull gently on the wire to see that it's connected securely
To specify how you have set up your speakers, press MENU on the remote control
and choose Audio. Then choose Speakers... from the menu. Fordetails, seethe
section "Adjusting TV Controls" in this book.
Connecting Front (Main) Speakers
To connect external front speakers:
1. Connect speakers to the FRONT SPEAKERterminal.
2. Set the speaker switch (labeled FRONT SPEAKER)to EXT.to indicate you would
like to use the connected external speakers.
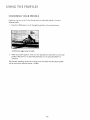
Connecting Rear Speakers
To connect rear speakers for surround sound effects:
1. Connect speakers to the REARSPEAKERterminal.
2. Position the speakers behind you in your TV room. To improve the surround
sound effect, you may prefer to set or mount the speakers several feet off the
ground.
When connecting the
speaker wire, make sure
you connect the positive
(+) terminal on theTV to
the positive (+) terminal
on the speaker. One side
of the speaker wire is
usually marked with a
white stripe to help you
match the terminals
correctly. If the (+) and
(-) terminals are not
matched properly, the
speakers will not be "in
phase," causing
reduction in bass
frequencies.
Do not aIIow the wire
core to touch other
wires or terminals.
Damage to components
could result if the cores
of two wires touch.
19

SETUP AND CONNECTIONS
Connecting a Subwoofer
To connect a subwoofer to the TV:
1. Connect the subwoofer's audio input to the LFE/SUBWOOFER OUT jack.
Connecting a Wireless Transmitter
To connect a wireless transmitter (for wireless speakers, wireless headphones, etc.):
1.
Connect the transmitter's audio input to the TRANSMITTER OUT jack. Make sure
to connect the right audio cable to the right audio jack and the left audio cable to
the left audio jack. The right audio connector is usually red and the left audio
connector is usually white.
2.
Specify that you have connected a wireless transmitter by pressing MENU on the
remote control, selecting Audio, then Special Audio, then Transmitter Out. Select
the appropriate variable audio output. For more information, see the section in this
book, "Adjusting TV Controls."
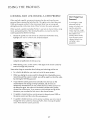
Connecting a Stereo Amplifier
1. Connect the amplifier's TV audio inputs to the left and right FIX/VARIABLE OUT
jacks.
2. You may prefer to turn off the TV's internal speakers by selecting a speaker
configuration with external speakers. Select Audio from the main menu and then
select Speakers.
Important: Do not use the amplifier's PHONO inputs. Consult the amplifier's
owner's manual for the manufacturer's recommended hookup.
TELEVISION
The FIX/VARIABLE OUT
jacks on the back panel
provide a fixed or
variable audio signal.
When set to "variable"
via the Audio menu, they
are ideal for use with an
audio amplifier that does
not have its own remote
volume control. When set
to "fixed," the output
volume stays the same no
matter how the volume
changes on the TV.
Arrange the speakers in your TV room to achieve maximum
sound quality.
2O
Page is loading ...
Page is loading ...
Page is loading ...
Page is loading ...
Page is loading ...
Page is loading ...
Page is loading ...
Page is loading ...
Page is loading ...
Page is loading ...
Page is loading ...
Page is loading ...
Page is loading ...
Page is loading ...
Page is loading ...
Page is loading ...
Page is loading ...
Page is loading ...
Page is loading ...
Page is loading ...
Page is loading ...
Page is loading ...
Page is loading ...
Page is loading ...
Page is loading ...
Page is loading ...
Page is loading ...
Page is loading ...
Page is loading ...
Page is loading ...
Page is loading ...
Page is loading ...
Page is loading ...
Page is loading ...
Page is loading ...
Page is loading ...
Page is loading ...
Page is loading ...
Page is loading ...
Page is loading ...
Page is loading ...
Page is loading ...
Page is loading ...
Page is loading ...
Page is loading ...
Page is loading ...
Page is loading ...
Page is loading ...
Page is loading ...
Page is loading ...
Page is loading ...
Page is loading ...
Page is loading ...
Page is loading ...
Page is loading ...
Page is loading ...
Page is loading ...
Page is loading ...
Page is loading ...
Page is loading ...
Page is loading ...
Page is loading ...
Page is loading ...
Page is loading ...
Page is loading ...
Page is loading ...
Page is loading ...
Page is loading ...
Page is loading ...
Page is loading ...
Page is loading ...
Page is loading ...
Page is loading ...
Page is loading ...
Page is loading ...
Page is loading ...
-
 1
1
-
 2
2
-
 3
3
-
 4
4
-
 5
5
-
 6
6
-
 7
7
-
 8
8
-
 9
9
-
 10
10
-
 11
11
-
 12
12
-
 13
13
-
 14
14
-
 15
15
-
 16
16
-
 17
17
-
 18
18
-
 19
19
-
 20
20
-
 21
21
-
 22
22
-
 23
23
-
 24
24
-
 25
25
-
 26
26
-
 27
27
-
 28
28
-
 29
29
-
 30
30
-
 31
31
-
 32
32
-
 33
33
-
 34
34
-
 35
35
-
 36
36
-
 37
37
-
 38
38
-
 39
39
-
 40
40
-
 41
41
-
 42
42
-
 43
43
-
 44
44
-
 45
45
-
 46
46
-
 47
47
-
 48
48
-
 49
49
-
 50
50
-
 51
51
-
 52
52
-
 53
53
-
 54
54
-
 55
55
-
 56
56
-
 57
57
-
 58
58
-
 59
59
-
 60
60
-
 61
61
-
 62
62
-
 63
63
-
 64
64
-
 65
65
-
 66
66
-
 67
67
-
 68
68
-
 69
69
-
 70
70
-
 71
71
-
 72
72
-
 73
73
-
 74
74
-
 75
75
-
 76
76
-
 77
77
-
 78
78
-
 79
79
-
 80
80
-
 81
81
-
 82
82
-
 83
83
-
 84
84
-
 85
85
-
 86
86
-
 87
87
-
 88
88
-
 89
89
-
 90
90
-
 91
91
-
 92
92
-
 93
93
-
 94
94
-
 95
95
-
 96
96


Ask a question and I''ll find the answer in the document
Finding information in a document is now easier with AI
Related papers
Other documents
-
RCA F38310 - 38" 16:9 HDTV User manual
-
 ANSTEN D1 User guide
-
EchoStar Universal Remote 21.0 User manual
-
Dish Network Blue Button 1.5 User manual
-
-
Haier HLT10 User manual
-
RCA DRD460RE User manual
-
 Senior TV LTC3204 Owner's manual
-
-
Panasonic TU-HDS20 HDTV Digital Receiver User manual

