Page is loading ...

Installation and Care Guide
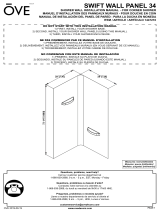
Locker with Wall Panels and Seams
Français, page ″Français-1″
Español, página ″Español-1″
1242396-2-B

Table of Contents
Tools and Materials ............................................................... 2
Before You Begin ................................................................. 3
Plan the Installation ............................................................... 4
Prepare the Site ................................................................. 5
Measure Components ............................................................. 6
Trim the Locker and Walls .......................................................... 8
Dry Fit the Locker and Walls ........................................................ 9
Install the Corner Joints (Optional) ................................................... 10
Install the First Wall Panel ......................................................... 11
Install the First Seam Joint ......................................................... 12
Prepare the Locker Unit ........................................................... 13
Install the Locker Unit ............................................................ 14
Install the Second Seam Joint ...................................................... 15
Install the Second Wall Panel ....................................................... 16
Prepare the Corner Joints (Optional) .................................................. 17
Install the Sidewall Panels without Joints .............................................. 18
Prepare the Seam Joints .......................................................... 19
Install the Sidewall Panels with Joints ................................................. 20
Install the Second Sidewall Panel .................................................... 21
Install the Edge Trim (Optional) ..................................................... 22
Seal the Enclosure ............................................................... 23
Complete the Installation .......................................................... 24
Care and Cleaning ............................................................... 24
Warranty ...................................................................... 24
Tools and Materials
Jigsaw with
Grit Blade and
Fine Toothed Blade
Denatured Alcohol
High Speed Rotary Tool
with Cut-Off Wheel
Rags
Shop Vacuum
Breathing
Protection
Drill & Hole Saw
(size will vary)
Plus:
• Standard Woodworking Tools
• Spring Loaded Braces or Lumber
(to create bracing)
• Sawhorses
• Drop Cloth
Sanding Block
1-2 Tubes Color Matched
100% Silicone Sealant
Caulk Gun
7-1/4" Circular Saw
and Masonry Blade
8+ tubes Non-Solvent
Based Construction Adhesive
(Silicone Adhesive when installing over tile)
Duct Tape
DENATURED
ALCOHOL
1242396-2-B 2 Kohler Co.

Before You Begin
WARNING: Risk of serious injury. When cutting walls and locker, take appropriate safety
measures including the use of breathing protection.
CAUTION: Risk of serious injury. Always wear safety glasses while cutting and drilling.
CAUTION: Risk of serious injury. If the ceiling will be covered with the wall material, the ceiling
must be installed prior to the wall panels. Allow sufficient time for the ceiling installation to cure
before installing the wall panels or the ceiling can fall during installation, causing injury.
CAUTION: Risk of product damage. The wall panels should be room temperature before cutting. Allow
the temperature to stabilize if the walls were in a cold environment.
IMPORTANT! Dust will be generated when cutting the wall panels and locker. Cutting the panels and
locker should be performed outside or in a well ventilated area.
IMPORTANT! For best results, cut the walls using a masonry blade. Do not use a blade with teeth.
IMPORTANT! Leave this manual for the end user.
Read these instructions before installing or using this product:
•
The locker must only be trimmed in height. Do not cut down the sides.
•
The existing rough walls must be within 3/8″ (10 mm) of plumb.
•
The locker unit must be braced using 2x4’s around the entire unit.
•
Use color matched silicone sealant in the seams and joints.
•
Cover the shower receptor with a drop cloth or other protective material to avoid damage.
•
Follow the construction adhesive and silicone sealant instructions for application and curing time.
•
Inspect all components for damage after unpacking, prior to installation.
•
A router may be used to cut the walls and locker. The router bit will dull quickly.
•
If the panels are being installed over existing tile, scuff the tile using 100 grit sandpaper for better
adhesive contact.
•
If installing accessories, install 2x4 backing for handrails, shelves, and hooks and 2x10 backing for
the flip-down seat.
Kohler Co. 3 1242396-2-B

Plan the Installation
NOTE: Determine which accessories will be installed and where before installing wallboard backing
material, as accessories may require wood bracing.
Install any required bracing.
2x4 backing is required for the hook unless it is installed into the studding.
2x4 backing is required for all handrails and shelves.
2x10 backing is required for the flip-down seat.
Accessories
Flip Down Seat
Shelf
Shelf
Shelf
Hook
24" (610 mm) Handrail
36" (914 mm) Handrail
40" (1016 mm) Handrail
54" (1372 mm) Handrail
1242396-2-B 4 Kohler Co.

1. Prepare the Site
IMPORTANT! Water resistant wallboard backing material is recommended.
Install the rough plumbing for the bath and shower components.
Check the studs for plumb. Studs should be within 3/8″ (10 mm) of plumb, shim if necessary.
Determine the height of the enclosure and the locker unit.
Install 2x4 bracing where the locker unit will be placed following the dimensions shown above.
Install backing support for all accessories that require additional support. Refer to the installation
guides packed with each product for specific installation needs.
Install wallboard backing material over the locker unit opening with the same dimensions as the 2x4
bracing cut out.
65"
(1651 mm)
K-97630: 9" (229 mm)
K-97631: 14-1/2" (368 mm)
2x4 Bracing
K-97630: 9" (229 mm)
K-97631: 14-1/2" (368 mm)
Wallboard
Backing
65"
(1651 mm)
Kohler Co. 5 1242396-2-B

2. Measure Components
Determine if there will be vertical or horizontal seams beyond the corner locations.
Order optional seam joints as needed.
Determine if edge joints will be installed.
Order optional edge joints as needed.
Back Wall Measurement
Measure the installation area to determine the cut dimensions for the panels.
Subtract 1/16” (2 mm) from the width of each back wall panel for the locker unit seam joints.
Subtract 1/16” (2 mm) from the wall panel’s height or width for each additional seam joint.
Subtract half the total width of the locker from the width of each back panel.
If corner joints will be installed, subtract 1/16” (2 mm) from the width of the back panels for each
corner joint.
Mark the cut lines on the back side of the back panel.
Sidewall Measurement
If corner joints will be installed, subtract 5/16” (8 mm) from the width of each sidewall panel before
cutting.
Subtract 1/16” (2 mm) from each panel’s height or width for each seam joint that will be installed.
Record the location of the handle, showerhead, bath spout, and other components.
Mark the cut lines on the back side of the sidewall panels.
Optional: Installation with Ceiling Panels
CAUTION: Risk of injury. Install the ceiling panel prior to installing the panels. Allow the
adhesive to cure before installing the panels.
If the ceiling will be covered with the panel material, measure and cut the ceiling panel to size.
Seam
Joint
1242396-2-B 6 Kohler Co.

Measure Components (cont.)
Construct bracing or use commercial bracing to hold the ceiling material in place while it cures.
NOTE: Polyurethane based adhesive is recommended for the ceiling panel.
Apply construction adhesive to the ceiling material as shown in ″Install the First Wall Panel″
section.
With a partner, carefully lift the ceiling panel into place.
Brace the panel tight against the ceiling and allow it to cure following the adhesive instructions.
Kohler Co. 7 1242396-2-B

3. Trim the Locker and Walls
Cut Wall Placement
IMPORTANT! The cut edge of the panel MUST be positioned opposite the seam. The vertical edge of the
seam MUST mate to an uncut, bevel molded edge on the panel.
A seam joint can be used between panels but the trimmed edge location requirements remain
unchanged.
Cutting the Walls and Locker
IMPORTANT! It is recommended the panel be cut using a circular saw and abrasive wheel or an abrasive
masonry blade.
IMPORTANT! Do not cut the sides of the locker unit. Only trim the top or bottom to fit your wall length.
IMPORTANT! The locker unit must be placed with the shelf grooves angled upward. If the locker unit is
placed upside down the shelves will fall out.
Position the back wall panel face down on a stand or sawhorses that have a protective material on
them.
Cut the panel to the required dimensions. Use a jigsaw with a grit blade for contour cuts.
Repeat with the sidewall panels.
NOTE: Remove any protective films on the locker unit surface before cutting.
Cut the locker unit to the required dimensions using a fine toothed blade.
From the front side of the panel, use a hole saw to cut the holes for valving and other shower
components.
IMPORTANT! It is critical the wall and panels are clean for a strong bond to be created by the adhesive.
Remove excess material and sand any rough edges using a sanding block.
Clean the back of the walls and locker unit with denatured alcohol.
Back Side
Sanding Block
Cut Edge
Uncut Edge
Sidewall
Panel
Shower Valving
1242396-2-B 8 Kohler Co.

4. Dry Fit the Locker and Walls
Dry fit the corner joints to the back panels if they are being installed. See ″Install the Corner Joints
(Optional) for correct orientation.
Dry fit the locker unit, seam joints, back, and sidewall panels with shims to confirm fit. Adjust as
needed.
Remove the panels and locker unit.
Remove the seam joints and the corner joints.
Shim
Seam
Joint
Kohler Co. 9 1242396-2-B

5. Install the Corner Joints (Optional)
Measure the height of the back panel.
Cut the corner joint to the height of the back panel using a small rotary tool with a cutting wheel.
Apply color matched sealant in the deep channel groove on the corner joint. Apply enough sealant
to fill 1/2 of the groove.
Install the deep channel of the corner joint on the side of the back wall panel.
Do Not apply sealant or install the second corner joint until you are ready to install the second back
wall panel.
Deep Channel
Sealant
Shallow
Channel
Top View
Back Wall with Joints
Deep
Channel
Shallow
Channel
Top View
1242396-2-B 10 Kohler Co.

6. Install the First Wall Panel
NOTE: Use silicone adhesive if the panels are being installed over tile. Use bath and shower construction
adhesive for other applications.
Apply adhesive to the back wall panel in a circular pattern. The beads of adhesive should be 5” (127
mm) to 7” (178 mm) apart.
Apply a bead of construction adhesive along the top edge of the back wall panel 3/4” (19 mm) from
the edge.
Move the back wall panel into place at a slight angle with the corner joint, if installed, fully pressed
into the corner.
Push the panel against the rough wall. Press firmly and evenly across the entire wall. The panel
should contact the rough wall completely.
TIP: To remove excess sealant, spray denatured alcohol on the area to be cleaned and onto your
finger. The denatured alcohol will help make the removal of the sealant easier.
Remove the excess sealant with your finger.
NOTE: Bracing may be needed to hold the panel in place depending on the wall material and adhesive
being used.
When installed over tile, use a temporary brace to secure each wall panel in place for 48 hours to
allow full adhesion.
Shims
Construction
Adhesive
Corner Joint
(optional)
Back Side
Kohler Co. 11 1242396-2-B

7. Install the First Seam Joint
Fill one channel on the wall side of the seam joint with color matched silicone sealant.
Install the seam joint onto the installed back wall panel.
Apply color matched silicone sealant to the second channel of the seam joint when you are ready to
install the locker unit.
Seam
Joint
1242396-2-B 12 Kohler Co.

8. Prepare the Locker Unit
Run two pieces of duct tape across the front of the locker unit, pulling the sides in until the center
of the locker unit is at the dimensions shown above.
Test the shelf fit in the set of grooves just above and below the taped areas of the locker unit.
Ensure the shelf fits tight. If the fit of the shelf is loose, tighten the tape across the locker unit until a
snug fit is achieved.
Leave the tape in place until the final step of the installation.
TIP: Urethane based adhesive may be more effective for locker unit adhesion.
Generously apply bath and shower construction adhesive or silicone adhesive to the back of the
locker unit on the top, bottom, and sides.
9" (229 mm)
Locker
14-1/2" (368 mm)
Locker
10-7/8"
(276 mm)
16-13/16"
(427 mm)
Duct
Tape
Kohler Co. 13 1242396-2-B

9. Install the Locker Unit
IMPORTANT! The locker unit must be placed with the shelf grooves angled upward. If the locker unit is
placed upside down the shelves will fall out.
Position the locker unit into place at a slight angle.
Push the locker unit against the installed seam joint and into the rough wall. Press firmly and
evenly across the entire locker unit.
1242396-2-B 14 Kohler Co.

10. Install the Second Seam Joint
Fill one channel on the locker side of the seam joint with color matched silicone sealant.
Install the seam joint onto the installed locker unit.
Apply color matched silicone sealant to the second channel of the seam joint when you are ready to
install the second back wall panel.
Seam
Joint
Locker
Kohler Co. 15 1242396-2-B

11. Install the Second Wall Panel
NOTE: Use silicone adhesive if the panels are being installed over tile. Use bath and shower construction
adhesive for other applications.
Apply construction adhesive or silicone adhesive to the wall panel in the same manner as the first
wall panel. The beads of adhesive should be 5” (127 mm) to 7” (178 mm) apart.
Apply a bead of construction adhesive along the top edge of the back wall panel 3/4” (19 mm) from
the edge.
Move the back wall panel into place at a slight angle with the corner joint pressed into the corner, if
installed.
Push the panel against the rough wall. Press firmly and evenly across the entire wall. The panel
should contact the rough wall completely.
Push the panel against the rough wall and into the installed seam joint. Press firmly and evenly
across the entire wall. The panel should contact the rough wall along the entire area.
Confirm the locker unit contacts the seam joints along the entire area.
Remove the excess sealant with your finger.
NOTE: Bracing may be needed to hold the panel in place depending on the wall material and adhesive
being used.
When installed over tile, use a temporary brace to secure each wall panel in place for 48 hours to
allow full adhesion.
Construction
Adhesive
Corner Joint (optional)
Back Side
Corner
Joint
1242396-2-B 16 Kohler Co.

12. Prepare the Corner Joints (Optional)
Apply color matched sealant in the shallow channel groove on the corner joint. Apply enough
sealant to fill 1/2 of the groove.
Do Not apply sealant to the second corner joint until you are ready to install the second sidewall
panel.
Kohler Co. 17 1242396-2-B

13. Install the Sidewall Panels without Joints
NOTE: Use silicone adhesive if the panels are being installed over tile. Use bath and shower construction
adhesive for other applications.
Apply adhesive to the sidewall panel in a circular pattern. The beads of adhesive should be 5” (127
mm) to 7” (178 mm) apart.
Apply a bead of construction adhesive along the edges of the sidewall panel 3/4” (19 mm) from the
edge.
Move the sidewall panel into place at a slight angle, pressing the sidewall panel into the corner
joint, if installed.
Push the panel against the rough wall. Press firmly and evenly across the entire wall. The panel
should contact the rough wall along the entire area.
Remove the excess sealant with your finger.
NOTE: Bracing may be needed to hold the panel in place depending on the wall material and adhesive
being used.
When installed over tile, use a temporary brace to secure each wall panel in place for 48 hours to
allow full adhesion.
Repeat these steps with the second side of the enclosure.
1242396-2-B 18 Kohler Co.

14. Prepare the Seam Joints
Installing with Corner Joints
Determine the required length of the seam joint by measuring the width of the sidewall panel,
allowing enough length to extend 7/8″ (14 mm) into the channel of the corner joint.
NOTE: To trim the seam joint, a small rotary tool with a cutting wheel is recommended.
Cut the seam joint to the required length.
Trim the end of the seam joint where it will meet the corner joint as shown.
Installing without Corner Joints
Determine the required length of the seam joint by measuring the width of the sidewall panel.
NOTE: To trim the seam joint, a small rotary tool with a cutting wheel is recommended.
Cut the seam joint to the required length.
Corner
Joint
Seam
Joint
7/8"
(14 mm)
Side View
Seam
Joint
Kohler Co. 19 1242396-2-B

15. Install the Sidewall Panels with Joints
NOTE: Use silicone adhesive if the panels are being installed over tile. Use bath and shower construction
adhesive for other applications.
Apply adhesive to the sidewall panel in a circular pattern. The beads of adhesive should be 5” (127
mm) to 7” (178 mm) apart.
Apply a bead of construction adhesive along the edges of the sidewall panel 3/4” (19 mm) from the
edge.
Move the sidewall panel into place at a slight angle, pressing the sidewall panel into the corner joint
if there is one.
Push the panel against the rough wall. Press firmly and evenly across the entire wall. The panel
should contact the rough wall along the entire area.
NOTE: Bracing may be needed to hold the panel in place depending on the wall material and adhesive
being used.
Shims
1242396-2-B 20 Kohler Co.
/