Page is loading ...

Meross

Safety
Information
-----------------++--+22-reect
eect
ees
n
ees
n
sess cece
cesses:
3
Product
Description
------------------------+++--0----
022
reer
eee
errr
reese
4
Package
Content
.-.----------------------------------------------------------
4
Installation
Guide
--------------------------+++----++
2220-22222
eee
cree
eee
5
LED
and
Button
Rules
5
LED
and
Buzzer
Rules
6
Silence
Mode
—
-----------------
+2020
ener
reer
n
rec
ee
nee
ree
ener
enters
nercees
7
Test
Mode
©
------------------
2-2-2
e
eee
e
eee
een
e
ener
een nee
rene
eee
e
eee
e
eee eee
8
HOw
to
Use
----------
2-2-2
re
ene
e
rene
nen
ce
nnn
e
ecw
e
nnn
re
renner
rece ners ccen
eres
8
Recommend
Locations
-------------------------------+
+2222
r
eer
ee
reer
eee
9
Do
Not
Install
Here
---------------------------------
+222
22
reer
reer
reese
10
Hardware
Installation
=
------------------------------------------2222------
1
Maintenance
and
Cleaning
_
----------------------------2-----2
2222220222
12
Replace
Battery
-----------------------------
2222 rece ence
rere
ee
eee
ee
rere
12
Repair
—
--------------------------------
2222222222222
eee
e
eee
cece
cece
eee
12
Develop
and
Practice
a
Plan
of
Escape
--------------------------------
12
Troubleshooting
|
-----------------------
22222222222
cere
reece
cece
ee 13
Technical
Specifications
_
----------------------------+---2
222-22
reer
ee
eeee
13
FAQ
----
22-22
eee
eee
e
cence
ence
en
ene
eee
eee
eee
13
Warranty
=
--------
+2
222222
nn
nnn
rrr
rece
cee
14
Disclaimer
—
--------------------200--
20
rcc
rrr
rcc
cre
crc
r
erence
ec
c
nese
c
eee
14

Thank
you
for
purchasing
our
smoke
alarm
with
wireless
and
heat
detection.
Please
take
a
few
minutes
to
read
the
user
manual
thoroughly
and
familiarize
yourself
and
your
family
with
its
operations.
We
suggest
you
save
it
for
future
reference.
Safety
Information
1.
The
test
button
is
designed
for
accurate
test
of
the
smoke
alarm
functions.
Do
not
use
any
other
test
method.
Test
the
smoke
alarm
on
a
weekly
basis
to
ensure proper
functioning
of
the
product.
2.
If
you
are
sure
it
is
a
false
alarm,
open
windows
or
fan
the
air
around
the
smoke
alarm
to
reset
and
silence
it.
3.
While
installing
the
smoke
alarm,
user
needs
to
comply
with
all
local
and
national
electrical
installation
and
building
codes.
4.
This
smoke
alarm
is
designed
to
be
used
inside
a
single
family
home
only.
In
multifamily
buildings,
each
individual
living
unit
should
have
its
own
smoke
alarms.
Do
not
install
in
non-residential
buildings
as
this
smoke
alarm
is
not
a
substitute
for
a
complete
alarm
system.
5.
Install
a
smoke
alarm
in
every
room
and
on
every
level
of
the
home.
Smoke
may
not
reach
the
smoke
alarm
for
many
reasons.
For
example,
if
a
fire
starts
in
a
remote
part
of
the
home,
on
another
level,
in
a
chimney,
on
a
wall
roof,
or
on
the
other
side
of
a
closed
door,
smoke may
not
reach
the
smoke
alarm
in
time
to
alert
household
members.
The
smoke
alarm
will
not
promptly
detect
a
fire
except
in
the
area
or
room
in
which
it
is
installed.
6.
The
smoke
alarm
may
not
alert
every
household
member
every
time.The
alarm
chirp
is
loud
in
order
to
alert
individuals
to
a
potential
danger.
However,
there
may
be
some
circumstances
where
a
household
member
may
not
hear
the
alarm
(i.e.
outdoor
or
indoor
noise,
sound
sleepers,
drug
or
alcohol
usage,
the
hard
of
hearing,
etc.).
If
you
suspect
that
this
smoke
alarm
may
not
alert
a
household
member,
install
and
maintain
specialty
smoke
alarms.
Household
member
must
hear
the
alarm
and
quickly
respond
to
it
to
reduce
the
risk
of
injury,
or
death
that
may
result
from
fire.
If
a
household
member
is
hard
of
hearing,
install
special
smoke
alarms
with
lights
or
vibrating
devices
to
alert
occupants.
7.
Smoke
alarms
can
only
sound
their
alarms
when
they
detect
smoke
or
detect
combustion
particles
in
the
air.
They
do
not
sense
flame
or
gas.
This
smoke
alarm
is
designed
to
give
audible
warning
of
a
developing
fire.
However,
many
fires
are
fast-burning,
explosive,
or
intentional,
and
others
are
caused
by
carelessness
or
safety
hazards.
In
such
circumstances,
smoke
may
not
reach
the
alarm
QUICKLY
ENOUGH
to
ensure
safe
escape.
Therefore
the
installation
of
smoke
alarms
is
not
a
substitute
for
practicing
fire
safety
in
the
home.
8.
Smoke
alarms
have
limitations.
This
smoke
alarm
is
not
foolproof
or
guarantees
to
protect
lives
or
property
from
fire.
Smoke
alarms
are
not
a
substitute
for
insurance.
Occupants
should
have
adequate
insurance
coverage
for
their
lives
and
property.
In
addition,
it
is
possible
that
the
smoke
alarm
may
fail
at
any
time.
For
this
reason,
you
must
test
the
smoke
alarm
weekly.

This
unit
is
a
photoelectric
3V
DC
smoke
alarm.
It
is
operated
by
3V
AA
Alkaline
battery.
With
the
photoelectric
technology,
it
is
more
sensitive
in
detecting
slow
smoldering
fires
which
generate
light
smoke,
little
heat
and
may
smolder
several
hours
before
bursting
into
flames.
This
smoke
alarm
does
not
contain any
radioactive
material.
=
Package
Content
Q&S
meross
Ci j<
<<}
|<
1x
Alarm
2 x
Expansion
Screw
1x
User
Manual
2 x
AA
Battery
(<,
[=]
}
°
1x
Power
Adapter
1x
USB
Cable
1x
Smart
Hub
GS559AH
Only
*
If
you
find
any
part
missing
in
the
package,
please
contact
https://www.meross.com/support/Email_
Support
we
will
provide
proper
solution
for
you.

=
Installation
Guide
1.
Connect
your
smartphone
or
tablet
to
a
2.4
GHz
Wi-Fi
network.
2.
Make
sure
your
smart
hub
is
covered
by
strong
Wi-Fi
signal.
3.
The
smart
hub
supports
iOS
13/
iPadOS
13
and
later.
It
is
recommended
that
you
upgrade
your
iOS
or
iPadOS
to
the
latest
version
before
pairing
with
the
smart
hub.
4.
Download
the
Meross
app.
5.
Launch
the
Meross
app
and
log
in
to
your
account,
or
if
you
are
a
new
user,
tap
Sign
up
to
create
a
new
account.
6.
Tap
the
“+”
icon
to
select
the
type
of
smart
device
you
want
to
add,
then
you can
just
follow
the
setup
wizard
to
finish
configuration.
7.
Relocation
of
the
smart
hub
does
not
require
additional
operations
provided
that
it
remains
on
the
same
network
with
strong
Wi-Fi
signal.
NOTE:
1. If
this
is
not
the
first
time
you've
added
this
smart
hub,
you'll
have
to
reset
it
before
going
any
further.
2.
As
long
as
you
finish
configuration,
you'll
be
able
to
manage
the
device
in
Apple
Home
app.
3.
If
the
QR
code
does
not
work,
please
try
to
add
the
smart
device
in
Apple
Home
app.
4.
Find
more
at
https://www.meross.com/support/.
=
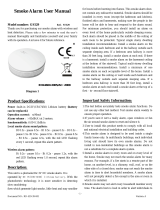
LED
and
Button
Rules
——®
@+
—_®
@
Status
LED
Flash
red
once:
The
device
is
powered
on.
Flash
red
rapidly:
Pairing
mode.
Solid
red:
Successfully
connected.
LED
will
be
OFF
automatically
in
5
seconds.
Flash
red
once
every
second:
Alarming.
Flash
red
once
every
16
seconds:
Silence
mode.

@
Test
Button
Test/silence:
Press
and
hold
over
1
second,
the
alarm
will
be
set
to
test/silence
mode.
Reset:
Keep
pressing
the
Test
Button
without
releasing
it,
and
power
on
the
device
with
the
battery.
At
this
time,
the
LED
will
stay
on
for
a
few
seconds
and
then
go
out.
After
the
LED
goes
out,
quickly
stop
pressing
the
Test
Button
(release
your
finger
from
the
Test
Button),
and
the
LED
will
stay
on
for
a
few
seconds
again.
At
the
moment,
press
the
Test
Button
again
and
you
will
hear
a
short
chirp,
which
means
the
reset
is
successful.
©
Status
LED
Solid
amber:
Initiating/Reset/Firmware
upgrading.
Flashing
amber
and
green:
Configuration
mode.
Flashing
green:
Pairing
mode/Connecting
to
Wi-Fi/Disconnected
from
Wi-Fi.
Solid
green:
Connected
to
Wi-Fi
with
internet
connection.
Solid
red:
No
internet
connection.
@
Button
Press
and
hold
(for
5
seconds)
until
Status
LED flashes
amber
and
green
to
set
into
configuration
mode.
Double
tap
to
set
into
pairing
mode.
=
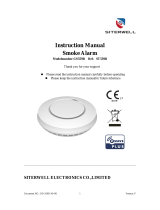
LED
and
Buzzer
Rules
Pair
with
hub
LED
Buzzer
Low
battery
and
Fault
mode
|
LED
Buzzer
Pairing
mode
Flash
red
rapidly
No
chirp
Low
battery
mode
Flash
red
once
every
50
seconds
The
buzzer
chirps
once
Successfully
connected
Solid
red,
will
be
OFF
in
5
seconds
|
Chirp
once
while
the
red
LED
flashes
Mode
LED
Buzzer
Fault
mode
Flash
red
once
every
50
seconds
The
buzzer
chirps
once
Standby
mode
Flash
red
once
every
50
seconds
No
chirp
between
the
red
LED
Smoke
alarm
Flash
red
once
every
second
chirp!
flashes
Heat
alarm
Flash
red
once
every
second
chirp?
The
alarm
is
powered
Flash
red
once
bow
battery
-
chirp
once:
Silence
mode
Flash
red
once
every
16
seconds
No
chirp
Powerful
battery
-
no
Test
mode
Flash
red
once
every
second
chirp’
chirp

chirp!:
chirp
0.5s
-
pause
0.5s
-
chirp
O.5s
-
pause
O.5s
-
chirp
0.5s
-
pause
1.5s
-
chirp
0.5s
-
pause
0.5s
-
chirp
O.5s
-
pause
0.5s
-
chirp
0.5s
-
pause
4.5s,
repeat
this
pattern.
(
ee
ee
EEL)
—
0.5s
OS
4.5s
6.5s
6.5s
chirp:
chirp
0.2s
-
pause
O.1s
-
chirp
0.2s
-
pause
O.1s
-
chirp
0.2s
-
pause
O.ls
...,
keep
this
pattern
for
8.5
seconds,
pause
4.5s,
repeat
this
pattern.
(
ao
a
)
|
|
|
| |
0.2s
/
O.1s
4.5s
8.5s
8.5s
Silence
Mode
When
the
alarm
chirps,
check
if
there
is
a
fire
first.
After
verifying
that
it
is
not
a
fire,
you can
silence
the
alarm
by
pressing
and
holding
the
test
button
(over
1
second).
This
will
silence
the
alarm
for
approximately
10
minutes.
The
red
LED
will
flash
once
every
16
seconds
indicating
the
smoke
alarm
is
in
the
silence
mode.
After
that,
if
particles
of
combustion
still
presents,
the
alarm
will
chirp
again.
Smoke
alarms
are
designed
to
minimize
nuisance
alarms,
but
combustion
particles
from
cooking
may
set off
the
alarm
if
the
alarm
is
located
close
to
the
cooking
area.
To
minimize
the
occurrence
of
false
alarms,
smoke
alarms
must
be
installed
a
minimum
of
3m
(1Oft)
from
the
nearest
cooking
appliance.
The
alarm
silence
is
extremely
useful
in
a
kitchen
area
or
other
areas
prone
to
nuisance
alarms.
The
silence
feature
is
to
be
used
only
when
a
known
alarm
condition,
such
as
smoke
from
cooking
activates
the
alarm.
—_—7—

Caution:
1.
Before
silencing
the
alarm,
identify
the
source
of
the
smoke
and
make
sure
the
surroundings
are
free
from
hazards.
2.
If
the
alarm
chirps
and
it
is
not
in
the
TEST
mode,
it
means
the
unit
is
sensing
smoke,
The
chirp
requires
your
immediate
attention
and
action.
Test
Mode
Test
the
unit
weekly
to
ensure
proper
functioning
of
the
product
by
pressing
and
holding
the
Test
Button.
This
will
chirp
the
alarm
if
the
electronic
circuitry,
buzzer,
and
batteries
are
working
properly.
If
no
alarm
chirps,
the
battery
may
be
depleted
or
there
exists
other
problems,
refer
to
"TroubleShooting"
section
for
a
solution.
To
protect
your
hearing,
when
you
press
and
hold
the
Test
Button,
the
alarm
chirp
will
not
be
too
loud
in
the
first
22
seconds,
yet
it
will
go
up
after
22
seconds.
Caution:
1.
Do
not
use
an
open
flame
to
test
your
alarm,
you
could
damage
the
alarm
or
ignite
combustible
materials
and
start
a
fire.
2.
Always
stand
an
arm
away
from
the
unit
when
testing.
3.
Test
the
alarm
on
a
weekly
basis.
How
to
Use
1.
General
Settings
+
Device
Settings
Device
name:
Change
device
name.
soe
nane
somamm
»
|
2Mart
hub:
Set
smart
hub
and
check
status.
coats
coonme
»
|
USer
manual:
Check
user
manual.
Alert:
Enable/disable
push
notifications.
“me
’|
Automation:
Set
certain
trigger
conditions
to
allow
presettings
by
other
Meross
smart
_
,
|
devices.
stomata
,
|
Test
alarm:
Test
whether
the
product
is
functioning
normally.
Test alam
>
Device
power
©

2.
Test
Alarm
History
Records
e
2020/11/28
+8000
2020/11/21
+8000
2020/11/14
rec000
2020/1117
+8000
2020/10/31
+8000
2020/10/24
rec000
‘Smoke
Alarm
“eat
alarm
“eat
alarm
“Test
alarm
“eat
alarm
“eat
alarm
“Test
alarm
w
Record
the
time
for
alarm
testing.
You
can
also
clear
the
records.
=
Recommend
Locations
1.
Locate
the
first
alarm
in
the
immediate
area
of
the
bedrooms.
2.
Try
to
monitor
the
exit
path
as
the
bedrooms
are
usually
farthest
from
the
exit.
If
more
than
one
sleeping
area
exists,
locate
additional
alarms
in
each
sleeping
area.
3.
Locate
at
least
one
alarm
on
every
floor
level.
4.
Locate
an
alarm
in
every
bedroom.
5.
Locate
an
alarm
in
every
room
where
electrical
appliances
are
operated
(i.e.
portable
heaters
or
humidifiers).
6.
Locate
an
alarm
in
every
room
where
someone
sleeps
with
the
door
closed.
The
closed
door
may
prevent
an
alarm
not
located
in
that
room
from
waking
the
sleeper.
7.
Smoke,
heat,
and
burning
things
will
spread
horizontally
after
rising
to
the
ceiling,
so
install
the
alarm
on
middle
of
the ceiling
ofordinary
structure
house.
Let
the
alarm
induce
every
corner.
8.
Not
recommend
to
use
for
Mobile
Home.
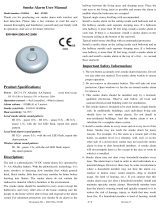
9.
For
single
floor
plan
and
multiple
floor
plan,
please
refer
to
the
diagram
@@
below.
10.
If
the
alarm
couldn't
be
installed
in
the
middle
of
the ceiling
for
some
reasons,
the
distance
which
the
alarm
away
from
the
wall
corner
should
be
beyond
10cm
(4in.),
please
refer
to
the
diagram
@
below.
Tl.
If
the
length
of
the
room
or
the
hall
is
beyond
9m
(30ft),
you
need
install
several
alarms
in
the
hall.
12.
When
the ceiling
is
slanting,
the
alarm
needs
to
be
installed
15cm
(6in.)
/
30cm
(12in.)
away
from
the
highest
ceiling
point
in
the
room,
please
refer
to
the
diagram
@@
below.
3.
Silence
<
‘Smoke
Alam
a2ap>
-—
Living
room's
Alarm
‘Smoke
detected
‘Temperature
is
too
high
Silence
the
alarm
for
minutes
when
the
alarm
is
chirping.

Dining
|
kitchen
7
Bedroom
|
Bedroom
room
O
,
O
O O
~ [
a
—
e
Bedroom
|
Hall
O
—
Ss
O
Living
.
Living
room
Kitchen
Room
IN
Bedroom
7
Single
floor
plan
P
why
jasement
@Smoke
alarms
for
minimum
protection
OSmoke
alarms
for
additional
protection
Multiple
floor
plan
@ @
=
Bedroom
Tom
(ain)
ili
7
Minimum
%
Ceiling
<
30cm
(12in.)
not
in
this
area
—,
»
15cm
(6in.)
Not
in
this
area
oem
(28in)
PA
t
Anywhere
in
this
area
+
Best
here
4
TIScm
(45in.)
“
Side
Anywhere
in
this
area
=
wall
“
Do
not
Do
not
install
here
install
here
@ @ ©
=
Do
Not
Install
Here
1.
Near
appliances
or
areas
where
normal
combustion
regularly
occurs
(kitchens,
near
furnaces,
hot
water
heaters).
Use
specialized
smoke
alarm
device
with
unwanted
alarm
control
for
this
area.
2. In
areas
with
high
humidity,
like
bathrooms
or
areas
near
dishwashers
or
washing
machines.
Install
at
least
3m
(10ft)
away
from
these
areas.
3.
Near
air
returns
or
heating and
cooling
supply
vents.
Install
away
from
these
areas
at
least
0.9m
(3ft).
The
air
could
blow
smoke
away
from
the
detector,
interrupting
its
alarm.
4.
In
rooms
where
temperatures
may
fall
below
0°C
(32°F)
or
rise
above
40°C
(104’F),
or
in
humidity
higher
than
93%.
These
conditions
will
reduce
battery
life
or
cause
a
fault
alarm.
5. In
extremely
dusty,
dirty,
or
insect-infested
areas,
particles
interfere
with
smoke
alarm
device
operation.
—10—

=
Hardware
Installation
Because
it
becomes
very
difficult
to
move
the
position
of
the
alarm
after
hardware
installation,
we
recommend
that
you
refer
to
the
"Installation
Guide"
section
first,
and
then
proceed
with
the
hardware
installation
after
the
software
is
installed.
].
Fix
the
two
AA
batteries
to
each
battery
box
of
the
-
smoke
alarm.
2.
Press
the
bracket
on
the
installation
position,
mark
installation
hole
of
bracket
with
pencil.
3.
Use
an
electric
drill
to
drill
two
mounting
holes
on
the
mark
so
that
the
diameter
of
the
holes
is
5mm
(0.2in.).
Strike
the
two
plastic
plugs
into
holes
with
hammer.
4.
Attach
the
bracket
to
the
plastic
plugs
and
fix
tightly
the
screws
into
the
plastic
plugs.
5.
Fit
the
alarm
on
the
bracket
and
turn
the
alarm
body
SS
clockwise,
until
matching
well
on
the
bracket.
6.
Test
smoke
alarm
using
the
test
button.
If
there
is
no
sound,
something
might
be
wrong
with
the
alarm,
you
[-
Two
screws
>|
can
refer
to
"TroubleShooting"
section
for
solution.
7.
If
you
have
any
questions
on
installation,
please
contact
https://www.meross.com/support/Email
Support,
we
will
provide
proper
solution
for
you.
Holes
in
ceiling
<
Plastic
plugs
>
Caution:
To
prevent
injury,
the
product
must
be
securely
attached
to
the
ceiling
in
accordance
with
the
installation
instructions.
—11—

=
Maintenance
and
Cleaning
1.
In
addition
to
weekly
testing,
the
alarm
requires
periodic
cleaning
to
maintain
a
good
working
condition.
Clean
the
alarm
at
least
once
a
year
to
remove
dust,
dirt, or
debris.
Use
a
vacuum
cleaner
with
a
soft
brush,
vacuum
all
sides
and
covers
of
smoke
alarm.
2.
Do
not
attempt
to
remove
the
cover
to
clean
inside.
This
will
void
the
warranty.
=
Replace
Battery
1.
Tum
the
alarm
body
counterclockwise
and
take
out
the
alarm
body
from
the
bracket.
2.
Take
out the
old
battery
from
the
battery
box.
3.
Fix
the
two
new
batteries
to
the
battery
box.
Please
note
the
battery
polarity.
4.
Fit
alarm
body
on
bracket
and
turn
the
alarm
body
clockwise.
5.
Test
smoke
alarm
using
test
button,
the
alarm
will
chirp,
If
the
test
continues,
the
chirps
will
become
louder.
If
there's
no
sound
output,
it
means
that
the
smoke
alarm
is
faulty
or
the
installation
is
incorrect,
and
you
should
refer
to
the
"TroubleShooting"
section
for
the
correct
installation.
=
Repair
1.
Do
not
attempt
to
repair
the
alarm.
It
will
compromise
your
warranty.
2.
If
the
alarm
is
not
operating
properly
during
the
warranty,
please
visit
https://www.meross.com/support/warranty
for
detailed
warranty
policy
and
product
registration.
=
Develop
and
Practice
a
Plan
of
Escape
1.
Install
and
maintain
fire
extinguishers
on
every
level
of
the
home
and
in
the
kitchen,
basement
and
garage.
Know
how
to
use
a
fire
extinguisher
prior
to
an
emergency.
2.
Make
a
floor
plan
indicating
all
doors
and
windows
and
at
least
two
escape
routes
from
each
room.
Second
story
windows
may
need
a
rope
or
chain
ladder.
3.
Have
a
family
meeting
and
discuss
your
escape
plan,
showing
everyone
what
to
do
in
case
of
fire.
4.
Determine
a
place
outside
your
home
where
you
all
can
meet
if
a
fire
occurs.
5.
Familiarize
everyone
with
the
sound
of
the
smoke
alarm
and
train
them
to
leave
your
home
when
they
hear
it.
—12—

6.
Practice
a
fire
drill
at
least
every
six
months,
including
fire
drills
at
night.
Ensure
that
small
children
hear
the
alarm
and
wake
when
it
sounds.
They
must
wake
up
in
order
to
execute
the
escape
plan.
Practice
allows
all
occupants
to
test
your
plan
before
an
emergency.
You
may
not
be
able
to
reach
your
children.
It
is
important
they
know
what
to
do.
7.
Current
studies
have
shown smoke
alarms
may
not
awaken
all
sleeping
individuals,
and
that
it
is
the
responsibility
of
individuals
in
the
household
that
are
capable
of
assisting
others
to
provide
assistance
to
those
who may
not
be
awakened
by
the
alarm
sound,
or
to
those
who may
be
incapable
of
safely
evacuating
the
area
unassisted.
=
Troubleshooting
Problem
Cause
and
Remedy
|
1.
Clean
smoke
alarm.
Please
refer
to
the
"Maintenance
and
Cleaning"
section.
1,
Smoke
alarm
does
not
chirp
when
tested
(press
and
hold
over
1
second)
2.
If
problems
persist
and
the
product
is
still
under
warranty, please
contact
2.
The
alarm
chirps
not
as
usual
https://www.meross.com/support/Email
Support, we
will
provide
proper
solution
3.
Fault
mode
for
you.
3.
If
the
product
is
out
of
warranty,
please
replace
with
a
new
one.
Le
(The
hi
hile
th
LED
flash
Bee
mode
(The
buzzer
chirps
once
while
the
red
ashes
every
The battery
is
depleted,
please
replace
the
battery.
1,
Press
test
button
to
silence
mode.
2.
Clean
smoke
alarm.
Please
refer
to
the
"Maintenance
and
Cleaning"
section.
3.
Move
the
alarm
to
a
new
location
and
press
test
button.
4.
Do
not
disconnect
battery
to
quiet
an
unwanted
alarm.
Smoke
alarm
sounds
unwanted
alarms
intermittently
or
when
residents
are
cooking,
taking
showers,
etc.
=
Technical
Specifications
Sensor
Type:
Photoelectric
Battery:
DC
1.5V
x
2
Alkaline
AA
battery,
replaceable,
typical
about
1
year
Recommend
battery:
Energizer:
E91
/
Gold Peak
Group:
GP
15A
LR6
/
Raymax:
LR6
Alarm Volume:
>
85
dB
(A)
at
3m
(10ft)
Alarm
Sensitivity:
0.115
-
0.168
dB/m
Heat
Sensitivity:
54
-
70°C
(129
-
158°F)
Dimensions
(W
x
D
x
H):
120
x
120
x
36.7
mm
(4.72
x
4.72
x
1.44
in.)
Weight:
162+8g
(5.7140.280z)
Wireless
Standard:
433MHz
(between
hub
and
alarm)
=
FAQ
At
Meross,
we
strive
to
assure
your
satisfaction.
Attached
below
is
a
non-exhaustive
list
of
questions
that
users
are
mostly
concerned
about.

1.
What
should
|
do
when
my
Meross
app
is
unable
to
check
the
added
smart
sensor?
You
can
troubleshoot
the
followings:
-
Check
the
Wi-Fi
internet
connection.
-
Make
sure
the
Wi-Fi
password
hasn't
been
changed.
-
Make
sure
the
device's
battery
is
not
used
up.
-
Make
sure
the
paired
Smart
Hub
is
still
online.
You
can
check
its
LED
color,
if
it
is
not
solid
green,
please
power
cycle
it
once,
if
it
still
not
works,
please
reset
the
Smart
Hub
and
configure
it
with
the
Smart
Sensor
once
more.
2.
How
to
fix
a
HomeKit
pairing
failure?
Please
visit
https://www.meross.com/support/FAQ/230.html
for
solution.
3.
Why
is
my
Meross
smart
device
not
responding
in
Apple
Home
app?
This
is
an exisitng
issue
with
Apple
Home
app.
You
need
to
exit
and
reboot
your
Home
app
to
fix
this
problem.
To
learn
more,
you
can
visit
https://www.meross.com/support/fags
to
find
solutions
for
more
frequently
asked
questions.
Warranty
Meross
products
are
covered
by
a
24-month
limited
warranty
from
the
date
of
purchase.
Please
visit
https://www.meross.com/support/warranty
for
detailed
warranty
policy
and
product
registration.
Note:
The
warranty
does
NOT
cover
the
batteries
supplied.
1.
The
function
of
this
smart
device
is
tested
under
a
typical
circumstance
described
in
our
specifications.
Meross
does
NOT
guarantee
that
the
smart
device
shall
perform
exactly
the
same
as
described
under
all
circumstances.
2.
By
using
third-party
services
including
but
not
limitted
to
Apple
HomeKit
and
SmartThings,
customers
acknowledge
that
Meross
shall
not
be
held
liable
in
any
way
for
the
data
and
private
information
collected
by
such
parties.
Meross's
total
liability
is
limited
to
what
is
expressly
covered
in
its
Privacy
Policy.
3.
Damages
arising
from
ignorance
of
the
SAFETY
INFORMATION
shall
not
be
covered
by
Meross
aftersales
service,
nor
does
Meross
take
any
legal
responsibility
therefrom.
Customers
acknowledge
understanding
of
these
articles
clearly
by
reading
this
manual.
—14—

Manufacturer:
Siterwell
Electronics
Co.,
Ltd.
SIMPLE DEVICE
SIMPLIFY
YOUR
LIFE
Email:
Website:
www.meross.com
Address:
No.666
Qingfeng
Road,
Jiangbei
District,
Ningbo,
Zhejiang
Province,
China
Product
Ident
GmbH
(for
Prodsg
authorities
only)
[ec
|
REP)
98,
71080
|
Bod
8
=
0905
EN
14604:2005/AC:2008
559A-CPR-(0001)
0905-CPR-00632
f20
MADE
IN
CHINA
INDOOR
USE
ONLY
/