Page is loading ...

Doc
u
SI
T
u
ment NO.: R
D
T
ERW
E
D
-559B-39-001
I
Mo
d
Please r
e
Pleas
e
E
LL EL
E
nstru
c
Sm
o
d
elnumbe
r
Than
k
e
ad the inst
r
e
keep the
i
E
CTRO
N
1
c
tion
M
o
ke A
l
r
:GS559B
k
you for yo
u
r
uction man
i
nstruction
m
N
ICS C
O
M
anu
a
l
arm
Ref:ST
5
u
r support
u
al careful
l
m
anualfor
f
O
.,LIM
I
a
l
5
59B
l
y before o
p
f
uture refer
e
I
TED
Vers
p
erating
e
nce
ion: F

Document NO.: RD-559B-39-001 2 Version: F
Product Introduction
The unit is a photoelectric 3V DC smoke and heat alarm. It is operated by 3v AA
Alkaline battery. With the photoelectric technology, it is more sensitive in detecting
slow smoldering fires which generate light smoke.little heat and may smolder for
hours before bursting into flames. This smoke alarm does not contain any radioactive
material.
The smoke alarm is an intelligent security equipment that can be controlled by the
Z-Wave network which has particular frequency. Different countries or areas, the
radio frequency of the Z-Wave is different. This product can be included and operated
in any Z-Wave network with other Z-Wave certified devices from other manufacturers
and/or other applications. All non-battery operated nodes within the network will act
as repeaters regardless of vendor to increase reliability of the network. In the Z-Wave
network communications, the smoke alarm can communicate with other devices
associated. When the smoke is detected, the sensor will send messages to the main
controller, and then the alarm sound. Through the Z-Wave network, the devices
associated can response after smoke is detected, For instance ,Start fire extinguishing
equipment and trigger an alarm,Through the Z-Wave network controller, You will be
notified in case of fire.
Technical Parameters
Power : DC2*1.5V Alkaline AA battery (Gold Peak Group: GP15A LR6 or
Energizer: E91 or Raymax: LR6)
Operation current : <13uA (Standby current), <90mA (Alarm current)
Alarm volume : >85dB(A) at 3 meters.
Smoke sensitivity : 0.114-0.167dB/m
Silence time: approx10 minutes
Heat sensitivity: 54-70℃
Local smoke alarm sound pattern: BI 0.5s - pause 0.5s – BI 0.5s – pause 0.5s – BI
0.5s – pause 1.5s, BI 0.5s - pause 0.5s – BI 0.5s – pause 0.5s – BI 0.5s – pause
4.5s, with the red LED flash, repeat this alarm pattern.
Local heat alarm sound pattern: BI 0.2s - pause 0.1s, with the red LED flash,
repeat this alarm pattern for about 8.5seconds,then pause 4.5 seconds. repeat this
alarm pattern.
Comply With: EN14604:2005/AC:2008
Radio Protocol: Z-Wave
Radio Frequency: 868.4MHz EU; 908.4MHz US
Wireless distance: >50 m in buildings
Security: S2_UNAUTHENTICATED

Document NO.: RD-559B-39-001 3 Version: F
Product Configuration
Product List:
Smoke Alarm 1pc
Bracket 1pc
Screw 2pcs
Screw stopper 2pcs
Instruction 1pc
Wireless function description:
Add(Including) alarm to Z-Wave Network
1:Make sure the battery is installed well before operating the product.
2:Make sure the alarm is on its final install location, then set the controller into the
Add(Inclusion )mode.
3:Quickly, triple click the test button, The LED will light up.
4:Issued beep, LED off, the alarm being Add (included)to the network successfully.
Remove(Excluding) alarm for Z-Wave Network
1: Make sure the battery is installed well before operating the product.
2: Set the Z-Wave Network controller into Remove(exclusion) mode.
3:Quickly, triple click the test button, The LED will light up and alarm enter
Remove(Excluding) Mode.
4:Wait for the main controller to Remove(exclusion) the alarm.
Note: If the alarm is Remove(excluded), then the sensor will be itselfrestored to
factory default settings.
Restore the alarm to factory default settings
Reset will delete all information on the Z-Wave network controller, and restore the
alarm to factory default settings.
1: Press and hold the test button , Installing the battery, red LED light, until the LED
is off, release the button, LED light up again, press the button again, When hearing a
beep, restore factory settings successfully.
Note: If this sensor is reset, the information of Z-Wave network in the sensor will be
deleted. The sensor will be itself restored to factory default settings. Please use this
procedure only when the network primary controller is missing or otherwise
inoperable.
Associations
This has the effect that when the sensor detects the smoke, all devices associated with
the sensor will receive the relevant reports and can be controlled by the sensor, e.g.
Fire extinguishing equipment, alarm device etc.
This device supports five linkage groups:
Linkage group 1 is Lifeline.

Document NO.: RD-559B-39-001 4 Version: F
Linkage group 2 is assigned to the devices status - sending BASIC SET control frame
to the associated devices having detected the smoke alarm.
Linkage group 3 reports the detection's status to the associated device. smoke alarm
Linkage group 4 is assigned to the devices status - sending BASIC SET control frame
to the associated devices having detected the heat alarm.
Linkage group 5 reports the detection's status to the associated device.
The alarm will send a “BASIC SET(0xFF)” message to associated group2,4 when
pressing test button. to check the function; The alarm will also send a “BASIC
SET(0x00)” message to associated group2,4 when quiting the test button. The alarm
will also send a “BASIC SET(0xFF)” message to associated group2, when the alarm
detects the smoke; and the alarm will also send a “BASIC SET(0x00)” message to
associated group2, when the smoke is cleared.The alarm will send a “BASIC
SET(0xFF)” message to associated group4, when the heat function is overheat alarm;
and the alarm will also send a “BASIC SET(0x00)” message to associated group4,
when the overheat alarm is cleared.
The maximum number of devices that can be added to the Linkage group 1is 1.
The maximum number of devices that can be added to the Linkage group 2,3,4,5 is 4.
Command Classes:
This sensor supports Command Classes as below:
COMMAND_CLASS_ZWAVEPLUS_INFO(V2)
COMMAND_CLASS_ASSOCIATION(V2)
COMMAND_CLASS_MULTI_CHANNEL_ASSOCIATION(V3)
COMMAND_CLASS_ASSOCIATION_GRP_INFO(V3)
COMMAND_CLASS_VERSION(V2)
COMMAND_CLASS_MANUFACTURER_SPECIFIC(V2)
COMMAND_CLASS_DEVICE_RESET_LOCALLY(V1)
COMMAND_CLASS_POWERLEVEL(V1)
COMMAND_CLASS_BATTERY(V1)
COMMAND_CLASS_NOTIFICATION(V8)
COMMAND_CLASS_WAKE_UP(V2)
S2 supported Command Classes:
COMMAND_CLASS_VERSION COMMAND_CLASS_ASSOCIATION
COMMAND_CLASS_MULTI_CHANNEL_ASSOCIATION
COMMAND_CLASS_ASSOCIATION_GRP_INFO
COMMAND_CLASS_MANUFACTURER_SPECIFIC
COMMAND_CLASS_DEVICE_RESET_LOCALLY
COMMAND_CLASS_POWERLEVEL COMMAND_CLASS_BATTERY
COMMAND_CLASS_NOTIFICATION COMMAND_CLASS_WAKE_UP
COMMAND_CLASS_SUPERVISION
Supported Notification Type: Smoke Alarm
Smoke AlarmSupportedEvent:
1:Smoke detected,Unknown Location(0x02)
2:SmokeAlarm Test(0x03)

Document NO.: RD-559B-39-001 5 Version: F
3:Replacement Required,Unspecified reason(0x04)
4:Alarm Silenced(0x06)
Supported Notification Type: Heat Alarm
Heat Alarm Supported Event: 1:Overheat detected,Unknown Location(0x02)
2:Heat Alarm Test(0x07)
3:Replacement Required,End-of-life(0x08)
4:Alarm Silenced(0x09)
Important Safety Information:
1. The test button accurately tests smoke alarm functions. Do not use any other test method. Test
smoke alarm weekly to ensure proper operation.
2. If you're sure it isn't a really alarm, open windows or fan the air around smoke alarm to test and
silence it.
3. User to install this product needs to comply with all local and national electrical installation and
building codes.
4. This smoke alarm is designed to be used inside a single family home only. In multifamily
buildings, each individual living unit should have its own smoke alarms. Do not install in
non-residential buildings as this smoke alarm is not a substitute for a complete alarm system.
5. Install a smoke alarm in every room and on every level of the home. Smoke may not reach the
smoke alarm for many reasons. For example, if a fire starts in a remote part of the home, on
another level, in a chimney, wall, roof, or on the other side of a closed door, smoke may not
reach the smoke alarm in time to alert household members. A smoke alarm will not promptly
detect a fire except in the area or room in which it is installed.
6. Smoke alarm may not alert every household member every time. The alarm horn is loud in order
to alert individuals to a potential danger. However, there may be some circumstances where a
household member may not hear the alarm (i.e. outdoor or indoor noise, sound sleepers, drug or
alcohol usage, the hard of hearing, etc.). If you suspect that this smoke alarm may not alert a
household member, install and maintain specialty smoke alarms. Household member must hear
the alarm’s warning sound and quickly respond to it to reduce the risk of injury, or death that
may result from fire, if a household member is hard of hearing, install special smoke alarms
with lights or vibrating devices to alert occupants.
7. Smoke alarms can only sound their alarms when they detect smoke or detect combustion
particles in the air. They
do not sense heat, flame, or gas. This smoke alarm is designed to give audible warning of a
developing fire. However, many fires are fast - burning, explosive, or intentional, and others are
caused by carelessness or safety hazards. In such circumstances, Smoke may not reach the alarm
QUICKLY ENOUGH to ensure safe escape. Therefore the installation of smoke alarms is not a
substitute for practicing fire safety in the home.
8. Smoke alarms have limitations. This smoke alarm is not foolproof and is not warranted to
protect lives or property from fire. Smoke alarms are not a substitute for insurance.
Homeowners and renters should have adequate insure to protect their lives and property. In
addition, it is possible for the smoke alarm to fail at any time. For this reason, you must test the

Document NO.: RD-559B-39-001 6 Version: F
smoke alarm weekly and replace them every 10 years.
Do Not Install Smoke Alarms in the Following Places:
1:Near appliances or areas where normal combustionRegularly occurs (kitchens, near furnaces,
hot water heaters).Use specialized smoke alarm device with unwanted alarm control for this
areas.
2:In areas with high humidity, like bathrooms or areas near dishwashers or washing machines.
Install all least 10feet away from these areas.
3:Near air returns or heating and cooling supply vents. Install at least 3 feet away from these areas.
The air could blow smoke away from the detector, interrupting its alarm.
4:In rooms where temperatures may fall below 0℃or rise above 40℃, or in humidity higher than
93%. These conditions will reduce battery life or cause a fault alarm.
5:Inextremely dusty, dirty, or insect – infested areas influence particles interfere with smoke alarm
deviceoperation.
Battery Usage Tips
Battery Specification:
Rating voltage: DC 1.5V
Package: AA alkaline battery
Recommend battery:
Raymax: LR6
Energizer: E91
Gold Peak Group: GP15A LR6
Replace Battery(see the diagram1).:
1: Turn the alarm body counterclockwise and take out the alarm body from the bracket.
2: Take out the old battery from the battery box.
3: Fix the two new batteries to the battery box. Please note the battery polarity.
4: Fix the battery into battery box, fit alarm body on bracket and turn the alarm body clockwise.
5: Test smoke alarm using test button. The sound pattern is 3 short beeps-1.5seconds pause,3 short
beeps-4.5seconds pause, repeat it. If there’s no sound output, it means that the smoke alarm is
faulty or the installing operation is wrong, and you should gain the correctly method of
disposal through reading “TROUBLE SHOOTING”.

Document NO.: RD-559B-39-001 7 Version: F
Diagram1
RECOMMENDED LOCATIONS FOR ALARMS:
• Locate the first alarm in the immediate area of the bedrooms. Try to monitor the exit path as the
bedrooms are usually farthest from the exit. If more than one sleeping area exists, locate
additional alarms in each sleeping area.
• Locate additional alarms to monitor any stairway as stairways act like chimneys for smoke and
heat.
• Locate at least one alarm on every floor level.
• Locate an alarm in every bedroom.
• Locate an alarm in every room where electrical appliances are operated (i.e. portable heaters or
humidifiers).
• Locate an alarm in every room where someone sleeps with the door closed. The closed door
may prevent an alarm not located in that room from waking the sleeper.
• Smoke, heat, and combustion products rise to the ceiling
and spread horizontally. Mounting the smoke alarm on the ceiling in the center of the room
places it closest to all points in the room. Ceiling mounting is preferred in ordinary residential
construction.
• Not recommend to use for MOBILE HOME.
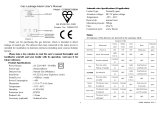
• For single floor plan and multiple floor plan, please refer to diagram 2 and diagram 3.
• If alarm couldn’t be installed in the middle of the ceiling for some reasons, the distance which
the alarm away fromthe wall corner should be beyond 50cm. (see the diagram 4).
• If the length of the room or the hall is beyond 30 foot, you need install several alarms in the hall.
• When the ceiling is slanting, the alarm needs to be installed 500mm away from the highest
ceiling point in the room (see the diagram5).

Document NO.: RD-559B-39-001 8 Version: F
Diagram 4 Diagram 4
Diagram 2
Diagram 3 Diagram 5
Installation Steps
·Fix the two AA batteries to each battery box of the smoke alarm.
·According to the “Wireless function description”
Section to operate the smoke alarm. Ensure the wireless function is ok.
·Then press the bracket on the installation position, mark installation hole of bracket with pencil.
·Bore two installation hole on the sign with electric drill. Make diameter of holes is 5mm, Strike
the two plastic plugs into holes with hammer.
·Attach the bracket to the plastic plugs and fix tightly the screws (3*25mm) into the plastic plugs.
(refer to Diagram 6).
·Fit the alarm on the bracket and turn the alarm body clockwise, until matching well on the
bracket.
·Test smoke alarm using test button. The alarm will sound 3 short beeps – 1.5 seconds pause, then
repeat it until release the button.
·if no sound, it indicates a defective alarm, you can refer to “Trouble shooting” for solution or
return to your retailer during warranty.

Document NO.: RD-559B-39-001 9 Version: F
·If you have any questions on installation, you can contact your retailer.
·During testing, may the other smoke detector will alarm. Once release the button, others will stop
alarming in 1 minute. In such a way, you can check the wireless function.
WARNING:
To prevent injury, this unit must be securely attached to the ceiling in accordance with the
installation instructions.
Tips
Testing:
Test the unit weekly to ensure proper operation by pressing the test button. about 3 seconds later,
this will sound the alarm if the electronic circuitry, horn, and battery are working properly. If no
alarm sounds, the battery may be depleted or another problem, refer to “Trouble shooting” section
for a solution.
DO NOT use an open flame to test your alarm, you could damage the alarm or ignite combustible
materials and start a structure fire.
CAUTION:Press the test button,the alarm generates a 2 cycle of soft alarm sound (After about 8
seconds),then the alarm sound will return to normal volume (>85dB),always stand an arms-length
away from the unit when testing. Test the alarm weekly to ensure proper operation. Erratic or low
sound coming from your alarm may indicate a defective alarm. Refer to “Trouble shooting”
section for a solution.
NOTE: WEEKLY TESTING IS REQUIRED
LED indicators
Diagram 6

Document NO.: RD-559B-39-001 10 Version: F
This smoke alarm is equipped with red LED indicators.
Standby Condition: The red LED will flash every 50 seconds to indicate that the smoke alarm is
operating properly.
Alarm Condition: When the alarm senses products of combustion and goes into alarm, the red
LED will flash rapidly (one flash per second).The rapid flashing LED and pulsating alarm will
continue until the air is cleared or the test button is released.
Silence Condition: The red LED will flash every 16 seconds as long as the alarm is in Hush
mode.
Low battery trouble indication: An intermittent “chirp” accompanied by a red LED flash every
50 seconds indicates a low battery, you may press the test button to silence the trouble indication
for 10 hours, but it will reset automatically after 10 hours. During this condition the unit will
continue to operate normally and detect smoke and sound an alarm. This action only temporarily
silences the chirp.
NOTE: As the battery in this unit is not replaceable, a low battery signal is an indication of end of
life. Therefore the alarm MUST be replaced as soon as possible!
Fault indication: This chirp will occur between the flashes of the red LED indicator light.
NOTE: When the unit chirps once every 50 seconds, pressing the test button temporarily
silences this warning tone for 10 hours,Refer to “Trouble shooting” section for solutions, if the
fault signal reactivates, you MUST replace
the unit with a new alarm at once or contact you retailer during warranty.
SMOKE SENSING CHAMBER OPERATION: This alarm will “chirp” if any of the components
in the smoke sensing chamber fail. This chirp will occur between the flashes of the red LED
indicator light. (If the chirp occurs at the same time as the red LED flash, indicating a low battery
information).
Alarm silence (silence mode):
When the alarm sounds check for a fire first, After verifying that it is not a fire the alarm can be
silenced by pushing the test button This will silence the alarm for approx 10 minutes. The red
LED will flash once every 16 seconds indicating the smoke alarm is in the silence mode. Smoke
alarms are designed to minimize nuisance alarms, but combustion particles from cooking may set
off the alarm if the alarm is located close to the cooking area. To minimize the occurrence of false
alarms, smoke alarms must be installed a minimum of 10 feet(3 meters) from the nearest cooking
appliance. If you accidentally let some smoke into the alarm cause alarm, you can open the doors
and windows. Turn on the fan blew it. The alarm will silence (test button) is extremely useful in a
kitchen area or other areas prone to nuisance alarms. The silence feature is to be used only when a
known alarm condition, such as smoke from cooking activates the alarm. The smoke alarm is
desensitized by push the alarm silence (silence mode) on the smoke alarm cover, the alarm will
silence to indicate that the alarm is in a temporarily desensitized condition. The smoke alarm will
automatically reset after approximately 10 minutes, if after this period, particles of combustion are
still present, the alarm will sound again. The alarm silencer (silence mode) can be repeatedly until

Document NO.: RD-559B-39-001 11 Version: F
the air has been cleared of the condition causing the alarm.
CAUTION: Before using the alarm silence (silence), identify the source of the smoke and be
certain a safe condition exists.
DANGER: If the alarm sounds, and it is not being tested, it means the unit is sensing smoke, THE
SOUND OF THE ALARM REQUIRES YOUR IMMEDIATE ATTENTION AND ACTION.
Low Battery status:
An intermittent "chirp" accompanied by a flashing red LED indicates once every 50 seconds
indicating that the battery has reached a low voltage. And this is a non-replaceable battery alarm,
so you need to replace a new smoke alarm within 7 days, In order to avoid noise to disturb your
sleeping in the night time, pressing the test button temporarily silence this warning tone for 10
hours,after 10 hours it will again prompt you to replace the battery.
WHAT TO DO WHEN THE ALARM SOUNDS:
1. Alert small children in the home to quickly follow the family escape plan.
2. Leave immediately by your escape plan. Every second counts, so don’t waste time getting
dressed or picking up valuables.
3. In leaving, don’t open any inside door without first feeling its surface. If hot, or if you see
smoke seeping through cracks, don’t open that door! Instead, use your alternate exit. If the
inside of the door is cool, place your shoulder against it, open it slightly and be ready to slam it
shut if heat and smoke rush in.
4. Stay close to the floor if the air is smoky. Breathe shallowly through a cloth, wet if possible.
5. Once outside, go to your selected meeting place and make sure everyone is there.
6. Call the fire department from your neighbor’s home -not from yours!
7. Don’t return to your home until the fire officials say that it is all right to do so. There are
situations where a smoke alarm may not be effective to protect against fire.
8. For instance:
a) Smoking in bed
b) Leaving children home alone
c) Cleaning with flammable liquids, such as gasoline
Note: These guidelines will assist you in the event of a fire, however, to reduce the chance that
fires will start, practice fire safety rules and prevent hazardous situations.
Trouble shooting:
DO NOT disconnect battery to quiet an unwanted alarm. This will remove your protection. Fan
the air or open a window to remove smoke or dust.
Problem Cause and Remedy
Smoke alarm does not
sound when tested.
1.Activate alarm before installation.
2.Clean smoke alarm. Please refer to the “maintenance and
cleaning” section.
3.If problems persist and the unit is still under warranty, you
can return to your retailer.
4. if the unit is out of warranty,please replace another new
alarm.
Smoke alarm beeps with
the red LED flash about
The battery is depleted, please replace battery.

Document NO.: RD-559B-39-001 12 Version: F
once 50 seconds.
Smoke alarm chirp
occurs every 50 seconds
(alarm goes into fault
mode).
Clean smoke alarm. Please refer to the “maintenance and
cleaning” section. Replace smoke alarm if the problem
persists
Smoke alarm sounds
unwanted alarms
intermittently or when
residents are cooking,
taking showers, etc.
1. Press test button to silence alarm.
2. Clean smoke alarm. Please refer to the “maintenance and
cleaning” section.
3. Move smoke alarm to new location and press test button.
The alarm sounds
different from it is used
to. It starts and stops.
1. Clean smoke alarm. Please refer to the “maintenance and
cleaning” section.
2. if the problem persists during warranty, you can return to
your retailer.
3. if the unit is out of warranty
please replace another new
alarm.
Maintenance and Cleaning:
In addition to weekly testing, the alarm requires periodic cleaning to remove dust, dirt, and debris.
Clean the alarm at least once a year to remove dust, dirt, or debris. Use a vacuum cleaner with a
soft brush, vacuum all sides and covers of smoke alarm. This alarm has a low battery monitor
which will cause the alarm to “chirp” approx every 50 seconds and the red LED flash once at the
same time for a minimum of 7 days when the battery gets low. If there is a defective battery or
other failures, you can refer to “Trouble shooting” for solution, if there are still failures during
warranty, you can return to your retailer.
WARNING: The battery is sealed and is not replaceable. Please replace with new alarm if the
low battery chirp occurs.
IMPORTANT: Do not attempt to remove the cover to clean inside. This will void the warranty.
Repair:
Caution: Do not attempt to repair the alarm. It will affect your warranty.
If the alarm is not operating properly, and is still under warranty, return it to the original place you
buy. Pack it in a well-padded carton, and ship to the original place you buy.
If the alarm is no longer under warranty, have a licensed electrician replace it immediately with a
comparable alarm.
DEVELOP AND PRACTICE A PLAN OF ESCAPE:
• Install and maintain fire extinguishers on every level of the home and in the kitchen, basement
and garage. Know how to use a fire extinguisher prior to an emergency.
• Make a floor plan indicating all doors and windows and at least two (2) escape routes from each
room. Second story windows may need a rope or chain ladder.
• Have a family meeting and discuss your escape plan, showing everyone what to do in case of
fire.
• Determine a place outside your home where you all can meet if a fire occurs.
• Familiarize everyone with the sound of the smoke alarm and train them to leave your home

Document NO.: RD-559B-39-001 13 Version: F
when they hear it.
• Practice a fire drill at least every six months, including fire drills at night. Ensure that small
children hear the alarm and wake when it sounds. They must wake up in order to execute the
escape plan. Practice allows all occupants to test your plan before an emergency. You may not
be able to reach your children. It is important they know what to do.
• Current studies have shown smoke alarms may not awaken all sleeping individuals, and that it is
the responsibility of individuals in the household that are capable of assisting others to provide
assistance to those who may not be awakened by the alarm sound, or to those who may be
incapable of safely evacuating the area unassisted.
Guarantee
• Company warrants to the original consumer. Purchase each new smoke alarm to be free from
defects in material and workmanship under normal use and service for a period of 3 years from
the date of purchase. This warranty does not cover damage resulting from accident, misuse or
abuse or lack of reasonable care of the product. In no case shall company be liable for any
incidental or consequential damages for breach of this or any other warranty express or implied,
whatsoever. The bad product can be mailed to the following address with a detail explanation of
problem.
• If after reviewing this manual you feel that your smoke alarm is defective in any way, do not
tamper with the unit. Return it for servicing to Manufacturer:
Manufacturer information:
SITERWELL ELECTRONICS CO.,LIMITED
ADDRESS: NO.76 HAICHUAN ROAD CHUANGYE ZONE B, JIANGBEI,
NINGBO, CHINA
TEL:0086-574-87729581
FAX:0086-574-87729581,E-MAIL:Sales@china-siter.com
/