Page is loading ...

QSG
Morning Call®2 Main Unit
2.
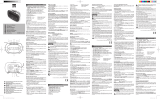
SETTING THE CLOCK
/ RÉGLAGE DE L'HORLOGE / AJUSTAR EL RELOJ / DIE UHR EINSTELLEN
3. SETTING TIME / RÉGLAGE DE L'HEURE / AJUSTAR LA HORA / DIE ZEIT EINSTELLEN
4. SETTING THE ALARM / RÉGLAGE DE L'ALARME / AJUSTAR LA ALARMA / DEN WECKER STELLEN
AC Adapter
WHAT’S INCLUDED
/ CONTENU DE LA LIVRAISON / CONTENIDO / LIEFERUMFANG
12 / 24 HR, 12/24 h, 12 / 24 H , 12 / 24 Stunden
Set up the preset station /
Réglage de la station préréglée
Ajuste la emisora preseleccionada /
Speichern Sie einen eingestellten Sender ein
Aux-In Mode / Mode Aux-In / Modo Aux-In / Aux-In Modus
AC Adaper
(Back)
(Back)
Wall socket
Prise électrique
Toma de corriente
Wandsteckdose
• For all settings, if you do not press any button for 5 ~ 10 seconds, you will be timed out.
All displayed changes will be saved and will go back to the previous mode.
• Pour procéder aux réglages, vous devez appuyer sur les touches pendant 5 à 10 secondes.
Toutes les modications affichées sont enregistrées et l'appareil bascule sur le mode précédent.
• Para todos los ajustes, si no pulsa ningún botón durante 5 ~ 10 segundos,
la acción se interrumpirá por exceso de tiempo.
Se guardarán todos los cambios visualizados y volverá al modo anterior.
• Für alle Einstellungen gilt: Wird für 5-10 Sekunden kein Knopf gedrückt, ist die Zeit abgelaufen.
Alle angezeigten Veränderungen werden gespeichert und es wird in den vorigen Modus gewechselt.
• Press the + or - button to adjust the time. Hold the + or - button to adjust quickly.
• Appuyez sur la touche + ou - pour régler l'heure. Maintenez la touche + ou - enfoncée
pour effectuer rapidement un réglage.
• Pulse el botón + o - para ajustar la hora. Mantenga pulsado el botón + o - para
ajustar rápidamente.
• Drücken Sie die Taste + oder -, um die Zeit einzustellen. Halten Sie die Taste + oder -
für schnelles Einstellen gedrückt.
• During the FM radio mode, press the ‘Preset’ button to play preset stations.
• En mode radio FM, appuyez sur le bouton « Preset » pour écouter
les stations préréglées.
• En el modo de radio FM, pulse el botón ‘Preset’ (Preselección) para
reproducir las emisoras preseleccionadas
• Drücken Sie im FM-Radiomodus die Taste ‘Preset’, um die eingespeicherten
Sender zu hören
• Press the button again to move to next preset station in cycle (Preset 1 -> 2 ... ->6).
• Appuyez à nouveau sur le bouton pour basculer sur la prochaine station
présélectionnée dans le cycle (Preset 1 -> 2 ... ->6)
• Pulse el botón de nuevo para moverse a la siguiente emisora preseleccionada en
ciclos (Preseleccionada 1 -> 2 ... ->6)
• Drücken Sie die Taste erneut, um zum nächsten eingespeicherten Sender zu
gelangen (Preset 1 -> 2 ... ->6)
• Tune the radio station you want to save
• Réglez la station radio souhaitée
• Sintonice la emisora de radio que desea guardar
• Stellen Sie den Sender ein, den sie speichern möchten
• Hold the ‘Bluetooth’ button to pair with a new device
• Maintenez le bouton « Bluetooth » enfoncé pour le jumeler avec un nouvel appareil
• Mantenga pulsado el botón ‘Bluetooth’ para emparejar con un nuevo dispositivo
• Halten Sie die Taste ‘Bluetooth’ gedrückt, um den Radiowecker mit einem neuen Gerät zu verbinden
• Go to "Settings" and “Bluetooth” from your mobile device
• Rendez-vous sur « Settings » et « Bluetooth » à partir de votre appareil mobile
• Vaya a "Ajustes" y “Bluetooth” desde su dispositivo móvil
• Gehen sie auf "Einstellungen" und “Bluetooth” auf Ihrem Mobilgerät
• Turn on Bluetooth® • Activez le Bluetooth® • Conecte Bluetooth® • Schalten Sie Bluetooth® ein
• When paired, the main unit will make a chime bell sound and
the Bluetooth indicator will stay on.
• Une fois le jumelage effectué, l'unité principale emet un son de
cloche et le voyant Bluetooth reste allumé.
• Una vez emparejada, la unidad principal emitirá un sonido de campana y el indicador
de Bluetooth permanecerá activado.
• Wenn die Verbindung erfolgt ist, ertönt vom Radiowecker ein Klingelton und das
Bluetooth-Symbol bleibt an.
• Again to save
• Appuyez une
nouvelle fois
• Otra vez para
guardar
• Erneut, um zu speichern
• When the alarm goes off, press the ‘SNOOZE | DIMMER’ button
to temporarily deactivate it. The snooze function will extend
your alarm in increments of 9 minutes.
* To adjust the display brightness.
• Lorsque l'alarme se déclenche, appuyez sur la touche
« SNOOZE | DIMMER » pour la désactiver temporairement.
La fonction snooze réactive votre alarme par intervalles de 9 minutes.
* Réglage de la luminosité de l'écran.
• Wenn der Wecker klingelt, drücken Sie die Taste ‘SNOOZE | DIMMER’, um ihn zeitweise abzustellen. Die Schlummerfunktion
stellt den Wecker in Abständen von 9 Minuten erneut. * Um die Helligkeit der Anzeige anzupassen.
• Cuando suene la alarma, pulse el botón ‘SNOOZE | DIMMER’
(‘REPETICIÓN | ATENUADOR’) para desactivarla temporalmente.
La función de repetición ampliará su alarma en incrementos de 9 minutos.
* Ajustar el brillo de la pantalla.
• Select FM radio from the source of your music.
(FM radio > aux-in > Bluetooth)
• Sélectionnez la radio FM à partir de la source de votre musique.
(radio FM > aux-in > Bluetooth)
• Seleccione la radio FM como fuente de su música.
(Radio FM > aux-in > Bluetooth)
• Wählen Sie FM-Radio als Musikquelle aus.
(Radio FM > aux-in > Bluetooth)
• Turn off
• Désactiver
• Desconectar
• Ausschalten
• The Default Alarm 1 time is 6:00am.
• L'alarme 1 par défaut est réglée sur 06:00
• La Alarma 1 predeterminada es a las 6:00 a. m.
• Die voreingestellte Weckzeit für Wecker 1 ist 6:00 Uhr.
Daylight Saving Time (DST) / Heure d'été (DST)
Horario de verano (DST) / Sommerzeit
• After showing +1 or -1 for 2 seconds, the display will show the current time.
• Après l'affichage de + 1 ou - 1 pendant 2 secondes, l'interface affichera l'heure actuelle.
• Después de mostrar +1 o -1 durante 2 segundos, la pantalla mostrará la hora actual.
• Nachdem +1 oder -1 für zwei Sekunden angezeigt wird, wird die Anzeige die
aktuelle Uhrzeit anzeigen.
1. TO POWER ON
5. FM RADIO / RADIO FM / RADIO FM / FM-RADIO
6. RADIO PRESET
/ PRÉSÉLECTION RADIO / PRESELECCIÓN DE RADIO / RADIOSENDER SPEICHERN
7. BLUETOOTH / AUX-IN
Quick Start Guide
Wireless Bluetooth® Jumbo LED Display
Dual Alarm Clock with FM Radio &
Hands-Free Phone Function
Réveil-matin sans l Bluetooth® Jumbo
affichage LED avec Radio FM et
fonction d'appel mains libres
Guide de démarrage rapide
Morning Call®2
QSG
Backup Battery
12/24 -1/+1 Time Set Aux-in Power
Time Format Daylight Saving Time
DC 5V
Bluetooth
PM
Sleep
Al 1
Radio
Buzzer
Al 2
Bluetooth
PM
Sleep
Al 1
Radio
Buzzer
Al 2
Bluetooth
PM
Sleep
Al 1
Radio
Buzzer
Al 2
Bluetooth
PM
Sleep
Al 1
Radio
Buzzer
Al 2
Bluetooth
PM
Sleep
Al 1
Radio
Buzzer
Al 2
12/24 -1/+1 Time Set Aux-in Power
Time Format Daylight Saving Time
DC 5V
(Back)
12/24 -1/+1 Time Set Aux-in Power
Time Format Daylight Saving Time
DC 5V
(Back) (Back)
12/24 -1/+1 Time Set Aux-in Power
Time Format Daylight Saving Time
DC 5V
12/24 -1/+1 Time Set Aux-in Power
Time Format Daylight Saving Time
DC 5V
02
• Press the ‘+’ or ‘>>’ button to increase the preset number
• Appuyez sur le bouton « + » ou « >> » pour dénir un
numéro de présélection supérieur
• Pulse el botón ‘+’ o ‘>>’ para aumentar el número preseleccionado
• Drücken Sie die Taste ‘+’ oder ‘>>’, um den Sender auf einer höheren
Zahl zu speichern
• Press the ‘+’ or ‘>>’ button to increase the preset number
• Appuyez sur le bouton « - » ou « << » pour dénir un
numéro de présélection inférieur
• Pulse el botón ‘-’ o ‘<<’ para reducir el número preseleccionado
• Drücken Sie die Taste ‘-’ oder ‘<<’, um den Sender auf einer niedrigeren Zahl zu speichern
* Press the ‘<<’ or >> button to change track. Hold the ‘<<’ or ‘>>’ to rewind or fast forward within the song
* Appuyez sur la touche « << » ou « >> » pour changer de piste. Maintenez la touche « << » ou « >> » enfoncée
pour effectuer une mise en avant ou en arrière rapide du morceau
* Pulse el botón ‘<<’ o ‘>>’ para cambiar de pista. Mantenga pulsado el botón ‘<<’ o ‘>>’ para retroceder o avanzar rápido por la canción.
* Drücken Sie die Taste ‘<<’ oder >>, um ein Lied weiter zu springen. Halten Sie die Taste ‘<<’ oder ‘>>’ gedrückt, um im Lied vor- oder zurückzuspulen
• Press the ‘<<’ or ‘>>’ button to tune the frequency.
• Appuyez sur le bouton « << » ou « >> » pour régler la fréquence.
• Pulse el botón ‘<<’ o ‘>>’ para sintonizar la frecuencia.
• Drücken Sie die Taste ‘<<’ oder ‘>>’, um die Frequenz einzustellen.
• Hold the ‘<<’ or ‘>>’ button to search down or up for next station.
• Maintenez le bouton « << » ou « >> » enfoncé pour rechercher la station.
• Mantenga pulsado el botón ‘<<’ o ‘>>’ para buscar la emisora siguiente en sentido
descendente o ascendente.
• Halten Sie die Taste ‘<<’ oder ‘>>’ gedrückt, um den nächsten Sender auf höherer oder
niedrigerer Frequenz zu suchen.
• If you do not press any button for 2 seconds, the display will go back to the current time.
• Si vous n'appuyez pas sur les boutons pendant 2 secondes, l'heure actuelle s'affiche.
• Si no pulsa ningún botón durante 2 segundos, la pantalla volverá a la hora actual.
• Wenn Sie für 2 Sekunden keinen Knopf drücken, springt die Anzeige zurück zur Zeitanzeige.
• Press the ‘+’ or ‘-‘ button to adjust the volume.
• Appuyez sur le bouton « + » ou « - » pour régler le volume.
• Pulse el botón ‘+’ o ‘-‘ para ajustar el volumen.
• Drücken Sie die Taste ‘+’ oder ‘-‘, um die Lautstärke einzustellen.
• Press the + or - button to adjust the time. Hold the + or - button to adjust quickly.
• Appuyez sur la touche + ou - pour régler l'heure. Maintenez la touche + ou - enfoncée
pour effectuer rapidement un réglage.
• Pulse el botón + o - para ajustar la hora. Mantenga pulsado el botón + o - para
ajustar rápidamente.
• Drücken Sie die Taste + oder -, um die Zeit einzustellen. Halten Sie die Taste + oder - für
schnelles Einstellen gedrückt.
• The Radio or Buzzer indicator will ash.
(Default is buzzer)
• Le voyant radio ou buzzer clignote.
(Le buzzer est conguré par défaut)
• El indicador de Radio o Timbre parpadeará.
(La opción por defecto es el Timbre)
• Das Radio oder Buzzer (Klingeln)-Symbol blinkt.
(Buzzer ist voreingestellt)
• Press the ‘+’ or ‘-‘ button to select wake to radio or buzzer.
• Appuyez sur le bouton « + » ou « - » pour sélectionner le réveil
radio ou buzzer.
• Pulse el botón ‘+’ o ‘-‘ para seleccionar despertarse con la radio o el timbre.
• Drücken Sie die Taste ‘+’ oder ‘-‘, um Radio oder Klingeln einzustellen.
• Anytime you press the ‘End’ button you save the settings and exit.
• Lorsque vous appuyez sur le bouton « End », les paramètres sont enregistrés et vous quittez le menu.
• Cada vez que pulse el botón ‘End’ (Terminar), guardará los ajustes y saldrá.
• Immer wenn Sie die Taste ‘End’ drücken, speichern Sie die Einstellungen und verlassen das Menü.
• If you do not press any buttons for 5 ~ 10 seconds, the displayed alarm time will be set up and go back to the previous mode.
• Si vous n'appuyez pas sur les touches pendant 5 à 10 secondes, l'alarme affichée est programmée et l'appareil revient au mode précédent.
• Si no pulsa ningún botón durante 5 ~ 10 seguidos, se congurará la hora de la alarma visualizada y volverá al modo anterior.
• Wird für 5-10 Sekunden kein Knopf gedrückt, wird die angezeigte Weckzeit gespeichert und in den vorigen Modus gewechselt.
• Set up the Alarm 2 in the same way. The Default Alarm 2 time is 7:00 am. • Réglez l'alarme 2 de la même manière. L'alarme 2 par défaut est programmée sur 07:00.
• Ajuste la Alarma 2 del mismo modo. La hora predeterminada de la Alarma 2 es las 7 a. m.
• Stellen Sie Wecker 2 genauso. Die voreingestellte Weckzeit für Wecker 2 ist 7:00 Uhr.
S n o o z e I D i m m e r
Alarm
1
Alarm
2
02
• The volume level will ash to set
the wake up sound volume
• Le niveau du volume clignote pour
permettre le réglage du volume sonore du réveil
• El nivel del volumen parpadeará a n de ajustar
el volumen del sonido para despertarse
• Die Lautstärke blinkt, damit sie für den Wecker
eingestellt werden kann
• Complete
• Terminer
• Completo
• Fertig
Bluetooth
PM
Sleep
Al 1
Radio
Buzzer
Al 2
Bluetooth
PM
Sleep
Al 1
Radio
Buzzer
Al 2
Bluetooth
PM
Sleep
Al 1
Radio
Buzzer
Al 2
Bluetooth
PM
Sleep
Al 1
Radio
Buzzer
Al 2
Bluetooth
PM
Sleep
Al 1
Radio
Buzzer
Al 2
S n o o z e I D i m m e r
Alarm
1
Alarm
2
4. SETTING THE ALARM / RÉGLAGE DE L'ALARME / AJUSTAR LA ALARMA / DEN WECKER STELLEN
S n o o z e I D i m m e r
Alarm
2
Alarm
1
STOP
Mode
Talk
Talk
Talk
Talk
1. 2.
Preset
Preset
:02
Mode
iLuv Morning Call 2
• If a phone call comes in, press the ‘Talk’ button to answer the call or
press the ‘End’ button to reject the call.
• Si un appel téléphonique arrive, appuyez sur le bouton « Talk » pour
répondre à l'appel ou sur le bouton « End » pour rejeter l'appel.
• Si recibe una llamada telefónica, pulse el botón ‘Talk’ (Hablar) para responder la
llamada, o bien pulse el botón ‘End’ (Terminar) para rechazar la llamada.
• Wenn ein Anruf ankommt, drücken Sie die Taste ‘Talk’, um ihn anzunehmen oder
die Taste ‘End’, um ihn abzulehnen.
• Press the ‘End’ button to end the call.
• Appuyez sur la touche « End » pour terminer l'appel.
• Pulse el botón ‘End’ (Terminar) para nalizar la llamada.
• Drücken Sie die Taste ‘End’, um den Anruf zu beenden.
End
Talk
Talk
Mode
• Adjusting item(s) will ash.
• L'élément/les éléments modié(s) clignote(nt).
• Al ajustar los elementos parpadeará.
• Angepasste(s) Symbol(e) blinkt/ blinken.
• Select Bluetooth from the source of your music.
(FM radio > aux-in > Bluetooth)
• Sélectionnez la Bluetooth à partir de la source de votre musique.
(radio FM > aux-in > Bluetooth)
• Select Aux-in from the source of your music.
(FM radio > aux-in > Bluetooth)
• Sélectionnez Aux-in à partir de la source de votre musique.
(radio FM > aux-in > Bluetooth)
• Seleccione Aux-in como la fuente de su música.
(radio FM > aux-in > Bluetooth)
• Wählen Sie Aux-in als Musikquelle aus.
(FM-Radio > Aux-in > Bluetooth)
/ METTRE EN ROUTE L'APPAREIL / PARA CONECTAR A LA RED ELÉCTRICA / EINSCHALTEN
• Seleccione la Bluetooth como fuente de su música.
(Radio FM > aux-in > Bluetooth)
• Wählen Sie Bluetooth als Musikquelle aus.
(Radio FM > aux-in > Bluetooth)
iLuv
Bluetooth
PM
Sleep
Al 1
Radio
Buzzer
Al 2
FM Radio Clock with Hands-Free and USB Charging
l WireIess
:02
7
8
1. To stop the alarm when alarm goes o
Press the alarm button once to stop the
alarm
(Alarm indicator will still stay on and the alarm will go
off the next day)
2. To disable the alarm
Press the alarm button once while the alarm is
not going off
(Alarm indicator will be off and the alarm will not go off
until you enable it again)
1. Pour arrêter l'alarme lorsqu'elle se déclenche
Appuyez une fois sur le bouton d'alarme pour la stopper
(L'indicateur d'alarme restera toujours allumé et l'alarme
s'éteindra le jour suivant)
2. Pour désactiver l'alarme
Appuyez une fois sur le bouton d'alarme lorsque l'alarme ne se
déclenche pas
(L'indicateur d'alarme sera éteint et l'alarme ne se déclenchera
pas jusqu'à ce que vous l'activiez à nouveau)
1. Zur Ausschaltung eines aktiven Alarms
Drücken Sie einmal auf den Alarmknopf, um den Alarm
auszuschalten
(Die Alarmanzeige bleibt an und der Alarm wird am
folgenden Tag erneut einsetzen)
2. Zur Deaktivierung eines Alarms
Drücken Sie zu einer Zeit, in der keine Alarmierung erfolgt,
einmal auf den Alarmknopf
(Die Alarmanzeige geht aus und der Alarm bleibt
ausgeschaltet, bis er erneut aktiviert wird)
1. Para detener la alarma cuando suena
Pulsar el botón de alarma una vez para detenerla
(el indicador de alarma permanecerá encendido y la
alarma sonará al día siguiente)
2. Para desactivar la alarma
Pulsar el botón de alarma una vez cuando la alarma no esté
sonando
(el indicador de alarma se apagará y la alarma no sonará hasta
que usted la active de nuevo)
Locate the backup battery compartment on the back of the unit and open. Insert 2 "AAA" batteries, which will
keep the time and alarm settings in the event of power failure or disconnection of the power cord.

Sleep
• Go to sleep mode. The sleep indicator will turn on.
• Rendez-vous sur le mode Sleep. Le voyant Sleep s'allume.
• Vaya al modo de sueño (Sleep). Se activará el indicador de sueño.
• Gehen Sie in den Schlafmodus. Das Schlaf-Symbol geht an.
8. SLEEP FUNCTION
/ FONCTION SLEEP / FUNCIÓN SUEÑO (SLEEP) / SCHLAFFUNKTION
9. CHARGING, BATTERY BACKUP
/ CHARGEMENT,
RECHARGE DE LA BATTERIE
/ CARGAR,
RESPALDO DE LA BATERÍA
/ AUFLADEN,
NOTFALLBATTERIE
iLuv®, TimeShaker
TM
, and GreeNology® trademarks are the exclusive properties of jWIN Electronics Corp.
and are registered with the U.S. Patent and Trademark Oce, and may be registered or pending registration
in other countries. All other iLuv® trademarks, service marks, and logos may be registered or pending
registration in the U.S. or in other countries. All other trademarks or registered trademarks are the property
of their respective owners.
© 2016 iLuv Creative Technology. Printed in China.
• Continue to press the ‘Sleep’ button to select the number of minutes you want your music to play: 90, 60, 45, 30, 15 minutes or OFF.
• Continuez à appuyer sur le bouton « Sleep » pour sélectionner le nombre de minutes pendant lesquelles vous
souhaitez diffuser votre musique : 90, 60, 45, 30, 15 minutes ou OFF.
• Continúe pulsando el botón ‘Sleep’ para seleccionar el número de minutos que quiere que se reproduzca su
música: 90, 60, 45, 30, 15 minutos u OFF (Desconectado).
• Halten Sie die Taste ‘Sleep’ weiter gedrückt, um die Zeit in Minuten auszuwählen, die die Musik laufen soll: 90, 60, 45, 30, 15
Minuten oder OFF (aus).
• To charge other devices, connect one end of the USB charging cable (not included) to the “Charge” port on the top of the main unit.
• Pour charger d'autres appareils, connectez une extrémité du câble de chargement USB (non inclus) au port
« Charge » situé au-dessus de l'unité principale.
• Para cargar otros dispositivos, conecte el extremo del cable de carga USB (no incluido) al puerto “Charge” (Cargar) situado
en la parte superior de la unidad principal.
• Um andere Geräte aufzuladen, verbinden Sie ein Ende des USB-Ladekabels (nicht enthalten) mit dem
Anschluss “Charge” oben auf dem Hauptgerät.
• The display will change back to the current time if you do not press any button for 3 seconds.
• L'heure actuelle s'affiche à nouveau si vous n'appuyez sur aucune touche pendant 3 secondes.
• La pantalla volverá a mostrar la hora actual si no pulsa ningún botón durante 3 segundos.
• Die Anzeige springt zurück zur aktuellen Zeit, wenn Sie 3 Sekunden lang keine Taste drücken.
• The music will stop playing once the sleep timer has nished.
• La musique s'arrête lorsque le temps programmé dans le mode Sleep est écoulé.
• La música dejará de reproducirse una vez que haya nalizado el temporizador de sueño.
• Die Musik geht aus, wenn die Schlafzeit abgelaufen ist.
• To stop sleep mode before the time is out press the ‘Sleep’ button to select ‘OFF’ or press the ‘Power’ button anytime.
• Pour arrêter le mode Sleep avant le temps programmé, appuyez sur le bouton « Sleep » pour
sélectionner « OFF » ou appuyez sur le bouton « Power » à tout moment.
• Para detener el modo de sueño antes de que termine el tiempo, pulse el botón ‘Sleep’ para seleccionar ‘OFF’ o pulse
el botón ‘Power’ (Encendido) en cualquier momento.
• Um den Schlafmodus auszuschalten, bevor die Zeit abgelaufen ist, drücken Sie die Taste ‘Sleep’, um ‘OFF’ auszuwählen,
oder drücken Sie jederzeit die Taste ‘Power’.
• Clock keeps running but no LCD backlight/display
• L'horloge continue à fonctionner mais le rétroéclairage LCD
/ l'écran ne s'allume pas
• El reloj sigue funcionando pero sin retroiluminación/visualización LCD
• Die Uhr läuft weiter, doch die LCD-Anzeige ist aus
• Battery low icon will stay on when the battery is close to dead
• L'icône indiquant un faible niveau de batterie s'allume lorsque la batterie
est presque totalement déchargée
• El icono de batería baja seguirá conectado cuando la batería esté
cerca de agotarse
• Das Symbol “Batterie schwach” bleibt an, wenn die Batterie fast leer ist
Talk
Reorient or relocate the receiving antenna.
Connect the equipment into an outlet on a circuit dierent
from that to which the receiver is connected.
Consult the dealer or an experienced radio/TV technician for help.
Increase the separation between the equipment and receiver.
Warning: Changes or modications to this unit not expressly approved by the party
responsible for compliance could void the user’s authority to operate the equipment.
NOTE: This equipment has been tested and found to comply with the limits for a Class B
digital device, pursuant to Part 15 of the FCC Rules. These limits are designed to provide
reasonable protection against harmful interference in a residential installation. This
equipment generates, uses and can radiate radio frequency energy and, if not installed
and used in accordance with the instructions, may cause harmful interference to radio
communications.
However, there is no guarantee that interference will not occur in a particular installation.
If this equipment does cause harmful interference to radio or television reception, which
can be determined by turning the equipment o and on, the user is encouraged to try to
correct the interference by one or more of the following measures:
This device complies with Part 15 of the FCC Rules. Operation is subject to the following
two conditions:
(1) this device may not cause harmful interference, and
(2) this device must accept any interference received, including interference
that may cause undesired operation.
The device has been evaluated to meet general RF exposure requirement. The device can
be used in portable exposure condition without restriction
Mode
3.2.
1.
/