iLuv®, TimeShaker
TM
, and GreeNology® trademarks are the exclusive properties of jWIN Electronics Corp.
and are registered with the U.S. Patent and Trademark Oce, and may be registered or pending registration
in other countries. All other iLuv® trademarks, service marks, and logos may be registered or pending
registration in the U.S. or in other countries. All other trademarks or registered trademarks are the property
of their respective owners.
© 2016 iLuv Creative Technology. Printed in China.
Quick Start Guide
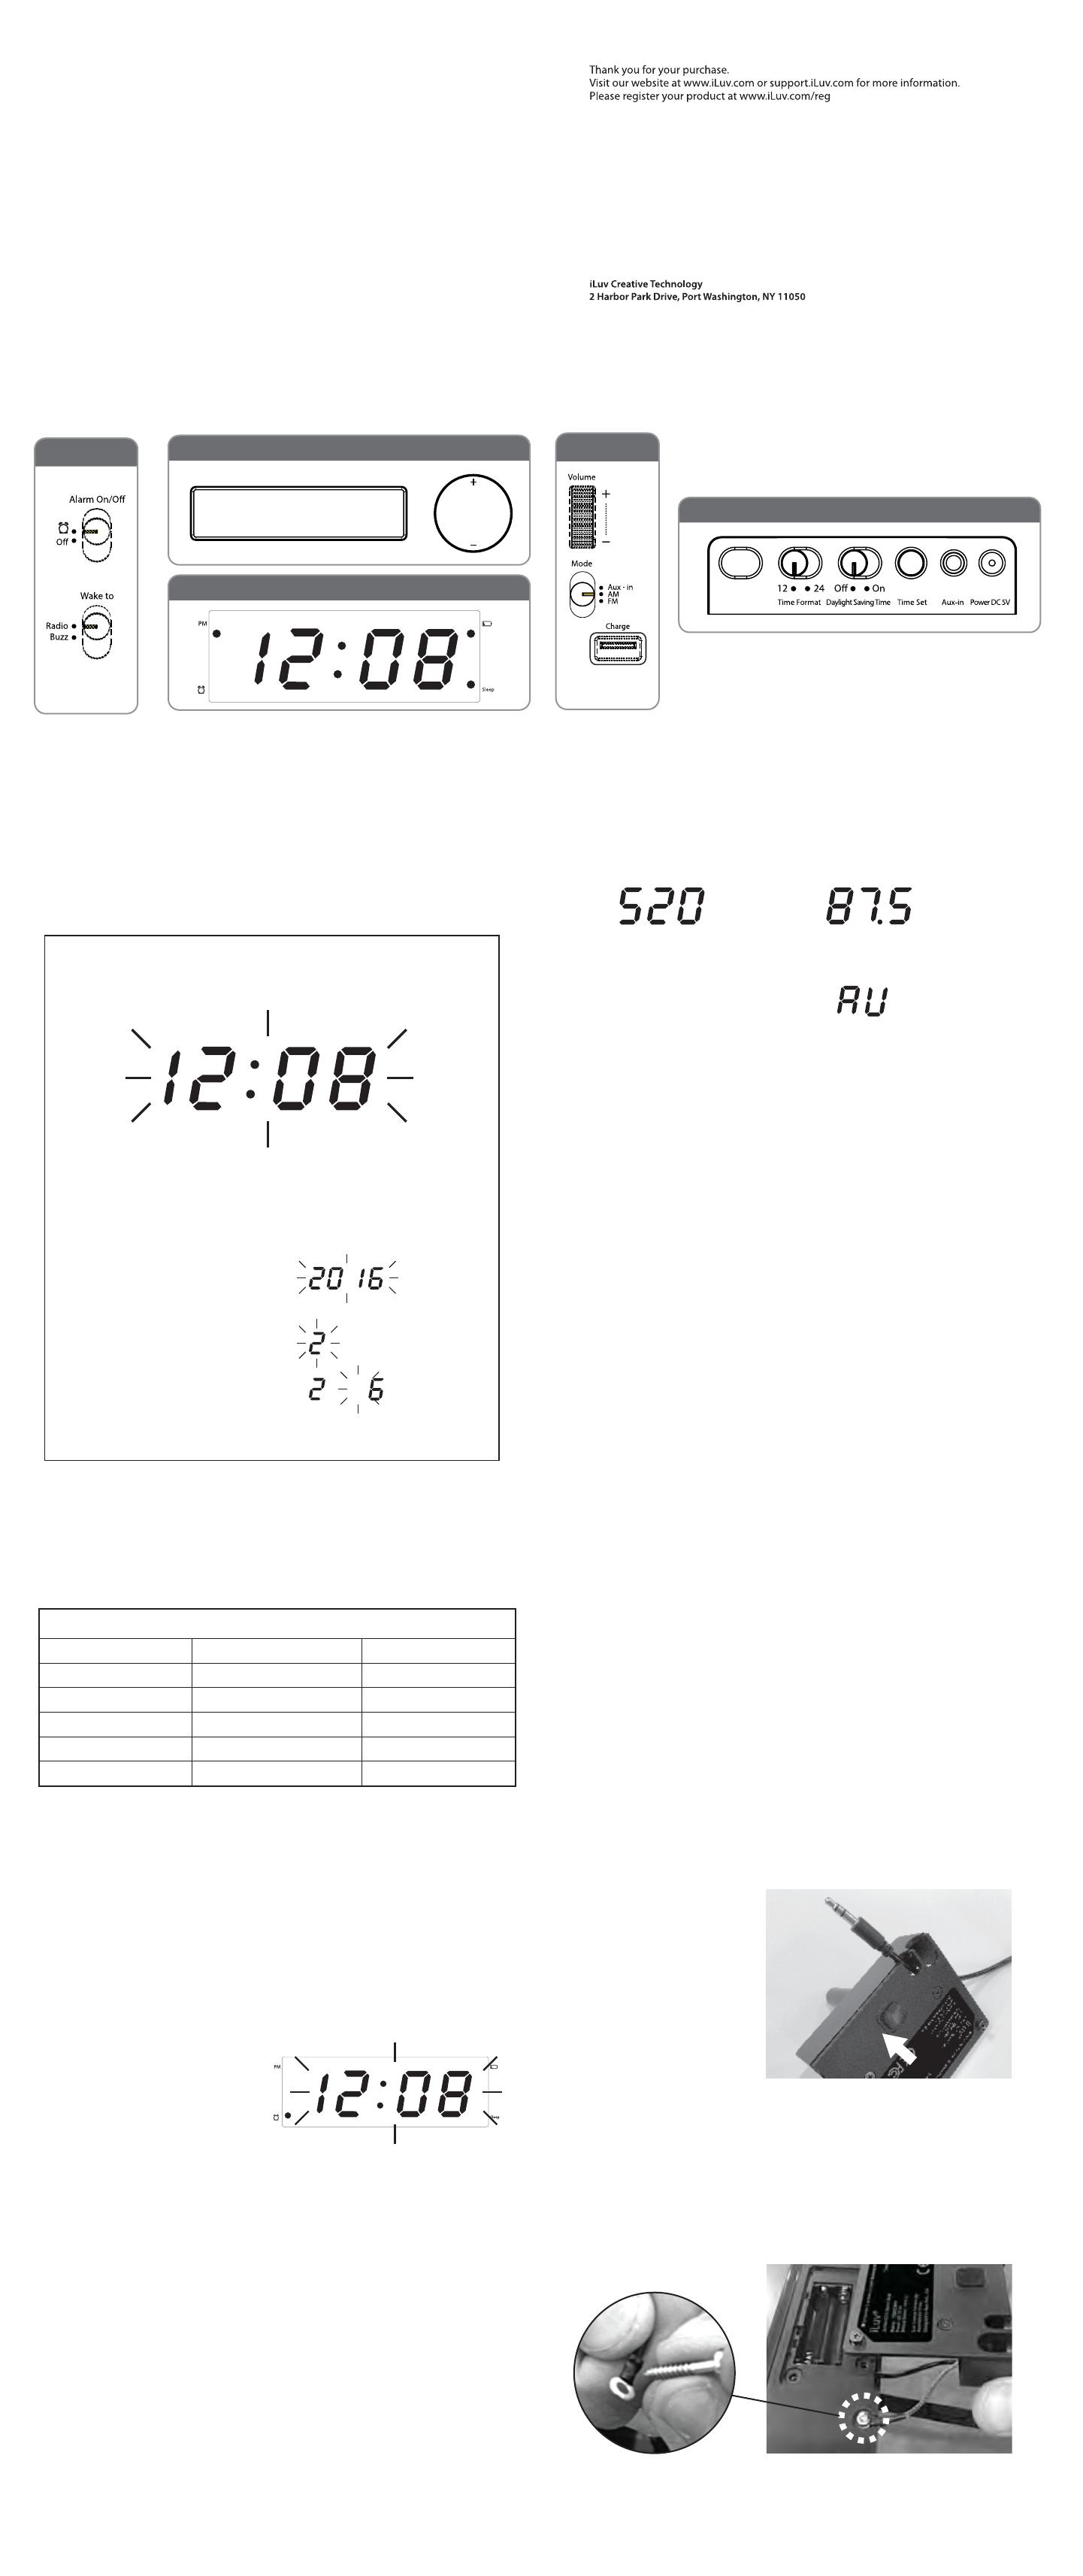
• Button Callout
• Function / note
• Time Set
LED Alarm Clock for Hotel
TimeShaker® Hotel
Alarm
1. For all settings, if no button is pressed for 5 seconds all changes
will be automatically saved.
1. Press the power button to turn on the unit. Slide the “mode”
switch to AM / FM for listening to radio or AUX for listening to
Aux-in music through built-in Aux-in cable.
1. Press the sleep button to go to “Sleep” mode. The sleep LED will stay on.
2. The display will show the sleep interval of 90, 60, 45, 30, 15 minutes or OFF.
3. The unit will automatically power o after the selected sleep time.
4. The display will change back to show current time if there are no
adjustments for 3 seconds. After showing the current time, press the sleep
button once to show remaining sleep time for 3 seconds. During the display
remaining of sleep time, press the sleep button again to adjust.
5. Users can stop the sleep operation before it times out by pressing the
sleep button utill the display shows "OFF" or press the “Power” button
anytime.
3. Press the + or - button to tune radio to a station you want. Press
and hold to seek for the next clear station.
5. The display will change back to show the current time if there are
no adjustments for 3 seconds.
4. For Aux-in, the display will show.
6. Press Power button again to turn o the unit.
2. For listening to the radio, the display will change to show the radio frequency.
AM Radio FM Radio
2. Adjusting item(s) should be ashing.
• Wake to Source
Depend on the WAKE-TO switch setting, the unit will wake to buzzer or radio.
• Alarm Disarmed
When the alarm goes o, press either Alarm set, Power or slide Alarm
on/o switch from On to O will stop the alarm. Alarm will be disarmed
(will not come back tomorrow) - one day alarm function.
• Radio/Aux-in Operation
•Sleep Operation
1. When the alarm goes o, press the snooze button to stop the alarm
sound for 9 minutes.
2. During standby mode, press and hold snooze button to adjust the LED
display brightness. Total of 3 steps (from bright to dim then from dim to
bright).
• No time will display but time will saved
• The “battery low” icon will stay on when the battery is close to dead
• Info that will save:
- Alarms time/setting
- Current radio station
- Clock
•Snooze / Dimmer
•Battery Backup
• Placing Back on Unit:
• Security Lanyard
1. Press and hold the Time Set button for 2 seconds to go to “Test set”
mode. Display will be ashing.
2. Press + or - button to adjust the time, press and hold + or - to
adjust more quickly.
3. For 12hour format, the light dot located in the upper left corner of the
clock display indicates the time is PM. For AM time, this dot will not light up.
4. Press the “Time set” button again
to adjust the YEAR, start from 2016
to 2099 (e.g. 2016)
5. Press the “Time set” button again
to adjust the Month (e.g. Feb)
6. Press the “Time set” button again
to adjust the Day (e.g. Feb 06)
7. Press the “Time set” button again to exit.
• Daylight Saving Time (DST)
DST Effective day
1. Slide DST switch to On for auto DST*
* USA only
2. Slide DST switch to O to turn o auto DST function.
• 12 / 24 HR
1. Slide the “12/24” switch to 12 to show the 12 hour format. If DST is set at
”ON" it will automatically activate.
Placing Back on Unit:
Screw piece onto unit.
Make sure time is correctly set rst.
2. Slide the “12/24” switch to 24 to show the 24 hour format. DST function
will be disabled if set to 24 hour format.
• Alarm Time Set
1. Press the Alarm set button for 2 seconds.
2. The display will change to show
the alarm time while ashing.
The alarm indicator will turn on too.
The default alarm time is 6:00am.
3. Press the + or - button to adjust the time, and press and hold + or - to
adjust more quickly.
4. For 12hour format, the light dot located in the upper left corner of the
clock display indicates the time is PM. For AM time, this dot will not light up.
5. Press the “Alarm set” button again to exit (or anytime you switch the Alarm
On/O switch it will store the setting and exit). If you do not press any
button for 5 seconds while setting alarm, alarm will store at currently
displayed time.
6. The alarm will automatically set to set alarm time. Alarm LED will stay on.
7. Alarm will auto disarm after alarm sounding. Alarm LED will stay o.
Year Start End
2016 March 13 November 6
2017 March 12 November 5
2018 March 11 November 4
2019 March 10 November 3
2020 March 8 November 1
Left Side
Right Side
Alarm Set Power
Tune up
Tune down
Snooze I Dimmer I Sleep
Top
Alarm
Display
Rear
Insert screw into screw
hole on lanyard
• Installation of the Backup Battery
Locate the backup battery compartment on the bottom of the unit and open.
Insert 2 "AAA" batteries, which will keep the time and alarm settings in the event
of power failure or disconnection of the power cord.


