Page is loading ...

Behind-the-Ear
Hearing Instruments
User Manual

Thank you for purchasing a Siemens Hearing Instrument.
Siemens Hearing Instruments are designed to achieve the
highest in quality and reliability. We are sure that you will
be very pleased with our product.
If this Hearing Instrument is being purchased for an infant or
young child, please confirm with your Audiologist or Hearing
Care Provider that it is recommended for this purpose and to
ensure appropriate supervision and use of the product.
Hearing Aid Information
Serial Number:
Left: Right:
Battery Size:
Left: Right:
Purchase Date:
Left: Right:
Dispenser Info stamped here

TABLE OF CONTENTS
2
TABLE OF CONTENTS
3
Table of Contents
Getting Started
Your hearing instruments ......................... 4
Safety information ................................4
Feature card .................................... 6
Identification information ......................... 7
Identifying the left and right hearing instrument(s)..... 8
Changing the battery............................. 9
Battery tips .................................... 10
Using the eCharger ............................. 11
Turning the hearing instrument on or off ............ 12
Attaching the earpiece............................13
Inserting and removing hearing
instrument with an earpiece ......................14
Inserting and removing the hearing
instrument with Life Tube or S-Life Tube............ 15
Operating Your Hearing Instrument-
Optional Features
Remote Control .................................17
Tek
®
/miniTek™ ..................................18
Changing the volume ............................18
Learning volume preference feature.................19
SoundLearning
®
feature ..........................20
Changing the program............................20
Directional microphone system.....................22
Telecoil ........................................22
AutoPhone
®
/Autophone magnet accessory............23
Audio input ....................................24
Battery compartment door lock.....................27
Operating Your Hearing Instrument-
Programmable Features
Wireless functionality.............................29
Push button on/off...............................31
Power on delay..................................31
Low battery indicator.............................31
Volume control alert tones ........................32
Program change alert tones........................32
Listening Tips ..........................33
Maintenance and Care ..................35
Performance Checklist.................. 37
Health Considerations ...................38
Important Notices ......................39
Warranty and Service ...................43

GETTING STARTED
4
GETTING STARTED
5
Getting Started
Your hearing instruments
By wearing your hearing instruments you may once again
enjoy the sounds of the environment and conversation
with your family and friends. Your decision to purchase
hearing instruments manufactured by Siemens reflects
the importance you place on quality and reliability.
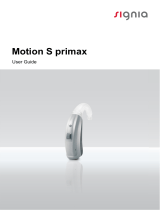
Your Siemens Behind-the-Ear (BTE) hearing instruments
are designed for comfort, performance and durability. They
should fit comfortably behind your ears and are attached to
custom-made earpieces or flexible LifeTubes and LifeTips.
Please read this manual carefully to benefit from all the
features of your new hearing system.
Safety information
WARNING
Choking hazard posed by small parts.
• Keephearinginstruments,batteriesandaccessoriesout
of children’s reach.
• Ifswallowedconsultaphysicianorhospitalimmediately.
• Ifinfants,smallchildrenormentallydisabledpersons
need to wear hearing instruments ensure adequate
supervision.
• Ensureappropriatesupervisionwhenyourchildis
wearing the hearing instruments.
• Checktheintegrityofthehearinginstrumentsregularly.
• Ensurethatyourchilddoesnotdetachthehearing
instrument from the ear mold.
• ConsultyourAudiologistorHearingCareProviderif
the housing is deformed.
• Keepthebatterycompartmentlocked.Verifytheproper
function of the locking mechanism.
WARNING
Risk in explosive environments, e.g., mining areas
• Don’tuseyourhearinginstruments(andremotecontrol)
in areas where there is danger of explosions.
Please read this manual carefully to benefit from all the
features of your new hearing system.
CAUTION
Risk of injury caused by incorrect use of Life Tip
• AlwaysweartheLifeTubewiththeLifeTip.
• MakesurethattheLifeTipiscompletelyattached
to the Life Tip adapter.
• ChangetheLifeTubeorLifeTipwhentheyarecracked.

GETTING STARTED
6
GETTING STARTED
7
• CarefullyinserttheLifeTubewiththeLifeTipintothe
ear canal. Be sure not to insert too deeply.
• UsetheLifeTubeandtheLifeTipinthewaydescribed
in this user guide.
If the Life Tip remains in the ear, have it removed by a
medical professional.
Feature card
Please refer to the feature card included with this manual.
The feature card is located at the back of this user manual
in a pocket.
The feature card contains important information about the
features in your new hearing instruments. This includes
battery size, serial number location, and features associated
with the operation of your hearing instruments.
Moreinformationaboutthesefeaturesislocatedin
the Operation section of this manual.
Identification information
Your hearing instruments have a serial number engraved on
them. The location of the serial number will vary according to
the style of hearing instrument you have chosen. Record the
serial number in the front of this manual for future reference
(Fig. 1).
The year of manufacture is incorporated into the serial
number. Please note the warranty is based upon the date
of purchase, not the date of manufacture.
The serial number may look similar to this sample: AY12345.
The second letter of this serial number refers to the year of
manufacture of the hearing instrument. The letters Y or A
indicate a 2011 year of manufacture. Your Audiologist or
Hearing Care Provider can answer any questions you may
have about the identifying code on your hearing instrument.
Record the serial numbers of each instrument in the space
provided for future reference.
t
Fig. 1: Identification information
Serial number
AY12345

GETTING STARTED
8
GETTING STARTED
9
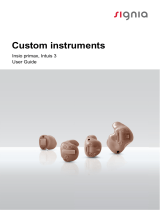
Identifying the left and right
hearing instrument(s)
Your Siemens hearing instruments may be color-coded for
your convenience. The left ear hearing instrument may have
a blue typeplate, and the right ear hearing instrument may
have a red typeplate (Fig. 2).
In addition, on Siemens Life
™
BTEs, the left ear hearing
instrument has a blue number on the LifeTip Adapter,
and the right ear hearing instrument has a red number
on the LifeTip Adapter (Fig. 3).
Changing the battery
Refer to the feature card or check with your Audiologist or
Hearing Care Provider to determine the battery size for your
hearing instrument.
To insert the battery into the hearing instrument, use your
fingernail to swivel open the door of the battery compartment.
Place the proper size battery in the battery compartment so
that the “+” symbol on the battery coincides with the “+” mark
on the battery compartment door.
Gently close the battery compartment. Do not force the door
shut. If it does not close easily, check to see if the battery was
inserted properly. When the battery door is completely closed,
your hearing instrument is ready for operation (Fig. 4 and 4.1).
Fig. 2: Location of Typeplate
Fig. 3: Location of right and left designator on LifeTip
adapter for Siemens Life
™
Product
Typeplate
Color-coded number
on Tip Adapter
Fig. 4: Inserting the battery
+
-
Color-coded number
on Tip Adapter
Battery

GETTING STARTED
10
GETTING STARTED
11
Your hearing instrument may be programmed to inform you
when the battery should be replaced.
Refer to the low battery indicator information in the Operation
section (page 31) of this manual for further information.
Battery tips
• Ifabatteryisaccidentallyswallowed,seekmedicalattention
immediately, or call the National Battery Hotline collect at
(202) 625-3333. Quebec residents, call le Centre Antipoison
at (800) 463-5060.
• Alwaysusetherecommendedbatterysizeforyourhearing
instrument. The battery size information for your hearing
instrument is located on the feature card.
• Removethebatteryfromyourinstrumentswhennotinuse.
This prevents possible damage from expansion or leakage of
the battery, if the instruments are not fully turned off.
• Alwayscarrysparebatteriesintheeventthatyourcurrent
battery goes dead. Place each spare battery in an individual,
non-metallic container to prevent contact with other
batteries or metal objects, such as keys or coins.
• Followyourlocalrecyclingrulesforbatterydisposal.
=
Fig. 4.1: Inserting the battery
CENTRA Life
Using the eCharger
If you have the optional charger, refer to the charger
instruction manual for operating instructions. Use only
the rechargeable batteries delivered with the charger or
available through your Audiologist or Hearing Care Provider.
The lifetime of a rechargeable battery is approximately one
year, depending on individual use.
NOTE: Do not attempt to charge standard,
non-rechargeable batteries!
NOTE: The hearing instrument must be turned off then on after
removing from the charger. This is required to turn the
instrument on.
Fig. 4.2: eCharger

GETTING STARTED
12
GETTING STARTED
13
Turning the hearing instrument on or off
To turn the hearing instrument on, insert a battery into
the hearing instrument and completely close the door.
To turn the hearing instrument off, open the battery door
to the first catch.
Siemens hearing instruments may also be programmed
to allow you to turn them on and off using the program
button. Refer to the Operation section (page 31) for further
information.
You can also use an optional remote control to turn the
hearing instruments on and off.
Some BTE’s may also have a LED light (Fig.5) near the
battery door.
The LED (optional) shows whether the hearing
instruments are on.
LED can be covered
or programmed on/off
• TheLEDshinescontinuously.
The hearing instruments are switched on and
sufficient battery power is available.
• TheLEDisoff.
The hearing instruments are switched off or the
battery must be replaced.
Attaching the earpiece (where provided)
If your earpiece detaches, gently insert the earhook of the
hearing instrument into the tubing of the earpiece supplied
by your Audiologist or Hearing Care Provider (Fig. 6).
Fig. 5: LED light
LED light

GETTING STARTED
14
GETTING STARTED
15
Inserting and removing hearing
instruments with an earpiece
Hold the earpiece between your thumb and index finger.
Gently work the earpiece into its proper position by adjusting
it until it is firmly seated in your ear. Then lift the hearing
instrument over the top of your ear and adjust it to fit behind
your ear (Fig. 7).
Fig. 6: Attaching the earpiece
Fig. 7: Inserting the hearing instrument
Earhook
Earpiece
Tubing
Lightly push on the back of the ear to help release the
earpiece and gently pull it out (Fig. 8).
Inserting and removing hearing
instruments with LifeTube or S-Life Tube
Hold the LifeTip between your thumb and index finger.
Gently work the LifeTip into its proper position in the ear
canal by adjusting it until it is firmly seated. Then lift the
hearing instrument over the top of your ear and adjust it
to fit behind your ear. Finally, place the retention strand
into the bottom of the ‘bowl’’ of your ear (Fig. 9).
Fig. 8: Removing the hearing instrument

OPERATING YOUR HEARING INSTRUMENT-OPTIONAL FEATURES
17
GETTING STARTED
16
To remove the instrument, gently pull the LifeTip out of
your ear and carefully lift the hearing instrument off your
ear. Do not pull or tug on the LifeTube to remove the Tip or
instrument, or the LifeTube may become damaged (Fig. 10).
Fig. 9: Inserting the hearing instrument
Fig. 10: Removing the hearing instrument
Retention Strand
LifeTip
LifeTube
Operating Your Hearing
Instrument–Optional Features
Refer to the feature card included with this manual to
determine the optional features your hearing instrument
is equipped with. Optional features are listed on the left
column of the feature card, see below (Fig. 11):
Remote Control
You may have received an optional remote control with your
hearing instrument. They can be used to change the memory
and volume of your hearing system.
For further information refer to the remote control
instruction manual.
Fig. 11: FEATURE CARD
Optional features section circled
Optional
Features
HEARING
INSTRUMENT
Volume control
Learning volume control
Program button
Directional microphone
Telecoil
AutoPhone
®
Audio input
Battery compartment door lock
ePocket
®
remote control
OPTIONAL FEATURES
RefertotheBTEUserManualforinformationon
Optional Features and Programmable Features.
Use the
type of
battery
shown
below
Microphones
Earhook
Audio
input
Volume control
wheel
Battery
compartment
door
FEATURE
CARD
e2e wireless
®
Push button on/off
Power on delay
Low battery indicator
Volume control
alert tones
Program change
alert tones
PROGRAMMABLE
FEATURES
PROGRAMS
Program number Listening environment
1
2
3
4

OPERATING YOUR HEARING INSTRUMENT-OPTIONAL FEATURES
18
OPERATING YOUR HEARING INSTRUMENT-OPTIONAL FEATURES
19
Tek
®
/miniTek
™
Wireless Enhancement
You may have received the optional Tek or miniTek
™
(Fig. 12
and 12.1) Wireless Enhancement with your hearing
instrument. Tek Connect can be used to change the program
and volume of your hearing system. In addition, other
adjustments can also be made to sound quality.
For detailed information and instructions refer to the Tek or
miniTek instruction manual or ask your Audiologist or Hearing
Care Provider.
Changing the volume
Your Siemens hearing instrument is fully automatic.
However, it may be equipped with a volume control for
manual adjustment.
You may hear soft beeps each time you change the volume
and a three beep warning when the volume limit has been
reached. These tones can be enabled or disabled by your
Audiologist or Hearing Care Provider.
You may have received an optional remote control with your
hearing instrument. Refer to the remote control user guide.
Learning volume preference feature
(if applicable)
You hearing instrument may have a learning volume control.
The learning volume preference feature retains information
on when and how you adjust the volume on your Siemens
hearing instruments programmed for manual adjustment.
Over time, your hearing system will automatically adjust to
that preferred volume in each listening program. For more
information about this feature, speak with your Audiologist
or Hearing Care Provider.
2
Volume control
•Rotatethevolumecontrolupto
increase the volume.
•Rotatethevolumecontroldown
to decrease the volume.
Rocker switch
•Pressuptoincreasethevolume.
•Pressdowntodecreasethevolume.
Fig. 13: Volume Control
Fig. 12: Tek Connect remote control
P1
P2
MICRO
R
IC TEK
P5
P4
P3
Program
Buttons
Volume up
Volume down
Fig. 12.1: miniTek remote control

OPERATING YOUR HEARING INSTRUMENT-OPTIONAL FEATURES
20
OPERATING YOUR HEARING INSTRUMENT-OPTIONAL FEATURES
21
SoundLearning
®
feature (if applicable)
SoundLearning allows all the functionality of the learning
volume control preference feature above and also retains your
sound quality preferences independently for loud and soft
sounds. For more information about this feature, speak to
your Audiologist or Hearing Care Provider.
Changing the program
Your Siemens hearing instrument may have up to 5
memories, also called hearing programs. Each program
is different and designed to help you hear better in specific
listening situations. Four of the five programs are selected
with the program button of your hearing instrument. The
fifth memory is activated automatically when an audio shoe
is attached to the hearing instrument (refer to the “Audio
Input” section, page 23). For Siemens Explorer
®
andMotion
®
,
when an audio shoe is attached all 5 programs can be
accessed via the program button.
When initially turned on (after the battery compartment door
is closed), the microphone is ON and ready for general use.
The default is Program 1. Your Audiologist or Hearing Care
Provider will provide you with the number of programs most
appropriate for your needs. Each time you press the program
button on the instrument, the instrument changes to the next
program. The program change may be confirmed by alerting
tones or beeps that correlate to the program you are in. That
means if you select Program 3, then the hearing instrument
beeps 3 times (Fig. 14).
Your Audiologist or Hearing Care Provider may list your
personal programs on the feature card (Fig. 15).
The optional remote control can also be used to change
the program.
HEARING
INSTRUMENT
Volume control
Learning volume control
Program button
Directional microphone
Telecoil
AutoPhone
®
Audio input
Battery compartment door lock
ePocket
®
remote control
OPTIONAL FEATURES
RefertotheBTEUserManualforinformationon
Optional Features and Programmable Features.
Use the
type of
battery
shown
below
Microphones
Earhook
Audio
input
Volume control
wheel
Battery
compartment
door
FEATURE
CARD
e2e wireless
®
Push button on/off
Power on delay
Low battery indicator
Volume control
alert tones
Program change
alert tones
PROGRAMMABLE
FEATURES
PROGRAMS
Program number Listening environment
1
2
3
4
Fig. 15: FEATURE CARD
Program information section highlighted
Programs
Via push button
•Pressthepushbuttonto
switch to the next program.
Via remote control
•Refertotheremotecontroluserguide.
Fig. 14: Changing the Program

OPERATING YOUR HEARING INSTRUMENT-OPTIONAL FEATURES
22
OPERATING YOUR HEARING INSTRUMENT-OPTIONAL FEATURES
23
Directional microphone system
According to your hearing needs, your Siemens hearing
instrument may be adjusted to focus on sounds in front of
you (directional mode) for when you are having a face-to-face
conversation in a noisy environment. The hearing system may
also be adjusted for when you are in more quiet environments
and want to hear the sounds around you (omnidirectional).
Your Audiologist or Hearing Care Provider may program the
operation of the directional microphone system to function
automatically or in conjunction with the program button or
remote control based on your particular hearing requirements.
Telecoil
Your Siemens hearing instrument may be equipped with a
T-coil (telecoil) for telephone use. It may be programmed to
work in a specific listening program in conjunction with the
program button. In the T-coil mode, place the telephone
receiver close to your hearing instrument for best reception.
By trying various positions of the telephone receiver, you
will discover what works best for you. Your Audiologist or
Hearing Care Provider can advise you on the proper use of
the T-coil.
Note: In order for the telecoil to function properly, your telephone
must be “hearing aid compatible”. Check your telephone’s
instruction manual to find out whether your phone has
this capability.
AutoPhone
®
The AutoPhone option allows the telecoil to automatically
engage when a “hearing aid compatible” telephone handset
is brought close to the hearing instrument.
To operate, bring the telephone handset close to the hearing
instrument. The telecoil will automatically engage to the
presence of the electromagnetic signal from the telephone.
When you are finished speaking on the phone, move the
handset away from the hearing instrument and the
microphone mode will re-establish itself.
AutoPhone magnet accessory
There is an AutoPhone magnet accessory available for your
telephone that can be used with the AutoPhone feature of
your hearing instrument. Ask your Audiologist or Hearing Care
Provider about this accessory and if it is appropriate for your
individual hearing care needs.
You must use the original magnet provided with your hearing
instrument. Using other magnets may cause irreversible
damage to the electronics of your hearing instrument.
Note : When magnets are properly cared for, they are safe to use
and can last a lifetime. However, the following guidelines
should be followed while using these magnets.
• Magnetscanposeriskstoelectronicsandmagneticstorage
media when placed in close proximity.
• Becarefulnottoplacemagnetsnearcomputers,color
monitors, television sets, floppy disks, video/audio tape,
and other electronic equipment.

OPERATING YOUR HEARING INSTRUMENT-OPTIONAL FEATURES
24
OPERATING YOUR HEARING INSTRUMENT-OPTIONAL FEATURES
25
•Magnetsmayinterferewiththeoperationoflifesupport
systems, such as pacemakers, magnetic valves, etc.
• Makecertaintomaintainadistanceofatleast4inches
between the magnet and the area of your support system.
• Keepmagnetsoutofthereachofchildrenorpets.
• Ifaccidentallyswallowed,seekmedicalattention.
Audio input
Your Siemens hearing instruments may be equipped with
audio input capability. This enables you to connect your
hearinginstrumentstootheraudiosourcessuchasanFM
system, tape recorder, television, or infrared system. It can
be useful for adults in difficult listening situations and for
children in classrooms. Because the sound is coming directly
from the sound source to the hearing instrument, the signal is
clearer and unaffected by poor room acoustics. Ask your
Audiologist or Hearing Care Provider if this feature may be
appropriate for your needs.
There are two methods for attaching and removing the
audio input shoe. Refer to the next page for the method
you should follow.
WARNING
Risk of injuries caused by electric shock!
Connect audio input only to devices conform to
IEC 60065 (IEC-Standard for audio, video and
other electronic devices).
ATTACHMENT METHOD 1:
Attaching and removing the audio input shoe (Fig. 16):
1. Using the fingernail of your thumb or index finger, open
the battery compartment door to the first catch.
2. Using your fingernail, lift up the audio input flap,
exposing the gold contacts.
3. Close the battery compartment door.
4. Place the gold contacts of the audio input shoe on the
gold contacts under the audio input flap on the BTE.
5. Gently push the audio input shoe into place by pressing
the audio input shoe toward the underside of the hearing
instrument until it snaps into place.
Note: When controlling your Siemens hearing instruments with an
audio input shoe attached to one or both hearing instruments,
the memory button on the remote control or on the instruments
will not change programs. It can be used to select the audio
mode only (audio input only, microphone only, or mixed mode)
if programmed accordingly by your Audiologist or Hearing Care
Provider. The volume can be changed using the volume control
wheel or the remote control.
Fig. 16: Method 1-Attaching the audio shoe

OPERATING YOUR HEARING INSTRUMENT-OPTIONAL FEATURES
26
OPERATING YOUR HEARING INSTRUMENT-OPTIONAL FEATURES
27
To remove the audio input shoe, hold the BTE with one hand
and the audio shoe with the other hand. Gently pull the audio
shoe off, guiding it from the underside towards the gold
contacts. Close the audio input flap.
ATTACHMENT METHOD 2:
Attaching and removing the audio input shoe (Fig. 17):
To attach an audio input shoe, open the battery compartment
to the first catch.
1. Hook the audio input shoe in from the front.
2. Gently press it into place until the audio shoe presses
against the underside of the hearing instrument.
3. The audio input shoe is now in place.
Note: When controlling your Siemens hearing instruments with
an audio input shoe attached to one or both hearing
instruments, the memory button on the remote control
or on the instruments will not change programs. It can
be used to select the audio mode only (audio input only,
microphone only, or mixed mode) if programmed accordingly
by your Audiologist or Hearing Care Provider (not applicable
for Motion and Siemens Explorer). The volume can be changed
using the volume control wheel or the remote control.
Fig. 17: Method 2-Attaching the audio input shoe
To remove the audio input shoe, press it toward the front of
the hearing instrument and gently unhook it.
Battery compartment door lock
Your Siemens hearing instruments may be equipped with a
lock that prevents the unintentional opening of the battery
compartment. This feature is located on the inner side of the
battery compartment door. To lock the battery compartment,
open the compartment door to the first catch. Push the slide
toward the right. To unlock the battery compartment for
opening, open the door to the first catch and push the slide
to the left (Fig. 18).
Your Audiologist or Hearing Care Provider can instruct you on
the use of this feature, if required.
Fig. 18: Battery compartment door lock
Locked
Unlocked

OPERATING YOUR HEARING INSTRUMENT-PROGRAMMABLE FEATURES
29
OPERATING YOUR HEARING INSTRUMENT-OPTIONAL FEATURES
28
The EXPLORER
®
500 P is equipped with a different battery
compartment lock (Fig. 19). Use a small screw driver to lock
and unlock the battery compartment door.
To Lock
• Pushthesmallslidetotheright.Thebattery
compartment is now locked.
To Unlock
• Pushthesmallslidetotheleft.Thebattery
compartment is now unlocked.
Ask your Audiologist and Hearing Care Provider if you
need assistance.
Locked
Unlocked
Fig. 19: EXPLORER
®
500 P compartment door,
locked, unlocked
Wireless functionality (if applicable)
Your hearing instrument may be equipped with wireless
functionality. This provides synchronization between
two hearing instruments. If you change the program or
volume on one instrument, the other is automatically
changed. In addition, wireless technology automatically
adjusts the system to change both hearing instruments
simultaneously to adapt to different listening situations.
The wireless functionality also enables use of an optional
remote control.
Note: The performance of the e2e® wireless 2.0 could be temporarily
affected when in close proximity to electromagnetic noise
sources, such as a computer monitor or television. Move away
from the noise source if you experience difficulty.
Technical information for e2e 2.0 wireless function:
Operating frequency : Fc = 3.28 MHz; Maxium field strength: –7 dB
µA/m at 10m meters.
Changes or modifications not expressly approved by the party
responsible for compliance could void the users authority to operate
the equipment.
This Class B digital apparatus complies with Part 15 of FCC Rules.
Operation is subject to the following two conditions: (1) this device
may not cause interference,and (2) this device must accept any
interference, including interference that may cause undesired
operation of the device. FCC: SGI-WL002BTE

OPERATING YOUR HEARING INSTRUMENT-PROGRAMMABLE FEATURES
30
OPERATING YOUR HEARING INSTRUMENT-PROGRAMMABLE FEATURES
31
This equipment has been tested and found to comply with the
limits for a Class B digital device, pursuant to Part 15 of the
FCC Rules.
These limits are designed to provide reasonable protection
against harmful interference in a residential installation. This
equipment generates, uses and can radiate radio frequency
energy and, if not installed and used in accordance with
the instructions, may cause harmful interference to radio
communications. However, there is no guarantee that
interference will not occur in a particular installation. If
this equipment does cause harmful interference to radio
or television reception, which can be determined by
turning the equipment off and on, the user is encouraged
to try to correct the interference by one or more of the
following measures:
• Reorientorrelocatethereceivingantenna.
• Increasetheseparationbetweentheequipment
and receiver.
• Connecttheequipmentintoanoutletonacircuitdifferent
from that to which the receiver is connected.
• Consultthedealeroranexperiencedradio/TVtechnician
for help.
Push button on/off
Your Siemens hearing instruments may be programmed to
allow you to turn them on and off using the program button.
To turn the instrument off using the program button, press
and hold the button for 3–5 seconds. To turn it back on, press
and hold the program button for 3–5 seconds. Please note
that after having turned the hearing instrument off using the
program button, you must wait approximately 10 seconds for
the system to reset before turning it back on again by using
the program button.
Power on delay
Your hearing instruments may be equipped with an advanced
power-on delay feature. This feature delays sound from
entering your hearing instruments when they are first
turned on so that you may insert the instruments into your
ears without experiencing unpleasant feedback (whistling).
Low battery indicator
Your hearing instrument may be programmed to inform you
when the battery should be replaced for best performance.
You may hear an intermittent series of beeps and/or
experience low amplification power or volume. Change
the battery immediately if either of these should occur.

LISTENING TIPS
33
OPERATING YOUR HEARING INSTRUMENT-PROGRAMMABLE FEATURES
32
Volume control alert tones
Your hearing instrument may be programmed to inform you
of changes to volume. You may hear soft beeps each time
you change the volume and a three beep warning when
the volume limit has been reached. Once the maximum or
minimum volume has been reached, further changes in that
direction will have no effect.
Program change alert tones
Your hearing instrument may be programmed to inform you
of changes to the program. The program change may be
confirmed by alert tones or beeps that correlate to the
program you are in. That means if you select Program 3,
the hearing instrument will beep 3 times.
Listening Tips
• Giveyourselftimetobecomeaccustomedtoyournew
hearing instruments. During this period, you may prefer
to wear your hearing instruments for only a portion
of the day, and then gradually increase your usage
throughout your normal routine each day.
• Youmayndthataquietenvironmentismorecomfortable
in the beginning of the adjustment period. Gradually
introduce new listening environments as your ears
become accustomed to hearing instrument amplification.
• Ifyouareanewhearinginstrumentuser,beawarethat
there are sounds, both pleasant and unpleasant, that you
may not have heard in a long time.
• Askthepeoplewithwhomyouareconversingtoattract
your attention before speaking to you. If you don’t
understand what someone has said, ask the speaker
to slow down or say it in another way, but not to shout.
• Innoisyordifcultenvironments,youmaynditeasierto
understand speech by facing the speaker. Focus on reading
lips and observing facial expressions and body language.
Be aware that in some situations, it may be too noisy to
understand what is being said.

MAINTENANCE AND CARE
35
LISTENING TIPS
34
• Encourageonepersontospeakatatimewhenyouare
engaging in group conversation.
• Listentoradioandtelevisionprogramsasyou
normally would.
• Experimentndingthebestplacetositforoptimum
hearing in public places like the theater, school auditoriums,
religious services, etc. If possible, choose a seat that is far
away from any source of distracting noise, such as a fan
or an open window, and where you have a good view of
the person speaking.
Maintenance and Care
Hearing instruments should be cleaned daily. You can wipe
them with a tissue or a soft cloth. Do not use water, alcohol,
benzene, or any other liquid or household cleaning agent to
clean your instruments as it may cause damage to them.
Always store your hearing instruments (and earpieces,
LifeTube, or LifeTip) inside the case. A soft carrying pouch
is also included for your convenience when traveling.
Remove the batteries to prevent damage from corrosion when
storing hearing instruments for an extended period of time.
Store the instruments in a dry area, preferably at room
temperature. If you perspire heavily or live in an area of
high humidity, you may find it beneficial to use a DRI-AID™
kit when the instruments are not in use. This product can be
purchased from your Audiologist or Hearing Care Provider.
Note: The charger can be used instead of the DRI-AID kit. Refer to
the Maintenance and Care section of the charger instruction
manual for further information.
CAUTION
Never immerse your hearing instruments in water!
Note: Your hearing instrument is sensitive to extreme heat, high
humidity, strong magnetic fields (>0.1T), X-rays and
mechanical stress.

PERFORMANCE CHECKLIST
37
MAINTENANCE AND CARE
36
• Donotexposeyourhearinginstrumenttoextreme
temperature or high humidity.
• Donotleaveitindirectsunlight.
• Donotwearitintheshowerorwhenyouapplymakeup,
perfume, aftershave, hairspray or suntan lotion.
• Donotwearyourhearinginstrumentswhenyouare
exposed to short-waves, a strong magnetic field, a
high frequency field or X-rays.
• Donotplaceyourhearinginstrumentsina
microwave oven.
* Aquaris
™
Instruments Recommendations
Aquaris instruments achieved International Protection Rating
(IP57) per the International Electrotechnical Commission
(IEC) 60529 Standard. Your instrument can be completely
submerged in water up to 3 feet for 30 minutes with no
damage to instrument, and dust will not interfere with the
operation of the device.
Special recommendations for water activities:
• Whenyouareswimming,useanearhookwitha
custom-made, unvented, soft ear mold.
• Removehearinginstrumentsbeforedivingandplaying
water sports that cause your hearing instruments to be
constantly immersed in water.
Performance Checklist
If the solutions in this checklist do not address a particular
issue you are having with your hearing instruments,
consult your Audiologist or Hearing Care Provider.
Problem Cause Possible Solution
Sound is
weak
Instrument
emits
whistling
sound
Sound is
distorted
Instrument
does not
work
Insert new battery
Clean instrument, earpiece,
or change LifeTip
Wipe hearing instrument
with cloth
Try reinserting earpiece or
LifeTip until it fits securely
Lower the volume
Clean earpiece or replace LifeTip
OR contact your Audiologist or
Hearing Care Provider
Lower the volume
Turn instrument on
Replace battery
Gently close the battery
compartment completely
Replace battery
Makesurebatteryis
inserted correctly
Wait 15 seconds and
check again
Clean instrument, earpiece
or change LifeTip
Weak or dead battery
Volume too low
Earpiece or LifeTip clogged
with wax or debris
Microphoneclogged
Improper seating in ear
Volume too high
Clogged with wax or
excessive wax in ears
Volume too high
Instrument not turned on
Weak battery
Battery compartment
not completely closed
Dead battery
Battery polarity reversed
Power-on delay is active
/