Page is loading ...


Warning and Attention Symbols
You must be aware of safety when you install and use this system. This User Guide provides
various procedures. If you do some of these procedures carelessly, you could injure or kill
yourself or damage equipment or property. Some other procedures require special attention.
The lightning flash with arrowhead symbol, within an equilateral triangle, is intended to
alert the user to the presence of uninsulated “dangerous voltage” within the product’s
enclosure that may be of sufficient magnitude to constitute a risk of electric shock to
persons.
The exclamation point within an equilateral triangle is intended to alert the user to the
presence of important operating and maintenance (servicing) instructions in the
literature accompanying the apparatus.
For Your Safety
Do not try to open the case. There is risk of electrical shock, which may cause
damage to the apparatus and/or personal injury or death to you. There are no user-
serviceable parts inside. Opening the case or making unauthorized changes will void
the warranty.
Warning: To reduce the risk of fire or electric shock, do not expose this apparatus to
rain or moisture.
Important Software Notice
As with all software controlled products, unexpected behavior could arise if the user tries to
perform operations in a non-routine manner. This product, like almost any other high tech
product, is subject to bugs and hence DISH Network CANNOT AND DOES NOT GUARANTEE
OR WARRANT THAT ALL FEATURES, SUCH AS PARENTAL CONTROLS, WILL WORK AS
INTENDED UNDER ALL CIRCUMSTANCES. DISH Network endeavors to improve such
conditions and will periodically download improvements.
In compliance with the terms of the GNU Public License (GPL), EchoStar is making some source
code available to the public to download from www.echostar.com.
Equipment and Software Covered by this Guide
This Guide covers the VIP®922 satellite
ViP922. This Guide may cover other devices, not listed here.
Copyright Notice
Copyright © 2010 EchoStar Technologies L.L.C., Englewood, Colorado 80112. All rights
reserved. The information in this Guide may change without notice. We may issue revisions to tell
you about such changes. Please send comments or questions about this Guide to: Technical
Publications, EchoStar Corporation, 100 Inverness Terrace East, Englewood, CO 80112.
Printed in the United States of America. Part Number: 176779 revision 02
DISH Network is a registered trademark of DISH Network L.L.C. For information about DISH
Network, please visit our website at www.dishnetwork.com
.
We acknowledge all product names, trade names, or corporate names we mention in this Guide
to be the proprietary property of the registered owners.
Manufactured under license from Dolby Laboratories. “Dolby” and the double-D symbol are
trademarks of Dolby Laboratories.
HDMI, the HDMI logo, and High-Definition Multimedia Interface are trademarks or registered
trademarks of HDMI Licensing LLC.
HomePlug is a trademark and registered trademark of the HomePlug Powerline Alliance, Inc.


SAFETY
ii
IMPORTANT SAFETY INSTRUCTIONS
1. Read these instructions.
2. Keep these instructions.
3. Heed all warnings.
4. Follow all instructions.
5. Do not use this apparatus near water.
6. Clean only with a dry cloth.
7. Do not block any ventilation openings. Install in accordance with
the manufacturer’s instructions.
8. Do not install near any heat sources such as radiators, heat
registers, stoves, or other apparatus (including amplifiers) that
produce heat.
9. Do not defeat the safety purpose of the polarized or grounding-
type plug. A polarized plug has two blades with one wider than
the other. A grounding-type plug has two blades and a third
grounding prong. The wide blade or the third prong are provided
for your safety. If the provided plug does not fit into your outlet,
consult an electrician for replacement of the obsolete outlet.
10.Protect the power cord from being walked on or pinched,
particularly at plugs, convenience receptacles, and the point
where they exit from the apparatus.
11. Use only attachments/accessories specified by the
manufacturer.
12.Unplug this apparatus during lightning storms or when unused
for long periods of time.
13.Refer all servicing to qualified service personnel. Servicing is
required when the apparatus has been damaged in any way,
such as the power supply cord or plug is damaged, liquid has
been spilled or objects have fallen into the apparatus, the
apparatus has been exposed to rain or moisture, does not
operate normally, or has been dropped.
14.Apparatus shall not be exposed to dripping or
splashing and no objects filled with liquids, such as vases,
shall be placed on the apparatus.

Important Safety Instructions
iii
CAUTION—To reduce the risk of fire, use only No. 26
AWG or larger telecommunication line cord.
• Locate the receiver in an open, well-ventilated area. Do not place
the receiver in an enclosure (such as a cabinet) without proper
ventilation.
• Do not impede ventilation by covering the ventilation slots (such
as with magazines, curtains, tablecloth, etc.), or the receiver will
overheat.
• Do not stack the receiver on top of or below other electronic
devices as this can cause heat build-up and vibration.
• Do not install the receiver in any area where the temperature can
be less than 40°F or more than 113°F, and do not cover it.
• Connect the power plug to an outlet having a safety ground
connection. The power plug must be readily accessible so that
the equipment can be easily disconnected from the AC power.
• Operate the receiver using only the type of power source
indicated on the marking label. Unplug the receiver power cord
by gripping the power plug, not the cord.
• Do not overload wall outlets or extension cords — this can result
in a risk of fire or electrical shock.
• Never insert objects of any kind through openings into the
receiver, as the objects may touch dangerous voltage points or
short out parts. This could cause fire or electrical shock.
• Do not attempt to service the receiver yourself, as opening or
removing covers may expose you to dangerous voltage, and will
void the Limited Warranty. Refer all servicing to authorized
service personnel.
• Unplug the receiver from the AC power outlet before cleaning.
The receiver is still connected to the AC power whenever it is
plugged in to a live power outlet, even if the receiver is “turned
off” using the remote control or front panel button.

SAFETY
iv
IMPORTANT SAFETY INSTRUCTIONS (continued)
• Do not place naked flame sources such as lighted candles on or
near the receiver.
• Do not expose the remote control batteries to excessive heat or
fire.
Note to Installer: This reminder is provided to call the installer's
attention to Article 810 section II of the National Electrical Code
(NEC) that provides guidelines for proper grounding and, in
particular, specifies that the cable ground shall be connected to the
grounding system of the building as close to the point of cable entry
as practical.
Do not locate the antenna near overhead light or power circuits, or
where it can fall into such power lines or circuits. When installing the
antenna, take extreme care to avoid touching such power lines or
circuits, as contact with them can be fatal.
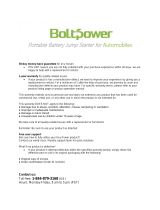
Example of Antenna Grounding
Antenna
Lead in Wire
Antenna
Discharge
Unit
(NEC Section 810-20)
Ground Clamp
Ground Clamp
Grounding
Conductors
(NEC Section 810-21)
Electric
Service
Equipment
Power Service Grounding
Electrode System
(NEC Art. 250, Part H)
National Electrical Code, 2008

Proper Care of Your Equipment
v
PROPER CARE OF YOUR EQUIPMENT
• Always handle the receiver carefully. Excessive shock and
vibration can damage the hard drive.
• Always turn the receiver off, unplug it, and then let it sit idle for at
least 30 seconds before moving it.
• If the receiver is cold to the touch, do not plug it in immediately.
Let it sit unplugged at room temperature for at least 45 minutes
before plugging it in.
• The use of accessories or attachments not recommended by the
receiver manufacturer will void the Limited Warranty.
• If you plug the receiver’s power cord into an outlet that contains
surge suppression, then verify you are using a HomePlug-
compatible surge-protected power strip or socket . Do not plug
the receiver into an outlet with ground fault protection.
• During an electrical storm or when the receiver is left unattended
and unused for long periods of time, unplug the power cord from
the wall outlet, and disconnect the lines between the receiver
and the antenna. This will provide additional protection against
damage caused by lightning or power-line surges.
• In some TVs, the presence of fixed images for extended periods
of time may cause permanent imprints on the screen. Consult
your TV’s manufacturer and user manual to determine if this is
an issue for your TV.

SAFETY
vi


2
Finding More Information
Getting More Help
F
INDING MORE INFORMATION
How to get help:
• If your new ViP®922
yet linked with at least one remote control, you
together to access various forms of on-screen user
Remote is not working on page 9.
• For more information on how to use your remote controls, refer to the
Quick Reference Guide that came with your ViP922 receiver.
• You can operate many of the features of your ViP922 receiver using
the capacitive-touch front panel controls, too. Note that this front panel
requires a light touch to activate it (and then it glows a little brighter)
before you touch the specific control to perform your intended function.
• On the Main Menu (accessed by pressing MENU on your linked remote
control or touching MENU on the front panel), a Help tile is displayed.
Selecting this tile accesses a Help area where you can browse the on-
screen user manual, view help videos, try out the interactive help
application, or search for help on any topic for the VIP922 receiver and
its remote controls. Most information a user needs is available in this
area of your receiver.
• Beginning on the next page, this guide provides tips for troubleshooting
certain kinds of issues you might encounter with your satellite system.
Also, you can find more information on your new satellite receiver and
its remote controls at www.dishnetwork.com. Select the Support link.

Troubleshooting
3
Getting More Help
T
ROUBLESHOOTING
Message Numbers
Message
Number
Possible Reason(s) What to Do
001
There may be a problem with the
multi-dish switch.
Check the coaxial cables and their connections
to and from the multi-dish switch. Make sure that
all required cables are in place, and check that
all cable connections are tight and dry (for
outdoor cables). Run the Check Switch test, as
follows:
1. Press MENU on your remote control or the
receiver’s front panel.
2. Select the Settings tile, and then scroll down
to Point Dish.
3. Access the Point Dish screen and select
Check Switch to run the test.
If this does not work, call the Customer Service
Center at 1-800-333-DISH (3474) for help.
002
Heavy rain, snow, or cloud cover
may be interfering with satellite
signal transmission, or there may
be other interference.
• Note the local weather conditions. Remove
any snow or other debris which may have
collected on the satellite dish. Make sure that
the satellite dish has a clear line of sight to the
satellite. Check whether branches or leaves
have grown into the line of sight of the dish.
• Make sure that the satellite dish is aimed at
the satellite. Check the strength of the signal
using the Point Dish screen (select the
Settings tile and scroll down to Point Dish).
Consult with your installer in order to re-aim
the dish, if necessary, to obtain the strongest
possible signal.
003, 004
The wrong type of coaxial cable
may be used in the system, or the
total run length of cable may be
too long. There may also be a
problem with the multi-dish
switch.
• Make sure the system uses RG-6 coaxial
cable; if not, contact your dealer or installer.
• Check the dish-to-receiver cable run length. If
your system is labeled DISH Pro, the cable
can be as much as 200 feet in length. Check
the coaxial cables and their connections to
and from the multi-dish switch. Make sure that
all required cables are in place, and check
that all cable connections are tight and dry
(for outdoor cables and connections). If this
does not work, run the Check Switch test, as
follows:
1. Press MENU on your remote control or the
receiver’s front panel.
2. Select the Settings tile, and then scroll
down to Point Dish.
3. Access the Point Dish screen and select
Check Switch to run the test.

4
Troubleshooting
Getting More Help
005
The receiver may not have
received authorization for
programming yet. The satellite
dish may have moved so that it is
no longer picking up the satellite
signal. The cable connections
may have loosened or have
moisture inside. There may be an
interruption of the satellite signal.
• If you have just authorized your receiver
(added it to your account), then wait a few
minutes to see if the message has been
removed. Make sure that all required cables
are in place, and check that all cable
connections are both tight and dry (for
outdoor cables and connections).
• Make sure that the satellite dish has a clear
line of sight to the satellite(s). Check whether
branches or leaves are in the line of sight of
the dish antenna.
• Check that the
Signal Strength bar on the
Point Dish screen (select the Settings tile,
scroll down, and select Point Dish) is green
and displays the word
Locked. If not, the
contact your installer to re-aim the satellite
dish, if necessary, to obtain the strongest
possible signal.
• If you have not authorized the receiver, then
call the Customer Service Center at 1-800-
333-DISH (3474) and do so.
006
The receiver may not be
connected to an active telephone
line or broadband Internet
connection.
You must keep each installed receiver
connected to an active telephone line or
broadband Internet connection at all times.
011, 012
Viewers in specific areas are
prohibited from watching certain
programs. For example, viewers
who live close to a particular
football stadium may be
prohibited from watching football
games that are played in that
stadium.
Program providers, not DISH Network, specify
which programs are blacked out for specific
areas.
013, 014
You may have tried to tune to a
program on a channel to which
you don’t subscribe.
• You must subscribe to a channel before you
can tune to a program on that channel. Call
the Customer Service Center at 1-800-333-
DISH (3474) to subscribe to one (or more)
new channel(s).
• If you subscribe to the channel and you see
these messages, then press the red reset
button behind the small door on the left side
of the receiver’s front panel and see if the
message has been removed after the reset is
complete.
• If you believe this message was displayed by
mistake, call the Customer Service Center at
1-800-333-DISH (3474).
Message
Number
Possible Reason(s) What to Do

Troubleshooting
5
Getting More Help
015
You may have just plugged in the
receiver and it is acquiring the
satellite signal, or the receiver
may have temporarily lost the
signal.
• Wait a few minutes to see if the message
goes away. Make sure that all required cables
are in place, and check that all cable
connections are both tight and dry (for
outdoor cables and connections).
• Make sure that the satellite dish has a clear
line of sight to the satellite(s). Check whether
branches or leaves have grown into the line of
sight of the dish antenna.
• Check that the Signal Strength bar on the
Point Dish screen (select the Settings tile,
scroll down, and select Point Dish) is green
and displays the word Locked. If not, then
contact your installer to re-aim the satellite
dish, if necessary, to obtain the strongest
possible signal.
018
The receiver may not be
connected to an active telephone
line or broadband Internet
connection.
• You must connect the receiver to an active
telephone line or broadband Internet
connection at all times.
• Call the Customer Service Center at 1-800-
333-DISH (3474) for help checking the credit
limit and/or to get authorization to make a
purchase.
022
The receiver may not have
received authorization for
programming yet. The satellite
dish may have moved so that it is
no longer picking up the satellite
signal. The cable connections
may have loosened or have
moisture inside. There may have
been an interruption of the
satellite signal.
• If you have authorized the receiver, wait a few
minutes to see if the message has been
removed. Make sure that all required cables
are in place, and check that all cable
connections are both tight and dry (for
outdoor cables and connections).
• Make sure that the satellite dish has a clear
line of sight to the satellite. Check whether
branches or leaves have grown into the line of
sight of the dish antenna.
• Check that the Signal Strength bar on the
Point Dish screen (select the Settings tile,
scroll down, and select Point Dish) is green
and displays the word Locked. If not, contact
your installer to re-aim the satellite dish. If you
have not authorized the receiver, then call the
Customer Service Center at 1-800-333-DISH
(3474) and do so.
028
The receiver may need to get
new software before you can use
it to order Pay-Per-View
programs.
Press the POWER button to turn the receiver off.
Doing this allows the receiver to download new
software via satellite. This download may take
several minutes; do not disturb or unplug the
receiver during this time. After the downloaded
software is installed, you will be able to order
Pay-Per-View programs through your receiver.
Message
Number
Possible Reason(s) What to Do

6
Troubleshooting
Getting More Help
059
You may have tried to close an
installation menu without having
performed the Check Switch test
on the Point Dish screen.
If your setup includes a multi-dish switch, then
run the Check Switch test, as follows:
1. Press MENU on your remote control or the
receiver’s front panel.
2. Select the Settings tile, scroll down, and then
select Point Dish.
3. Access the Point Dish screen and select
Check Switch to run the test.
060
You may have aimed the satellite
dish at one satellite, but selected
the option for another satellite on
the Point Dish screen.
• Make sure that you have selected the option
for the correct satellite on the Point Dish
screen (select the Settings tile, scroll down,
and select Point Dish).
• Make sure that the cable(s) for the satellite
that you have selected is connected to the
LNBF that receives signals from that satellite.
Contact your installer to re-aim the satellite
dish, if necessary, at the correct satellite(s).
061
The receiver is downloading
current software.
It is very important for the receiver to get the
latest software to function properly. The satellite
download may take several minutes. Do not
disturb or unplug the receiver during this time.
074
The receiver gives you three
chances to enter the correct
password. If you fail to do so, the
receiver “times out” and will not
allow you to try again for several
minutes.
Wait a few minutes and then try again to enter
the password.
Note: The “time out” feature is designed to
prevent someone from trying password after
password until he or she happens to guess the
right one and then gains unauthorized access to
the receiver.
078,
079, 080
You may not have connected the
receiver to an active telephone
line or broadband Internet
connection, or the telephone line
or Internet connection may be
defective.
Connect the receiver to an active telephone line
or broadband Internet connection. Make sure
that the telephone line or Internet connection to
which you connect the receiver is working
properly.
Note: To order Pay-Per-View programs, you
must keep each receiver connected to an active
telephone line or broadband Internet
connection. The receiver uses the telephone line
to make toll-free calls (when the phone is not in
use) or the Internet connection to send purchase
information to DISH Network.
093
You may have selected the Reset
to Factory Defaults option.
If you want to reset the receiver to its factory
default settings, select Yes. If you do not want to
reset the receiver to factory defaults, select No.
Message
Number
Possible Reason(s) What to Do

Troubleshooting
7
Getting More Help
Signal loss on all channels
1. Ensure you have selected the correct input/source or channel number
on your TV for watching digital channels using your satellite receiver. If
you are using the optional digital OTA tuner module and missing local
channels, then see Missing Over-The-Air channels (optional module).
2. Try a different satellite TV channel. Sometimes just one channel may be
experiencing a problem, while other channels are fine. If just one
channel seems to have the problem, go to the next section, Signal loss
on one or some channels. If all channels are experiencing the problem,
then continue with Step 3.
3. Verify that the coax cables connecting to your receiver are hand tight,
and are properly connected to your DISH Network antenna.
4. Verify that your DISH Network antenna is still in place and does not
appear to have been damaged or moved. If the antenna is out of proper
alignment, then you may receive signal loss messages on some or all of
your channels.
5. Try resetting your satellite receiver. Press the red reset button behind
the small door on the left side of your receiver’s front panel and wait a
few seconds. You can also press the POWER button on the remote
control to turn it off (in standby mode), then unplug the satellite receiver
from the power outlet for 30 seconds, plug it back in, and select
POWER again to turn it back on (out of standby mode).
6. Check the Signal Strength bar for your satellite channels using the Point
Dish screen and changing satellite locations and transponders, as
needed. Satellite TV transponders with a signal strength below about
40 are likely to experience some video loss.
7. Your antenna may need to be adjusted. Contact DISH Network or your
local retailer, as applicable, for assistance. If you want to try adjusting
the antenna yourself, refer to any instructions accompanying the
antenna, or to www.antennaweb.org for over-the-air antenna
recommendations and general information on antenna alignment.
Signal loss on one or some channels
1. Try a different channel. Sometimes just one channel may be
experiencing a problem, while other channels are fine. If all channels
are experiencing the problem, go to the previous section, Signal loss on
all channels. If just one channel or a few channels seem to have a
problem, then continue with Step 2 on the next page.

8
Troubleshooting
Getting More Help
2. Press the GUIDE button twice and check if the Program Guide is set to
show All Channels or All Subscribed. If another Favorites list is
displayed, then other channels may appear to be missing. If you try to
access channels not shown in the current list, then the receiver skips
over them.
3. Try resetting your satellite receiver. Press the red reset button behind
the small door on the left side of your receiver’s front panel and wait a
few seconds. You can also press the POWER button on the remote
control to turn it off (in standby mode), then unplug the satellite receiver
from the power outlet for at least 30 seconds, plug it back in, and select
POWER again to turn it back on (out of standby mode).
4. If you are using the optional digital tuner module and missing local
channels, see Missing Over-The-Air channels (optional module).
Missing Over-The-Air channels (optional module)
1. Your ViP922 receiver is able to tune satellite TV channels and local
digital channels (with an optional, digital OTA tuner module). It is
possible that some missing channels are channels still broadcasting in
analog.
2. You can go to the website www.antennaweb.org to find out which local
channels in your area are currently broadcasting a digital signal. If the
channel you are missing is still broadcasting in analog, you can view the
channel using a TV’s analog tuner. To view any analog channels, you
may need to change input/source or channels on your TV using the
TV’s remote control. When you want to return to watching digital
channels using your ViP922 receiver, change back to the correct input/
source or channel on your TV.
3. Check the Signal Strength bar for Over-The-Air (OTA) channels; select
MENU and then the Main Menu’s Settings tile, scroll down, and select
Local Channels, then the option to Add a New Channel. Find a
channel experiencing problems and verify it has a strong signal. OTA
channels with an indicated signal strength below approximately 60 are
likely to experience some video loss.
4. Your antenna may need to be adjusted. Contact your local installer or
antenna retailer, as applicable, for assistance. If you want to try
adjusting the antenna yourself, refer to any instructions accompanying
the antenna, or visit the www.antennaweb.org website for over-the-air
antenna recommendations and general information on antenna
alignment.

Troubleshooting
9
Getting More Help
Remote is not working
1. Verify the batteries are installed according to the diagram inside the
remote control’s battery compartment.
2. Try changing the batteries in the remote control. Batteries should all be
of the same type (for example, alkaline or lithium) and size.
3. Confirm your remote is in the correct mode for the device you want to
control. For example, to control your satellite receiver, press the SAT
mode button on the remote before the function you want performed.
4. Make sure you are using the correct remote control provided for your
ViP922 receiver. These remotes use radio frequency (RF) signals to
operate your ViP922 receiver. Other equipment is usually controlled
using infrared (IR) light signals. If you have programmed the remote to
control your equipment in other device modes, then the remote control
must have a clear line of sight to the front of these other devices.
5. Check that the remote control antenna is hand tightened onto the back
panel connector on your ViP922 receiver. The small antenna should
not be touching other cables, connectors, or equipment. Adjusting this
antenna to point straight up usually attains the best performance. When
linking a remote, hold it within a couple of feet of this remote antenna.
6. Verify you have linked your remote control to your ViP922 receiver.
Touch POWER on the receiver on the front panel to activate the
capacitive controls, then select SYSTEM INFO. With the System Info
screen displayed, any linked remote control(s) should be listed on the
right-hand side of the screen. If your remote is not listed, hold it close to
the remote antenna attached to the back of the receiver, and then press
and release the SAT mode button. Check several buttons to see if your
remote is now linked to and controls your ViP922 receiver.
7. If your remote still doesn’t work, select Un-Link on the System Info
screen and listen for the confirmation tone. After you hear it, you can
press the SAT button to link the remote again. If you do not hear the
tone, continue with the next step to un-link the remote control manually.
8. If your remote is not listed or cannot be un-linked on the System Info
screen, then do the following:
- Access the System Info screen, as in Step 6 above
- Press and hold down the SAT button for a few seconds until all the
device-mode buttons light up, and then release SAT.
- Press the RECALL and 0 (number zero) buttons at the same time
(SAT lights up), and then release them.

10
Troubleshooting
Getting More Help
- Press the SEARCH button (SAT lights up).
- Press the VOL+ button (SAT lights up)
- Press the STOP button (SAT lights up, then un-link tone is heard).
- Go back to Step 6 and repeat to re-link your remote control.
Forgot password for Parental Controls
1. If you have forgotten your existing password, you must call 1-800-333-
3474 (DISH) with your Receiver CA ID number to get more assistance.
Locate the Receiver ID number by selecting SYSTEM INFO on the front
panel, or alternately, by pressing MENU twice. You can also view
detailed information by selecting the Settings tile, scrolling down, and
then selecting System Info. Write down the Receiver ID number (after
the letter R and before the dash).
2. To reset your password, press MENU to access the Main Menu, select
the Settings tile, then select Parental Controls, and then choose the
Edit Password option. When prompted for your old password, you
must re-enter your existing password before you can enter and confirm
a new password. If you have forgotten your existing password, see the
preceding Step 1.
Parental Controls issues
1. If you have set up parental controls (for example, blocking programs
according to their ratings), but the programs are not being blocked, then
you may not have locked your ViP922 receiver. See the topics for
Parental Controls in the on-screen Manual under the Help tile.
2. If you have forgotten your password and therefore cannot unlock your
receiver, then see Forgot password for Parental Controls.
Program Guide issues
1. If you try to display future programs in the Electronic Program Guide
(EPG), but are unable to find the program schedule you are looking for,
then first try scrolling the guide out far into the future until a guide-
information update is triggered. You may also try displaying the
Program Guide again later. By that time, periodic updates to the guide
information may show the programs for the times you want.
2. The Program Guide can display only programs that have not yet ended.
The Guide cannot display a time or day earlier than the present.

Troubleshooting
11
Getting More Help
3. If some channels are missing when you are using the Program Guide or
Info banner, you may have locked the satellite receiver to hide adult
channels, or you may have displayed a Favorites lists or the All HD list
instead of All Channels or All Subscribed. To show the missing
channels, unlock the ViP922 receiver (see the topics for Parental
Controls in the on-screen Manual under the Help tile), or press GUIDE
again and choose the All Channels, All Subscribed, or a different
Favorites list containing the channels (see Favorites and Quick Clicks in
the on-receiver Help area).
Timer issues
1. If a program is locked (see Parental Controls in the Help area), you
must enter your password first before you may create a timer for that
program.
2. If you have set up the maximum number of event timers, then your
satellite receiver displays an error message when you try to set up an
additional one, giving you the option of deleting an existing event timer.
3. If you try to extend the end of an event timer and create a conflict with
other timers’ start times, then an error message displays.
4. If you stop or skip a timer that recurs, the next showing of the program
is not affected. To stop all occurrences, you must delete the event timer.
(Timers set to record Once are automatically deleted after they occur.)
5. If you set a timer that misses the beginning or end of a program, you
may want to change the Start Early or End Late options for that timer.
Events not recording
1. Ensure event timers you have set that you want to record programs are
listed as DVR (Digital Video Recorder) timers, not Auto-Tune timers.
2. If you set up a recurring event timer, but it does not record one or more
specific showings of the program, then double-check that you set the
correct recurrence frequency for that timer (Weekly, Daily, Mon-Fri.).
3. If you set up a timer to Record Series, ensure that you have selected
the correct choice between Only New Episodes or New and Reruns.
4. If you have several timers set for the same or overlapping time periods,
then one or more will be skipped. Ensure that you have set the Priority
of the recordings correctly. By default, new event timers are set with
lower priority than existing timers, but that default can be changed.
(Select the Settings tile, then Series Timer Defaults to change it.)

12
Troubleshooting
Getting More Help
5. Press the DVR button on your remote control and select Daily
Schedule on the My Media screen to see what specific events in the
near future may be skipped due to timer conflicts.
Events disappearing from Recordings list
1. If you run out of space for more recordings on your satellite receiver,
then existing recordings that are not protected are erased, starting with
the oldest unprotected one, as needed, to make room for new
recordings as they occur.
You should be aware that certain timers you set up may match and
record more events than you expected. To view timers scheduled to
record events in the near future, press the DVR button twice on your
remote control, or select Daily Schedule on the My Media screen.
2. If you do not want a recording to be deleted, select Protect on the
screen for that recording.
Network connectivity issues
1. If your receiver is connected to the Internet, but you are having trouble
accessing certain On Demand options or other Internet-based services
from your receiver, then you may have a problem with your broadband
Internet connection or home network. For more information on your
receiver’s Ethernet connectivity and home networking options, see the
dishnetwork.com website. Select the Support link on the web page.
2. Press MENU and select the Settings tile, then select Broadband
Setup. On the Broadband Setup screen, verify that a valid IP address
for your home network is listed. If the IP address seems to be invalid or
is all zeroes, then select Reset Connection.
3. If the Connection Status is still Not Connected, or one or more items
on the Broadband Setup screen say Failed, then troubleshoot your
home network, router or gateway device, and broadband modem. See
the installation instructions, user guides, help, and support information
for the equipment on your home network. Ensure that your existing
computer(s) can access the Internet via this network.
4. To connect your satellite receiver to your router or gateway device using
a HomePlug-to-Ethernet adapter, like a SlingLink, plug the receiver and
SlingLink directly into nearby non-switched, non-GFI power outlets and
ensure that no halogen lights, power supply units or adapters are
plugged into the same outlets. If you need to restart your router or
gateway device, unplug your ViP922 receiver first, followed by the
SlingLink(s), and then your router. Plug them back in in reverse order.
/