Brady LOCKOUT PRO 3.0 Administrator's Manual
- Category
- Networking
- Type
- Administrator's Manual

Administrator’s Guide
LOCKOUT-PRO
TM
Graphical Procedure Writing Software
v3.0 Enterprise Version

LOCKOUT-PRO
TM
ENTERPRISE USER GUIDE
•
•
•
•
•
•
YOU SHOULD CAREFULLY READ THE FOLLOWING TERMS AND CONDITIONS OF THIS
LICENSE AGREEMENT BEFORE OPENING THIS PACKAGE. IF YOU DO NOT AGREE WITH
THESE TERMS AND CONDITIONS, PLEASE PROMPTLY RETURN THIS PACKAGE FOR A
FULL REFUND.
LICENSE AGREEMENT
Brady Worldwide, Inc. (hereafter "Brady") hereby grants you a non-exclusive, nontransferable license to
use this software and the accompanying documentation according to the following terms:
1. LICENSE GRANT: You may 1) install the software on the number of computers covered by invoices for
this license from Brady, which are hereby incorporated by reference; 2) use and transmit the software on
a network within a site if authorized by an invoice from Brady; 3) install the software on one server or
multiple servers as invoiced for a single server or multiple servers which invoices are hereby incorporated
by reference; and 4) make copies of the software in machine readable form for backup purposes only.
2. LICENSE RESTRICTIONS: You may not: 1) modify, adapt, translate, reverse engineer, decompile,
disassemble, create derivative works based on, or copy (except for the backup copy) the software or the
accompanying documentation; 2) rent, transfer or grant any rights in the software or accompanying
documentation without the prior, express written consent of Brady; or 3) remove any proprietary notices,
labels, or marks on the software and accompanying documentation.
3. NATURE OF THIS AGREEMENT: This license is not a sale. License fees paid by you, if any, are in
consideration of the licenses granted under this Agreement. Title and copyrights to the software,
accompanying documentation, and any copy made by you, remain the property of Brady or its suppliers.
Unauthorized copying of the software or the accompanying documentation, or failure to comply with the
above restrictions, shall automatically terminate this license, without further notice, and terminate your
rights to use the software, and Brady shall, in addition to its other legal remedies, be entitled to its
reasonable attorney fees.
4. LIMITED WARRANTY: Brady warrants that, for a period of ninety (90) days from the date of delivery
to you as evidenced by a copy of your receipt, the software, as furnished, under normal use, will perform
without significant errors. Brady's entire liability and your exclusive remedy under this warranty (which
is subject to you returning the software to Brady) will be, at the option of Brady, to attempt to correct or
help you around errors, to replace the software with functionally equivalent software or diskettes, or to
refund the license fee of the software and terminate this Agreement.
EXCEPT FOR THE ABOVE EXPRESS LIMITED WARRANTY, BRADY MAKES AND YOU RECEIVE
NO WARRANTIES, EXPRESS, IMPLIED, STATUTORY OR IN ANY COMMUNICATION WITH YOU,
AND BRADY SPECIFICALLY DISCLAIMS ANY IMPLIED WARRANTY OF MERCHANTABILITY OR
FITNESS FOR A PARTICULAR PURPOSE. BRADY DOES NOT WARRANT THAT THE OPERATION
OF THE PROGRAM WILL BE UNINTERRUPTED OR ERROR FREE.
Some states do not allow the exclusion of implied warranties so the above exclusions may not apply to
you. This warranty gives you specific legal rights. You may also have other rights which vary from state
to state.
5. LIMITATION OF LIABILITY: IN NO EVENT WILL BRADY BE LIABLE FOR ANY DAMAGES,
INCLUDING LOSS OF DATA, WHEN LOADING THIS SOFTWARE OR OTHERWISE, OR LOST
PROFITS, COST OF COVER OR OTHER SPECIAL, INCIDENTAL, CONSEQUENTIAL OR INDIRECT
DAMAGES ARISING FROM THE USE OF THE PROGRAM OR ACCOMPANYING DOCUMEN-
TATION, HOWEVER CAUSED AND ON ANY THEORY OF LIABILITY. THIS LIMITATION WILL
APPLY EVEN IF BRADY HAS BEEN ADVISED OF THE POSSIBILITY OF SUCH DAMAGE.
Some states do not allow the limitation or exclusion of liability for incidental, or consequential damages,
so the above limitation may not apply to you.
6. GENERAL: This Agreement shall be governed by, and interpreted under, the laws of the State of
Wisconsin, USA. You acknowledge that U.S. law and regulations may restrict the export/re-export of the
software. You agree not to export/re-export the software or portions thereof in any form without the
appropriate U.S. and foreign government licenses. This obligation shall survive and continue after this
Agreement terminates. This Agreement is the entire agreement between the parties and supersedes any
other communications or advertising with respect to the software and accompanying documentation. If
any provision of this Agreement is held invalid, the remainder of this Agreement shall continue in full
force and effect.
6555 West Good Hope Road, P.O. Box 571, Milwaukee, Wisconsin 53201-0571, USA, tlf. +1 (414) 358-6600

LOCKOUT-PRO
TM
ENTERPRISE ADMINISTRATOR’S GUIDE III
•
•
•
•
•
•
• • • • • •
T
ABLE
OF
C
ONTENTS
Administering LOCKOUT-PRO
LOCKOUT-PRO Enterprise Server Functions
A–1
Server Components
A–1
User Permission Levels
A–2
System Requirements for Server & Client Applications
A–4
Installing & Setting Up Server Applications
A-5
Preparing for Installation
A–5
Installation Overview
A–5
Installing the Enterprise Server Applications
A–6
Activating & Configuring LOCKOUT-PRO
A–7
Distributing LOCKOUT-PRO to Clients
A–8
Using the Administrator Application
A–9
Becoming Familiar with Administrator
A–10
Viewing & Managing Domains
A–10
Managing User Groups
A–12
Maintaining Users & Permission Levels
A–13
Managing User Files
A–14
Performing Other Administrative Tasks
A–15
Starting/Stopping Network Service
A–15
Viewing LOCKOUT-PRO Events
A–15
Troubleshooting Enterprise Functions
A–16

IV
LOCKOUT-PRO
TM
ENTERPRISE ADMINISTRATOR’S GUIDE
•
•
•
•
•
•
Copyright
This manual is copyrighted with all rights reserved. No portion of this
manual may be copied or reproduced by any means without the prior
consent of Brady Worldwide, Inc.
While every precaution has been taken in preparation of this document,
Brady assumes no liability to any party for any loss or damage caused
by errors or omissions or by statements resulting from negligence,
accident, or any other cause. Brady further assumes no liability arising
out of the application or use of any product or system described, herein;
nor any liability for incidental or consequential damages arising from
the use of this document. Brady disclaims all warranties of
merchantability or fitness for a particular purpose.
Brady reserves the right to make changes without further notice to any
product or system herein to improve reliability, function, or design.
Reproduction of this material, in part or whole, is strictly prohibited
without the written permission of Brady Worldwide, Inc.. For more
information, contact: Brady Worldwide, Inc. Signmark® Division, 2221
W. Camden Road, Milwaukee, WI 53209.
Disclaimer
Every effort has been made to make this guide as accurate and complete
as possible. Brady Worldwide, Inc. is not responsible for inaccuracies
and omissions occurring during the use of this guide.
This manual is proprietary to Brady Worldwide, Inc. and may be revised
from time to time without notice. Brady Worldwide, Inc. disclaims any
understanding to provide you with revisions, if any.
All brand or product names referenced in this manual are trademarks
or registered trademarks of their respective companies or organizations.
LOCKOUT-PRO, GlobalMark, and HandiMark are trademarks of
Brady Worldwide, Inc.
© 2006 Brady Worldwide, Inc. All rights reserved.
www.bradycorp.com

LOCKOUT-PRO
TM
ENTERPRISE ADMINISTRATOR’S GUIDE
A
- 1
•
•
•
•
•
•
• • • • • •
A
DMINISTERING
LOCKOUT-PRO
The Enterprise Version of LOCKOUT-PRO
TM
Graphical Procedure
Writing Software includes tools that allow the application’s
administrator to easily manage usage across an entire organization.
This
Administrator’s Guide
explains more about the Enterprise version
and how to use these tools, including:
An overview of LOCKOUT-PRO
TM
Enterprise server functions
How to install and set up the LOCKOUT-PRO
TM
Enterprise server
components and prepare for client installations
How to manage user domains, user groups, users, and files
How to start and stop the network service and view LOCKOUT-
PRO
TM
events
Common error messages and how to troubleshoot them
LOCKOUT-PRO Enterprise Server Functions
LOCKOUT-PRO
TM
Enterprise Version is designed for larger
organizations that want to deploy the software over a network and
centralize control of user rights, procedure templates, defaults, and
enhanced security. LOCKOUT-PRO
TM
Enterprise v3.0 combines server-
side administrator utilities and a network service with the desktop
application running on the client PC.
Server Components
There are three primary components active on the LOCKOUT-PRO
TM
Enterprise server:
•
Administrator Application
•
Network Service
•
Event Viewer Entry

A-2
A
DMINISTERING
LOCKOUT-PRO LOCKOUT-PRO
TM
ENTERPRISE ADMINISTRATOR’S GUIDE
•
•
•
•
•
•
LOCKOUT-PRO
TM
Administrator Application
Through this utility, administrators of LOCKOUT-PRO
TM
Graphical
Procedure Writing Software can monitor client users and files, register
users, assign them to groups, and set user rights. The utility also allows
you to copy files from one group to another, and to unlock files that have
been “checked out” and cannot be unlocked using the normal process
(due to a client PC crash, for example).
The Administrator Application is set up on the server only once.
However, after setting up at least one administrator on the server, you
can establish additional administrators who can run a “remote” version
of the Administrator Application from their client PCs.
LOCKOUT-PRO
TM
Network Service
This service running on the Enterprise server is the means by which
LOCKOUT-PRO
TM
client users connect to the server for access to online
files. This service can be started and stopped using standard Windows
administrator tools (Services Function), or by using controls provided in
the LOCKOUT-PRO
TM
Administrator Application.
You can start and stop the service
only
from the server, using either the
standard Windows tools or the Administrator Application. These
functions cannot be performed when running the Administrator
Application remotely.
Event Viewer Entry
Every step or “transaction” by client users is logged and can be viewed
using the standard Windows Event Viewer. The specific entry for
LOCKOUT-PRO
TM
is named
LOPE
. Logged transactions include: user
access to the service, file open/save, number of users online, whether a
user tries to open a locked resource, any server problems, and
administrative service functions.
You can view or save Event Viewer entries only from the server. These
functions cannot be performed when running the Administrator
Application remotely.
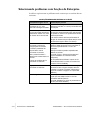
User Permission Levels
LOCKOUT-PRO
TM
Enterprise incorporates three permission levels for
users:

LOCKOUT-PRO
TM
ENTERPRISE ADMINISTRATOR’S GUID
E
A- 3
•
•
•
•
•
•
•
Administrator
: A user with
Admin
rights may perform all functions
available in both the client and server components of LOCKOUT-
PRO
TM
.
•
Author
: A user with
Author
rights may create and edit procedures
from the client application, as well as view and print, but cannot
modify templates, defaults, or the related information.
•
Viewer
A user with
Viewer
rights may only view and print
procedures, lockout tags, energy source labels, and related
information.
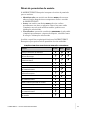
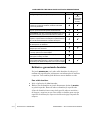
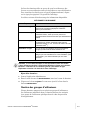
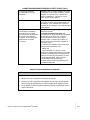
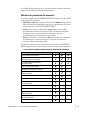
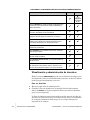
The following table lists the primary functions in LOCKOUT-PRO
TM
Enterprise and to which permission levels they are assigned.
FUNCTIONS ASSIGNED BY USER PERMISSION LEVELS
Functions Admin
Author Viewer
View existing procedures
Print procedures, tags, energy source labels
View the related information in LOCKOUT-
PRO
TM
Create new procedures
Revise existing procedures
Import earlier versions of LOCKOUT-PRO
TM
files
Export procedures to other file formats
Save new or revised procedures
Administer LOCKOUT-PRO
TM
client licenses
Maintain user permission levels
Edit procedure templates
Change LOCKOUT-PRO
TM
default lists
Modify the related information in LOCKOUT-
PRO
TM
Transfer procedures between user groups

A-4
A
DMINISTERING
LOCKOUT-PRO LOCKOUT-PRO
TM
ENTERPRISE ADMINISTRATOR’S GUIDE
•
•
•
•
•
•
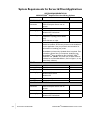
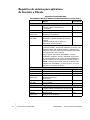
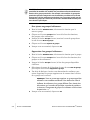
System Requirements for Server & Client Applications
SYSTEM REQUIREMENTS FOR
LOCKOUT-PRO
TM
Graphical Procedure Writing Software
Minimum: Recommended:
DESKTOP CLIENT
Network
Connection
Access to installation of LOCKOUT-
PRO
TM
Enterprise Server over an
intranet
Protocol TCP/IP
Operating System Windows 2000
Windows XP Professional
Same
Printers Supported GlobalMark
TM
HandiMark
TM
(energy source labels
only)
Sheet-fed laser or inkjet
Printer Drivers for the printer(s) you will use with LOCKOUT-PRO
TM
should be installed. At least one printer must be installed to
run the application. See your printer’s documentation for
information on installing your printer.
GlobalMark
TM
printers only: Updated driver is required. First,
uninstall the printer from your computer. Install the new
GlobalMark
TM
driver included on the LOCKOUT-PRO
TM
installation CD. (NOTE: This driver has not been tested or
validated to work with MarkWare
TM
, Surf on Signs
TM
, or any
other Brady software.)
SERVER
Processor 1.2 GHz or better 2.6 GHz
Memory (RAM) 512 MB 1G
Disk Space 500 MB Same
Operating System Windows 2000 Advanced Server
Windows 2003 Server
Windows XP
Same
IIS support V5 or v6, configured and enabled
ASP .NET V1.1, installed
REMOTE ADMINISTRATOR
Network
Connection
Access to installation of LOCKOUT-
PRO
TM
Enterprise Server over an
intranet
Protocol TCP/IP
Operating System Windows 2000
Windows XP Professional
Same

LOCKOUT-PRO
TM
ENTERPRISE ADMINISTRATOR’S GUID
E
A- 5
•
•
•
•
•
•
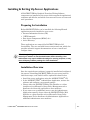
Installing & Setting Up Server Applications
All LOCKOUT-PRO
TM
Graphical Procedure Writing Software
components are installed on the server which contains the application’s
templates and defaults, and which client users will access to create and
store procedures.
Preparing for Installation
Before LOCKOUT-PRO
TM
can be installed, the following Micrsoft
applications must be installed on your server:
•
Internet Information Services (IIS)
•
.NET Framework
•
Data Access Components (MDAC) v2.8
•
Active Directory
These applications are essential for LOCKOUT-PRO
TM
’s full
functionality. They are available from www.microsoft.com, which also
provides extensive support documentation on how to install and
configure them.
TIP: Although this guide provides the basic setup structure, be sure to
consult your network or domain administrator before installing. Your
administrator may require additional settings for security purposes, or may
use a third-party software package for client installation.
Installation Overview
Once the required server software is properly installed and configured,
the process of installing LOCKOUT-PRO
TM
on your server involves
these basic steps, each of which will be explained in detail below:
•
Install the server applications using the LOCKOUT-PRO
TM
CD.
•
In the LOCKOUT-PRO
TM
Administrator Application, activate the
software and configure your network settings.
•
Choose either the LOCKOUT-PRO
TM
Web Installer or a silent
installer such as Microsoft’s Group Policy Management tool to
distribute the client-side application to user machines.
•
If you want to set up additional users to run the Administrator
Application remotely, choose either the LOCKOUT-PRO
TM
Web
Installer or a silent installer such as Microsoft’s Group Policy
Management Tool to distribute the Administrator Application to
additional administrator user machines.

A-6
A
DMINISTERING
LOCKOUT-PRO LOCKOUT-PRO
TM
ENTERPRISE ADMINISTRATOR’S GUIDE
•
•
•
•
•
•
Installing the Enterprise Server Applications
Your first step is to install the server applications using the LOCKOUT-
PRO
TM
Enterprise CD.
To install Enterprise server applications:
1
Insert the LOCKOUT-PRO
TM
CD in the CD-ROM drive of the enterprise
server. The installation program will launch automatically. If it does not
open after a short while, you can manually launch it by taking these
steps:
•
Open the folder for the drive containing the LOCKOUT-PRO
TM
CD.
•
Locate and double-click on the file:
Lockout PRO 3.0 Installer.exe
2
When the installer window appears, select the menu option:
Install Lockout PRO Server
.
3
When prompted, choose the language you want.
4
When the Install Shield Wizard opens, click
Next
to begin installation.
5
When prompted, read and accept the license agreement by clicking
Yes
.
6
Enter your name, company name, and serial number from the CD
package, and then click
Next
.
7
Accept the destination folder for the program by clicking
Next
.
8
Accept or select the Programs Folder and then click
Next
.
9
The
Setup Statu
s window appears while the installer completes the
following tasks:
•
Install the LOCKOUT-PRO
TM
Administrator Application on the
server.
•
Install the LOCKOUT-PRO
TM
Network Service through which client
users connect to the server.
•
Create the required folders on the enterprise server.
•
Copy the LOCKOUT-PRO
TM
Enterprise database to the appropriate
folder on the server.
•
Install the files for LOCKOUT-PRO
TM
Enterprise on the server.
•
Install the documentation on the server.
•
Install the Event Viewer Entry.
10
When the setup is completed, click the
Finish
button to continue.
11
When your browser opens the registration page, follow the prompts to
register LOCKOUT-PRO
TM
.
12
Close the browser and the installation window.Activating &
Configuring LOCKOUT-PRO
TM

LOCKOUT-PRO
TM
ENTERPRISE ADMINISTRATOR’S GUID
E
A- 7
•
•
•
•
•
•
Activating & Configuring LOCKOUT-PRO
After installation, you will need to activte the software using the
activation code provided by Brady. The code is an encrypted key that
specifies the number of licenses your organization has purchased. These
are “floating licenses” meaning that they can be used on any computer
on your network, as long as the total number of licenses in use at any
given time does not exceed the number of licenses purchased.
Once activated, you will need to add the domains and configure the
network settings.
NOTE:
You must complete the following procedure before you can
distribute LOCKOUT-PRO
TM
to clients or additional Administrator
Application users.
To activate and configure LOCKOUT-PRO:
1
Open the Administrator Application from a desktop shortcut or your
Start>Programs
menu.
2
When prompted, enter the product key that is provided on the license
certificate you received with the software, and then click
OK
.
3
(Optional)
When the Administrator window opens, you can change the
language by clicking the
Language
menu item at the top left and
choosing the language you want to use for the Administrator
Application interface.
NOTE:
The language choice here only sets the language for the
Administrator Application. Users can select the language
individually on their client machines.
4
Click the
Network Interface Settings
menu item at the top of the
Administrator
window.
5
In the
Network Interface Settings
window, enter the network’s
LAN/Wireless
address for the LOCKOUT-PRO
TM
server and the
VPN
address, if your network uses VPN.
NOTE:
To discard the data you’ve entered into this window, click
Cancel
. The fields will be blanked out.
6
Enter the
Port number
you want to use.
7
Click
OK
.
8
A dialog box appears asking you to verify these settings are correct. If
they are, click
Yes
.
9
In the
Administrator
window, enter the domain name in the
Domain
textbox, and click the
Add
button. The domain name will appear in the
left navigation panel.

A-8
A
DMINISTERING
LOCKOUT-PRO LOCKOUT-PRO
TM
ENTERPRISE ADMINISTRATOR’S GUIDE
•
•
•
•
•
•
Distributing LOCKOUT-PRO to Clients
After you’ve activated and configured LOCKOUT-PRO
TM
, you can
distribute the client installation files to users’ computers, as well as
send the Administrator Application to additional administrator user
machines. There are two ways to distribute theese files:
•
Use the provided Web Installer, which offers an easy interface
instructing users how to save the installation files and then install
LOCKOUT-PRO
TM
.
•
Use Microsoft’s Group Management Policy tool to silently “push” the
installation files to the client machines. (You may also have a third-
party software application that you use to perform such silent
installs.)
To distribute to client machines using the Web Installer:
1
When you add a domain in the Administrator Application, LOCKOUT-
PRO
TM
will automatically place a Web Install file on the desktop for each
user in that domain.
2
When the user next reboots, the installation icon will appear. Double-
clicking on this icon opens the Web Installer window with instructions
for proceeding.
NOTE:
The Web Installer address should be:
http://<server name or IP address>/LOPClientSetup/
3
The user will be instructed to right-click on each of two links and choose
Save Target As
to save the file connected to each link into the same folder
on the client machine.
4
The user then double-clicks the
LOCKOUT-PRO 3.0
icon to begin
installation.
5
When the
Windows Installer
opens, the user clicks
Next
.
6
When prompted to choose the program folder, the user clicks
Next
.
7
When asked to confirm the installation, the user clicks
Next
.
8
After the program finishes installing, the user clicks the
Close
button.
To distribute to client machines using the Group Policy tool:
1
On the server where LOCKOUT-PRO
TM
is installed, locate and open the
folder
LOPE
.
2
Find the
ClientFiles
folder, then right-click on it to open the
ClientFiles
Properties
window.

LOCKOUT-PRO
TM
ENTERPRISE ADMINISTRATOR’S GUID
E
A- 9
•
•
•
•
•
•
3
Click the option to
Share the folder
(and change any other settings you
wish), then click
OK
.
4
From the Windows
Start
menu, open the
Group Policy Management
tool.
NOTE:
This tool is only available with Windows 2003 Server and
XP Pro. It is a free download from www.microsoft.com if it is not
already on your server.
5
In the
Group Management Policy
window’s navigation panel, under
Forest
, locate your domain and server.
6
Under your server, right-click the
Default Domain Policy
, and select
Edit
from the menu.
7
The
Group Policy Object Editor
window for your domain will open. At this
point, you have two options:
•
To set up a push install for every
computer
on the domain, select the
Software Seetings
folder under
Computer Configuration
.
•
To set up a push install for every
user
on the domain, select the
Software Settings
folder under
User Configuration
. Right-click on it and
select
Properties
. In the
Deployment
tab of the
Lockout PRO 3.0
Properties
window, choose
Basic
under
Installation user interface
options
, and then close the window.
8
Right-click on
Software Settings,
then choose
New>Package
from the
menu.
9
Navigate to:
My Network Places>Entire Network>Microsoft Windows
Network>
your domain
>
your server
>ClientFiles folder>Lockout PRO
3.0.msi file
.
10
In the
Deploy Software
window, configure the deployment according to
your organization’s policies, then click
OK
.
NOTE:
For help in using the Group Policy Management tool, go to
http://support.microsoft.com/kb/816102/.
11
When users next log on, their desktop will display either an installation
icon or the icon for the installed LOCKOUT-PRO
TM
(depending on the
deployment settings you selected in the Group Policy Management tool).
NOTE:
Follow your organization’s policies and procedures for
either the Group Policy Management tool. If using third-party
software, refer to its user documentation for specific instructions
on setting up a silent install of LOCKOUT-PRO
TM
.
Using the Administrator Application
The Administrator Application provides an easy-to-use interface to
manage the enterprise server functions.

A-10
A
DMINISTERING
LOCKOUT-PRO LOCKOUT-PRO
TM
ENTERPRISE ADMINISTRATOR’S GUIDE
•
•
•
•
•
•
Becoming Familiar with Administrator
When the Administrator Application is launched, it opens the
Administrator
window with the following components and features, and
whether they are available when using the application remotely.
Viewing & Managing Domains
From the
Administrator
window, you can view network domains that
have already been entered, along with their user and file information.
You can also add other domains in your network.
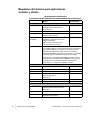
ADMINISTRATOR APPLICATION COMPONENTS & FEATURES
Functions Server
Remote
Main menu across the top of the window
(except
Network
Interface
Settings
)
Domain panel along the left side that provides access to
domains, user groups, individual users, and permission
levels
Unlock File button, which allows you to free a file
accidentally locked
Groups button, which opens a window allowing you to
add or delete user groups on a domain
Browse button, which opens a Windows Explorer-type
window that displays the information in the Domain
panel in a directory tree and file format
Performance Monitor button, which accesses the
Windows Performance Monitor
Refresh button, which refreshes your displayed
information whenever you click it
Start Network Service button, which allows you to
resume the service when stopped
Stop Network Service button, which allows you to stop
service to the network
Display area to the right where you can view the
domain, group, and user information in a Windows
Explorer-type window with editing icons

LOCKOUT-PRO
TM
ENTERPRISE ADMINISTRATOR’S GUID
E
A- 11
•
•
•
•
•
•
To v i e w d o m a i n s :
1
Launch the Administrator Application.
2
View the list of domains in the window directly under
Domain
in the left
panel. These are all the domains already entered.
The list of domains provides an overview of all users, licenses in use, and
files in use. To view the details for a given information type, click the
plus sign
(+)
to the left of the label.
The following table further describes the information available.
TIP: If you wish to view the domain list in a two-paneled window similar to
Windows Explorer, click the
Browse... button on the bottom left. An Explorer-
type window will open in the display area to the right.
To add a domain:
1
Launch the Administrator Application.
2
In the text box under
Domain Name
, type in the name of the domain.
3
Click the
Add
button. The name will be added to the list in the
Administrator
window.
DOMAIN VIEW
Label Details
Registered Users Names of all registered users of LOCKOUT-PRO
TM
Graphical Procedure Writing Software for the
domain
Pending Users Names of users who have installed the client version
of LOCKOUT-PRO
TM
but have not yet been
registered in the database by the network
administrator
Licenses in Use (x) The number and names of all users in this domain
who are currently using LOCKOUT-PRO
TM
licenses
(i.e., have launched the client version of LOCKOUT-
PRO
TM
)
Users On-line The names of all users who are currently on-line,
regardless of whether they have a license checked
out
Locked Files The names of all procedure files, and their assigned
group, that are currently in use and thus “locked out”
for anyone else’s use

A-12
A
DMINISTERING
LOCKOUT-PRO LOCKOUT-PRO
TM
ENTERPRISE ADMINISTRATOR’S GUIDE
•
•
•
•
•
•
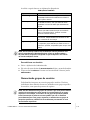
Managing User Groups
Each domain incorporates one or more user groups. Individual users in
that domain must be assigned to a specific user group as part of the
registration process.
TIP: One of the benefits of user groups is that you can modify procedure
templates to meet the needs of a specific group. For example, a production
group’s templates can include default wording or text formatting that creates
the best procedures for that group, while a research group’s templates can
be edited differently for their specific needs.
To add a user group:
1
In the
Administrator
window, select the domain for the new group.
2
Click the
Groups
button beneath the list of domains, groups, and users.
3
When the
Groups
window opens, type the group’s name into the
Group
Name
textbox.
4
Click the
Add Group
button.
5
When finished, click
OK
.
To delete a user group:
1
In the
Administrator
window, select the domain for the group.
2
Click the
Groups
button beneath the list of domains, groups, and users.
3
When the
Groups
window opens, the list of available groups will be
displayed.
4
Select the group from the list in the
Group Name
text box, and click the
Delete Group
button.
5
A dialog box will open asking you to confirm your action. Deleting a
group deletes all contents in that group’s folder on the server.
NOTE:
You cannot delete a group to which users are currently
assigned. You must first reassign the users to a different group. For
information on how to do so, see the procedure below “To change
a user’s group or permission level:”.
6
When finished, click
OK
.

LOCKOUT-PRO
TM
ENTERPRISE ADMINISTRATOR’S GUID
E
A- 13
•
•
•
•
•
•
Maintaining Users & Permission Levels
When a user first launches LOCKOUT-PRO
TM
Graphical Procedure
Writing Software on a client computer, a request is sent that the user
be added as a registered user. As administrator, you complete the user’s
registration by accessing the user’s data on the
Pending Users
list,
setting the permission level, and then adding the user name to the list
of
Registered Users
.
You can also reassign registered users to different groups and/or change
their permission levels.
To complete a pending user’s registration:
1
In the
Domain
panel of the
Administrator
window, click the domain name
to expand it to view all the user information under that domain.
2
Click on
Pending Users
to display the user names.
3
Click on the name of the user to be registered.
4
The
Edit User
window will open, displaying the domain’s first listed
group in the
Group
text box.
•
If the group shown is the one you wish to add the user to, proceed to
the next step.
•
If you wish to add the user to a different group, click the down-arrow
in the
Group
text box and select another from the list.
5
In the
Permissions
box, the permission defaults to
Viewer.
To set a
different permission level, click the down-arrow and select the level you
wish.
6
Click the
Update
button. The user’s name is now moved to the
Registered
Users
list.
NOTE:
Once a user is added to the Registered Users list on the
admin server, the client must re-launch LOCKOUT-PRO
TM
.
To remove a user from the Registered Users list:
1
In the
Administrator
window, click the user’s name on the
Registered
Users
list under the domain name you’re working with.
2
When the
Edit User
window opens, click the
Disable
button. The window
will close, and the user will be moved to the
Pending Users
list. Users on
this list are not allowed access to the LOCKOUT-PRO
TM
server data.
To change a user’s group or permission level:
1
In the
Administrator
window, click the user’s name on the appropriate
list under the relevant domain and group name.

A-14
A
DMINISTERING
LOCKOUT-PRO LOCKOUT-PRO
TM
ENTERPRISE ADMINISTRATOR’S GUIDE
•
•
•
•
•
•
2
When the
Edit User
window opens, select a different
Group
and/or
Permissions
option in either or both boxes.
3
Click the
Update
button. The window will close, and the user
information will be changed.
Managing User Files
The enterprise version of LOCKOUT-PRO
TM
Graphical Procedure
Writing Software ensures the integrity of procedure files by storing
these files in a single location on the server and, with the use of groups
and permission levels, restricting them from being changed by
unauthorized users. LOCKOUT-PRO
TM
also keeps a file from being
changed by more than one user at the same time through use of a “file
lockout” feature.
The Administrator Application allows you to work around those
restrictions when needed. Two common situations where you may need
to manage files manually are:
•
When users in different groups wish to share files between groups
•
When a file that has been checked out cannot be checked back in by
the client user because of technical problems, such as a PC crash
To copy, cut, paste, or delete user files:
1
In the
Administrator
window, click the
Browse
button to open the browser
window on the right.
2
Navigate to the relevant folder containing the file(s) you wish to
manage.
3
Perform the desired function as appropriate:
•
To copy-and-paste or cut-and-paste a file, click on the file, then click
the
Copy
or
Cut
icon on the browser window’s toolbar. Navigate to the
destination directory, and click on the
Paste
icon.
•
To delete a file, click on the file, then click the
Delete
icon on the
browser window’s toolbar.
To unlock a locked file:
1
In the
Administrator
window, locate the locked file in the
Locked Files
list
under the appropriate group and domain.
2
Click on the file to select it.
3
Click the
Unlock File
button below the
Domain
panel. The file now
becomes available for any other authorized user to access it.
4
Click the
Refresh
button to update the list under
Locked Files
.

LOCKOUT-PRO
TM
ENTERPRISE ADMINISTRATOR’S GUID
E
A- 15
•
•
•
•
•
•
NOTE:
If the original user made any changes to the file since it was
last saved on the server, those changes will be lost. Also, if the user
did not shut down LOCKOUT-PRO
TM
normally, the license being
used by that user will not be released when the file is unlocked. To
release the license, the user must log in and shut down LOCKOUT-
PRO
TM
normally.
Performing Other Administrative Tasks
Starting/Stopping Network Service
Starting and stopping network service is a standard Windows
administrative function. The Administrator Application provides
simple one-click buttons to perform these functions when running the
application on the server. (You cannot start or stop network service from
a remote installation of the Administrator Application.)
To start or stop the network service:
1
From
Administrator
running on the LOCKOUT-PRO
TM
server:
•
If the network service is currently
not
running and you wish to
restart it, click the
Start Network Service
button.
NOTE:
Once the network service has been restarted, users must
relaunch LOCKOUT-PRO
TM
on their client machines to reconnect.
•
If the service
currently
is
running and you wish to disconnect clients
from the enterprise server, click the
Stop Network Service
button.
NOTE:
You can also use the Windows Services function
(
Start>Control Panel>Administrative Tools>Services
) to start or
stop the network service.
Viewing LOCKOUT-PRO Events
You must be running the Event Viewer on the server (not remotely) in
order to view LOCKOUT-PRO
TM
transactions:
To view transactions in Event Viewer:
1
Open the Windows Event Viewer (
Start>Control Panel>Administrative
Tools>Event Viewer
).
2
Select the
LOPE
entry to display the LOCKOUT-PRO
TM
Enterprise
events.

A-16
A
DMINISTERING
LOCKOUT-PRO LOCKOUT-PRO
TM
ENTERPRISE ADMINISTRATOR’S GUIDE
•
•
•
•
•
•
3
To see additional details for an event, double-click on the event.
TIP: It is recommended that you periodically save the LOCKOUT-PRO
TM
event log by right-clicking the LOPE entry in Windows Event Viewer and
selecting the Save option.
Troubleshooting Enterprise Functions
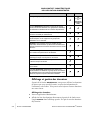
The following table shows the most common problems users are likely to
encounter.
CLIENT-SIDE ERROR CONDITIONS/MESSAGES
Error Conditions/Messages Possible Causes/Solutions
User gets an error message
box, but no message is
displayed.
User is unable to ping to the server, or the
service on the server side is stopped.
User cannot log on, because
either all the licenses are in use
or the user account is not
found.
1) The user is not a registered user. Users
logging on for the first time may see this error if
they remain in the Pending Users list.
2) The maximum number of floating licenses
has been reached. The user will have to wait
until another user logs out and releases a
license.
Remote path not found. Check
connection settings.
Default base file path not found
on server.
Cannot retrieve date/time of
base template on server.
User group not found or
assigned.
Any of these errors might occur if, by accident,
folders on the server are deleted or not copied
due to an installation error.
Check to see if all shared folders exist on the
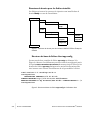
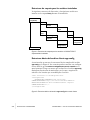
server. (See “Figure 1: Folder Structure for
LOCKOUT-PROTM Enterprise Installed Files”)
If any folders are missing, copy them from the
LOCKOUT-PRO
TM
CD, or call Brady Technical
Support.
User group not found or
assigned
The user may not be assigned to a user group.
To fix the situation, add the user to a group. (See
“Managing User Groups” on page 1-12 for
details.)
Access denied The user may be trying to perform a function not
included at the permission level set for that user.
(See “Maintaining Users & Permission Levels”
for details.)
(continued)
Page is loading ...
Page is loading ...
Page is loading ...
Page is loading ...
Page is loading ...
Page is loading ...
Page is loading ...
Page is loading ...
Page is loading ...
Page is loading ...
Page is loading ...
Page is loading ...
Page is loading ...
Page is loading ...
Page is loading ...
Page is loading ...
Page is loading ...
Page is loading ...
Page is loading ...
Page is loading ...
Page is loading ...
Page is loading ...
Page is loading ...
Page is loading ...
Page is loading ...
Page is loading ...
Page is loading ...
Page is loading ...
Page is loading ...
Page is loading ...
Page is loading ...
Page is loading ...
Page is loading ...
Page is loading ...
Page is loading ...
Page is loading ...
Page is loading ...
Page is loading ...
Page is loading ...
Page is loading ...
Page is loading ...
Page is loading ...
Page is loading ...
Page is loading ...
Page is loading ...
Page is loading ...
Page is loading ...
Page is loading ...
Page is loading ...
Page is loading ...
Page is loading ...
Page is loading ...
Page is loading ...
Page is loading ...
Page is loading ...
Page is loading ...
Page is loading ...
Page is loading ...
Page is loading ...
Page is loading ...
Page is loading ...
Page is loading ...
Page is loading ...
Page is loading ...
Page is loading ...
Page is loading ...
Page is loading ...
Page is loading ...
Page is loading ...
Page is loading ...
Page is loading ...
Page is loading ...
Page is loading ...
Page is loading ...
-
 1
1
-
 2
2
-
 3
3
-
 4
4
-
 5
5
-
 6
6
-
 7
7
-
 8
8
-
 9
9
-
 10
10
-
 11
11
-
 12
12
-
 13
13
-
 14
14
-
 15
15
-
 16
16
-
 17
17
-
 18
18
-
 19
19
-
 20
20
-
 21
21
-
 22
22
-
 23
23
-
 24
24
-
 25
25
-
 26
26
-
 27
27
-
 28
28
-
 29
29
-
 30
30
-
 31
31
-
 32
32
-
 33
33
-
 34
34
-
 35
35
-
 36
36
-
 37
37
-
 38
38
-
 39
39
-
 40
40
-
 41
41
-
 42
42
-
 43
43
-
 44
44
-
 45
45
-
 46
46
-
 47
47
-
 48
48
-
 49
49
-
 50
50
-
 51
51
-
 52
52
-
 53
53
-
 54
54
-
 55
55
-
 56
56
-
 57
57
-
 58
58
-
 59
59
-
 60
60
-
 61
61
-
 62
62
-
 63
63
-
 64
64
-
 65
65
-
 66
66
-
 67
67
-
 68
68
-
 69
69
-
 70
70
-
 71
71
-
 72
72
-
 73
73
-
 74
74
-
 75
75
-
 76
76
-
 77
77
-
 78
78
-
 79
79
-
 80
80
-
 81
81
-
 82
82
-
 83
83
-
 84
84
-
 85
85
-
 86
86
-
 87
87
-
 88
88
-
 89
89
-
 90
90
-
 91
91
-
 92
92
-
 93
93
-
 94
94


Brady LOCKOUT PRO 3.0 Administrator's Manual
- Category
- Networking
- Type
- Administrator's Manual
Ask a question and I''ll find the answer in the document
Finding information in a document is now easier with AI
in other languages
- français: Brady LOCKOUT PRO 3.0
- español: Brady LOCKOUT PRO 3.0
- português: Brady LOCKOUT PRO 3.0
Related papers
-
Brady LOCKOUT PRO 3.0 User manual
-
-
-
-
-
-
-
-
-
Other documents
-
Canon MAXIFY iB4020 Quick Guide for Mac
-
Trendnet TEW-APC1 Quick Installation Guide
-
Casio Activation User manual
-
Canon LBP122dw Single Function Printer Installation guide
-
SonicWALL SMA 1000 Series User guide
-
Fujitsu-siemens fi-6670(A) User manual
-
Fujitsu fi-6670 User manual
-
 SmartBridges airPoint-Pro sB2510 User manual
-
Sharp MXMFX1 Datasheet
-
Fujitsu P3PC-1932-01EN User manual
