UM-1VP0A-005-00
User's manual
FC-R9100-P
User's manuals in other languages are available at :
http://si.shimano.com
IMPORTANT NOTICE
•
Contact the place of purchase or a bicycle dealer for information on
installation and adjustment of the products which are not found in the
user's manual. A dealer's manual for professional and experienced bicycle
mechanics is available on our website (http://si.shimano.com).
• Do not disassemble or alter this product.
•
The Bluetooth
®
word mark and logos are registered trademarks owned by
the Bluetooth SIG, Inc. and any use of such marks by SHIMANO INC. is under
license.
Other trademarks and trade names are those of their respective owners.
For safety, be sure to read this user's manual thoroughly
before use, and follow it for correct use.
Important Safety Information
For replacement information, contact the place of purchase or a bicycle
dealer.
DANGER
• Use the dedicated charging cable when charging the battery. If any
non-specifi ed items are used, fi re, overheating, leakage, or damage to the
connected PC may occur.
• Do not get the charging cable wet and do not touch or hold it while it is
wet or with wet hands. If this is not observed, problems with operation or
electric shocks may occur.
• Use an AC adapter with a USB port with a voltage of 5.0 V DC and with a
current equal to or higher than 0.5 A DC. If the one with a current lower
than 0.5 A is used, the AC adapter may heat up, potentially causing a fi re,
smoke, heating, destruction, electric shock, or burns.
• Do not heat the battery or throw it into fi re. If this is not observed, fi re or
bursting may occur.
• Do not use or leave the battery in hot and humid places such as where the
battery is exposed to direct sunlight, in a closed vehicle on a hot day, or
near a heater. If this is not observed, leakages, overheating or bursting
may cause fi re, burns or other injury to occur.
• Do not disassemble or modify the battery or apply solder directly to the
battery terminals. If this is not observed, leakages, overheating or bursting
may cause fi re, burns or other injury to occur.
• Do not touch the metal terminals with metal items such as hairpins.
If this is not observed, short-circuits, overheating, burns or other injuries
may occur.
• If any liquid leaking from the battery gets into the eyes, immediately wash
the affected area with clean water without rubbing the eyes, and then
seek medical advice. If this is not done, blindness may occur.
WARNING
• Check that there are no cracks in the crank arms before riding the bicycle.
If there are any cracks, the crank arm may break and you may fall off the
bicycle.
• Be careful not to let the cuffs of your clothes get caught in the chain while
riding, otherwise you may fall off the bicycle.
•
When connecting or disconnecting the charging cable, be sure to hold the
plug of the cable. Failure to do so may cause a fi re or electric shock.
• If the following symptoms are observed, stop using the device and contact
a dealer. A fi re or electric shock may be caused.
* If heat or acrid-smelling smoke is coming out from the power plug.
* There may be a bad connection inside the power plug.
• If it thunders while charging with an AC adapter with a USB port, do not
touch the device, bicycle, or the AC adapter. When lightning strikes, an
electric shock may be caused.
• Do not use a USB hub when connecting the cable to a PC USB port. This
may cause a charge error or fi re due to heating.
• Be careful not to damage the charging cable. (Do not damage, process,
forcibly bend, twist or pull them, bring them near hot objects, place heavy
objects on them or bundle them tightly together.) If they are used while
damaged, fi re, electric shocks or short-circuits may occur.
• If the battery does not become fully charged after 4 hours of charging,
stop charging. If this is not observed, fi re, bursting or overheating may
occur.
• Do not place this product in fresh water or sea water, etc., and do not
allow the terminals to get wet. If this is not observed, fi re, bursting or
overheating may occur.
• The operating temperature ranges for the battery are given below. Do not
use the battery in temperatures outside these ranges. If the battery is used
or stored in temperatures which are outside these ranges, fi re, injury or
problems with operation may occur.
1. During discharge: –10°C - 50°C
2. During charging: 0°C - 45°C
• Do not throw or subject this product to strong shocks. If this is not
observed, bursting, overheating or problems with operation may occur.
• Be careful not to get grease etc., on the metal terminals.
A conduction failure may result.
• Do not use the battery if leakages, discoloration, deformation or any other
abnormalities occur. If this is not observed, bursting, overheating or
problems with operation may occur.
• If any leaked fl uid gets on your skin or clothes, wash it off immediately
with clean water. The leaked fl uid may damage the skin.
• Keep magnetic cards, medical devices, electronic devices, precision
instruments, etc., away from the magnet included with this product.
Data loss or malfunctioning may result.
• This product contains a powerful magnet.
Take care when handling as there is a risk of your hand or fi nger getting
caught and injury.
• After reading the user's manual carefully, keep it in a safe place for later
reference.
CAUTION
• There is the danger of injury from the tips of the teeth on the chainrings.
• Store the battery in a safe place away from the reach of infants and pets.
• Disconnect the charging cable when performing maintenance.
Note
• Use a neutral detergent to clean the crank arm and the bottom bracket.
Using alkaline or acidic detergents may cause discoloration.
• In addition, if pedaling performance does not feel normal, check this once
more.
• Do not wash the bottom bracket with high-pressure jets of water.
• You should periodically wash the chainrings in a neutral detergent. In
addition, cleaning the chain with neutral detergent and lubricating it can
be an effective way of extending the useful life of the chainrings and the
chain.
• The cuffs of your clothing may get dirty from the chain while riding.
• This is a small waterproof connector. Do not repeat connecting and
disconnecting it. It may impair the function.
• The components are designed to be fully waterproofed to withstand wet
weather riding conditions; however, do not deliberately place them into
water.
• Do not clean the bicycle in a high-pressure car wash. If water gets into any
of the components, operating problems or rusting may result.
• Contact the place of purchase for updates of the product software. The
most up-to-date information is available on the Shimano website.
• Do not use thinners or similar substances to clean the products. Such
substances may damage the surfaces.
• Do not get the charging cable or connector wet when connecting them.
• Store in a safe place out of the reach of small children to avoid letting
them swallow by mistake.
• 2.4 GHz digital wireless system
2.4 GHz-frequency digital wireless technology, which is the same
technology used for wireless LAN.
However, in a very rare occasions, objects and places may generate strong
electromagnetic, waves and interference, which may result in incorrect
measurement.
* Television, PC, radios, motors/engines, or in car and trains.
* Railroad crossings and near railway tracks, around television
transmitting stations and radar bases.
* Other wireless computers or digitally controlled light.
• Do not use the charging cable while it is tied up.
• Do not connect the charger to PC when it is on standby. This may cause a
failure of PC depending on its specifi cations.
• Do not apply excessive tension to the charging cable.
• Do not extend the charging cable using an extension cable etc.
Extending the cable may disrupt charging.
• Do not ride the bicycle with the charging cable still connected to it.
• E-TUBE PROJECT cannot be used when the charging cable is connected.
• Charge the battery in indoor places to avoid exposure to rain or wind.
• Charging can be carried out at any time regardless of the amount of
charge remaining. Always use the dedicated charging cable and charge
the battery until it is fully charged.
• The battery is not fully charged at the time of purchase. Before riding, be
sure to fully charge the battery.
• If the ambient temperature is low, the battery's usable time will be
shorter.
• If the unit will not be used for an extended period, store it, after charging,
in a cool indoor place (approx. 10 to 20°C) where the battery will not be
exposed to direct sunlight or rain, and charge it every 6 months.
• Store the product, or bicycle installed with the product, in a cool indoor
place (approx. 10 to 20°C) where it will not be exposed to direct sunlight
or rain. If the storage temperature is low or high, the performance of the
battery is reduced, and its available time will be shorter. When you use the
battery after a long storage period, be sure to charge it before use.
• If the battery has become fully spent, charge it as soon as possible. If you
leave the battery without charging it, it will cause the battery to
deteriorate.
• The battery is a consumable item. The battery will gradually lose its
capacity for charging after repeated use and after time has passed. If the
length of time or the riding distance over which the battery can be used
has become signifi cantly reduced, consult the place of purchase.
• Keep away from magnetized objects. If this is not observed, the product
may be damaged.
For products that have magnets attached, make sure to install the product,
using the attached magnet, in the location that is specifi ed.
• Products are not guaranteed against natural wear and deterioration from
normal use and aging.
• For maximum performance we highly recommend Shimano lubricants and
maintenance products.
Regular inspections before riding the bicycle
Before riding the bicycle, check the following items. If any problems are
found with the following items, contact the place of purchase or a bicycle
dealer.
• Are there any cracks in the crank arms?
• Are the fastening sections fi xed securely?
• Are the bearing sections fi xed securely?
• Are there any abnormal noises?
• Is there suffi cient charge remaining in the battery?
•
Are power and cadence correctly displayed on the cycle computer?
• Is the outer cap fi tted securely?
• Have you performed a zero offset calibration?
About wireless functions
Cycle computer connection
This product transmits the following information wirelessly to cycle
computers or receivers that support ANT
+
TM
or Bluetooth
®
LE connections.
• Power
• Pedal smoothness*
• Torque effectiveness*
• Left/right power balance
• Cadence
• Battery level information
* Not transmitted over Bluetooth
®
LE connections.
For information on which of the above types of information are displayed,
refer to the manual for your cycle computer or receiver.
E-TUBE PROJECT connection
E-TUBE PROJECT for smartphones/tablets may be used if a Bluetooth LE
connection is established with a smartphone/tablet.
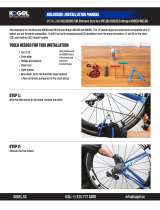
Included parts
The following parts are included in this product.
Make sure that no parts are missing.
Crankset Outer cap
* Chainrings are not included with some products.
Left crank installation
ring
Magnet set
Covers (1 black, 1 white) Magnet (x1) Double-sided tape (x2)
Charging cable (1.5 m) Left crank installation
tool (TL-FC40)
Magnet
positioning tool