Page is loading ...

SM-500
USER GUIDE
SWR • SCOTTSDALE, AZ • USA

INTRODUCTION
The SM-500 Professional Bass Amplifier provides the power, performance, flexibility and portability
required by the professional bassist for every style of playing and nearly every playing situation.
To design an amplifier that would cover “all of the basses,” SWR had to use almost every imaginable
type of electronic component available. This added up to an all TUBE preamp section, a limiter circuit
utilizing Field Effect Transistors (“FETs”), tone and equalizer controls utilizing integrated circuits, and
two individual power amps employing discrete, solid state devices.
The power amplifiers in the SM-500 can be used individually to provide full stereo capabilities, each
delivering 250 watts into individual 4 ohm speaker enclosures. In the event that more power is required,
the amplifiers can be bridged for 400 Watts @ 8 ohms or 550 watts @ 4 ohms. The power amps are
cooled by a thermostatically controlled fan and the chassis is vented on its rear and right side.
The SM-500 also boasts a studio-oriented “side chain" effects loop allowing you to use an effects
unit while maintaining the constant clarity and naturalness of the instrument. The SM-500’s Tuner
Out jack is also on a side chain. Remember when you had to unplug your bass from your amp and
hook into your tuner and frantically tune up between songs? Or install the tuner between your instru-
ment and amp, thus degrading sound quality? Those times are history!
The SM-500 is housed in an all aluminum chassis for light weight and lasting beauty and weighs just
20 pounds. It is easily carried by the heavy-duty, chrome rack handles secured to the front panel.
The tube employed in the preamp section of the SM-500 is a specially selected 12AX7 and should
not require replacement for one to three years.
To get the most out of your SM-500, please take the time to read through the entire owner’s manual.
SM-500 USER GUIDE
SM-500 USER GUIDE • 1

2 • SM-500 USER GUIDE
SM-500 FRONT PANEL FEATURES
• Dual independent input jacks compatible for both active and passive instruments
• Gain Control with LED peak clipping indicator
• Variable Limiter Control
• Aural Enhancer Control
• Bass Control ±15dB cut/boost (shelving point: 80Hz)
• Treble Control ±15dB cut/boost (shelving point: 2kHz)
• Transparency Control ±15dB cut/boost (shelving point: 5kHz)
• Variable Graphic Equalizer with ±15dB cut/boost
• Band One: 31Hz to 160Hz
• Band Two: 80Hz to 320Hz
• Band Three: 200Hz to 800Hz
• Band Four: 400Hz to 1.6kHz
• Effects Blend Control
• Dual Concentric (Stereo) Master Volume Control
• Speaker On/Off Switch
• Power On/Off Switch
• Rack Handles
SM-500 REAR PANEL FEATURES
• Balanced XLR Output with select switch for Line or Direct Mode
• XLR ground lift & pad control
• Power Amp Assign Switch (selects Bridge or Stereo mode)
• Side Chain Effects Loop
• Tuner Output
• Two 1/4" jacks per side for Left and Right Stereo Output
• One Speakon
®
output jack per side for Left and Right Stereo Output
• One Speakon
®
output jack for Mono/Bridge operation
• (2) Speaker fuses: 3AG, 8 amp, fast-blo
• (1) Line Fuse: 3AG, 7 amp, slo-blo
• AC power cord receptacle

SM-500 USER GUIDE • 3
SM-500 SPECIFICATIONS
Note: All measurements were taken with a line voltage of 120VAC. All noise specifications are
“unweighted.” All voltages and watts are "RMS." All measurements taken with tone controls
set flat, Aural Enhancer at minimum.
POWER (minimum):
Bridge/Mono Mode
500 Watts @ 4 Ohms
400 Watts @ 8 Ohms
250 Watts @ 16 Ohms
(minimum load = 4 Ohms)
Stereo Mode (per side)
300 watts @ 2 Ohms
250 watts @ 4 Ohms
150 watts @ 8 Ohms
(minimum load = 2 Ohms)
FREQUENCY RESPONSE (power amplifier): 10Hz to 40kHz
SENSITIVITY (full output under clipping, 8 ohms load, 100Hz):
Passive Input Jack: 38 millivolts
Active Input Jack: 155 millivolts
Power Amplifier (Effects Return Jack “in”): .5 volts
INPUT IMPEDANCE:
Passive/Active Input: 800kohms
Active Input: 60kohms
Effects Return: 27kohms
OUTPUT IMPEDANCE:
Effects Send: 100 ohms
Tuner Output: 100 ohms
XLR Balanced Out: 750 ohms
SIGNAL TO NOISE RATIO: –72 dB (<10 millivolts typical)
EQUIVALENT INPUT NOISE: 9 microvolts
SIZE (measured from the rack ears back): 19" W x 3.5" H x 13.375" D (82.6 x 8.9 x 39.73 mm)
WEIGHT: 20 lbs. (9.07 kg)

4 • SM-500 USER GUIDE
SM-500 FRONT PANEL FEATURES
INPUT JACKS
Both input jacks accept a standard 1/4" phone plug and both inputs can be used at the same time.
Since the two inputs are totally independent, no loss in volume or tone will occur if two instruments
are used simultaneously. Please keep in mind, however, that the Active/Passive input has five times
more gain than the Active input.
Passive/Active Input
A “passive” instrument has no built-in preamp and does not use a battery. On the other hand, an
“active” bass utilizes a battery operated preamp, either for gain, tone controls, or both. Although
labeled “passive,” the Passive input jack will work with all instruments having a maximum output of
less than 1 volt RMS. Generally speaking, try the Passive input jack first. If you hear a small amount
of distortion and the preamp clip LED is not activated, try using the Active input jack.
Note: If you want to overdrive the first TUBE stage, this can be accomplished by using an exter-
nal preamp between your instrument and the Passive input. To obtain optimum sound when try-
ing this, make sure the preamp clip LED is not activated. If this occurs, turn down your Gain
control. The first preamp tube stage is NOT monitored by the preamp clip circuit for this reason.
Active Input
The Active input jack should be used with instruments having a built-in (on board) preamp that will
produce signals over 1 volt RMS. Basses with really “hot” pickups may be more compatible with this
input. If you are using a KEYBOARD or BASS PEDAL, etc. with the SM-500, we have found the best
choice to be the Active input.
Note: Using the Active input with a passive instrument may result in a loss of high end tran-
sients. Players who roll off their high end frequencies starting at about 2kHz or who prefer a
“darker” sound may prefer to use this input.
If you hear some distortion with your active bass and are using the Active input jack, check your
instrument’s battery. Also, make sure that the preamp clip LED is not lit. Following these instructions
can save you and a service technician a lot of aggravation.
GAIN CONTROL
The Gain control adjusts the volume of the preamp section. After the tone controls, Variable Graphic
Equalizer, and Limiter are set to your liking, the Gain control should be set to where the Preamp Clip
LED barely flashes upon striking your loudest note. Then adjust the Master Volume to the desired vol-
ume level. Utilizing these controls in this manner assures the user of maximum signal-to-noise ratio
and prevents distortion caused by the preamp circuits clipping.
PREAMP CLIP LED
The Preamp Clip LED will light if any portion of the preamplifier reaches clipping or runs out of head-
room. This can be caused by the Gain control being set too high or any tone or equalizer control set
in a high boost position. To correct this condition, turn down one of the previously mentioned controls.
Note: The Preamp Clip LED indicates that at some point the preamplifier is clipping. No harm is
being done to your amplifier but, clipping of the power amplifier can cause damage to your
speakers and is not recommended.

SM-500 USER GUIDE • 5
LIMITER
The Limiter circuit prevents the signal from exceeding a preset level. The Limiter control sets the
“threshold,” which is the level at which limiting begins to take effect. The Limiter LED will light to indi-
cate that the signal has reached the limiter threshold and that the Limiter is now active. The Limiter
is completely out of the circuit when the Limiter control is set to the “Off” position. Loss in volume
caused by extreme limiting can be overcome by increasing the level of the Master Volume control.
Note: If the Threshold is set at maximum and still no limiting effect occurs, the Gain control is
set too low and should be increased to a desired level.
AURAL ENHANCER
SWR’s Aural Enhancer control was developed to bring out the fundamental low notes of the bass
guitar, reduce certain frequencies that help mask the fundamentals, and enhance the high end tran-
sients. The resulting frequency response should be similar to that used for recording the bass in the
studio. This effect becomes more radical as the control is turned to maximum. The result is a more
“transparent” sound and is especially noticeable when “slapping” on the bass guitar.
Basically, the Aural Enhancer can be thought of as a tone-shaping control, as it is a passive R/C
network that alters the frequency response throughout the bass spectrum. This pre-shaping is
“blended” into the original signal via the Aural Enhancer control. Exact frequencies affected are
dependent on the characteristics of the instrument used.
BASS CONTROL
The Bass control is a shelving-type tone control that cuts or boosts the lower or bass frequencies
from mid-position. Starting at mid-position, turning the control counter-clockwise cuts the bass
response and turning the control clockwise boosts the bass response. Shelving point for this control
is 80Hz.
VARIABLE GRAPHIC EQUALIZER
Level Control (Slider)
The Level control slider cuts or boosts the frequency set by the Frequency control knob located
directly beneath it. It is used in the same manner as a Graphic Equalizer. Starting at mid-position,
moving the slider up or towards “+15” boosts the selected frequency, while moving the slider down
from mid-position or towards “–15” cuts the selected frequency.
Frequency Control
The Frequency control selects the center frequency that will be cut or boosted by the Level control
directly above it. If The Level control is at “0” or mid-position, moving the Frequency control will have
no affect on the sound. The Frequency control covers a three octave range.
To better understand how the Level and Frequency controls work with each other, try the following
example:
1. Set the Gain and Master Volume controls for listening level.
2. Set all tone and level controls at mid-position and turn all frequency controls fully counter-
clockwise.
3. Strike the open “E” string on the bass and move the Level Control on the first band of the
Equalizer to +15 (the Frequency control should be set at 40Hz, which is the fundamental
that the open “E” string produces). The change in sound and pressure levels is a result of
the fundamental “E” note being increased by approximately 15db.

6 • SM-500 USER GUIDE
4. Keeping all controls in their present positions (Level control at +15 and Frequency control at
40Hz), strike your open “E” string again and move the Frequency control from 40Hz to 160Hz.
As the Frequency Control is moved from 40Hz to 16Hz you should hear two increases in
volume. The first will be at 80Hz or your first overtone (harmonic) and the second will be at
160Hz or the second harmonic of your open “E” string.
From the above example a few things may be apparent. One, there’s a lot of information contained in
one note on your instrument. Two, if one position of the Frequency control gives a much louder sound
or volume, you may have found the area of greatest efficiency of your speaker cabinet. And, three,
the tonal variations you can achieve with the Variable Graphic EQ are just about infinite!
TREBLE/TRANSPARENCY CONTROL
The Treble/Transparency control is a dual concentric knob that offers individual control over the
Treble and Transparency functions.
The Treble control (outer knob) is a shelving-type tone control that cuts or boosts the high frequen-
cies. Starting from mid-position, turning the Treble Control counter-clockwise cuts the high frequen-
cies, while turning the control clockwise boosts them. Shelving point for this control is about 2kHz.
The Transparency Control (inner knob) is a shelving-type tone control that cuts or boosts the high
frequencies a full octave above the treble function. Shelving point for this control is about 5kHz.
EFFECTS BLEND CONTROL
This function “blends” the signal sent from your bass, etc., with that coming from your effects unit.
With the Effects Blend control fully counter-clockwise (“dry”), no signal from your effect will be heard.
As you turn this control clockwise, more of the effect can be heard in the overall sound. When the
control is set fully clockwise (“wet”), no true or unaffected signal is heard other than what your
effects unit provides.
The Effects Blend circuit is similar to that used on recording consoles with the effects loop on a
“side chain” to the normal circuit. Unless the control is set to the full wet position, you will always
get the full sound of your instrument and get the diversity an effects unit offers. This circuit is also
effective in reducing noise caused by effects units because it is located after the gain stages. When
not using an effect, the Effects Blend control should be set to the fully counter-clockwise position.
STEREO MASTER VOLUME CONTROL
The Stereo Master Volume control adjusts the volume of the internal power amplifiers. It should be
used in conjunction with the Gain control to achieve maximum signal-to-noise ratio. The SM-500’s
Stereo Master Volume control is a dual-concentric knob that offers individual volume control over
both the right side (outer knob) and left side (inner knob) when the SM-500 is being run in the Stereo
Mode. When the SM-500 is being run in the Bridge/Mono Mode, the inner knob controls the overall
volume (the outer knob is disabled and will have no effect in Bridge/Mono Mode).
SPEAKER ON/OFF SWITCH
Moving the Speaker On/Off Switch to the “On” position allows the signal from the amplifier to be
heard through any speaker enclosure(s) connected to the SM-500’s output section. Moving the
Speaker On/Off Switch to the “Off” position disables the SM-500’s output section. This feature
allows the user to:
1. Use the XLR Output without using the internal speakers. This is especially useful in recording
when you are miking the speakers and only a direct signal is required.
2. Tune up without interfering with other band members while using the Tuner Output feature.
Note: If you do not hear any sound when you plug in and your system is properly connected,
check the position of the Speaker On/Off switch.

SM-500 USER GUIDE • 7
POWER ON/OFF SWITCH
Moving the Power switch to the “On” position will turn on you amplifier as indicated by the Power LED
lighting.
SM-500 REAR PANEL FEATURES
AC CORD RECEPTACLE
The SM-500 accepts a standard AC power cable (supplied with the SM-500), used with almost all cur-
rent musical, professional and household electronic devices. If it becomes misplaced, a replacement
can be purchased at almost any computer, electronics, or pro audio store.
Note: The rating for this cable is 3 conductor, 10 amperes minimum. If replacement is neces-
sary, or if you need a longer cable, look for the rating on the cable and be sure it is at least
10 amps.
Make sure the AC cord is plugged in all the way in both the amp and the wall socket. If your cord
ever becomes frayed or split, replace it immediately.
POWER AMP ASSIGN SWITCH
The position of the Power Amp Assign switch determines the SM500’s mode of operation (based on
the impedance of the cabinet or cabinets that you intend to use). If you want to run your amplifier in
Stereo mode, move the Power Amp Assign switch to the “Stereo” position. Operation in Bridge mode
is achieved by setting the switch to the “Bridge” position. (For Stereo and Bridge/Mono mode con-
nection information, see diagrams beginning on page XX.)
Minimum impedance in the Stereo mode is 2 ohms per side. This means that you can connect:
• One 2 ohm speaker enclosure per side
• Two 4 ohm speaker enclosures per side
• Four 8 ohm speaker enclosures per side
Minimum impedance in the Bridge/Mono mode is 4 ohms. This means that you can connect:
• One 4 ohm speaker to the Bridge/Mono output
• Two 8 ohm speaker enclosures to the Bridge/Mono output
• Four 16 ohm speaker enclosures to the Bridge/Mono output
Damage to the SM-500’s power amplifier section may occur if speaker enclosures are connected to
the speaker output section with impedances that total less than the minimum loads listed above. The
owner’s manual that came with your speaker cabinet should state its total impedance. On SWR
speaker enclosures, the total impedance is generally indicated on the speaker’s input panel.
To figure out the total impedance of two or more cabinets of equal value hooked up in parallel,
divide the impedance of one cabinet by the number of cabinets:
Impedance of one cabinet / number of cabinets = total impedance
For an in-depth discussion of impedance/power rating issues, we recommend reading the article
“Plug & Play,” which cane be found in the “Press” section at: swrsound.com

8 • SM-500 USER GUIDE
LEFT & RIGHT SPEAKER FUSES
The left and right speaker fuses are provided to protect your speakers in the unlikely event of a power
amp failure or incorrect connection procedures. Size and rating of the fuses are 3AG, 8 amp, fast-
blo. Do not defeat the purpose of this feature by using a higher rated fuse.
The speaker fuses can open if there is a fault in the speaker cable or the speakers themselves.
Therefore, it is always wise to carry extra fuses at all times.
SPEAKER OUTPUT JACKS
Note: If you are using only one channel (in Stereo mode), use the left channel speaker output,
as the thermal sensor for the fan is located on the left heat sink.
When used in Stereo mode, the internal power amplifiers of the SM-500 will deliver 300 watts
@ 2 ohms, 250 watts @ 4 ohms and 150 watts into 8 ohms. Optimum performance will be achieved
by using a total of 4 ohms per channel. When using 2 ohms loads, the amplifier will run hotter than
normal and the internal fan will be running most of the time. Minimum speaker load in the stereo
mode is 2 ohms per side.
When used in the Bridge mode, the SM-500 will deliver 250 watts into 16 ohms, 400 watts into
8 ohms, and 500 watts into 4 ohm loads. Please make sure the speakers you use in this mode can
handle the power. Minimum load in the “Bridge” mode is 4 ohms.
LEFT & RIGHT (STEREO) SPEAKER OUTPUT JACKS
There are two 1/4" jacks and one Speakon
®
jack provided for each side of the output section of the
SM-500. The Left and Right speaker jacks are provided for use in the Stereo Mode only. DO NOT use
these jacks when the SM-500’s Power Amp Assign switch is in the “Bridge” position. You can bal-
ance the Left and Right channels by using the Stereo Master Volume control located on the front
panel. Make sure all speakers are connected BEFORE turning on the amplifier whenever possible.
Connecting (or disconnecting) your speakers while the amplifier is on is not recommended.
SPEAKON VS. 1/4" JACKS
We have found the Speakon connection to be superior in both stability and amperage conductivity, so
we have provided Speakon output jacks in addition to the standard 1/4" jack. If the Speakon output
jack is used, we highly recommend a Speakon-to-Speakon speaker cable (supplied with the SM-500).
If your speaker enclosure does not have a Speakon input jack, you should use the 1/4" output jacks
on the SM-500 and connect them accordingly.
Note: All SWR Professional Line speaker cabinets come equipped with Speakon input jacks.
The SM-500’s Speakon jacks are wired “standard"” (+1/–1) and additional Speakon-to-Speakon
cables are available through most music stores.
SPEAKER CABLE
Speaker cable should be made of 18-gauge, or heavier, wire. (The thicker the wire, the lower the
gauge, so 18-gauge is heavier than 20-gauge and so on.) Do not use instrument cables to hook up
your speakers. This can result in intermittent power loss, cause your power amp to oscillate, and
damage itself and/or your speakers, and render the cables useless for any purpose.
BRIDGED OUTPUT SPEAKON
®
JACK
The Speakon jack marked “Bridge,” located directly below the Power Amp Assign Switch (in the cen-
ter of the “Speaker Outs” section), is provided for use in the Bridged/Mono mode only. A six-foot
heavy-duty speaker cable (Speakon-to-Speakon) is provided with each unit for your convenience.
MAKE SURE that the Power Amp Assign switch is set to “Mono” when using this jack!

SM-500 USER GUIDE • 9
The frequency response of the SM-500 is far greater than usually found in musical instrument ampli-
fiers (10 Hz to 40kHz). This was engineered in order to give the bass player the same punch and
clarity on stage as found in the studio or concert PA systems. Therefore, it is doubly important that
you be aware of the impedance and power rating of the speakers that you intend to use and that they
are compatible with the SM-500.
Note: Make sure your speakers can handle the power provided by the SM-500 in the
Mono/Bridge mode. Speakers that have been overdriven are easy to detect and generally do
not fall under a manufacturer’s warranty.
EFFECTS SECTION
Both Mono and Stereo Effects Loops are provided on the SM-500. It should be noted, though, that
both cannot be used simultaneously. Always use high quality shielded patch cables for all connec-
tions between the amplifier and your effects units. Also, it is recommended that the cables be as
short as possible.
The Gain control acts as an effects send level control. The amount of signal present at the Effects
Send jack is governed by the Gain control on the front panel. If your effects unit is overloading and it
does not provide for compensating incoming signals (such as an input volume or switches marked +4
or –10, for example), you may turn down the Gain control to avoid the overloading. If your effects unit
has input level adjustments, they should be set for either 0 dB or +4 dB.
The Stereo Master Volume control may be used to recover losses in gain caused by some effects
units.
Use the Effects Blend control to adjust the amount of effect with the natural signal from your instru-
ment. No sound from your effects unit will be heard if the Effects Blend control is in the fully counter-
clockwise (“dry”) position.
To use the
mono Effects Loop, run a shielded patch cable from the SM-500’s “Send” jack to the
INPUT of your effects unit. Run a second patch cable from the OUTPUT of your effects unit to the SM-
500’s mono effects return jack. Then adjust the Effects Blend control for the mix you desire.
To use the stereo Effects Loop, run a patch cable from the Effects SEND jack to the mono input of
your stereo effects unit. This generally is either the left or right input of the unit (check your owners
manual). If for some reason your effects unit does not provide a mono input, purchase a “Y” mono
cord from your local music or electronics store. Plug the common end in the effects Send jack and
the other two ends in the left and right inputs of your effect.
If you wish to use just the internal power amps in the SM-500, the Effects Return jacks will serve as
the “inputs.” Insert your MONO signal source in the
mono Effects Return jack. This will send the
source to both power amps. If you have a stereo source, plug the left and right outputs into the cor-
responding Effects Return jacks. If you want to use just one side of the amp, use the LEFT CHANNEL
ONLY. This is because the thermostat that regulates the fan is located on the left side.
TUNER OUT
The Tuner Out jack allows the user to connect an instrument tuner and tune up without having to
unplug and go back and forth from amp to tuner. This feature is totally isolated from the rest of the
preamp and will function regardless of the settings of any control on the front panel. Being on a side
chain (isolated) also avoids loading down of the instrument causing a loss in dynamic range.
To use this feature, plug in a shielded patch cord from the Tuner Out to the INPUT on your tuner. Turn
the amplifier on and you're ready to go. If you do not wish to monitor your sound while tuning up, set
the Speaker On/Off switch to the “Off” position.

10 • SM-500 USER GUIDE
BALANCED XLR OUT
The Balanced Out is a true balanced output and serves two functions. In the “Direct” position, the
XLR is essentially an active tube direct box. The signal is taken directly from the input jacks. No con-
trols on the front panel affect the sound, volume or content of the signal. In the “Line” position, ALL
controls on the front panel (with the exception of the Effects Blend and Master Volume) function and
affect the signal. Output level in the “Line” position is determined by both the Gain and XLR pad.
When using this switch, make sure it is all the way to one side or the other and not in a “half way”
position, as this could result in no output.
The “Line” position can be used for recording directly into a tape machine as well as going directly to
the studio board. An external power amplifier with a balanced input can be driven in the "Line" mode.
Pin out for the XLR connector are as follows:
Pin 1 = Ground Pin 2 = + Pin 3 = –
The SM-500 is compatible with Phantom Power-equipped mixing consoles.
XLR PAD AND GROUND LIFT
The XLR pad adjusts the level (volume) appearing at the XLR connector directly below in either the
Line or Direct mode. Volume increases as the control is turned clockwise.
If you are in the “Line” position and change the Gain control on the front panel, the level will also
change at the balanced output. You may readjust the XLR pad if necessary without affecting any
other function.
A ground lift is provided for the record out XLR Output. It is built into the XLR Pad. With the knob on
the XLR pad in the “In” position, the ground to pin one is engaged. Pulling the knob to the out or
“Ground Lift” position will interrupt or defeat the ground on pin 1.
If a persistent hum exists after trying both positions of the ground lift, there is probably a mis-wire or
bad ground in the feed lines to the board or console or a dirty or miswired AC socket. SWR recom-
mends the purchase of an AC wall socket tester which can identify proper wiring (available at most
hardware stores). These inexpensive devices are a simple way to protect you and your equipment
from faulty electrical systems.
LINE OR MAINS FUSE
The size and rating of the line fuse is 3AG, 7 amp, slo-blo. NEVER replace this with a fuse of a higher
rating as it will void your warranty.
INTERNAL FEATURES
COOLING FAN
The SM-500 contains an internal thermostatically controlled cooling fan. When the temperature of the
heatsinks reach 50 degrees centigrade, the fan will automatically turn on and remain on until the
heatsink cools down to approximately 40 degrees centigrade. This greatly reduces component fatigue
and increases reliability.
For proper ventilation, make sure that all of the SM-500’s vents are unobstructed when installing it in
a rack case.
Note: At low volume levels, the cooling fan in the SM-500 may be audible.

SM-500 USER GUIDE • 11
VACUUM TUBE (VALVE)
SWR installs a specially selected 12AX7 dual triode tube in the preamp section of every SM-500.
When it becomes time to replace it, we recommend that you do so with a similar high quality product.
This tube will need replacing only if it becomes noisey or microphonic (sounds like glass tinkling in
the background of certain notes), or completely fails (resulting in no output).
RACK MOUNTING INSTRUCTIONS
To preserve the beauty and reliability of your amplifier, we recommend that you install your amplifier
in a rack case. The SM-500 is rackmountable, requiring no additional parts or accessories other than
rack screws and the rack case itself.
The SM-500 takes up two full rack spaces (3 1/2"). If the rack in which you mount the SM-500
requires that the rubber feet on the bottom of the chassis be removed, please remember to
REPLACE the screws, as they help to reinforce the chassis.
The SM-500 should be mounted as close to the bottom of the rack case as possible. The height of
the rubber feet was chosen so that when you slide the unit in the bottom of a rack case, the rack
mounting holes on the front panel should line up with the mounting holes of the rack rail. This pre-
vents the SM-500 from flexing downward if the rack case is dropped. If you must mount the SM-500
in an area of the rack other than the bottom space, a piece of wood or similar solid material should
be installed between the bottom of the rack case and the bottom of the amplifier to prevent flexing
of the amplifier’s chassis. Severe or constant flexing of the chassis can damage the amplifier and is
not covered under the SM-500’s warranty.
Don’t neglect your amp after it’s been installed in a rack case. Continuous transportation and vibra-
tion can cause screws to become loose, both on the SM-500 and with your rack case rails. We rec-
ommend that at least once a month you remove the SM-500 from the case and tighten all outside
screws (especially on the front panel), and wipe off the outside of the chassis with a damp cloth.
Then check all the connections in your rack case and reinstall the unit.
POWER-ON TRANSIENT
When the SM-500’s Power switch is moved to the “On” position, you will notice a turn-on transient
heard as a “thud” through your speakers. This will not harm speakers made by SWR, however, you
may connect your speaker cable to the SM-500 after powering up if you choose. Just make sure you
are not playing through the unit when you make the connection, as it could cause a speaker fuse to
blow. Eliminating this transient would require a component called a relay. SWR chose not to incorpo-
rate this type of component due to the fact that relays degrade signal quality and often fail, causing
the unit to have no output, and requiring a trip to a local service center.
A FEW WORDS CONCERNING HEAT
One of the most asked questions about our amplifiers is why they tend to get warmer than other
amps. The chassis of your amplifier can get quite warm during normal usage. This is especially true
if you are using a 4 ohm total impedance in the Bridge mode. This is because a 4 ohm impedance
(or 2 ohms per channel in Stereo mode) introduces the least efficient condition of the unit (in other
words, power drawn from the outlet in relation to power produced in the speakers).
The difference in these two figures can be quite high, resulting in the equivalent of a high wattage
light bulb in a metal box (which would obviously get quite hot).
Most musical instrument amplifiers on the market today use steel for their chassis which, in most
cases, is considerably cheaper than aluminum and does not conduct heat as well as aluminum. The
SM-500 uses an all aluminum chassis because it has less impurities than steel, is less susceptible
to rust and is a better conductor of heat. This results in the chassis acting as a heatsink drawing

heat away from heat producing components inside and thus extending their life. In this manner, we
feel we have produced a more reliable amplifier, but, at the same time, the outside of our units will
get warmer than cases made out of steel.
You should be aware of the possibility of the power amp in your SM-500 becoming “over biased.”
This condition can be recognized by turning your amplifier on and letting it sit without speakers
plugged in and without playing it. If, under these conditions, your unit becomes quite warm, it may be
over biased. This situation should be attended to and can be easily remedied in about 15 minutes by
a service tech. A power amp can become over biased through continuous vibration or by any large
jolt received in shipping, transportation, etc.
12 • SM-500 USER GUIDE

AC FUSE
7 AMP
SLO BLO
120 VOLTS
50/60 HZ
840 WATTS
FUSE
LEFT SPEAKER
RIGHT SPEAKER
L SPKR
FUSE
8 AMP
R SPKR
FUSE
8 AMP
SPEAKER OUTPUTS
250W X2
STEREO
1 2
1 2
BRIDGE
500W MONO
FUSE
FUSE
EFFECTS
STEREO
EFFECTS RETURN
L
EFFECTS
SEND
R
MONO
BALANCED OUT
TUNER OUT
XLR PAD
PULL GND
LIFT
MIN
LINE
MAX
DIRECT
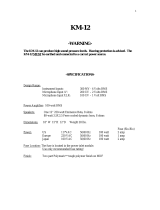
SM-500 Bridge Mode Operation Diagram
Power Amp Assign Switch
set to “Bridge Mono” position.
Center Bridge/Mono Speakon
Output Jack must be used.
Note: When the power amp assign switch is set to the Bridge/Mono position, only the center Speakon output
jack may be used.The SM-500 delivers a minimum of 500 Watts RMS into a 4 ohm load, and 400 Watts RMS
into an 8 ohm load. Please make sure that your speaker system is capable of handling this amount of power.
Speaker 1 = 8 Ohms
Speaker 2 = 8 Ohms
This example shows two 8 ohm speaker enclosures connected in parallel for a total load of 4
ohms.This is the minimum impedance that the SM-500 is designed to drive safely in the Bridge
Mode. Connecting multiple enclosures that have a combined total impedance of less than 4
ohms may result in damage to your amplifier.
The following cabinet configurations may be used:
• one 4 ohm enclosure
• one 8 ohm enclosure
• two 8 ohm enclosures
• four 16 ohm enclosures
SM-500 Power Output Ratings
Bridge/Mono Mode
500 Watts @ 4 Ohms
400 Watts @ 8 Ohms
250 Watts @ 16 Ohms
(minimum load = 4 Ohms)
SM-500 USER GUIDE • 13

AC FUSE
7 AMP
SLO BLO
120 VOLTS
50/60 HZ
840 WATTS
FUSE
LEFT SPEAKER
RIGHT SPEAKER
L SPKR
FUSE
8 AMP
R SPKR
FUSE
8 AMP
SPEAKER OUTPUTS
250W X2
STEREO
1 2
1
2
BRIDGE
500W MONO
FUSE
FUSE
EFFECTS
STEREO
EFFECTS RETURN
L
EFFECTS
SEND
R
MONO
BALANCED OUT
TUNER OUT
XLR PAD
PULL GND
LIFT
MIN MAX
SM-500 Stereo Mode Operation Diagram
Power Amp Assign Switch
set to “Stereo” position.
Note: When the power amp assign switch is set to the “Stereo” position, only the right and left Speakon
output jacks or left and right 1/4” output jacks may be used. Do not use the center Speakon jack as it is
provided for Bridge/Mono operation only.
SM-500 Power Output Ratings
Stereo Mode (per side)
300 watts @ 2 Ohms
250 watts @ 4 Ohms
150 watts @ 8 Ohms
(minimum load = 2 Ohms)
Speaker 1 = 8 Ohms
This example shows two 8 ohm speaker enclosures, each connected
to one side of the stereo power amp for a total load of 8 ohms per
side. Although the minimum impedance that the SM-500 is designed
to drive safely in the Stereo Mode is 2 ohms (per side), 4 ohms per
side or greater is recommended. Connecting multiple enclosures that
have a combined total impedance of less than 2 ohms per side may
result in damage to your amplifier.
The following cabinet configurations can be used:
• one 2 ohm enclosure (per side)
• one 4 ohm enclosure (per side)
• one 8 ohm enclosure (per side)
• two 4 ohm enclosures (per side)
• two 8 ohm enclosures (per side)
Speaker 2 = 8 Ohms
LINE
DIRECT
14 • SM-500 USER GUIDE

AC FUSE
7 AMP
SLO BLO
120 VOLTS
50/60 HZ
840 WATTS
FUSE
LEFT SPEAKER
RIGHT SPEAKER
L SPKR
FUSE
8 AMP
R SPKR
FUSE
8 AMP
SPEAKER OUTPUTS
250W X2
STEREO
1
2
1 2
BRIDGE
500W MONO
FUSE
FUSE
EFFECTS
STEREO
EFFECTS RETURN
L
EFFECTS
SEND
R
MONO
BALANCED OUT
TUNER OUT
XLR PAD
PULL GND
LIFT
MIN MAX
SM-500 Stereo Effects Patching Diagram
Power Amp Assign Switch
set to “Stereo” position.
Speaker 1
Speaker 2
Note: Use Shielded Patch Cable for all Effects Loop connections.
Stereo Effects Unit
Left Out
Mono In
Right Out
LINE
DIRECT
SM-500 USER GUIDE • 15

LIMITED WARRANTYLIMITED WARRANTY
The SM-500 from FMIC is warranted to the original consumer purchaser for TWO YEARS from the
date of purchase, against defects in materials and workmanship and provided that it is purchased from
an Authorized SWR Dealer. This warranty applies only to products purchased in the USA or Canada.
This warranty is VOID if the unit has been damaged due to accident, improper handling, installation or
operation, shipping damage, abuse or misuse, unauthorized repair or attempted repair, or if the serial
number has been defaced or removed. FMIC reserves the right to make such determination on the
basis of inspection by an Authorized FMIC Cervice Center.
All liability for any incidental or consequential damages for breach of any expressed or implied
warranties is disclaimed and excluded herefrom.
Some states do not allow limitations on how long an implied warranty lasts, or the exclusion or
limitation of incidental or consequential damages, so that the above exclusion may not apply to you.
This warranty gives you specific legal rights and you may also have other rights which vary from state to
state.
For a complete list of Authorized FMIC Service Centers
-and to learn more about SWR products and artists —
point your browser at:
swrsound.com
SHOULD YOUR SWRSHOULD YOUR SWR AMPLIFIER REQUIRE SERVICE OR REPAIR, AMPLIFIER REQUIRE SERVICE OR REPAIR,
PLEASE USE THE FOLLOWING PROCEDURE:PLEASE USE THE FOLLOWING PROCEDURE:
Locate your original receipt showing date of purchase, model and serial number.
Determine the closest Authorized FMIC Service Center to your location. The fastest way to get a complete list of
Authorized FMIC Service Centers is on the web, at:
http://www.mrgearhead.com/faq/allservice.html
You can also get this information by calling FMIC Consumer Relations at (480) 596-7195.
To receive warranty service, return the complete product to an Authorized FMIC Electronics Service Center, with proof
of purchase, during the applicable warranty period. Transportation costs are not included in this Limited Warranty.
Defective products that qualify for coverage under this warranty will be repaired or replaced, at FMIC's discretion, with
a like or comparable product, without charge.
1
2
3
4

IMPORTANT SAFETY INSTRUCTIONS
CAUTION: TO REDUCE RISK OF ELECTRIC SHOCK, DO NOT REMOVE THE COVER OR BACK.
NO USER-SERVICEABLE PARTS INSIDE. PLEASE REFER TO A QUALIFIED SERVICE TECHNICIAN.
A. Read Instructions: All safety and operation instructions should be read before the product is operated.
B. Retain Instructions: The safety and operating instructions should be retained for future reference.
C. Heed Warnings: All of the warnings on this product and in the operating instructions should be adhered to.
D. Follow Instructions: All operating and use instructions should be followed.
E. Cleaning: Unplug this product from the wall outlet before cleaning. Do not use liquid cleaners or aerosol cleaners. Use a slightly
damp cloth for cleaning.
F. Water and Moisture: Do not use this product near water; for example, near a swimming pool, wet basement, and the like.
G. Accessories: Do not place this product on an unstable cart, stand, tripod, bracket or table. The product may fall, causing
serious injury to a child or adult, and serious damage to the product.
H. Ventilation: Slots and openings in the unit are provided for ventilation and to ensure reliable operation of the product, to protect it
from overheating, thus these openings must not be blocked or covered. This product should not be placed in a built-in installation
such as a bookcase or rack unless proper ventilation is provided or the manufacturer's instructions have been adhered to.
I. Grounding: This product is equipped with a three-wire grounding-type plug, a plug having a third (grounding) pin. This plug will only
fit into a grounding-type power outlet. This is a safety feature. If you are unable to insert the plug into the outlet, contact your electri-
cian to replace your obsolete outlet. Do not defeat the safety purpose of the grounding-type plug.
J. Power Cord Protection: Power supply cords should be routed so that they are not likely to be walked on or pinched by items
placed upon them, paying particular attention to cords at plugs and the point where they exit the product.
K. Lightning: For added protection of this product during a lightning storm or when it is left unattended and unused for long
periods of time, unplug it from the wall outlet. This will prevent damage to the product due to lightning and power-line surges.
L. Overloading: Do not overload wall outlets or extension cords as this can result in a risk of fire or electric shock.
M. Object and Liquid Entry: Never push objects of any kind into this product through the openings as they may touch dangerous volt-
age points or short out parts that could result in a fire or electric shock. Never spill liquid of any kind on the product.
N. Servicing: Do not attempt to service this product yourself as opening or removing covers may expose you to dangerous
voltage or other hazards. Refer all servicing to qualified service personnel.
O. Damage Requiring Service: Unplug this product from the wall outlet and refer servicing to qualified service personnel under the
following conditions:
1) When the power supply cord has been damaged
2) If liquid has been spilled or objects have fallen into the product
3) If the product has been exposed to rain, water, or other conductive liquids
4) If the product does not operate normally by following the operating instructions
5) If the product has been dropped or damaged in any way
6) When the product exhibits a distinct change in per formance.
P. Replacement Parts: When replacement parts are required, be sure the service technician has used replacement parts specified
by the manufacturer or have the same characteristics as the original part. Unauthorized substitutions may result in fire,
electric shock, or other hazards.
Q. Safety Check: Upon completion of any service or repairs to this product, ask the service technician to per form safety checks to
determine that the product is in proper operating condition.
R. Heat: The product should be situated away from heat sources such as radiators, heat registers, stoves or other products that
produce heat.

SWR
8860 E. Chaparral Rd. Suite 100 • Scottsdale, AZ 85250-2618 USA
PHONE: (480) 596-9690 • FAX: (480) 367-5262
EMAIL: [email protected]
©2001 SWR
All rights reserved.
REV. 08/01
Part # 320027
Learn more about SWR products and artists
by pointing your browser to:
swrsound.com
/