Page is loading ...

1
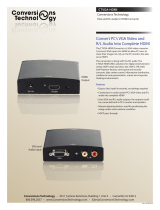
HDTV Multimedia AV Center
Analog To Digital Video Up Converting
Up-Scaling Any SD Video To 1080P True HD
Advanced 10-Bit Video Processor
Next Generation Audio Video Switch
Ambery Model Number: HDV6
INTRODUCTION
Congratulations on your purchase of our latest HDTV multimedia AV center / HD video
upconverter product. Your satisfaction is very important to us. This next-generation product offers
the best solution for integrating all of your existing anlaog home AV equipments together and up
scaling them to the true 1080p HDTV format through single digital HDMI link with any flat panel
display or HDTV set.
This innovative digital multimedia center is by far the only product to support all analog and
digital video inputs including Composite Video, SV, Component Video, PC VGA and HDMI for
comprehensive sources selection and eventually upconverts each input to crystal clear digital 1080p
pictures in HDMI format.
This unit supports total of 6 digital/analog AV inputs including 2 HDMI inputs, 2 PC VGA inputs,
2 stereo audio inputs combined with any 2 of the analog video inputs from its composite video,
s-video or component video inputs. This design is meant to solve the typical problem of watching
standard non-HD video on a digital HD display and reduce the inconvenience of constantly
swapping audio video cable connection for those TVs’ with limited inputs or visible cable mess .
More importantly, this product is aimed at enhancing standard analog video quality to the ultimate
digital format at true 1080 resolution through HDMI connection with the HD display.
Combining all the features of audio video switch, SD to HD video scaler, PC to TV converter
and digital audio video format converter into one single unit, this next generation multimedia center
enables users to keep their non-HDMI analog source devices to perform well with the new digital flat
panel display through one single HDMI link and enjoy the sensational visual and audio sonic
entertainment from this neat and slick HD multimedia box.

2
PRODUCT FEATURES
All-In-1 HDTV solution for combining features of audio video switch, SD/HD video scaler, PC To
TV converter and digital audio video format converter into one single unit.
Enhances all standard definition videos to crystal clear and sharp high definition picture quality.
Top-notched 10-bit video processor built in for vivid color depth during A/D conversion.
Supports video up scaling to the true HD 720p, 1080i and 1080P resolution.
Supports comprehensive range of pixel clock rate from 25MHz ~ 165 MHz.
Adopts the most advanced 3D Y/C separation comb filter.
Fully supports the latest HDMI
TM
V1.3 with HDMI Input Pixel Clock Rate: 25MHz ~ 225 MHz.
Upconverts all 480i composite video or s-video signals to digital HD resolution in HDMI format.
Upconverts all 480p,720p or 1080i component video signals to the ultimate 1080p HD resolution.
Converts PC VGA output to the digital HDMI or DVI signal for big screen display or presentation.
Supports ultra high VGA input up to 1920×1080 pixels at 60Hz for both PC and Mac systems.
Supports both NTSC and PAL systems.
Converts stereo RCA audio to HDMI format for receiver or amplifier.
Dolby TrueHD, DTS-HD Master Audio lossless compressed digital audio compliant.
Fast device switching between all 6 inputs including 2 HDMI
TM
, 2 PC VGA inputs plus any 2 of
the analog composite AV, s-video or component video inputs.
Individual input source button selection for seamless switching between all video devices.
All inputs/output terminals are gold plated connectors for maximum signal transfer and corrosion
resistance.
Fully supports all HD displays up to 1080p including HDTV, plasma panel, LCD TV, projection TV
and all other HD monitors.
Fully supports HDCP devices for HDMI inputs.
Blue LED panel display for active input indication.
Backwards compatible with all DVI HD devices and DVI HD displays.
Support IR remote control and manual control.
Stylish metal housing design to fit easily with modern home theater setup.
PACKAGE CONTENT
HDV6 Multimedia AV Center main unit
IR remote controller
User manual
DC 5V/4A power adaptor

3
PRODUCT SPECIFICATION
Video Inputs:
Composite Video Channel x 2 Via RCA Jack
S-Video Channel x 2 Via Mini Din Connector
Component Video Channel x 2 Via RCA Jacks
PC VGA Channel x 2 Via HD15 Pin Connectors
HDMI Channel x 2 Via 19-Pin HDMI Connectors
Audio Inputs:
Stereo RCA Left Right Channels x 2 Via RCA Jacks
HDMI Channel x 2 Via 19-Pin HDMI Connectors
Video Output:
HDMI Channel x 1 Via 19-Pin HDMI Connector
Audio Output:
Linear PCM audio 2 channels at 48 kHz digital audio via HDMI terminal.
Video Input Resolution Support
VGA input resolution: 640×480 (60/72/75 Hz), 800×600 (60/72/75 Hz), 1024×768 (60/70/75
Hz), 1280×768(60 Hz),1280×960 (60 Hz), 1280×1024 (60/75 Hz), 1360×768 (60 Hz),
1400×1050 (60 Hz), 1440×900 (60 Hz), 1920×1080(60 Hz),720×400 (70 Hz), MAC640×480
(67 Hz), MAC832×624 (75), MAC 1024×768 (75 Hz)
HDMI input resolution: 480i, 480p, 576i, 576p, 720p (50/60 Hz), 1080i (50/60 Hz), 1080p
(50/60 Hz); 640×480 (60 Hz), 800×600 (60 Hz), 1024×768 (60 Hz), 1280×720 (60 Hz),
1280×1024 (60 Hz), 1920×1080 (60 Hz)
Component video input supports resolution: 480i, 480p, 576i, 576p, 720p(50/60 Hz),
1080i(50/60 Hz), 1080p(50/60 Hz)
AV / S-video input support: NTSC, PAL
Digital Video Output Resolution Support
HDMI output supports resolution: 480p (60 Hz), 720p (60 Hz), 1080i (60 Hz),1080p (60 Hz)
Front Panel LED
2 LED for AV input channels
2 LED for PC VGA input channels
2 LED for HDMI input channels
1 LED for selecting video output resolution
1 LED for Power On/Standby mode
Operation
Push buttons available for manual operation
IR remote controller
Power Supply
AC Power Input: 100V-240V 50-60Hz switching mode
DC Power Output: 5V, 4A

4
Front AND BACK PANEL
Front Panel
Rear Panel
SETUP CONNECTION ILLUSTRATION
CONNECTION AND OPERATION
Connect your devices to our HDV6 media center unit
1. Connect the HDMI cable from the HDMI output of your HDV6 unit to your HD TV display.
2. Connect all of the input devices to your HDV6 multimedia center. (You can connect up to 2
HDMI sources to the HDMI inputs of HDV6, 2 PC VGA sources to the VGA inputs of HDV6, and
2 analog video sources to the composite video and s-video inputs of HDV6.)
3. Plug the 5V DC power adapter to the HDV6 Media Center.
Blue-ray DVD
Power
Adaptor
Rear Panel
PS3
XBOX 360
TM
Computer IPTV Box
TV
Wii

5
4. Power on your AV source devices first and then turn on the power of HDV6.
5. Each input source has its own push button with LED light associated on the front panel for fast
selection. Press the push button to choose the desired input source for display. For example, if
you want to switch to the device connected to the HDMI input channel 1, press the push button
on the front panel with “1” in the HDMI section.
6. Press the “RES.” Button on the front panel to adjust the HDMI video output resolution for
display.
7. Use IR Remote control for more control features.
HDMI input digital audio supports 5.1 channels, 48 kHz. (HDMI Output: 2 channels, 48 kHz
digital audio)
The AV1 and AV2 stereo audio input will be converted to 2 channels, 48 kHz digital audio for
HDMI output.
For each analog video connection, users can choose to use Composite Video, S-video or
Component Video inputs. RCA type stereo audio inputs are provided to be shared for all
Composite, S-video or Component input channels.
The VGA input supports VGA to HDMI video conversion only. For PC audio output, which
does not need to be converted, please connect the PC sound card output directly to any
multimedia speaker or use a 3.5mm mini stereo to 2 RCA adapter cable to connect the PC
sound to the TV’s audio input directly.
->>> If you encounter difficulty seeing the computer screen on the TV or other HD display.
Please change the video card resolution setting in your PC and select the proper VGA
resolution according to the VGA support range of our HDV6 unit.
->>> If the PC screen can not be displayed at full screen on TV (overscan/ underscan), users
may use Auto Frame or Full TV Frame function from their TV display to adjust the screen if
such functions available from the TV display.
Note:
HDV6 is designed mainly for up-scaling the HDMI Output signal to 480P, 720P and 1080P.
The function of 1080i is a simulated sub-function. Users are strongly recommended to use
720P and 1080P up-scaling to avoid the compatibility issue between TV and HDV6.
Operations of HDV6 Media Center
Manual Operation mode
Power On: Please use the power key to turn on the HDV6 from standby mode. The LED
indication light of power will be on.
Power Off: Please use the power key to turn the HDV6 into standby mode. The LED
indication light of power will be off.
Selection: Press the selection key of each input source to select the inputs. After you press
the selection key, the selection key will be light on to indicate the input source device.
1. Press AV1 key to select analog video input between Composite 1, S-video 1, and
Component 1.
2. Press AV2 key to select analog video input between Composite 2, S-video 2, and
Component 2.
3. Press VGA1 key to select VGA 1 video input.
4. Press VGA2 key to select VGA 2 video input.
5. Press HDMI1 key to select HDMI 1 input.
6. Press HDMI2 key to select HDMI 2 input.
Resolution setting: 480P, 720P, 1080i, 1080P.
Use “RES.” key at front panel to set the output resolution. The sequence is in a circling order.
If the picture can not show on screen, the TV may not support that resolution you select.
Please change to another resolution. For example, if the TV can not show while you select
1080i, please try to change resolution to 720p, 1080p etc. to meet the resolution and format
that TV supports.

6
IR Remote Control Operation mode
1. Input Channel Selection key: AV1, AV2, VGA, HDMI
Press “AV1” button on the remote for selecting the analog video input channel #1. The
selection will be made in the sequential order of Composite Video 1, S-video 1 and
Component Video 1. Keep pressing this “AV1” button will lead the user to toggle through
all analog video inputs again.
Press “AV2” button on the remote for selecting the analog video input channel #2. The
selection will be made in the sequential order of Composite Video 2, S-video 2 and
Component Video 2. Keep pressing this “AV2” button will lead the user to toggle through
all analog video inputs again.
* The associated stereo audio (R/L audio) inputs will be converted accordingly to digital
audio along with digital video through the same HDMI output.
Press “VGA” button from the remote for selecting the desired PC VGA input channel.
Keep pressing this “VGA” button will lead the user to toggle through the VGA 1 and VGA
2 input.
Press “HDMI” for selecting the HDMI input channel between HDMI 1 and HDMI 2. Keep
pressing this “HDMI” button on the remote will lead the user to toggle through the HDMI
1 and HDMI 2 input.
2. Power ON/OFF: Press this button to set the unit to be into active or standby mode.
3. 【RES.】 Select the HDMI video output resolution among 480P, 720P, 1080i and 1080P.
Press this “RES.” button on the remote to set the up scaling resolution for output. The
output resolutions are listed in a sequential order. Keep pressing this button will toggle
through them all.
If the picture can not be shown on the TV screen, the TV may not be able to support the
resolution you select from this HDV6 unit. Please change to another resolution. For
example, if the TV can not show while you select 1080i, please try to change the
resolution to 720p or 1080p etc or look up the TV’s user manual for reference before
adjusting the resolution.
4.
【OSD】 Display the current video input channel and output resolution information on the
screen.
5.
【Scal.】 Aspect ratio information display. Show aspect ration information(4:3 or 16:9).
6.
【MENU】 Menu of Brightness, Contrast, Saturation, Hue, and Sharpness adjustment.
Press the “MENU” button, a menu will show on the TV screen for setting adjustment.
Press down button to enter the setting. The selected item will show in yellow color.
Use up and down button to select different items, and use left and right button to adjust
the setting. The preset value is 50. The setting range is from 0 to 100.
After finish the setting, press the “MENU” button again to leave to the menu setting
mode.
7.
【Mute】 Press “Mute” button to mute the audio output.
8.
【Reset】 System Reset. Press the “Reset” button on the remote controller to restore the

7
system back to the manufacturer default setting.
9.
【P.M】 Picture mode . Press “P.M” for picture mode selection. Three picture modes,
Clear, Normal and Dark are available for selection.
10.
【N.R】 Noise reduction. Press “N.R” for selecting different noise reduction level. Three
levels of noise reduction mode are available for selection.
11.
【Aspect】 Press “Aspect” button to switch from 4:3 standard mode to 16:9 widescreen
mode.
* When the aspect ratio of original input signal is 16:9, only 16:9 aspect ratio will
be showed.
* This aspect ratio adjustment is not available when VGA input is selected.
Note: The left and right keys on the remote controller can be used as audio volume control
keys. Press the left key to turn down the volume. Press the right key to turn up the
volume.
TROUBLE SHOOTING
1. No picture output on the display ?
Make sure that all the cable connections are correct and connected well.
Check the quality of the cable used.
When seeing no computer screen on the TV or other HD display, please check the computer
video card resolution setting in the PC or Mac and make sure that a proper supported VGA
resolution is selected. Refer to page 3 for the supported VGA video card resolutions.
Try power cycling the HDV6 by unplugging the power supply and then reconnecting the power.
Supply again.
Try pushing the “Reset” button from the HDV6 unit to restore to the system default again.
2. Only picture displayed but no sound ?
Make sure that all the cable connections are correct and connected well.
Check the quality of the cable used.
If the AV device has HDCP encrypted, the signal may not match very well with this multimedia
center unit at first connection. In that case, please try resetting or power cycling your HDV6
again for proper sync up.
Please be advised that HDCP protected content is not allowed for recording. Make sure that
you do not connect the output from this HDV6 unit to a video recorder since the HDMI output
from a HDCP-ready device such as blue-ray DVD or digital cable box will automatically lock
up the audio part.
3. My HDV6 does not respond to remote control or manual push buttons ?
Please unplug the power cord to reset HDV6.
4. Set the output at 1080p from the HDV6 but it is not showing on my plasma ?
Please make sure that both of your source device and TV display end are fully supporting
1080p.
5. Why the TV could not display the 1080i output from my HDV6 unit ?
When up-scaling the video signal to the 1080i level, some LCD TVs or other flat panel
displays may not support the interlaced video unless the 1080i is de-interlaced before
showing on the screen under that circumstance. If 1080i can not show on your TV, please
change the output resolution from your HDV6 to 720p, 1080p etc. to match what TV supports.
NOTICE
Manufacturer reserves the right to make changes in the hardware, packaging and any
accompanying documentation without prior written notice.
HDMI, the HDMI Logo and High-Definition Multimedia Interface are trademarks or registered
trademarks of HDMI Licensing LLC.
HDV6 incorporates HDMI
TM
technology.
Trademarks and brand names are the properties of their respective owners.
/