Page is loading ...

30’
CLASSIC FRAME TENTS
|
ASSEMBLY INSTRUCTIONS
2995 NW 75th Street, Miami, FL 33147-5943 • 305-691-0191 • TOLL FREE: 800-438-3226
EMAIL: sales @economytent.com • WEB: economytent.com

STAKING / ANCHORING BASICS
By law you are required to contact your local “Call before you
dig” number before you plan to dig or drive tent stakes for your
local utility company to mark the location of all underground
utility lines. Laws vary from state to state as to how far in
advance you must call. Plan in advance.
Soil and setup conditions can vary greatly between installation
sites. It is the installer’s responsibility to be sure the staking is
adequate for each site on each setup.
SAFETY BEST PRACTICES
Economy Tent International products are of superior design
and function best in the parameters of these instructions. It
is recommended that the instructions are carefully read and
followed. Please read these “Safety Best Practices” before
the installation or removal of any tent.
• The installer is solely responsible for the evaluation of the
site and determining the proper securing method. Some
soils require different staking or securing other than what is
provided with the tent or purchased by the customer. Our
responsibility is limited to the construction of the tent and
not damage due to installation. Damaged frame parts or
fittings are usually caused by improper lifting of the frame
and are not covered under the terms of the warranty.
• Installation during threatening weather conditions is not
advised under any circumstances. It is the responsibility
of the tent installer/maintainer to determine the severity of
the weather and utmost care must be used. This product
is to be used as a temporary structure. In any questionable
weather conditions, evacuation is recommended and all
valuable merchandise should be removed immediately.
Use good judgment, common sense and safety during
take-down of the tent.
• Due to shifting of the tent frame, loosening of the stakes or
loosening buckles, it is possible for the cover to “pocket”
water in rain conditions. It is imperative to continually
inspect the frame and cover for proper fit and alignment
and adjust as required.
• Proper safety equipment should be used at all times to
insure a safe installation and take down. Careful evaluation
should be made to determine if hard hats, steel toe shoes,
safety glasses and any other equipment should be used
for the safe and proper installation. Tent lifts or other
equipment might be considered for lifting or take down.
5” to 6”
5’ to 6’
GENERAL CARE & MAINTENANCE
SOLID COVER & SIDEWALL VINYL
The vinyl fabric developed for this tent system requires specific
attention during installation, cleaning, and storage to maintain
its maximum life span. Please follow the following care and
maintenance guidelines provided for this product.
MILDEW TREATMENT: Our vinyl fabric is pretreated with
mildew inhibitors that help prevent the growth and spreading of
mildew and fungus. If you see mildew wipe it away immediately
with a clean towel and diluted soap solution. Never fold tent
covers if the fabric is even slightly wet since mildew will grow
in moist environments.
CLEANING: The best way to clean the vinyl tent fabric is
with a soft towel or soft bristled brush immersed in a diluted
solution of warm water and a tent cleaning solution. Apply the
diluted solution directly to the fabric using 1) a towel immersed
in the solution, or 2) a spray bottle or larger pressurized
spraying apparatus to evenly cover the fabric with the solution.
Let this sit on the fabric for about one minute to allow the
mixture to penetrate the fabric. Using a soft towel or soft
bristled polypropylene brush, gently work the cleaner into the
fabric using only mild pressure. Never allow the tent cleaner to
CORRECT ANGLE INCORRECT ANGLE
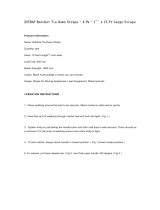
STAKING BASICS
A properly driven
stake will have 6”
or less of the head
exposed. The
deeper the stake,
the greater the
holding strength.
Anchoring stakes
must be driven
deep and vertical
(not at an angle)
about 5’ to 6’
away from the
tent.
dry on the fabric. Once the cleaning is complete be sure to rinse
away any cleaning solution completely. The best way to dry the
vinyl tent fabric is to hang-dry in a low humidity environment.
Fans can be used to circulate air but do not use heated dryers.
STORAGE: Store in a cool, dry area in the storage bags that
came with your cover.
FRAME HARDWARE & COMPONENTS
The hardware components developed for this tent system
require specific attention during installation, cleaning, and
storage to maintain their maximum life span. Please follow the
following care and maintenance guidelines provided for this
product.
OXIDATION: The hardware components for this tent system
have been supplied to you with specialty coatings to help limit
oxidation. With usage, these coatings will need to be maintained
for the product to reach its full intended lifespan.
CLEANING: It is very important to keep your frame
hardware components clean and free of dirt. If soiled, wipe
down immediately to remove the foreign matter.
STORAGE: The tent frame system should be stored dry in a
cool, dry, low humidity covered place.
See full “Care & Maintenance” on economytent.com.

30’
CLASSIC FRAME TENTS
|
ASSEMBLY INSTRUCTIONS
ORGANIZE TUBING & FITTINGS
Lay out all the canopy frame tubing and ttings on the ground forming a loose diagram of the framing layout. It
is best to do the assembly in the approximate location that the tent will be in when assembled. Note: A 30’ x 40’
frame layout is used in this manual for illustration. Go to www.economytent.com for frame sketches for all the 30’
Classic frame sizes, along with a materials list for each frame size.
Corner Fitting
Mid-Leg/
Rafter Fitting
6-Way
Crown Fitting
14’4”
Side Eave Bar
9’4”
Top Bar
21’8” Double Tube
Corner Rafter
16’ Mid Rafter
16’ Mid Rafter
9’4”
Side Eave Bar
40’
30’
TUBING, FITTING, EQUIPMENT LIST
30’ TUBING
• 9’4” Side Eave Bar
• 9’4” Top Bar
• 14’4” Side Eave Bar
• 16’ Mid Rafter Bar
• 21’8” Double Tube Corner Rafter Bar
• 7’ - 9’ Adjustable Leg
SINGLE TUBE DOUBLE TUBE
30’ FITTINGS
6-Way Crown
Mid-Leg/Rafter
Top Extension
Corner
RECOMMENDED EQUIPMENT AND MANPOWER FOR INSTALLATION:
• Six experienced installers can normally install these products in three hours or less.
• One or two 8’-10’ commercially rated step ladders.
• Approved safety head gear, steel toed shoes and eye protection.
• Frame tent jacks (minimum one for a 30’x40’ frame. One additional jack is recommend-
ed for each additional 20’ in length).
• Prior to laying out this or any other ETI product be sure you have thoroughly inspected
the area for any overhead or underground obstructions that may interfere with the safe
installation of this product. Please refer to IFAI anchoring and installation guidelines.

1. Slide a (14’4”) Side Eave Bar into each
eave connector opening of the four
Corner Fittings until the snap buttons
engage. The rafter connector opening
of the Corner Fitting should be pointing
up and inwards, and the leg connector
opening should be pointing downwards.
2. Then attach the other end of the Side
Eave Bars to the eave connector
opening of a Mid-Leg Rafter Fitting until
the snap buttons engage. Be sure the
rafter connector opening of the Mid-Leg
Rafter Fitting is pointing inwards and
the leg connector opening is pointing
downwards. On the 30-foot side, there
will only be one Mid-Leg Rafter Fitting
that connects both Side Eave Bars.
3. For the 40-foot side, slide each end of
a (9’4”) Side Eave Bar into the eave
connector openings of the Mid-Leg
Rafter Fittings, connecting both ends.
Be sure the snap buttons engage.
(Repeat for structures longer than 40’)
You should now have a completed eave
section.
EAVE ASSEMBLY
30’
CLASSIC FRAME TENTS
|
ASSEMBLY INSTRUCTIONS

If needed, position a tent jack near the center
of the tent to support the 6-Way Crown Fitting
and Rafters while assembling. You may also
need a ladder when connecting the rafters to
the crown fitting.
4. Starting on either the left or right 30-foot
side, slide a (21’8-1/4”) Double Tube
Corner Rafter into the rafter connector
opening of each of the Corner Fittings.
Assure that the snap buttons engage.
Using a ladder if necessary, attach the
6-Way Crown Fitting to the other end of
each of the Corner Rafters until the snap
buttons engage. If needed, temporarily
supply support the Crown Fitting using
the tent jack. (Note: The corner connector
openings of the 6-Way Crown Fitting that
connect to the Corner Rafters will be the
shorter tube openings.) Be sure the 90°
connector opening of the 6-Way Crown
Fitting is pointing towards the opposite
Crown Fitting.
5. One at a time, insert a (16’1/4”) Mid-Rafter
to a Mid-Leg/Rafter Fitting until the snap
button engages and connect the other
end to the 6-Way Crown Fitting until the
snap button engages. Repeat for all three
Mid-Rafters. The perimeter of the frame is
designed to flex sufficiently to make this
step easy.
6. Repeat steps 4 & 5 for the opposite side.
7. Connect the two 6-Way Crown Fittings in
the middle with a (9’4”) Top Bar. Be sure
to insert the bar until the snap buttons
engage. You now have a completed 30’ x
40’ peak assembly.
RAFTER / PEAK ASSEMBLY
30’
CLASSIC FRAME TENTS
|
ASSEMBLY INSTRUCTIONS
For structures longer than 40’, connect the end 9’4” Top Bars to a Top Extension Fitting. Connect additional
9’4” Top Bars between the Top Extension Fittings and the opposite end 6-Way Crown Fitting. One at a time,
insert a (16’1/4”) Mid-Rafter to a Mid-Leg/Rafter Fitting until the snap button engages and connect the
other end to the Top Extension Fitting(s) until the snap button engages.

30’
CLASSIC FRAME TENTS
|
ASSEMBLY INSTRUCTIONS
IMPORTANT: Cross Bracing Tubing and Fittings are supplied with the tent framing and must first be in place
before raising the tent on the legs.
8. For stability and to prevent frame bowing,
solid interior bracing using 14’4” x 2”
Cross Brace Tubing and Fittings need
to be installed between each opposing
16’1/4” Mid-Rafters. Start at one end along
the longer side and install as many cross
braces as there are mid-rafters.
CROSS BRACING
COVER ATTACHMENT
9. Roll out a large drop cloth next to the assembled frame to protect the cover from dirt and abrasion.
10. Lay out two-piece covers with lace edges together and top side up.
Matching centerlines, start in the center by pushing the rst lacing
loop up through the corresponding grommet.
(See diagram)
Continue
lacing process and tie o last long lacing loop. Cover lacing with
protective ap and secure the hook-n-loop closure. Repeat lacing
procedure on the opposite side.
11. Loosely pull the cover over the frame. Check the corners, hip areas and crowns to make sure the cover is
positioned correctly on the frame. Temporarily strap the cover at the corners and side (if required) of the frame
to keep any wind from catching the cover.
ADDING LEGS AND LIFTING
12. Lay out the (7’-9’) Adjustable Legs at each Corner Fitting and at each Mid-Rafter Fitting location. Leave
the adjustable Legs at the shortest length. Starting at the two corners of the longer side of the frame, two
installers should lift the corner Legs to their vertical position. Then together lift the entire side of the tent frame
and insert the Corner Fittings onto the corner Legs until the snap button engages. (Do not lift one corner at
time; lift the entire side of the tent.) Insert Legs into the side Mid-Rafter Fittings along the same elevated side
until the snap button engages.
13. Repeat the above procedure for inserting the Legs on the opposite side of the frame. Then insert Legs into the
side Mid-Rafter Fittings along the shorter side until the snap button engages.

30’
CLASSIC FRAME TENTS
|
ASSEMBLY INSTRUCTIONS
STAKES, RATCHET STRAPS & GUY ROPES
16. Place Stakes approximately 5-feet out from each leg. Drive each
Stake vertically into the ground so that approximately 6” of the
stake is showing.
(See staking diagram)
17. Attach Guy Ropes or Ratchet Straps to each Leg and Stake.
Secure corner legs rst and then the side legs.
GUY ROPES: Loop the rope through the exterior ring on each
Corner and Mid-Rafter Fitting. Tie the bottom ends of the rope
to the stake using a Double Loop Clove Hitch knot
(See knot
diagram)
. Tighten by pulling on the excess rope. Fold and secure
excess rope to the stake. Repeat at each leg and stake.
RATCHET STRAPS: Attach the ratchet buckle with the loop
strap to the stakes by turning the 6” loop at the end of the
ratchet inside out and pull the strap through the loop to create
a noose and pull tight over the stake. Take the loose strap and
run it through the ring on Corner Fitting and pull it through the
reel bars slot of the ratchet (ratchet buckle needs to have the
handle facing upward). Pull the loop strap back towards the tent
approximately 18”. Hold the strap with one hand and begin to
crank the ratchet handle back and forth. Roll excess strapping
and secure in the ratchet buckle. Repeat at each leg and stake.
SECURING COVER
14. While the tent is at its lowest position, nish adjusting the t of the Cover and secure it to the frame with
the cover straps and buckles. Neatly tuck excess strapping behind the buckle.
15. Adjust all the Legs to the desired tent height.
5” to 6”
5’ to 6’
CORRECT ANGLE INCORRECT ANGLE
DOUBLE LOOK CLOVE HITCH KNOT
RATCHET STRAP
PLACEMENTS
18. For securing the tent on a hard surface , such as concrete, where stakes can’t be used, you will need to refer
to IFAI Tent Rental Division’s Ballasting Tool.
For additional installation and anchoring information entitled “The IFAI Procedural Handbook For The Safe
Installation And Maintenance Of Tentage” is published by the Tent Rental Division of the Industrial Fabric
Association International (IFAI).
The installation of the tent framing and cover is now complete. If desired, Sidewalls, Liners and Drapes
may be installed.

30’
CLASSIC FRAME TENTS
|
DISASSEMBLY INSTRUCTIONS
1. Remove Sidewalls, Liners and Drapes. Fold and roll for cleaning and/or storage.
2. Loosen all Ratchet Straps or Guy Ropes. Leave Corner anchoring in place for now. Remove all anchoring
from the side Mid-Rafter Legs.
3. Adjust the tent height on all the Legs to the lowest height.
4. Leaving any corner straps secured to keep cover from falling or blowing off, unfasten the Cover straps
and buckles along the inside perimeter of the frame.
5. Leaving the corner Legs and anchoring in place, remove the Legs from the Mid-Rafter Fittings on the
shorter sides first, and then remove on one of the longer sides.
6. Remove the anchoring straps from the Corner Fittings and Legs on the same side. Remove the two
corner Legs and carefully lower this side of the frame to the ground. Note: Corner legs should be
removed at the same time and the entire length of the frame should then be lowered. Do not remove and
lower one corner at a time. Use tent jacks if necessary to support and lower the side of the tent.
7. Repeat on the opposite side.
8. Lay out a drop cloth along one side of the frame and cover to protect the cover from dirt and abrasions
as you remove it. Unfasten the rest of the Cover straps and carefully remove the Cover onto the drop
cloth. Fold and roll the Cover as tightly as possible. Do not stand or walk on the Cover fabric as you
remove and fold it. Store cover in storage bag.
9. Disassemble the frame in the opposite order of assembly.
10. Remove all stakes. Roll and store guy ropes and ratchet straps.
/