Page is loading ...

Tools and Materials
Thank You For Choosing Kohler Company
We appreciate your commitment to Kohler quality. Please take a few
minutes to review this manual before you start installation. If you
encounter any installation or performance problems, please don’t
hesitate to contact us. Our phone numbers and website are listed on
the back cover. Thanks again for choosing Kohler Company.
Before You Begin
NOTE: One style of handle is shown in each installation type. The
same installation procedures apply to other handle styles.
Please read all instructions before you begin.
Observe all local plumbing and building codes.
Kohler Co. reserves the right to make revisions in the design of
faucets without notice, as specified in the Price Book.
Screwdrivers
Hex Wrenches
Plumbers
Putty
113433-2-BB 2 Kohler Co.

1. Install Deck-Mount Handles
Close the valves (hot = clockwise, cold = counterclockwise).
Install the washer into the escutcheon base.
Thread the escutcheon onto the valve body.
Install the spline adapter about halfway onto the valve stem
spline.
Press the handle loosely onto the spline adapter, and check the
alignment of the handle.
For further alignment, remove the handle, and reposition the
spline adapter on the valve stem until the handle alignment is
correct.
Secure the handle with the screw, and press the plug button in
place.
For vandal-proof configurations, insert the applicable red or blue
vandal-proof button, and secure it with the screw.
Repeat for the other handle.
Washer
Escutcheon
Screw
Valve Stem
Spline
Spline
Adapter
Handle
Assembly
Plug
Button
Vandal-Proof
Button
(Red/Blue)
Vandal-Proof
Screw
Kohler Co. 3 113433-2-BB

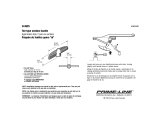
2. Installing Wall-Mount Handle - With Stops
Position the escutcheon on the valve body.
Thread the escutcheon lock sleeve onto the valve body until it
contacts the escutcheon. The sleeve will hold the escutcheon in
place.
Install the spline adapter about halfway onto the valve stem
spline.
Partially install the handle to the spline adapter, and check the
alignment of the handle. Lever handles should point down.
For further alignment, remove the handle, and reposition the
spline adapter on the valve stem spline until the handle
alignment is correct.
Secure the handle with the screw, and press the plug button in
place.
For vandal-proof configurations, insert the applicable red or blue
vandal-proof button, and secure it with the screw.
Repeat for the other handle.
Escutcheon
Lock Sleeve
Escutcheon
Vandal-Proof
Button
(Red/Blue)
Vandal-Proof
Screw
Plug
Button
Valve Stem Spline
Spline Adapter
Handle Assembly
Screw
113433-2-BB 4 Kohler Co.

3. Installing Wall-Mount Handles - Without Stops
Install the washer into the base of the escutcheon, and thread the
escutcheon onto the valve body.
Install the spline adapter about halfway onto the valve stem
spline.
Press the handle loosely onto the spline adapter, and check the
alignment of the handle.
For further alignment, remove the handle, and reposition the
spline adapter on the valve stem spline until the handle
alignment is correct. Lever handles should point down.
Secure the handle with the screw, and press the plug button in
place.
For vandal-proof configurations, insert the applicable red or blue
vandal-proof button, and secure with the screw.
Repeat for the other handle.
Washer
Escutcheon
Screw
Valve Stem Spline
Spline
Adapter
Handle
Assembly
Plug
Button
Vandal-Proof
Button
(Red/Blue)
Vandal-Proof
Screw
Kohler Co. 5 113433-2-BB

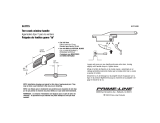
4. Installing the Diverter Handle
Remove the thread protector if it is installed on the diverter.
Thread the sleeve onto the diverter.
Apply a ring of plumbers putty or other sealant to the back of the
escutcheon according to the manufacturer’s instructions.
Slide the escutcheon onto the sleeve until it is tight against the
finished wall.
Tighten the setscrew.
Press the knob onto the diverter stem, and tighten the setscrew.
Diverter
Sleeve
Stem
Setscrews
Escutcheon
Knob
Apply Plumbers
Putty Here.
113433-2-BB 6 Kohler Co.
/