
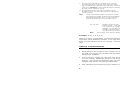
TC0926AD Rev. CN 10/10 2001 Avery Dennison Corp. All rights reserved.
MONARCH
®
926
KNIFE ADDENDUM
Use these instructions with the Monarch® 9855® printer and the optional
knife. Information in this document supercedes information in previous
versions. Check our Web site (www.monarch.com
) for any updates.
Caution: Do not place your fingers or any other objects into the knife.
Installing the Knife
The knife, printer, and stacker must be installed on a level surface. Turn off
the printer before you install the knife.
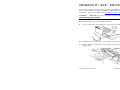
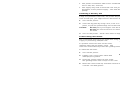
1. Using a Phillips screwdriver, remove the base cover.
2. Replace the screw. You can throw away the base cover.
3. Press down on the exit cover tabs to open the exit cover on the front of
the printer.
Exit cover tabs
Base cover

2
4. Remove the printer's exit cover by pressing in the center and pulling it
out. The exit cover will flex when you press in the center. You can throw
away the exit cover.
5. Attach the printer's connectors to the knife's board as shown. The small
connector (2-pin) is keyed and attaches from the top. The large
connector (9-pin) attaches from the side.
Note: Do not force the connectors onto the board. This damages the
board.
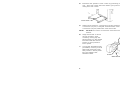
6. Align the knife in front
of the printer's exit
chute by lining up the
three holes on the knife
bracket with the three
holes on the printer's
base plate.
7. Using the thumbscrews
provided, loosely screw
the knife bracket onto
the printer's base plate.
Do not tighten the
thumbscrews.
Press here
Screw
Knife bracket

3
8. Push the knife toward the printer until the knife does not pivot or rotate.
Be sure to center the knife in the printer’s opening.
9. Tighten the thumbscrews.
10. Turn on the printer.
Cut a batch of tags to check the cut angle. If the cut is not straight (parallel
to the printed image), adjust the cut angle.
Adjusting the cut angle
To adjust the cut angle:
1. Loosen the thumbscrews.
2. Slightly rotate the knife to the left or to the right. The knife may appear
to sit at a slight angle to the printer.
3. Tighten the thumbscrews.
Cut another batch of tags. If you are unable to adjust for a straight cut, call
Service.
Using the Knife
The installed knife is two and a half (2-1/2) inches away from the printhead.
Pressing and holding Feed/Cut for two seconds marks the tag under the
printhead to be cut when it reaches the knife. Depending on the length of
your supply, you may lose up to two tags after the last batch. However, if
you have extended backfeed enabled, you do not lose any tags after the
batch. For more information about extended backfeed, refer to the optional
Packet Reference Manual available on our Web site.
Note: The knife operates when the printer is running. If the printer is
paused, the knife stops cutting.
Adjust the cut position from the keypad or use the supply setup packet.
Refer to the optional Packet Reference Manual for more information.

4
If using a 9855 printer, adjust the cut position from the printer’s keypad as
shown:
To change the setting, from the Main Menu, select Setup, Supply, then
Positioning. Then, follow these steps.
1. Press or until you see
POSITIONING
Cut Pos
2. Press Enter/Pause. You will see the current setting, for example:
Enter knife adj
[-300/300]: +0
3. Press or to change the cut position. Pressing decreases the
value (moves the cut down); increases it (moves the cut up). The cut
position adjusts where the tag is cut. The printer adjusts the cut
position according to the black marks on the supply. You may need to
adjust for aperture supplies.
Note: We do not recommend setting a positive cut position while using
extended backfeed. You may cut off the leading edge of the next
tag.
4. Press Enter/Pause when the number you need appears. Press
Escape/Clear to exit to the Setup menu.
To adjust the cut type or cut multiple, your System Administrator should
send the Batch Control Field.
Defining the Batch Control Field
The batch header must precede this field. The batch control field defines
the print job and applies only to the batch that immediately follows.
Syntax E,feed_mode,batch_sep,print_mult,multi_part,
cut_type,cut_mult¦
E1. E Batch Control Field.
E2. feed_mode Feed Mode. Options:
0 Continuous Feed (default)
1 On-demand

5
E3. batch_sep Batch Separator (striped label between batches).
Options:
0 Does not print a separator (default)
1 Prints a separator
2 Double-length separator- prints 2 tags
Note: If using non-indexed supply, the batch separator is always six
inches long. If using a stacker, the batch separator is always
3.66 inches long.
E4. print_mult Number of tags with the same image. 0 is the default.
Range: 1 to 999
E5. multi_part Number of identical parts on one tag. 0 is the default.
Range: 1 to 5
E6. cut_type Enables or disables the knife. Options:
0 Does not cut (default)
1 Cuts before, during, and after last tag – printed
tag(s) left between printhead and knife.
2 Cuts in strips, not each tag – printed
tag(s) left between printhead and knife.
3 Cuts before, during, and after last tag – no
printed tags left between printhead and knife.
4 Does not cut before first tag, cuts each tag and
after the last tag – printed tag(s) left between
printhead and knife.
5 Cuts in strips, not each tag – no printed tags
left between printhead and knife.
Recommended Settings for optimal
performance with:
Description of cut mode operation Straight Edge Tags Edge Aperture Tags
Cut
Mode
Cut Before
first tag in
Batch?
Cut Between
Tags?
Cut After
Batch?
Extended
backfeed
Overstrike
w/verifier
Extended
backfeed
Overstrike
w/verifier
0 No No No Yes Yes No No
1 Yes Yes Yes* Yes Yes Yes Yes
2 Yes No
(Feeds strips)
Yes* Yes Yes No No
3 Yes Yes Yes** No Yes Yes Yes
4 No Yes Yes* Yes Yes No Yes
5 Yes No
(Feeds strips)
Yes** Yes Yes No No

6
* The last tag in the batch is queued to be cut once
it reaches the knife; however, there may be printed
tags left between the printhead and the knife. The user
must press Feed/Cut or send another batch to feed the
last tag out far enough to be cut.
** The printer feeds the last tag in the batch out far
enough to be cut. No user intervention is required to
cut the last tag.
Note: Using "overstrike/continue" as the Error Action
minimizes the number of RFID tags left between
the printhead and the knife. To use the least
amount of RFID tags, set overstrike to five.
E7. cut_mult Number of tags to print
before cutting. A cut multiple of one cuts after each tag.
The range is 0 to 32,000. 0 is the default. The cut
multiple is a multiple of the print quantity. If the cut
multiple is three and the print quantity is 16, then five
sets of three tags and one set of one tag is produced.
Note: The last tag in the batch is always cut, regardless of the multiple.
Example E,0,1,4,2,1,4¦
Defines a batch control field. Continuous feed mode is used and a
separator prints between batches. Four tags have the same image and
there are two identical parts on one tag. The knife cuts after every four
tags.
Special Considerations
When using the knife, note the following items:
Depending on the length of your supply, you may lose up to two tags at
the end of a supply roll and after the last batch, unless extended
backfeed is enabled.
At the end of a supply roll, two tags may be left uncut if you are using
1.2-inch supply. When the printer is out of supplies, 756 appears on the
display. The printer recalibrates after you load new supplies; however,
supplies will not be cut during recalibration.
The maximum print speed using the knife is 6.0 inches per second.
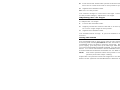
Edge Aperture
Straight Edge
Feed

7
Guiding hole
Cam
Guiding hole
The printer recalibrates after errors numbered 700 - 799, except for
errors 758, 761, and 764.
The supply may shift as the knife cuts and you may see a small
disruption on the printed supply. This shift does not affect bar code
quality.
Clearing a Knife Jam
If tags are jammed in the knife, the printer displays 760 on the LCD. To
clear a knife jam, you might have to disconnect the stacker from the knife.
1. Turn off the printer.
2. Clear the tag path by using a tool, such as a screwdriver or needle-nose
pliers, to pull the jammed tags out of the knife.
Caution: Do not place your fingers near the knife’s blade.
Do not use excessive force to remove tags. This may damage
the knife.
3. Turn on the printer. Send a test batch of tags to the printer.
Lubricating the Knife
We recommend lubricating the knife after using 15 rolls of
supply or performing 100,000 cuts.
To prevent excessive wear on the knife,
regularly lubricate the knife’s cams. The
cams are located directly below the guiding holes.
To lubricate the knife:
1. Turn off the printer.
2. Lightly coat a long cotton swab with
multi-purpose grease.
3. Insert the cotton swab into one of the
two guiding holes until it stops on the cam.
4. Move the cotton swab up and down several times to
coat the cam with grease.

8
5. Repeat steps 2 - 4 for the other cam.
6. Wipe off any excess grease from the top cover of the knife.
7. Turn on the printer.
Tag Cut Dimensions
Use these specifications for the knife.
Widths: 0.75 to 4.0 inches (19 mm to 102 mm)
Lengths: 0.75 inches (19 mm) without cutting
1.2 to 16.0 inches (30 mm to 406 mm) with cutting
Note: The maximum cut tag length using the stacker
is 3.66 inches (93 mm).
Thickness: 7 to 10 mils
Batch Separator: 3.66 inches (93 mm)
Using the 9855RFMP Printer
The above specifications apply to using the knife with an RFID printer with
the following exceptions:
The minimum cut width is 1.5 inches (38 mm).
The minimum cut length is 1.5 inches (38 mm).
Use only Monarch approved RFID tag supplies.
The knife can cut our manufactured tags up to 14 mils thick only for RFID
applications. We do not recommend cutting competitor's RFID supplies.
The limited warranty on knives used in or with RFID printers is one (1)
year from the date of shipment, or 500,000 cuts, whichever occurs first.
-
 1
1
-
 2
2
-
 3
3
-
 4
4
-
 5
5
-
 6
6
-
 7
7
-
 8
8


Avery Dennison 9855RFMP Owner's manual
- Type
- Owner's manual
- This manual is also suitable for
Ask a question and I''ll find the answer in the document
Finding information in a document is now easier with AI
Related papers
-
Avery Dennison 9906 Operating instructions
-
-
Monarch 9855 Printer User manual
-
Avery Dennison 9416XL Owner's manual
-
-
-
Monarch Monarch 9825 User manual
-
-
-
Other documents
-
Monarch 9855 Operator's Handbook Manual
-
-
Paxar Monarch 9855 RFID User manual
-
-
-
-
-
-
-
Monarch 9855 RFMP User manual