Gigabyte P35: Your Versatile Computing Companion
With its powerful performance and versatile features, the Gigabyte P35 is designed to elevate your computing experience. Equipped with a backlit keyboard for comfortable typing in low-light conditions, a large storage capacity for storing your essential files and media, and a long battery life for uninterrupted usage, the P35 is ideal for both work and play. Stay connected with ease through its comprehensive connectivity options, including Wi-Fi, Bluetooth, and multiple ports.


-
 1
1
-
 2
2
-
 3
3
-
 4
4
-
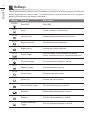 5
5
-
 6
6
-
 7
7
-
 8
8
-
 9
9
-
 10
10
-
 11
11
-
 12
12
-
 13
13


Gigabyte P35: Your Versatile Computing Companion
With its powerful performance and versatile features, the Gigabyte P35 is designed to elevate your computing experience. Equipped with a backlit keyboard for comfortable typing in low-light conditions, a large storage capacity for storing your essential files and media, and a long battery life for uninterrupted usage, the P35 is ideal for both work and play. Stay connected with ease through its comprehensive connectivity options, including Wi-Fi, Bluetooth, and multiple ports.
Ask a question and I''ll find the answer in the document
Finding information in a document is now easier with AI