D-Link DIR-850L User manual

Category
Routers
Type
User manual

D-Link DIR-850L is a powerful wireless router offering high-speed AC1200 dual-band Wi-Fi, ensuring smooth streaming, gaming, and web browsing. With four Gigabit LAN ports, you can connect wired devices like gaming consoles, smart TVs, and NAS drives for fast and reliable wired connections. The router also features a USB port to share files and media across your network. Advanced security features like firewall protection and parental controls safeguard your network and connected devices.

D-Link DIR-850L is a powerful wireless router offering high-speed AC1200 dual-band Wi-Fi, ensuring smooth streaming, gaming, and web browsing. With four Gigabit LAN ports, you can connect wired devices like gaming consoles, smart TVs, and NAS drives for fast and reliable wired connections. The router also features a USB port to share files and media across your network. Advanced security features like firewall protection and parental controls safeguard your network and connected devices.

www.dlinkmea.com
DIR-850L
Wireless AC1200 Dual Band
Gigabit Router
User
Manual
www.dlinkmea.com
2
USER MANUAL: DIR-850L
Wireless AC1200 Dual Band Gigabit Router
SYSTEM REQUIREMENTS
Network Requirements An Ethernet-based Cable
IEEE 802.11ac, 802.11a, 802.11n or 802.11g wireless clients
10/100/1000 Ethernet
Web-based Configuration
Utility Requirements
Computer with the following:
Windows®, Macintosh, or Linux-based operating system
An installed Ethernet adapter
Browser Requirements:
Internet Explorer 7 or higher
Firefox 3.5 or higher
Safari 4 or higher
Chrome 8 or higher
Windows® Users:
Make sure you have the latest version of Java installed.
Visit www.java.com to download the latest version.
HARDWARE OVERVIEW CONNECTIONS
1
3
4
5
6
2
7
www.dlinkmea.com 3
1USB Port Connect a USB flash drive to share content throughout your network.
2WPS Button Press to start the WPS process. The Internet LED will start to blink.
3LAN Ports (1-4) Connect 10/100/1000 Ethernet devices such as computers, switches, storage (NAS) devices and game consoles
4Internet Port Using an Ethernet cable, connect your ONT to this port.
5Power Button Press the power button to power on and off.
6Power Receptor Receptor for the supplied power adapter.
7Reset Button Insert a paperclip in the hole and wait for several seconds to reset the router to default settings.
HARDWARE OVERVIEW LEDS
1Power LED A solid green light indicates a proper connection to the power supply. The light will blink green during the WPS
process. The light will blink orange during boot up.
2Internet LED A solid light indicates connection on the Internet port. If the LED is orange, the connection is good but the router
cannot connect to the Internet.
www.dlinkmea.com
4
FIRST TIME LOGIN
When you log in to the DSL Router for the first time, the login wizard appears.
Open a Web browser on your computer.
Enter http://192.168.1.1 (DSL router default IP address) in the address bar. The login page appears.
Enter a user name and the password. The default user name is admin and the password is printed on the device label located
at the bottom of the casing.
Click Enter to log in.
D-LINK QUICK SETUP WIZARD
Select Basic settings to run the Setup Wizard
Please wait while your router detects your Internet connection type. If the router detects your Internet connection, you may need to enter your
ISP information such as user name and password. If the router detected or you selected PPPoE, enter your PPPoE user name and password
provided by ISP and
www.dlinkmea.com 5
Click Next to continue
For both the 2.4GHz and 5GHz segments, create a Wi-Fi network name (SSID) using up to 32 characters.
Create a Wi-Fi password (between 8-63 characters). Your wireless clients will need to have this pass phrase or key entered to be able to con-
nect to your wireless network
The router will reboot once the settings are saved. Please wait till it comes up.
www.dlinkmea.com
6
WEB-BASED CONFIGURATION UTILITY
To access the configuration utility, open a web-browser such as Internet Explorer and enter the IP address of the router (http://192.168.1.1) in
the address bar.
Enter your User name and Password
INTERNET CONNECTION SETUP
Configure the PPPOE interface
To configure the PPPoE connection go to: TCP/IP Settings >> WAN Interface
PPP User name: Type the user name provided by the ISP
PPP Password: Type the password provided by the ISP
PPPoE Service Name: Optional (keep it blank)
www.dlinkmea.com 7
CHECK THE STATUS OF MANAGEMENT INTERFACE
To Check the status of Management interface: Go to Management >> Status > >WAN configuration
If connected, the management interface acquires a private IP address automatically from DHCP server.
CHECK THE STATUS OF PPPOE/INTERNET INTERFACE
To check the status of management interface go to: Management>>Status>>WAN configuration
If successfully authenticated the PPPOE WAN Interface will receive a public routable IP address.
The PPPOE WAN interface is the default gateway towards external world / Internet as depicted in the screenshot the Management Interface is
up but the PPPOE interface is connected.
www.dlinkmea.com
8
LAN CONNECTION SETUP
You can configure the LAN IP address according to the actual application. The preset IP address is 192.168.1.1. You can use the default settings
and DHCP service to manage the IP settings for the private network. The IP address of the device is the base address used for DHCP.
Choose: TCP/IP Settings >> LAN Interface. The Local Network page shown in the following figure appears.
WIRELESS CONNECTION SETUP
To Configure 5 GHz Wireless 802.11ac SSID
This function is used to modify the standard 802.11AC wireless 5GHz radio settings. It is recommended not to change the default settings,
because incorrect settings may impair the performance of your wireless radio. The default settings provide the best wireless radio performance
in most environments.
Choose: Wireless >> wlan1 (5GHz) >> Basic Settings. The page shown in the following figure appears
www.dlinkmea.com 9
Disable Wireless: Select this to turn Wi-Fi on and off.
Wireless Network Name (SSID): The Wireless Network Name is a unique name that identifies a network. All devices on a network must share
the same wireless network name in order to communicate on the network. If you decide to change the wireless network name from the default
setting, enter your new wireless network name in this field.
Channel Number: Select Auto
WIRELESS SECURITY
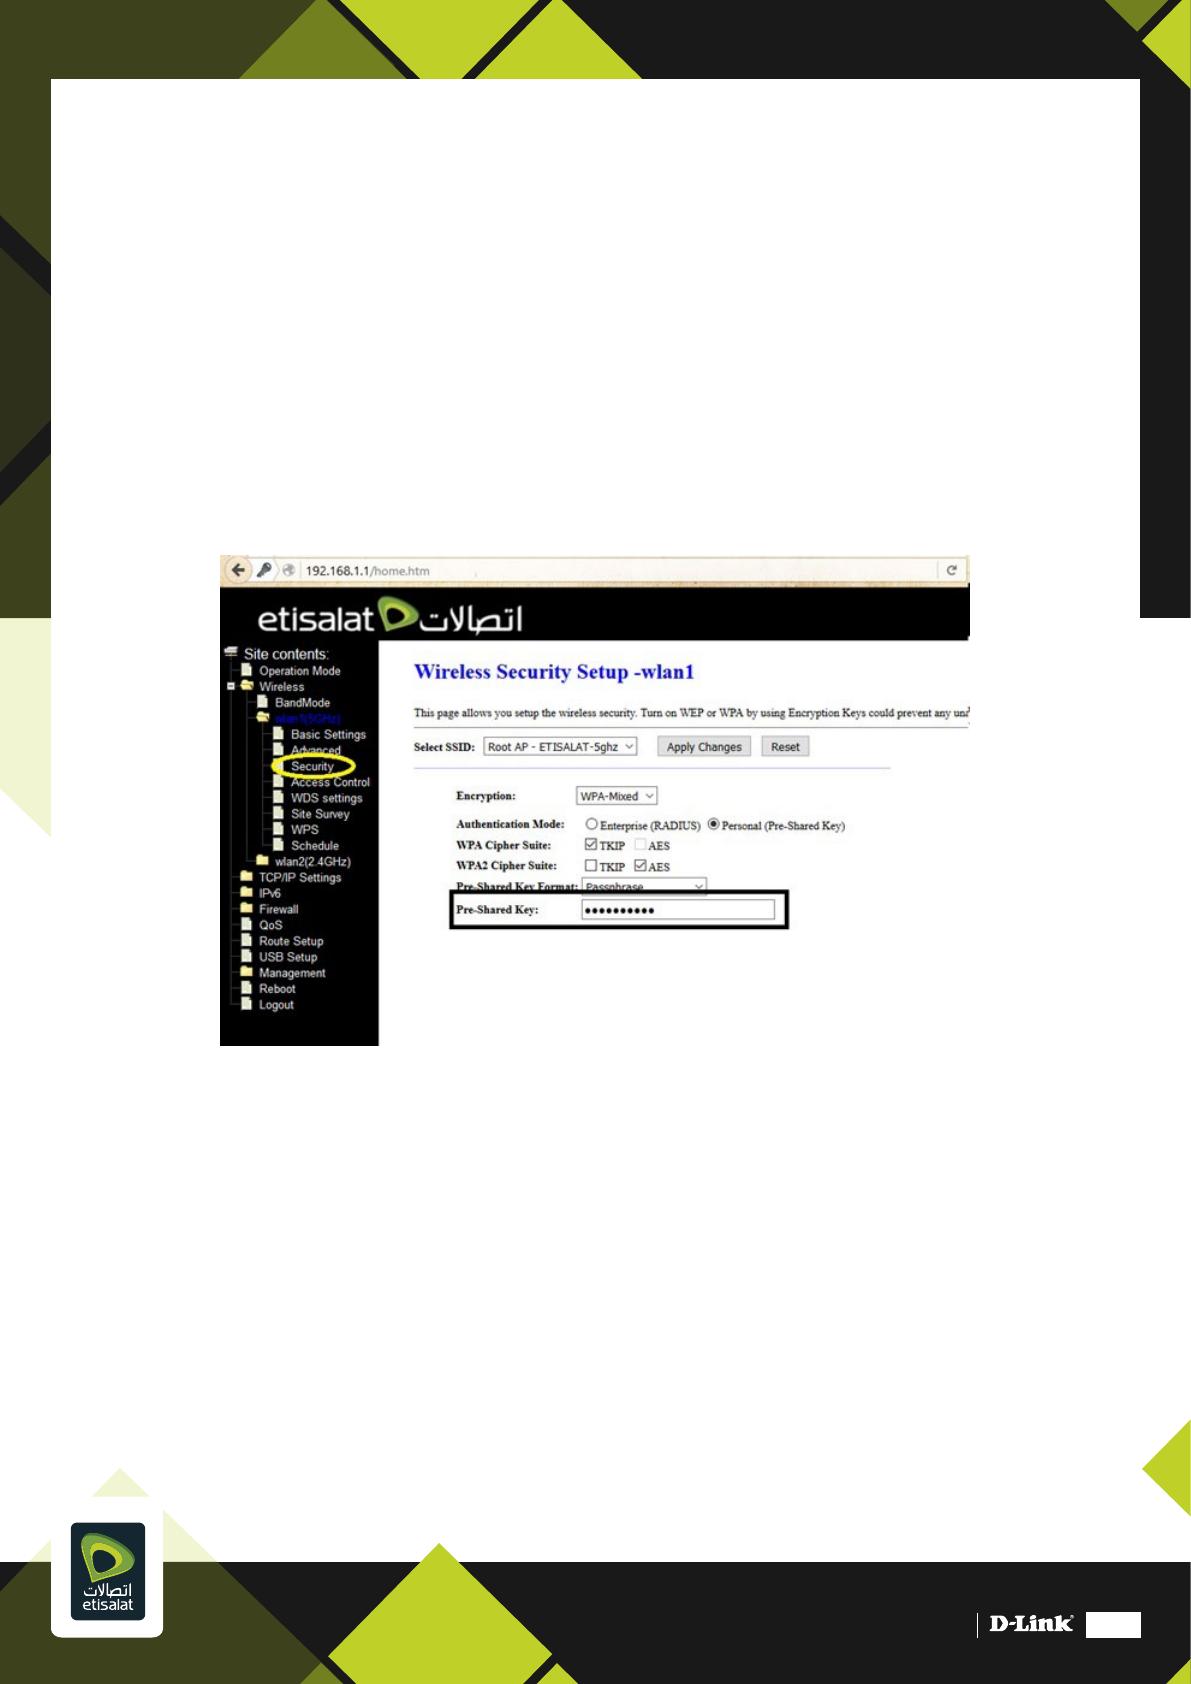
Choose: Wireless >> wlan1 (5GHz) >> Security:
In the Wireless Settings page, click Security Settings. The page shown in the following figure appears. Select the SSID that you want to
configure from the drop-down list.
Select the encryption type from the Security Mode drop-down list. You can select None, WEP, WPA, WPA2 and WPA-Mixed.
WPA-Mixed (WPA + WPA2): It’s recommended to select this encryption mode in order to ensure backward compatibility
with legacy WI-FI adaptor.
Pre-Shared key: this is the wireless password.
Click Apply Changes to save the settings.
www.dlinkmea.com
10
TO CONFIGURE 2.4 GHZ WIRELESS 802.11 B/G/N SSID
This function is used to modify the standard 802.11 b/g/n wireless 2.4 GHz radio settings. It is recommended not to change the default settings,
because incorrect settings may impair the performance of your wireless radio. The default settings provide the best wireless radio performance
in most environments.
Choose: Wireless >> wlan2 (2.4GHz) >> Basic Settings.
Disable Wireless: Select this to turn Wi-Fi on and off.
Wireless Network Name (SSID): The Wireless Network Name is a unique name that identifies a network. All devices on a network must share
the same wireless network name in order to communicate on the network. If you decide to change the wireless network name from the default
setting, enter your new wireless network name in this field.
Channel Number: Select Auto
www.dlinkmea.com 11
WIRELESS SECURITY
In the Wireless Settings page, click Security Settings. The page shown in the following figure appears. Select the SSID that you want to
configure from the drop-down list.
Select the encryption type from the Security Mode drop-down list. You can select None, WEP, WPA , WPA2 and WPA-Mixed.
WPA-Mixed (WPA + WPA2): It’s recommended to select this encryption mode in order to ensure backward compatibility with
legacy WI-FI adaptor.
Pre-Shared key: This is the wireless password.
Click Apply Changes to save the settings.
FIREWALL SETTINGS,
1. PORT FILTERING
To do Port Filtering, please go to: Firewall >> Port Filtering:
For example: Here we have enabled HTTP blocking (port 80), which will block all the HTTP services and will allow all HTTPS services.
Click Apply Changes once the settings are done.
www.dlinkmea.com
12
2. IP FILTERING
To select the IP Filter option to configure the IP filters function for the router.
To do IP Filtering go to: Firewall >> IP Filtering:
Local IPv4 Address: Select the IP Address.
Click Apply Changes once the settings are done.
3. MAC FILTERING
To select the MAC Filter option to configure the MAC filters function for the router.
To do MAC Filtering, go to: Firewall >> MAC Filtering
www.dlinkmea.com 13
MAC Address: Select the MAC address of the device that you want to allow or deny.
Click Apply Changes once the settings are done.
4. PORT FORWARDING
Port forwarding allows you to specify a port or range of ports to open for specific devices on the network. This might be necessary for certain
applications to connect through the router.
To do Port Forwarding go to: Firewall >> Port Forwarding:
www.dlinkmea.com
14
IP Address: Enter the IP address of the computer on your local network that you want to allow the incoming service to.
Application Name: Use the drop-down menu to select the Application.
Port Range: Set the TCP and UDP ports that you want to OPEN.
Click Apply Changes once the settings are done.
5. URL FILTERING
The website filter settings allow you to block access to certain web sites. You can either create a list of sites to block, or create a list of sites to
allow (with all other sites being blocked).
If you want to create a list of sites to block, select deny URL address (blacklist), All other sites will be accessible.
If you want to specify a list of sites to allow, select allow URL address (whitelist), All other sites will be blocked.
To do URL Filtering go to: Firewall >> URL Filtering:
Click Apply Changes once the settings are done.
www.dlinkmea.com 15
6. DMZ
On this page the user can configure services related to the DMZ feature of this product.
To do DMZ Settings go to: Firewall >> DMZ
DMZ Host IP Address: Enter the internal IP address for the DMZ function.
Click Apply Changes once the settings are done.
www.dlinkmea.com
16
MANAGEMENT
1. FIRMWARE UPDATE
The Firmware update section can be used to update to the latest firmware code to improve functionality and performance. To update the
firmware, follow these steps:
Click the Browse button to locate the D-Link update file on your computer.
Once you have found the file to be used, click the upload button below to start the firmware update process. This can take a minute or more.
Wait for the router to reboot. This can take another minute or more.
To do the Firmware Upgrade, go to: Management >> Firmware Update:
2. SAVE/LOAD SETTING
To Reset the device to Factory Settings, go to: Management >> Save/Load Setting >> Reset Settings to default.
www.dlinkmea.com 17
Reset Setting to Default: When you select to restore the Default Settings you will lose any settings defined before.
If the admin’s password is lost and you can no longer manage the device, Use the restore switch at the back
of the device to set the settings to Factory settings.
3. ADMIN PASSWORD
To change the Admin password, go to: Management >> Password:
User name: Enter the User name.
New Password: Enter the new Web UI login password here.
Confirm Password: Enter the new Web UI login password here again to verify.
www.dlinkmea.com
18
QUESTIONS & ANSWERS
Q: What is the Ethernet port?
In Router/AP mode, the Ethernet port is used to connect to your existing wired network (e.g. an existing router, a wired connection in a hotel
room or Broadband Modem).
In Repeater and Wi-Fi Hotspot modes, the Ethernet port is used to connect a wired client to the wireless network (e.g. computer, Smart TV,
video game console).
Q: Windows 7 - Basic Network Connection Setup
Click here to read about Windows 7 - Basic Network Connection Setup.
Q: How do I log into my router?
A: Note: This FAQ uses the DIR-850L as an example. Also, the web UI is not a website on the Internet, it is built in to the router. Make sure your
computer or device is connected to the router.
Step 1: Open your web browser and type in http://dlinkrouter.local or type in the IP address of the router (default - http://192.168.1.1).
Step 2: Enter or select the user name (admin) and enter your password (printed on device label), and then click OK or Log In. The password is
case-sensitive.
www.dlinkmea.com 19
If you forgot your password, you will need to reset the router back to the factory default settings. Unfortunately this will remove any settings
you have and you will need to reconfigure your router.
To reset your router, use a paper clip and press & hold the reset button (usually located on the back of the router) for 10 seconds and release.
Allow 1 minute to reboot. The default IP address of the router will be 192.168.1.1 and the password is blank.
If you are connecting wirelessly, you will need to reconnect your device to the default wireless network after the router reboots. The default
Wi-Fi network/password may be printed on the label on the bottom of the router or on the included Wi-Fi Configuration Card (newer models).
Q: How do I connect my Wi-Fi enabled computer to Router?
A: Note: The following instructions and screenshots are for Windows® 7. Other versions of Windows may have slightly different appearances.
Step 1: Click on the network icon in the bottom right corner (next to the clock).
Step 2: Select the wireless network you want to connect to and click Connect.
www.dlinkmea.com
20
Step 3: If you have a Wi-Fi password (security key) configured on your extender, enter the password and click OK.
Step 4: Select the Network Type.
Step 5: Your computer is now connected. The computer should now automatically connect to this network when it is within range.
  • Page 1 1
  • Page 2 2
  • Page 3 3
  • Page 4 4
  • Page 5 5
  • Page 6 6
  • Page 7 7
  • Page 8 8
  • Page 9 9
  • Page 10 10
  • Page 11 11
  • Page 12 12
  • Page 13 13
  • Page 14 14
  • Page 15 15
  • Page 16 16
  • Page 17 17
  • Page 18 18
  • Page 19 19
  • Page 20 20

D-Link DIR-850L User manual

Category
Routers
Type
User manual

D-Link DIR-850L is a powerful wireless router offering high-speed AC1200 dual-band Wi-Fi, ensuring smooth streaming, gaming, and web browsing. With four Gigabit LAN ports, you can connect wired devices like gaming consoles, smart TVs, and NAS drives for fast and reliable wired connections. The router also features a USB port to share files and media across your network. Advanced security features like firewall protection and parental controls safeguard your network and connected devices.

Ask a question and I''ll find the answer in the document

Finding information in a document is now easier with AI