Paragon Rescue Rescue Kit 11 Professional User manual
- Category
- Backup recovery software
- Type
- User manual

PARAGON Software GmbH, Systemprogrammierung
Heinrich-von-Stephan-Str. 5c 79100 Freiburg, Germany
Tel. +49 (0) 761 59018201 Fax +49 (0) 761 59018130
Internet www.paragon-software.com Email sales@paragon-software.com
Copyright© 1994-2011 Paragon Software Group. All rights reserved.
Rescue Kit™ 11 Professional
User Manual

Copyright© 1994-2011 Paragon Software Group. All rights reserved.
Contents
Introduction .......................................................................................................................... 3
What’s New in Rescue Kit 11 ....................................................................................................................... 3
Product Components ............................................................................................................. 4
Features Overview ................................................................................................................. 4
Key Features ............................................................................................................................................... 4
Supported Technologies .............................................................................................................................. 5
Supported File Systems ............................................................................................................................... 5
Supported Media ........................................................................................................................................ 6
Getting Started ...................................................................................................................... 6
Contacting Paragon Software GmbH ........................................................................................................... 6
System Requirements ................................................................................................................................. 6
Booting from the Linux/DOS Recovery Media .............................................................................................. 7
Booting from the WinPE Recovery Media .................................................................................................... 9
Basic Concepts ..................................................................................................................... 11
System and Data Protection ....................................................................................................................... 11
Data Sanitization........................................................................................................................................ 13
Data Backup and Rescue ............................................................................................................................ 13
Undeleting Partitions ................................................................................................................................. 17
Wipe Tasks ................................................................................................................................................ 19
Transfer Files ............................................................................................................................................. 21
Typical Scenarios ................................................................................................................. 22
Backup Scenarios ....................................................................................................................................... 22
Recovery Scenarios .................................................................................................................................... 25
Making System Bootable on Different Hardware (P2P Adjust OS) ............................................................... 45
Cleaning User Passwords for Windows ....................................................................................................... 52
Hard Disk Utilization .................................................................................................................................. 54
Extra Scenarios for WinPE .......................................................................................................................... 55
Troubleshooter .................................................................................................................... 58

Copyright© 1994-2011 Paragon Software Group. All rights reserved.
Introduction
Paragon Rescue Kit™ 11 is an integrated set of powerful tools that is specially designed to tackle most of the problems
you might face while using PC. Its primary objective is to provide all the necessary facilities to get the system back on
track when it fails to boot or at least to retrieve valuable data from the failed hard disk. But that is not all the product
can be used for. With Rescue Kit 11 you can easily recover an accidentally deleted partition, clean user passwords for
Windows NT/2000/XP/Vista/2003/7/2008, securely utilize an outdated hard disk, etc.
In this manual you will find the answers to many of the technical questions, which might arise while using the program.
Our company is constantly releasing new versions and updates to its software, that's why
images shown in this manual may be different from what you see on your screen.
What’s New in Rescue Kit 11
The updated P2P Adjust OS Wizard to successfully start up a Windows physical system on a different hardware
platform (P2P) by allowing injection of all required drivers and the other actions crucial for this type of
migration. Including the third generation of Paragon’s Adaptive Restore™ technology, it now can:
- Analyze all installed drivers inside a target system to report on devices without drivers.
- Search for and install lacking drivers from the built-in Windows repository.
- Notify the user about boot critical devices without drivers (HDD/RAID controllers, etc.), automatically
prompting to provide a path to a driver repository.
- Name all devices according to their model description, not some alphanumeric code, which requires
additional deciphering.
- Determine and install drivers not only for boot critical devices, but for physically connected NICs as well.
Boot Corrector for WinPE to fix most of the system boot problems not only with the Linux and PTS DOS
bootable recovery environments, but WinPE 3.0 as well.
The latest Linux kernel to enjoy support of a wider range of hardware configurations, including the brand new
Intel ICH9 chipset.
WinPE 3.0 based bootable recovery environment to enjoy support of a wider range of hardware configurations
with the option to add drivers for specific hardware on-the-fly.
Support for exFAT (Extended File Allocation Table) file system (backup, restore) developed by Microsoft
Corporation particularly for flash storages. It supports drives up to 16 exbibytes, files much larger than 4GB,
larger cluster sizes, etc.
Better support for 64-bit platforms to reboot your computer to one of the three special modes (Windows
native, Linux, or DOS) to automatically complete operations, which cannot be accomplished under 64-bit
Windows.
Better support for GUID Partition Table (GPT) to back up and restore not only single GPT volumes but entire
disks, including the option of resize during the restore operation.
Better support for the Apple Boot Camp Configuration with the option not only to back up and restore this kind
of configurations, but to copy single volumes or entire disks with resize.
Better support for Linux ExtFS starting from Ext2FS up to the brand new Ext4FS.
AFD (Advanced Format Drive) ready.
Support of 2TB+ and non-512B sector size drives.

Copyright© 1994-2011 Paragon Software Group. All rights reserved.
USB 3.0 ready.
Product Components
In order to cope with different tasks, the product contains several components:
Linux/DOS based recovery environment is a multi-platform bootable media that enables to run utilities under
Linux or PTS DOS, and that way to get access to your hard disk for maintenance or recovery purposes. Both
platforms have their strong sides, for instance Linux can boast support of FireWire (i.e. IEEE1394) or USB
devices. It enables to burn CD/DVD disks. However there can be some difficulties with detecting new hardware.
DOS in its turn has no problems of that kind but is limited in features. The Linux/DOS recovery environment
requires no installation and can be of great help when the system fails to boot. Besides it offers a Windows XP
like environment.
WinPE based recovery environment. Especially for keen followers of Windows, our product also offers a WinPE
3.0 based bootable media. Unlike the Linux/DOS recovery environment it can boast an excellent hardware
support and the same interface as the Windows version can. However its system requirements are much
tougher.
Features Overview
This chapter dwells upon key benefits and technical highlights of the product.
Key Features
Let us list some of the key features:
A handy Launcher to easily find and run the required tasks.
Support of all present day techniques to store backup images:
- Backup to local mounted/unmounted (without drive letter assigned) partitions;
- Backup to an external mounted storage to provide for a higher level of data protection and system
independence;
- Backup to a special secured place on the hard disk called the Backup Capsule that has an independent system
layout (e.g. a separate partition) and will stay operable should the active file system be damaged. To avoid an
accidental removing or unauthorized access of the backup data, this partition is hidden and thus cannot be
mounted in the operating system;
- Backup to external media (CD/DVD) to guarantee a high level of data protection as long as the backup media is
kept secure;
- Backup to a network drive to stand a better chance of success in case of a hard disk failure;
Sector backup to save not only all on-disk information but also the system service structures. It is ideal for
making a backup image of an entire hard disk or system partitions to guarantee the operating system’s working
capability.
Restore an entire disk, separate partitions or only files you need from the previously created backup image.
Adaptive Restore to successfully migrate a Windows physical system to a different hardware platform (P2P) by
allowing automatic injection of all required drivers and the other actions crucial for a migration of this kind.
Undelete Partitions Wizard to recover an accidentally deleted partition.

Copyright© 1994-2011 Paragon Software Group. All rights reserved.
Registry Editor to view and modify settings of any Windows System Registry in the offline mode, i.e. when your
operating system has not been started up. It is organized just the way Windows built-in editor is, so you can feel
comfortable with it.
It is only available for the Linux/DOS recovery environment.
Password Cleaner to clean user passwords for Windows NT/2000/XP/Vista/7/2003/2008. With its help you can
easily change any user password, including Administrator's to a blank one, thus providing the possibility to
freely log in to your operating system. Even if your password has been encrypted with the Syskey utility, you can
still clean it up.
It is only available for the Linux/DOS recovery environment.
Data wiping to successfully destroy all on-disk information including the standard bootstrap code and other
system service structures.
Free space clearing to destroy any remnants of deleted files/directories left on disk without affecting the used
data.
File Transfer Wizard to make such operations as transferring of files/directories or burning of them to CD/DVD
as easy and convenient as possible. Providing access to Paragon backups as regular folders, it may also help to
replace corrupted data from a previously created image in case of an operating system failure.
Recovery Media Builder to create a bootable recovery media based on Linux/DOS or WinPE 3.0 on a CD, DVD
disc, or flash memory, which can later be used to boot and recover your computer in case of an operating
system failure. Moreover, with its help you can save data from partitions of your hard disk directly to compact
discs or burn ISO-images. The utility supports various formats of laser discs: CD-R/RW, DVD-R/RW, DVD+R/RW,
DVD-R, DVD+R double layer, Blu-ray and can handle multi-session burning.
Network Configuration Wizard to establish a network connection under Linux or WinPE either to save a backup
of a partition/hard disk or just several files on a network computer or retrieve a previously made backup from a
network computer for recovery purposes.
Boot Corrector to fix most of the system boot problems that can be a result of a human factor, program error or
a boot virus activity.
Supported Technologies
Along with using innovative technologies from outside, Paragon has developed a number of its own original
technologies that make its products unique and attractive for customers:
Paragon UFSD™ technology to browse partitions of any file system including hidden and unmounted, modify
and copy files and folders, etc.
Microsoft Dynamic Disk (simple, spanned, striped, mirrored, RAID-5) to offer more management flexibility
without the partition limitation of basic disks. Dynamic storage can be particularly beneficial for large-scale
businesses when dealing with many physical hard disks involving complex setup.
GUID Partition Table (GPT). It is the next generation of a hard disk partitioning scheme developed to lift
restrictions of the old MBR. GPT disks are now supported by Windows Vista/7, Server 2008, Mac OS X and Linux.
Supported File Systems
Full read/write access to FAT16/FAT32/exFAT partitions.

Copyright© 1994-2011 Paragon Software Group. All rights reserved.
Full read/write access to NTFS (Basic and all five types of Dynamic Disks) under Windows 95/98/ME, Linux and
PTS DOS. Compressed NTFS files are also supported.
Full read/write access to Ext2FS/Ext3FS/Ext4FS partitions under all versions of Windows, DOS 5.0 and later.
Limited read/write access to Apple HFS+ partitions.
Unfortunately, support of non-Roman characters for the HFS+ file system is unavailable at
the moment. The company is about to implement it in the nearest future.
Supported Media
Support of both MBR and GPT hard disks (2.2TB+ disks included)
IDE, SCSI and SATA hard disks
SSD (Solid State Drive)
AFD (Advanced Format Drive)
Non-512B sector size drives
CD-R, CD-RW, DVD-R, DVD+R, DVD-RW, DVD+RW, DVD-R, DVD+R double layer and also Blu-ray discs
FireWire (i.e. IEEE1394), USB 1.0, USB 2.0, USB 3.0 hard disks
PC card storage devices (MBR and GPT flash memory, etc.)
Getting Started
In this chapter you will find all the information necessary to get the product ready to use.
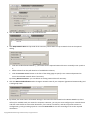
Contacting Paragon Software GmbH
If you have any questions about the company products, please do not hesitate to contact Paragon Software GmbH.
Service
Contact
Visit Paragon GmbH web site
www.paragon-software.com
Registration & updates web-service
www.paragon-software.com/support
Knowledge Base & Technical Support
kb.paragon-software.com
Pre-sale information
sales@paragon-software.com
System Requirements
Linux/DOS based recovery environment
To use the Linux/DOS recovery environment on your computer (it doesn’t matter what operating system is installed),
please make sure that it meets the following minimum system requirements:
IBM AT compatible computer with i486 or higher CPU
256 MB of RAM
SVGA-compatible monitor
Mouse (recommended)

Copyright© 1994-2011 Paragon Software Group. All rights reserved.
WinPE based recovery environment
To use the WinPE based recovery environment on your computer, (it doesn’t matter what operating system is installed),
please make sure that it meets the following minimum system requirements:
Intel Pentium III CPU or its equivalent, with 1000 MHz processor clock speed
At least 512 MB of RAM
SVGA-compatible monitor
Mouse (recommended)
Additional requirements
There may be additional requirements if you want to use advanced features:
Network card to send/retrieve data to/from a network computer
Recordable CD/DVD drive to burn data to compact discs
External USB hard drive to store backup data.
Booting from the Linux/DOS Recovery Media
The Linux/DOS recovery environment can be used to boot your computer into Linux or PTS DOS to get access to your
hard disk for maintenance or recovery purposes. It also has the PTS DOS safe mode, which may help in a number of non-
standard situations such as interfering hardware settings or serious problems on the hardware level. In this case, only
basic files and drivers (such as hard disk drivers, a monitor driver, and a keyboard driver) will be loaded.
Startup
To start working with the Linux/DOS recovery environment, please take the following steps:
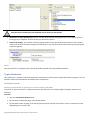
1. Start up the computer from our Linux/DOS recovery media.
2. Launch a boot mode you need (Normal, Safe, Low-Graphics Safe) in the Boot menu.
By default the Normal Mode will be automatically initiated after a 10 second idle period.
3. Click on the required operation to start. Hints on the selected at the moment item will help you make the right
choice.
4. Consult the help system by pressing ALT+F1 to know more on the subject.
Boot menu
The Boot menu contains the following commands:
Normal Mode. Boot into the Linux normal mode. This mode uses the full set of drivers (recommended);
Safe Mode. Boot into the PTS DOS mode. This mode can be used as an alternative of the Linux normal mode if it
fails to work properly;

Copyright© 1994-2011 Paragon Software Group. All rights reserved.
Low-Graphics Safe Mode. Boot into the PTS DOS safe mode. In this case, only the minimal set of drivers will be
included, like hard disk, monitor, and keyboard drivers. This mode has simple graphics and a simple menu;
Floppy Disk. Reboot the computer from a system floppy disk;
Hard Disk 0. Boot from the primary hard disk;
Find OS(s) on your hard disks. The program will scan hard disks of your computer to find any bootable operating
system.
To move within the menu, please use the arrow keys of the computer keyboard.
While working with the recovery environment you might experience some inconvenience
caused by possible video artifacts. It is just a result of changing video modes and in no way
will affect the program functionality. If this is the case, please wait a bit and everything will
be OK.
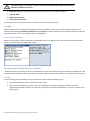
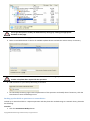
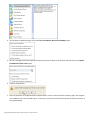
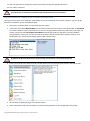
Normal Mode
When the Normal mode is selected, the Linux launch menu appears:
Hard Disk Manager (enables to copy and back up separate partitions or entire hard disks, carry out partitioning
operations, etc.);
Simple Restore Wizard (allows restoring hard disks and partitions);
Wipe Wizard (enables to destroy all on-disk information or only remnants of deleted files/directories);
File Transfer Wizard (allows coping files/folders to another disk or a partition as well as recording them to
CD/DVD);
Boot Corrector (helps to correct the Windows System Registry without Windows being loaded);
Undelete Partition (enables to recover an accidentally deleted partition);
Registry Editor (helps to view and modify settings of any Windows System Registry in the offline mode);
Password Cleaner (allows cleaning user passwords for Windows NT/2000/XP/Vista/7/2003/2008);
Network Configurator (enables to establish a network connection under Linux);

Copyright© 1994-2011 Paragon Software Group. All rights reserved.
If you are going to use network resources, first launch the Network Configuration Wizard to
establish a network connection.
Log Saver (helps to collect and send the necessary log files to the Technical Support);
Eject CD/DVD;
Reboot the computer;
Power off the computer.
To move within the menu, please use the arrow keys of the computer keyboard.
Safe Mode
When the Safe mode is selected, the PTS DOS launch menu appears. It has nearly the same functionality as for the
Normal mode except the Network Configurator and Log Saver commands. Besides due to certain limitations of the PTS
DOS environment, there is no possibility to burn CD/DVD discs.
Low Graphics Safe Mode
When the Low Graphics mode is selected, the PTS DOS launch menu appears. It has the same functionality and looks
similar to the Safe mode but graphically simpler.
Booting from the WinPE Recovery Media
The WinPE recovery environment can be a real alternative to the Linux/DOS recovery environment. Providing nearly the
same level of functionality it offers an excellent hardware support and the same interface as the Windows version does.
Startup
To start working with the WinPE recovery environment, please take the following steps:
1. Start up the computer from our WinPE recovery media.
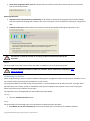
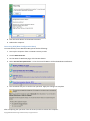
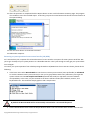
2. Once it has been loaded, you will see the License Agreement. Read the agreement and then mark the
appropriate checkbox to accept. If you do not agree with any conditions stated there, you won’t be able to use
the program.

Copyright© 1994-2011 Paragon Software Group. All rights reserved.
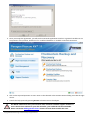
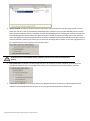
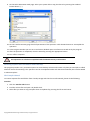
3. Once you accept the agreement, you will see the Universal Application Launcher. In general it enables to run
components of the product, load drivers for undefined hardware or establish a network connection.
4. Click on the required operation to start. Hints on the selected at the moment item will help you make the right
choice.
5. Consult the help system by pressing ALT+F1 to know more on the subject.
Our WinPE 3.0 based recovery environment offers excellent hardware support. However in
case it doesn’t have a driver for your disk controller, your hard disks will be unavailable.
Please consult the Adding specific drivers scenario to know how to tackle this issue.

Copyright© 1994-2011 Paragon Software Group. All rights reserved.
Basic Concepts
This chapter explains terms and ideas that show how the program works. To understand these helps to obtain a general
notion of the operation performance and makes it easier for the user to operate the program.
System and Data Protection
The data protection issue is a growing cause of worrying for more and more people today. Indeed, it is hardly to find a
person who will be particularly happy when all precious information on the hard disk is irreversible lost as a result of its
malfunction. So how this tragedy can be prevented?
Full Sector Backups
A full sector-based backup image includes all contents of a partition or a hard disk at the moment of its creation. If you
roll back your system to the initial state on a regular basis, that’s exactly what you’re looking for. But if you want to have
multiple backup archives of the same partition reflecting certain time stamps, unchanged data will inevitable be
duplicated in all archives and take additional space on backup media.
Backup Storage
Our program supports all present day techniques of storing backup images. Let’s take a closer look at them all to
understand what kind of storage is able to provide better security:
You can place a backup image to a local mounted or unmounted (without drive letter assigned) partition.
Despite the fact that it is the most convenient way, try not to use it. You can delete your backup just by accident
or lose it as a result of a hardware malfunction, or a virus attack;
You can place a backup image to an external mounted storage to provide for a higher level of data protection
and system independence;
You can place a backup image to a special secured place on the hard disk called the Backup Capsule that has an
independent system layout (e.g. a separate partition) and will stay operable should the active file system be
damaged. To avoid an accidental removing or unauthorized access of the backup data, this partition is hidden
and thus cannot be mounted in the operating system. However it won’t help you in case of a hardware
malfunction;
You can place a backup image to external media (CD/DVD) to guarantee a high level of data protection as long
as the backup media is kept secure;
You can place a backup image to a network drive to stand a better chance of success in case of a hard disk
failure. Moreover, by storing it on a special-purpose server you may be pretty sure nothing will happen to it;
Adaptive Restore
Technology Background
Windows family operating systems are notorious for their excessive sensibility to hardware, especially when it turns to
replacement of such a crucial device as HDD controller or motherboard – actually Windows will most likely fail to boot
as a result of this operation.
In 2008 our company came with an exclusive technology called Paragon Adaptive Restore™. Initially aimed at restore of
Windows Vista or Server 2008 from a backup to a different hardware configuration, its current realization, available in
the P2P Adjust OS Wizard, enables to make any Windows since XP bootable on dissimilar hardware by allowing
automatic injection of all required drivers and the other actions crucial for this type of migration.
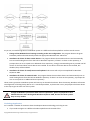
Technology Concept
Let’s take a closer look at how Paragon Adaptive Restore works.

Copyright© 1994-2011 Paragon Software Group. All rights reserved.
As you see, successful migration of a Windows system to a different hardware platform involves several actions:
1. Change of the Windows kernel settings according to the new configuration. The program detects the given
hardware profile and automatically installs the appropriate Windows HAL and kernel.
2. Installation of drivers for boot critical devices. The program detects those without drivers and automatically
tries to install lacking drivers from the built-in Windows repository. If there’s no driver in the repository, it
prompts the user to set a path to an additional driver repository, strongly recommending not to proceed until all
drivers for the found boot critical devices are installed. In case drivers for these devices are installed, but
disabled, they will be enabled.
3. Installation of drivers for a PS/2 mouse and keyboard. This action will only be accomplished for Windows
XP/Server 2003.
4. Installation of drivers for network cards. The program detects those without drivers and automatically tries to
install lacking drivers from the built-in Windows repository. If there’s no driver in the repository, it prompts the
user to set a path to an additional driver repository.
These actions guarantee a Windows system will start up on dissimilar hardware. After the startup, Windows will initiate
reconfiguration of all Plug'n'Play devices. It’s a standard procedure, so please don’t worry and prepare the latest drivers
at this step to get the most out of the system.
Though all Windows systems have built-in driver repositories, please be prepared to have
additional drivers when dealing with Windows XP/Server 2003, because for these systems
they are very modest.
Technology Application
Let’s consider a number of situations when the Adaptive Restore technology can help you out:
If you need to migrate to a different hardware platform with minimal effort

Copyright© 1994-2011 Paragon Software Group. All rights reserved.
If you need to upgrade hardware while keeping all programs and settings intact
If you need to replace failed hardware and cannot find an exact match for original system specifications
Known Issues
1. After transferring Microsoft Vista and later versions to different hardware, you will need to re-activate license of
the system. It’s normal behavior as these systems keep tracking any change of hardware. Re-activation is legally
justified in this case, as you transfer your system to another PC.
2. If you’ve installed several operating systems on one partition, we can only add drivers to the latest version of
OS. Microsoft highly recommends that you install an operating system on a separate partition.
3. Please note drivers are not cached during selection. That’s why if you select a driver to add to the system, but
it’s already unavailable during the operation, the program will end the operation with an error.
Data Sanitization
Data security is a two-sided problem. It is to be made clear, that providing confidentiality implies not only information to
be stored properly, but also be destroyed according to certain rules. The first step to protecting yourself is to know
exactly which security precautions work and which do not.
Many people believe the misconception that repartitioning a disk will result in complete destruction of its contents.
Actually that is not quite so. Repartitioning the drive only alters references to partitions in the Partition Table, leaving all
file data intact. In fact, there are a number of programs available to successfully recover previously deleted partitions.
Formatting a drive also does not guarantee data destruction. Formatting procedure implies modification of the Master
File Table (MFT) that keeps track of where file contents are stored on the disk and verification of each sector for
consistency. Even a low-level format does not actually erase the file contents for good, since they can still be
resurrected from their deleted state with minimal effort by using the popular today Magnetic Force Microscopy
technology.
The only way to make sure that all the data has been erased from a hard drive is to overwrite all on-disk sectors with
random patterns of ones and zeros. Although this sounds complex, there is an easy way to do this.
The process of deliberately, irreversibly removing or destroying the data stored on a memory device (magnetic disks,
flash memory drives, etc.) is generally known as Data Sanitization. A device that has been sanitized has no usable
residual data and even advanced forensic tools should not ever be able to recover it, thus providing maximum level of
security.
Data Backup and Rescue
In this chapter you will find all the information necessary to establish a reliable data protection system.
Postmortem Backup
By going through steps of the wizard, you configure all the necessary settings to launch the backup operation. To
minimize the possibility of making any mistake, the wizard provides auxiliary information on every single option.
Moreover you can get an in-depth description to any setting, control, or field of the wizard just by clicking the hint
button and then the object you need.
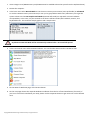
Startup
Click the Postmortem Backup button.
Setup
The wizard offers the following steps to accomplish the backup operation:

Copyright© 1994-2011 Paragon Software Group. All rights reserved.
The object to back up. You can back up either an entire disk or separate partitions of the disk (primary,
extended or logical). In case of backing up an entire disk, you’ve got the possibility to include into the image
such disk elements as the Master Boot Record (MBR) and the first track of the hard disk. This can be very helpful
for serious disk recovery procedures.
Backup destination. The wizard allows saving backup archives to local or network drives or burning them to
CD/DVDs. You need to select a destination, taking the estimated archive size and available space on the backup
destination into account.
Name and location of the resulted image. Provide a file name for the new image and its exact location. The
program automatically offers an easy to understand name containing the date and the time of the archive
creation, which can anyway be modified.
The program automatically calculates size of the future archive and informs the user about
space available on the selected destination.
Archive Comment. You can add some additional description to the archive that will later help to distinguish it
from the others.
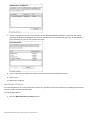
In addition, there is the possibility to make further detailed settings (although the default values will do in most cases).
To activate the advance mode, you need to mark the appropriate option on the second page of the wizard. When it is
marked, the next page enables to define:
Whether the archive integrity will be controlled.

Copyright© 1994-2011 Paragon Software Group. All rights reserved.
Checking archive integrity enables to guarantee that all backup images created with the
program are 100 percent flawless. Nevertheless if you decided not to control the archive
integrity, the backup operation would take about 3-5% less time.
Whether image file names will be set automatically in complex archives.
Compression level for the backup image (including the No compression variant).
Whether the archive will be split (if yes, you can set the maximum size for the archive files).
Splitting images enables to tackle issues caused by a file size limitation of some file
systems.
Whether the archive will be protected by password.
Whether the selected disk (or the selected partition) will be copied in the sector-to-sector mode (including
unused sectors as well).
Whether the OS auxiliary files (pagefile.sys, hyberfil.sys) will be included in the backup image.
Whether the operation will be performed without rebooting the system. The program needs to reboot the
system in order to have exclusive access to processing data. In a Windows environment this is difficult to
achieve because even when all the other applications are closed, the system service programs are still running.
However, there is a way to avoid rebooting. The mode of processing the backup operation without rebooting is
named Hot Processing. You can also define specific parameters for the Hot Processing mode.
The data to be automatically excluded from the resulted backup.
Result
After the backup operation is completed you receive an image of the selected disk (or the selected partition). This image
is placed into the specified destination, its features defined by the wizard.
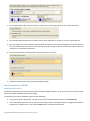
Postmortem Restore
Startup
Click the Postmortem Restore button.
Setup
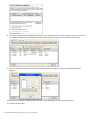
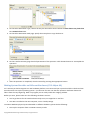
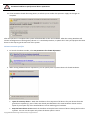
The wizard offers the following steps to accomplish the restore operation:
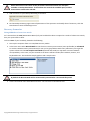
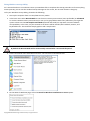
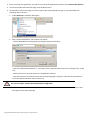
A backup image to be restored. The Browse for Archive page enables to find a backup image you need.
You can find the required image in the browser-like window. The section below (i.e. Archive File Details) will also
display a short description of the selected image.

Copyright© 1994-2011 Paragon Software Group. All rights reserved.
Moreover, on this page you’ve got the possibility to create new folders, delete existing files/folders or map
network drives by clicking the appropriate buttons.
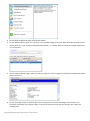
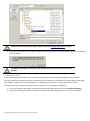
Sector Backup Restore
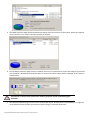
Data to restore. An item of the selected archive to be restored. The program allows you to restore not only an
entire archive, but also separate items of the archive. It is very convenient in case of restoring separate
partitions from the entire disk archive.
A place to restore. Selecting the destination, please note - all contents on the disk selected for restoring
purposes will be deleted during the operation.
To help you get a clear-cut picture of the operation outcome, the program allows inspecting the resulted disk
layout.
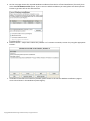
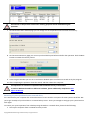
Restoring Partition:
Size of the restored volume and free space before and after it on the disk.

Copyright© 1994-2011 Paragon Software Group. All rights reserved.
Drive letter assignment after restore. The pull-down list contains vacant drive letters that can be associated
with the restored partition.
Restoring Hard Disk:
Copy data and resize partitions proportionally. If this option is activated, the program proportionally changes
the size of partitions keeping their relative order intact. The option can be useful when restoring to a larger hard
disk.
Perform surface test. Define whether the surface test will be accomplished during the operation or not.
All contents on the disk selected for restoring purposes will be deleted during the
operation.
Result
The wizard will restore the archived data, and make it available to use in the operating system.
To make a Windows bootable on different hardware, please additionally complete the P2P
Adjust OS Wizard.
Undeleting Partitions
When simply deleting a partition (without additional wiping) disk management software only removes references to it in
the Partition Table, thus leaving the possibility to recover it later.
The program enables to find and recover these partitions. A restored partition will be fully functional, as long as other
partitions were not created, moved or exceeded the disk space occupied by that partition. That is why the program
offers this function only for blocks of free space.
The operation can be accomplished with the Undelete Partition Wizard.
Startup
Click the Undelete Partition button.
Setup
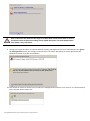
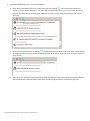
The wizard offers the following steps to accomplish the undelete partition operation:
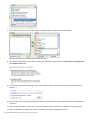
Free blocks to scan for lost partitions. Choose a free block from a tree-like list of available hard disks.

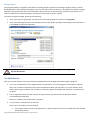
Copyright© 1994-2011 Paragon Software Group. All rights reserved.
Search method. By default, the wizard selects the fastest search method for your operating system. In most
cases that will do to find any accidentally deleted partition. However if you're under Windows XP for instance
(the Conventional Search option is selected), but the deleted partition you're looking for has been created with
the Disk Management utility under Vista, the wizard won't be able to find this partition, unless you manually
select the appropriate option (Quick Search for Partitions Created by Vista or Later OS). Moreover if the wizard
still fails to find the partition you need, you can select the Thorough Search option to scan every single sector in
the specified search area to get the most accurate results.
To know more on the available search methods, please use the context sensitive hint
system.
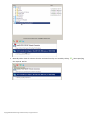
File system filter. By default, the wizard will search for all known file systems. However, by clicking on the
appropriate option on the second page of the wizard, you can specify only those file systems you need.
A partition to undelete (if several). By default, the program searches records of any deleted partition ever
existed on the selected block of free space. So you can get several partitions to choose from.

Copyright© 1994-2011 Paragon Software Group. All rights reserved.
Most likely the required partition will be found first. If so, you may abort the search operation by pressing the
Stop search button.
Result
After the operation is completed you receive a fully functional partition.
Wipe Tasks
In this chapter you will find all the information necessary to wipe a hard disk/partition of any file system or only destroy
any remnants of deleted files/directories left on disk without affecting the used data, thus providing high level of
security.
The operation can be accomplished with the Wipe Wizard or corresponding dialogs.
Wizard Startup
Click the Wipe Hard Disk or Partition button.
Wizard Setup
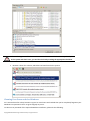
The wizard offers the following steps to accomplish the operation:
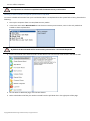
The hard disk/partition to wipe. Select a hard disk/partition the data of which you want to destroy.
Wipe mode. This section enables to switch between two options:
- Wipe out all data. Select the option to irreversibly destroy all on-disk data of the selected object.

Copyright© 1994-2011 Paragon Software Group. All rights reserved.
- Clear (wipe) free space. Select the option to destroy any remnants of deleted files/directories left on disk
without affecting the used data.
The Clear Free Space operation is available only for Logical and Primary partitions of known
file systems.
Wipe method. Here you can select a specific data erasure algorithm or create a customized method by marking
the appropriate option.
- In case you preferred to use a specific algorithm, the next page of the wizard enables to get detailed
information on the selected algorithm, choose whether to carry out residual data verification or not specifying
the percentage of sectors to check and estimate the time required to accomplish the operation.
- In case you preferred to create a customized algorithm, the next page of the wizard enables to define up to 4
wiping patterns, number of passes for each wiping pattern and for the group of patterns. The Mask spinner
control allows you to set a two-figure hexadecimal character value ("00" by default). The available range is from
"00" to "FF". You can also choose whether to carry out residual data verification or not specifying the
percentage of sectors to check.
Revise your changes. This page informs on all the actions to be made in the wizard in a bright, graphical form.
Wizard Result
After the operation is completed you can see a well informative summary page, providing structurally divided in-depth
information on all the actions made in the wizard.
The program also enables to store the resulted report. To do that, just press the Save button and choose the exact
location in the opened dialog.
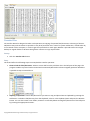
To make sure that all on-disk data is irreversibly destroyed call the Disk Viewer dialog by clicking the appropriate tab and
see it for yourself.
Page is loading ...
Page is loading ...
Page is loading ...
Page is loading ...
Page is loading ...
Page is loading ...
Page is loading ...
Page is loading ...
Page is loading ...
Page is loading ...
Page is loading ...
Page is loading ...
Page is loading ...
Page is loading ...
Page is loading ...
Page is loading ...
Page is loading ...
Page is loading ...
Page is loading ...
Page is loading ...
Page is loading ...
Page is loading ...
Page is loading ...
Page is loading ...
Page is loading ...
Page is loading ...
Page is loading ...
Page is loading ...
Page is loading ...
Page is loading ...
Page is loading ...
Page is loading ...
Page is loading ...
Page is loading ...
Page is loading ...
Page is loading ...
Page is loading ...
Page is loading ...
Page is loading ...
-
 1
1
-
 2
2
-
 3
3
-
 4
4
-
 5
5
-
 6
6
-
 7
7
-
 8
8
-
 9
9
-
 10
10
-
 11
11
-
 12
12
-
 13
13
-
 14
14
-
 15
15
-
 16
16
-
 17
17
-
 18
18
-
 19
19
-
 20
20
-
 21
21
-
 22
22
-
 23
23
-
 24
24
-
 25
25
-
 26
26
-
 27
27
-
 28
28
-
 29
29
-
 30
30
-
 31
31
-
 32
32
-
 33
33
-
 34
34
-
 35
35
-
 36
36
-
 37
37
-
 38
38
-
 39
39
-
 40
40
-
 41
41
-
 42
42
-
 43
43
-
 44
44
-
 45
45
-
 46
46
-
 47
47
-
 48
48
-
 49
49
-
 50
50
-
 51
51
-
 52
52
-
 53
53
-
 54
54
-
 55
55
-
 56
56
-
 57
57
-
 58
58
-
 59
59


Paragon Rescue Rescue Kit 11 Professional User manual
- Category
- Backup recovery software
- Type
- User manual
Ask a question and I''ll find the answer in the document
Finding information in a document is now easier with AI
Related papers


Other documents
-
 Paragon Backup Backup & Recovery 11 Home User manual
-
 Paragon Drive Drive Copy 14 Professional User manual
-
 Paragon Hard Hard Disk Manager 14 suite User manual
-
 Paragon Hard Hard Disk Manager 14 Premium User manual
-
 Paragon Hard Hard Disk Manager 14 professional User manual
-
 Paragon Drive Drive Backup 10.0 Professional User guide
-
Vivitek NC1000US Operating instructions
-
 Paragon Backup Backup & Recovery 12 Home User guide
-
 Paragon Hard Hard Disk Manager 2011 Suite User guide
-
 Paragon Disk Disk Wiper 11 Professional Operating instructions


