M3 Mobile M3 POS Quick Start
- Category
- Handheld mobile computers
- Type
- Quick Start
This manual is also suitable for

www.m3mobile.co.kr
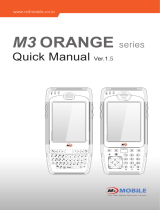
M3 POS
Quick Manual Ver.1.3

01
PACKAGE
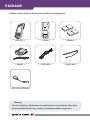
▪ Please check all items below are included in package box.
< M3 POS >
< Adaptor >
< DC to 24 pin Gender >
< Cradle >
< USB cable >
< Battery >
< Stylus pen >
※Warning
Use of controls or adjustments or performance of procedures other than
those specified herein may result in hazardous radiation exposure.

02
FEATURES
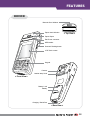
Barcode Scan Window
DEVICE
Paper check Window
Paper Output
Ear-Phone connector
Scanner/ Feeding button
LCD Touch screen
Keypad
MSR reader
Camera
Leather strap Hook
Battery Lock
Battery
Charging / Serial Port
< Top View >
< Front View >
< Rear View >

03
FEATURES
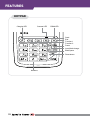
Numbers
Reset button
Back Space
Input Mode change
Power
End
Send
Charging LED Scanner LED CDMA LED
Function 1
Function 2
KEYPAD

04
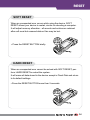
When an unexpected error occurs while using the device, SOFT
RESET allows your device to restart, similar to rebooting a computer.
It will adjust memory allocation - all records and entries are retained
after soft reset but unsaved data or files may be lost.
When an unexpected error cannot be solved with SOFT RESET, per-
form HARD RESET to restart the system.
It will erase all data stored in the device except in Flash Disk and return
to its default settings.
▪ Press the RESET BUTTON more than 5 seconds.
▪ Press the RESET BUTTON briefly.
SOFT RESET
HARD RESET
RESET

05
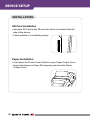
SD Card Installation
▪ Insert the SD Card to the SD card slot which is located at the left
side of the device.
▪ Check whether it is installed properly.
Paper Installation
▪ Push down the Printer Cover Switch to open Paper Output Cover.
▪ Insert rolled paper in Paper Slot properly and close the Paper
Output Cover.
INSTALLATION
DEVICE SETUP

06
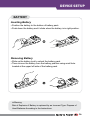
Inserting Battery
▪ Position the battery to the bottom of battery pack.
▪ Push down the battery and it clicks when the battery is in right position.
Removing Battery
▪ Slide up the battery lock to unlock the battery pack.
▪ Then remove the battery from the battery position using small hole
located at the upper left side of the battery pack.
BATTERY
DEVICE SETUP
※Warning
Risk of Explosion if Battery is replaced by an Incorrect Type. Dispose of
Used Batteries According to the Instructions.

07
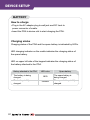
How to charge
▪ Plug in the AC adaptor plug to wall jack and DC Jack to
power connector of cradle.
▪ Insert the PDA to device slot to start charging the PDA.
Charging status
Charging status of the PDA and the spare battery is indicated by LEDs.
LED charging indicator on the cradle indicates the charging status of
the spare battery.
LED on upper left side of the keypad indicates the charging status of
the battery attached to the PDA.
BATTERY
DEVICE SETUP
Battery attached to the PDA
LED color Spare battery
The battery is being
charged.
RED
The spare battery is
being charged.
The battery is fully
charged.
GREEN
The spare battery is fully
charged.

08
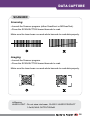
DATA CAPTURE
※Warning
LASER LIGHT - Do not stare into beam, CLASS 2 LASER PRODUCT
1.0mW, MAX OUTPUT:650nM
Scanning
▪ Launch the Scanner program (either ScanEmul or M3ScanTest).
▪ Press the SCAN BUTTON toward barcode to read.
Imaging
▪ Launch the Scanner program.
▪ Press the SCAN BUTTON toward barcode to read.
Make sure the laser beam covered whole barcode to read data properly.
Make sure the laser beam covered whole barcode to read data properly.
SCANNER

09
DATA CAPTURE
▪ Run the Camera program.
▪ Tab the Capture button to take a picture.
▪ Taken pictures are stored in Photo folder.
(My Device\Flash Disk\Camera\Photo)
* Video function is not supported in M3 POS.
CAMERA
※Warning
It may cause significant damage to your eyes if you directly look the flash
attached at camera module.

010
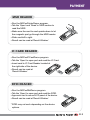
PAYMENT
▪ Run the M3PosPrinterDemo program.
▪ Tab the ‘Open’ and ‘Read’ in MSR section to
read the MSR.
▪ Make sure the card to read upside-down to let
the magnetic part go through the MSR reader.
▪ Slide card left to right.
▪ Result can be read at ‘Result Window’.
▪ Run the M3PosICCardDemo program.
▪ Tab the ‘Open’ to open port and read the IC Card.
▪ Insert card to IC Card Reader located at
the right side of the device.
▪ Result can be read at
‘Result Window’.
▪ Run the M3PosRfidDemo program.
▪ Tab the ‘Open’ to open port and read the RFID.
▪
Approach card to around LCD panel of the device.
▪ Result can be read at ‘Result Window’.
* RFID may not work depending on the device
options.
MSR READER
IC CARD READER
RFID READER

011
SERVICES AND SUPPORT
Should you require any services or technical support on M3 Mobile’s
products, contact your supplier or visit M3 Mobile technical support
webpage http://support.m3mobile.co.kr. Desired or relevant manuals
can be downloaded from Manuals or FAQ in technical support webpage.
User manual, especially, is included in Flash Disk so that M3 POS users
can obtain it from the Flash Disk as well.
For DOA or RMA, please send the defective product to suitable address
AFTER consulting the supplier.
Please download the ActiveSync from Microsoft webpage to
activesync with PC.
ActiveSync :
http://www.microsoft.com/downloads/en/details.
aspx?FamilyID=9e641c34-6f7f-404d-a04b-dc09f8141141
Windows Mobile Device Center (Windows Vista and 7) :
http://www.microsoft.com/windowsphone/en-us/howto/wp6/sync/
installing-wmdc.aspx
SYNCHRONIZE with YOUR PC

012
MEMO

013
MEMO

014
MEMO

Headquarter/Service Center Production Center
M3 bldg., 735-45,
Yeoksam-Dong, Gangnam-gu,
Seoul, 135-080, Korea
Tel : +82 2 574 0037
Fax : +82 2 558 1253
www.m3mobile.co.kr
Chun-ui Techno Park 201-610,
202, Chun-ui Dong, Won-Mi gu,
Buchoen, Gyeonggi Do,
Tel: +82 32 623 0030
Fax: +82 32 623 0035
Copyright©2000 – 2011 M3 Mobile Co., Ltd. All Rights Reserved.
420-857, Korea
-
 1
1
-
 2
2
-
 3
3
-
 4
4
-
 5
5
-
 6
6
-
 7
7
-
 8
8
-
 9
9
-
 10
10
-
 11
11
-
 12
12
-
 13
13
-
 14
14
-
 15
15
-
 16
16


M3 Mobile M3 POS Quick Start
- Category
- Handheld mobile computers
- Type
- Quick Start
- This manual is also suitable for
Ask a question and I''ll find the answer in the document
Finding information in a document is now easier with AI
Related papers
-
M3 Mobile M3 T Quick start guide
-
M3 Mobile M3 Black Quick start guide
-
M3 Mobile M3 Smart Quick Start
-
-
 M3 M3 Orange Quick Start
-
-
-
-
-

Other documents
-
 M3 Orange Quick Manual
-
 M3 Orange User manual
-
DT Research DT430 User guide
-
Atid AB700 User manual
-
Kramer Electronics RK-WP6 Datasheet
-
Symbol MC9000-G User manual
-
DT Research WebDT 435 User manual
-
Datalogic J Series User manual
-
Datalogic Scanning Datalogic Jet User manual
-
Zebra MC92N0-G Owner's manual

