
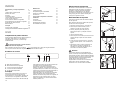
FREEZER
CONGELADOR
CONGELADOR
ZV 210 R
INSTRUCTION BOOKLET
LIBRO DE INSTRUCCIONES
MANUAL DE INSTRUÇÕES
2222 050-51

General Safety
¥ This appliance is designed to be operated by
adults. Children should not be allowed to tamper
with the controls or play with the product.
¥ It is dangerous to alter the specifications or modi-
fy this product in any way.
¥ Before any cleaning or maintenance work is car-
ried out, be sure to switch off and unplug the
appliance.
¥ This appliance is heavy. Care should be taken
when moving it
¥ ce lollies can cause frost burns if consumed
straight from the appliance.
Service/Repair
¥ Any electrical work required to install this appli-
ance should be carried out by a qualified electri-
cian or competent person
¥ This product should be serviced by an authorized
Service Centre, and only genuine spare parts
should be used.
¥ Under no circumstances should you attempt to
repair the appliance yourself. Repairs carried out
by inexperienced persons may cause injury or
more serious malfunctioning. Refer to your local
Service Centre, and always
Use
¥ The domestic refrigerators and freezers are
designed to be used specifically for the storage
of edible foodstuffs only.
¥ Frozen food must not be re-frozen once it has
been thawed out.
¥ ManufacturersÕ storage recommendations should
be strictly adhered to. Refer to relevant instruc-
tions.
¥ The inner lining of the appliance consists of
channels through which the refrigerant passes. If
these should be punctured this would damage
the appliance beyond repair and cause food loss.
DO NOT USE SHARP INSTRUMENTS to scrape
off frost or ice. Frost may be removed by using
the scraper provided. Under no circumstances
should solid ice be forced off the liner. Solid ice
should be allowed to thaw when defrosting the
appliance. See defrost instructions.
¥ Do not place carbonated or fizzy drinks in the
freezer as it creates pressure on the container,
which may cause it to explode, resulting in dam-
age to the appliance.
Installation
¥ There are working parts in this product which
heat up. Always ensure that there is adequate
ventilation as a failure to do this will result in
component failure and possible food loss. See
installation instructions.
¥ Care must be taken to ensure that the appliance
does not stand on the electrical supply cable.
Important: if the supply cord is damaged, it must
be replaced by a special cord or assembly avail-
able from the manufacturer or its service agent.
¥ Parts which heat up should not be exposed.
Wherever possible the back of the product
should be against a wall.
¥ If the appliance has been transported horizontal-
ly, it is possible that the oil contained in the com-
pressor flows in the refrigerant circuit. It is advis-
able to wait at least two hours before connecting
the appliance to allow the oil to flow back in the
compressor.
Environment Protection
This appliance does not contain gasses which
could damage the ozone layer, in either its
refrigerant circuit or insulation materials. The
appliance shall not be discarded together with
the urban refuse and rubbish. Avoid damaging
the cooling unit, especially at the rear near the
heat exchanger. Information on your local dis-
posal sites may be obtained from municipal
authorities. The materials used on this appliance
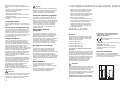
marked by the symbol are recyclable.
It is most important that this instruction book should be retained with the appliance for future refer-
ence. Should the appliance be sold or transferred to another owner, or should you move house and
leave the appliance, always ensure that the book is supplied with the appliance in order that the new
owner can be acquainted with the functioning of the appliance and the relevant warnings.
If this appliance featuring magnetic door seals is to replace an older appliance having a spring lock
(latch) on the door or lid, be sure to make that spring lock unusable before you discard the old appli-
ance. This will prevent it from becoming a death-trap for a child.
These warnings are provided in the interest of safety. You must read them carefully before installing or
using the appliance.
WARNINGS
Printed on recycled paper2

3
Warnings 2
Use 3
Cleaning the interior 3
Control panel 3
Operation 3
Temperature regulation 4
Fast freezing 4
Warning light 4
Freezing fresh food 4
Storage of frozen food 4
Thawing 4
Ice-cube production 4
Cold accumulator 4
Hints 5
Hints for freezing 5
Hints for storage of frozen food 5
Maintenance 6
Periodic cleaning 6
Periods of no operation 6
Defrosting 6
Customer service and spare parts 7
Installation 7
Location 7
Electrical connection 7
Rear spacers 8
Door reversal 8
Cleaning the interior
Before using the appliance for the first time, wash
the interior and all internal accessories with luke-
warm water and some neutral soap so as to remove
the typical smell of a brand-new product, then dry
thoroughly.
Do not use detergents or abrasive
powders, as these will damage the finish.
CONTENTS
USE
This freezer has been marked with the symbol, which means that it is suited to the freezing of fresh
foods, the conservation of frozen foods and the production of ice-cubes.
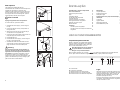
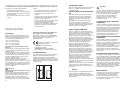
The control panel
E
DCB
A
0
6
5
4
3
2
1
A. N/S knob
B. Thermostat knob
C. Function indicator light
D. Quick-freezing indicator light
E. Temperature alarm light
Operation
Insert the plug into the wall socket. The pilot light
will light up, indicating that the appliance is in
operation.
To stop the appliance, turn the thermostat knob to
position Ç
0
È.
2222 050-51
22
Espa•adores traseiros
Dentro do envelope de pl‡stico juntamente com toda
a documenta•‹o relativa ao electrodomŽstico,
tambŽm existem dois espa•adores para inserir nos
furos apropriados, que se encontram nas traseiras
do aparelho. Inserir os espa•adores nos furos
antepostos, assegurando-se que a seta (A) esteja
orientada no sentido que demonstra a Ilustra•‹o.
Sucessivamente rod‡-los de 45¡ (seta (A) na
direc•‹o vertical) atŽ que se bloqueiem na posi•‹o
correcta.
Reversibilidade da porta
Desligue o aparelho da corrente antes de efectuar
qualquer opera•‹o. Para mudar o sentido de
abertura da porta proceda da seguinte maneira:
1. desmontar a dobradi•a inferior (1), e o pŽ (2);
2. retirar a porta do perno (G), desaparafusar este e
voltar a aparafus‡-lo no lado oposto;
3. desaparafusar o pŽ anterior esquerdo (3) e voltar
a aparafus‡-lo no lado oposto;
4. desaparafusar, no lado anterior esquerdo, os dois
parafusos que disfar•am os furos para a fixa•‹o
da dobradi•a;
5. voltar a montar a porta;
6. voltar a montar a dobradi•a inferior (1), e o pŽ (2)
no lado oposto seguindo as indica•›es da figura;
7. inverter o puxador tirando primeiro as pe•as de
cobertura dos parafusos, aplicadas por engate.
Os furos n‹o utilizados s‹o disfar•ados por
pequenas tampas de pl‡stico que v•m dentro do
saco de acess—rios.
Aten•‹o
Depois de mudado o sentido de abertura da porta,
controre se a veda•‹o magnŽtica fica pegada ao
m6vel. Se a temperatura ambiente for fria (por ex.
no inverno) pode acontecer que a veda•‹o n‹o
pegue perfettamente ao m6vel. Nesse caso, pode
esperar pela natural recupera•‹o da veda•‹o ou
tornar mais r‡pido esse processo aquecendo a parte
interessada com um normal secador de cabelos.
G
D715 PIED/M
1
2
3
D162/1
PR60
A
45°

4
Temperature regulation
The temperature is automatically regulated and can
be increased to achieve a higher temperature
(warmer) by rotating the thermostat knob towards
minimum or reduced (colder) by rotating the knob
towards maximum. However, the exact setting
should be chosen keeping in mina that the
temperature inside the refrigerator depends on:
room temperature;
how often the door is opened;
the quantity of food stored;
location of appliance.
A medium setting is generally the most suitable.
To stop operation, simply turn the thermostat knob to
position Ç
0
È.
Fast freezing
For quick-freezing, turn the N/S knob (A) to the ÇSÈ
symbol. The quick-freezing indicator light (D) will
then light up.
Warning light
Warning light (E) lights up when the temperature
inside the freezer compartment has increased to a
value which might endanger the long-term storage of
food in the compartment. When the appliance is
switched on for the first time or when food is placed
in the compartment for freezing, it is normal for this
light to remain on until the temperature has reached
the level required for correct storage.
Freezing food
Set the freezer to quick-freezing operational status.
Wait at least 3 hours before introducing fresh foods
into the freezer if it has only recently been turned on.
If the freezer has already been working for some
time, turn the respective knob to the ÇSÈ position at
least 24 hours before introducing the food into the
freezer in order to ensure better freezing results.
This period of time may be shortened according to
the quantity of food. When quick-freezing is being
performed, the compressor works continuously,
employing all of its refrigerating power to the
maximum. Keep the knob as it is for another 24
hours after the introduction of the food into the
freezer and then return the knob to the ÇNÈ position.
Bear in mind the freezing capacity of your freezer;
that is, the maximum quantity of food that may be
frozen in 24 hours. This freezing capacity is 22 kg.
Distribute the packages in the two upper baskets.
Arrange the foods to be frozen in the upper
compartments. When the necessary freezing time
has elapsed, distribute the newly-frozen foods into
the drawers to free the compartments for new foods
to be frozen.
Important
When electrical current happens to be cut off, the
freezer door must not be opened. If the power failure
is short (up to 6-8 hours) and the freezer is full, there
is no risk that the food will spoil. If the power failure
lasts longer, the food must be consumed as rapidly
as possible, or otherwise cooked and re-frozen
again.
Note
On the inner door you will find a list of foods followed
by a number. These numbers indicate the maximum
period of time for which the food in question may be
conserved (in months).
Frozen food storage
When the freezer is being turned on for the first time,
or after a prolonged period of disuse, turn the N/S
knob to the Quick-freezing position and then wait at
least two hours before introducing the food to be
conserved. You may then return the knob to the ÇNÈ
position. This two-hour waiting period may be
avoided if the freezer has already been in operation.
Thawing out frozen foods
Frozen foods must be allowed to thaw out before
use either in the refrigerator (meat, poultry, fish, etc.)
or at room temperature (ali other foods) according to
the available time. Frozen products which come in
small-sized or separate packages may be cooked
directly without thawing; obviously, in this case, the
cooking time will fast a little longer.
Ice-cube production
Fill the trays with water to 3/4 of their height, to
permit the expansion of the ice, then put them in the
space below the quick-freezing compartment (see
the diagram). If the water in your area is rich in
minerai salts (limestone, in particular), we advise you
to use noncarbonated mineral water for the
production of ice cubes. The ice-cubes may be
shaken out of the plastic trays with a slight twist.
Cold accumulator
A cold accumulator is supplied in the freezer; this
increases the leght of time for which food will keep in
the event of the power failure or breakdown. It must
be placed in the top drawer.
21
Coloca•‹o
Coloque o aparelho longe de qualquer fonte de calor
(aquecimento, fog›es, ou raios solares demasiado
intensos). Para conseguir bons resultados, o
aparelho deve ser colocado num local onde a
temperatura seja compreendida entre
+18¡C e +43¡C (classe T);
+18¡C e +38¡C (classe ST);
+16¡C e +32¡C (classe N);
+10¡C e +32¡C (classe SN).
A classe Ž indicada na placa sinalŽtica.
Verifique que nas partes posterior, superior e inferior
o ar pode circular livremente. Para um melhor
funcionamento verifique que a parte superior t•m
pelo menos 100 mm de distancia de algum m—vel
suspenso por cima do aparelho (A). A solu•‹o
prefir’vel Ž indicada na Fig. B (sem m—vel). Um ou
v‡rios pŽs niveladores situados na base t•m a
fun•‹o de nivelar o aparelho correctamente.
Importante
Verifique se a tomada de corrente da parede est‡
em bom estado e apta a receber a ficha do fio de
alimenta•‹o do aparelho.
Esta œltima est‡ conforme ˆs normas em vigor e
possui uma entrada para a liga•‹o ˆ terra.
Essa ficha pode ser ligada a qualquer tomada de
corrente desde que esta tenha uma ponta de liga•‹o
ˆ terra. No caso em que a tomada n‹o tenha a
liga•‹o ˆ terra, ligar o aparelho a uma instala•‹o de
liga•‹o ˆ terra separada, conforme as normas em
vigor, consultandopara isso um tŽcnico
especializado.
A Casa Construtora declina toda e qualquer
responsabilidade no caso de esta norma contra
os acidentes n‹o ser cumprida e se verificarem
acidentes originados por deficiente liga•‹o ˆ
terra, ou falta dela .Este aparelho est‡ conforme
com a Directiva da C.E.E n¡ 87/308 de 2/6/87
respeitante ˆ supress‹o das interfer•ncias radio-
elŽctricas.
Este aparelho est‡ conforme as seguintes
Directrizes Comunit‡rias:
- 73/23 CEE 19/02/73 (Baixa Tens‹o) e sucessivas
modifica•›es;
- 89/336 CEE 03/05/89 (Compatibilidade
ElectromagnŽtica) e sucessivas modifica•›es.
Liga•‹o elŽctrica
Verifique, antes de ligar o aparelho, se a voltagem e
a frequ•ncia indicadas na placa sinalŽtica
correspondem ˆs da sua rede.
100 mm10 mm
10 mm
A
B
NP006
ASSISTæNCIA TƒCNICA E PE‚AS DE
SUBSTITUI‚ÌO
Caso o aparelho apresentar anomalias de
funcionamento, controle:
¥ se a ficha est‡ bem inserida na tomada de
corrente e se o interruptor da instala•‹o elŽctrica
est‡ fechado;
¥ se falta a energia elŽctrica;
¥ se os comandos est‹o na posi•‹o correcta;
¥ se, havendo sinais de ‡gua no fundo do
refrigerador, o orif’cio de escoamento da ‡gua de
descongela•‹o est‡ obstruido (veja cap’tulo
ÒDescongela•‹oÓ).
Ap—s esses controlos, se a anomalia de
funcionamento persistir, dirija-se ao Centro de
Assist•ncia TŽcnica mais pr—ximo.
Para uma interven•‹o sol’cita Ž importante, no
momento da chamada, indicar as refer•ncias
completas do aparelho, ou seja moderlo e
nœmero de sŽrie, que figuram no cart‹o da
garantia ou na placa sinalŽtica no interno do
aparelho, lado esquerdo em baixo.
INSTALA‚ÌO

5
Hints for freezing
¥ All products to be frozen must be fresh and of
excellent quality.
¥ Each freezing package must be adjusted to the
familyÕs consumption quantity in order to be used
just once.
¥ Small-sized freezing packages allow a more rapid
and uniform freezing.
¥ Do not forget that once frozen foods trave thawed
out, they spoil rapidly.
¥ Low-fat content foods are better conserved in the
freezer than those with higher fat content. Salt
(whenever present) reduces the duration of
satisfactory conservation.
¥ Foods to be frozen must be enclosed in air-tight
sacks or containers especially indicated for this
purpose.
¥ Close these sacks or containers tightly to
eliminate all air.
¥ Never piace bottles or cans of carbonated
beverages in the freezer. These might explode.
¥ Never introduce hot foods or liquids.
¥ Never fill the freezing sacks or containers with
covers to the brim.
¥ Do not consume certain products (popsicles, etc.)
immediately after removing them from the
freezer,because their extremely low temperature
might cause burns.
¥ Indicate the freezing date on every sack or
container as a means of controlling conservation
times.
¥ Never open the freezer door or introduce new
foods to be frozen whenever a Quick-freezing
phase is already in progress.
HINTS
Hints for storage of frozen food
¥ Always check the preparation date indicated on
the frozen foods you buy and respect the
expiration time provided by the producer.
¥ Do not open the freezer door too often and leave
it open only for the minimum time necessary.
Unnecessary increases in temperature will
notably reduce the duration of the frozen food
conservation.
¥ Make sure that all frozen food packages are
intact; otherwise the food may trave spoiled.
¥ If such packages present signs of swelling or
humidity marks, this means that the food has not
been conserved correctly, implying that the
product has lost some of its original quality.
¥ When buying frozen foods, carry them in a
thermally insulated shopping bag whenever
possible. In any case, always purchase frozen
foods at the end of your shopping. Wrap the
frozen foods in newspaper and then put them into
the freezer as soon as you arrive home.
¥ Always check the frozen foods you buy carefully
at the moment of purchase, because even
partiallythawed foods must not be re-frozen but
must be consumed within 24 hours of purchase.
20
Antes de qualquer interven•‹o no
aparelho, aconselhamos que se desligue a
tomada de corrente.
Limpeza peri—dica
Lave as paredes e acess—rios com ‡gua tŽpida e
bicarbonato de soda. Enxague e segue
cuidadosamente.
Paragem prolongada
No caso de se ausentar por um per’odo prolongado,
desligue a tomada de corrente, esvazie, degele e
limpe o aparelho.
Mantenha as portas entre-abertas durante toda a
n‹o utiliza•‹o, para facilitar a circula•‹o do ar no
interior e evitar a forma•‹o de cheiros
desagrad‡veis.
Remo•‹o de gelo
O compartimento congelador cobre-se
progressivamente de gelo. Este deve ser eliminado
com um raspador de pl‡stico fornecido com o
aparelho, quando ultrapassar 4 mm.
Para efectuar esta opera•‹o n‹o Ž necess‡rio
desligar o aparelho nem retirar os alimentos do
congelador.
Recomendamos que fa•a esta opera•‹o quando o
congelador n‹o estiver multo carregado.
Para uma descongela•‹o completa proceda da
seguinte forma:
1. Retire todos os alimentos, envolva-os em varias
folhas de papel de jornal e coloque-os no lugar
mais frio que possuir.
2. Desligue o aparelho ou coloque o term—stato na
posi•‹o ÒOÓ.
3. Deixe a porta do compartimento aberta.
4. Coloque o raspador na parte central inferior,
como se indica na figura e coloque por baixo um
recipiente para a ‡gua de descongela•‹o
escorrer.
5. Acabada a opera•‹o seque as superf’cies
cuidadosamente.
6. Conserve o raspador de pl‡stico para utiliza-lo
futuramente.
7. Ligue o aparelho e ponha o term—stato na
posi•‹o de congela•‹o r‡pida. Depois de duas
horas colo-tue os alimentos no congelador.
Importante
Nunca utilize objectos pontiagudos ou met‡licos
para ritirar o gelo.
D068
MANUTEN‚ÌO

6
MAINTENANCE
Unplug the appliance before carrying out
any maintenance operation.
Internal cleaning
Never use metal objects for clearing your appliance
as it may get damaged.
When performing a complete defrosting, wash the
internal surfaces of the freezer with lukewarm water
and bicarbonate; rinse and then accurately dry.
External cleaning
Wash the outer body with lukewarm water and soap.
Periodically use a clearing polish to keep the outer
body shining. Dust the condenser located behind the
freezer with a soft brush or a vacuum cleaner. An
excessive accumulation of dust might compromise
the freezerÕs efficiency.
Extended periods of non-operation
Whenever the freezer is not to be used for an
extended period of time, disconnect it from the wall
socket and empty and clean the freezer. Remember
to leave the door open for the entire period of time in
which the freezer is not to be used.
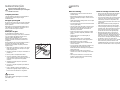
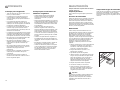
Defrosting
Scrape away the frost with the plastic scraper
provided with the freezer when this layer arrives to
approximately 4 mm in height. For this operation,
you do not need to unplug the freezer or remove all
frozen foods. Whenever the layer of frost exceeds 4
mm in thickness, you must proceed to a complete
defrosting. Take advantage of the periods when you
do not trave too much food in storage to do this by
proceeding as follows:
1. Empty the freezer and temporarily store the
frozen food removed in a cool place, wrapped in
several sheets of newspaper.
2. Set the thermostat to the ÇOÈ position or unplug
the freezer from the wall socket.
3. Keep the freezer door open.
4. Use the scraper together with a collecting tray
and insert it in the lower central part of the freezer
as shown in Figure.
5. The collecting tray should be positioned directly
below in order to receive the water which will exit
during defrosting. Afterwards, dry all freezer
surfaces with care.
6. Keep the scraper for future use.
7. Re-connect the plug and set the freezer to the
quickfreezing position. After two hours you may
replace the frozen foods previously removed.
Important
Never use knives or metal objects to scrape away
accumulated frost.
An increase in the surface temperature of the frozen
foods during defrosting will notable diminish the
duration of their conservation.
D068
19
CONSELHOS
Conselhos para a congela•‹o
¥ Para obter os melhores resultados na
congela•‹o dos alimentos, aconselhamos o
seguinte:
¥ Congele s— alimentos de —ptima qualidade,
frescos e bem limpos.
¥ Divida tudo em pequenas por•›es para facilitar a
rapidez de congela•‹o e permitir descongelar s—
as quantidades necess‡rias em cada ocasi‹o.
¥ Envolva os alimentos em papel de alum’nio ou
em pl‡stico aderente,verificando que estes
aderem perfettamente aos alimentos.
¥ Os alimentos por congelar t•m que estar
embalados em quantidades adequadas ao
consumo familiar, para serem utilizados de uma
s— vez.
¥ Os produtos depois de descongelados
deterioram-se r‡pidamente.
¥ Os alimentos magros conservam-se melhor que
os gordos.
¥ O sal reduz o tempo de conserva•‹o.
¥ N‹o introduzir no frigorifico alimentos ou l’quidos
quentes e n‹o encha completamente os
recipientes.
¥ Nunca ponha bebidas com g‡s no congelador,
pois estas podem explodir.
¥ Indique a data de congela•‹o em cada
embalagem, para controlar o per’odo de
conserva•‹o.
¥ N‹o abra a porta nem introduza novos alimentos
se estiver em curve a fase de congela•‹o r‡pida.
Conselhos para a conserva•‹o
dos alimentos congelados
¥ Coloque sempre a data de aquisi•‹o nos
alimentos e respeite sempre a validade dos
mesmos.
¥ N‹o abra a porta com multa frequ•ncia,
mantenha-a aberta apenas o tempo
indispens‡vel. Os aumentos desnecess‡rios de
temperatura diminuem o tempo de conserva•‹o
dos alimentos.
¥ Verifique se todos os alimentos est‹o em bom
estado de conserva•‹o, pois se isto se verificar
este alimento pode danificar todos os outros.
¥ Se alguma embalagem estiver abaulada ou
apresentar vest’gios de humidade, isto quer dizer
que o produto n‹o foi bem conservado e perdeu
as suas qualidades originais.
¥ Quando comprar alimentos congelados, leve um
seco tŽrmico para os transportar, e se poss’vel
compre estes alimentos depois de todos os
outros.
¥ Quando chegar a casa envolva os alimentos em
papel de jornal e coloque-os no congelador. Se
os alimentos que comprar estiverem total ou
parcialmente descongelados, n‹o se podem
congelar novamente e t•m que ser consumidos
dentro de 24 horas.

7
¥ Before calling your local dealer for servicing
assistance, check the following points to see if
you may not resolve the problem yourself:
¥ Make sure that the freezer is plugged into the
wall socket correctly, and that electrical current
arrives to the freezer without interruption.
¥ Control the thermostat setting.
¥ In the event that the freezer makes excessive
noise or vibration, make sure that it is not in direct
contact with the wall or adjacent furniture.
¥ If defective operation continues after these
controls, call your local Service Network and
provide all the data listed on the rating plate:
model, serial number, etc.
CUSTOMER SERVICE AND SPARE PARTS
INSTALLATION
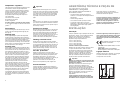
Location
The appliance should be installed well away from
sources of heat such as radiators, boilers, direct
sunlight etc. Best performance is obtained with
ambient temperature between
+18¡C and +43¡C(class T);
+18¡C and +38¡C (class ST);
+16¡C and +32¡C (class N);
+10¡C and +32¡C (class SN).
The class of your appliance is shown on its
rating plate.
Ensure that air can circulate freely around the back
of the cabinet. To ensure best performance, if the
appliance is positioned below an overhanging wall
unit, the minimum distance between the top of the
cabinet and the wall unit must be at least 100 mm
(A). Ideally, however, the appliance should not be
positioned below overhanging wall units (B).
Accurate levelling is ensured by one or more
adjustable feet at the base of the cabinet.
Important
It is essential that the appliance be connected to an
efficient earth tap. For this purpose the supply cable
plug incorporates a special earth contact. If the
sockets of your domestic wiring system are not
earthed, have the appliance connected to a separate
earth wire by a qualified electrician in accordance
with existing safety regulations.
The Manufacturer declines all responsibility if
the above safety precautions are not observed.
This appliance complies with EEC directive
number 87/308 of 2/6/87 relative to radio
interference suppression.
This appliance complies with the following
E.E.C. Directives:
- 73/23 EEC of 19.2.73 (Low Voltage Directive) and
subsequent mod)fications;
- 89/336 EEC of 3.5.89 (Electromagnetic
Compatibility Directive) and subsequent
modifications.
Electrical connection
Before plugging in, ensure that the voltage and
frequency shown on the serial number plate
correspond to your domestic power supply. Voltage
can vary by ±6% of the rated voltage.
100 mm10 mm
10 mm
A
B
NP006
18
Espere que a luz de alarme (E) se apague,
assinalando que o congelador atingiu a temperatura
ideal.
A posi•‹o correcta do term—stato selecciona-se de
acordo com os seguintes factores:
- Temperatura ambiente
- Frequ•ncia da abertura da porta
- Quantidade de alimentos que est‹o no aparelho
- Posi•‹o do aparelho
Para desligar o aparelho coloque o term—stato na
posi•‹o ÒOÓ.
Congela•‹o r‡pida
Para a congela•‹o r‡pida, gire o comando N/S (A)
atŽ ao s’mbolo ÒSÓ. Acende-se a luz de congelac‹o
r‡pida.
Luz de alarme da temperatura (E)
A luz de alarme acende-se automaticamente, cada
vez que a temperatura no interior do congelador
ultrapasse um certo valor, que poderia por em risco
uma boa conservac‹o dos alimentos. Depois de
ligar o congelador a luz de alarme ficar‡ acesa, atŽ
o congelador atingir a temperatura ideai para
conservar os alimentos.
Congelar alimentos
Ponha o congelador em congela•‹o r‡pida. Se
acabou de ligar o congelador deve esperar pelo
menos 3 horas antes de introduzir os alimentos
frescos. Se o congelador est‡ ligado a algum tempo,
ponha o comando na posi•‹o ÒSÓ pelo menos 24
horas antes de introduzir os alimentos, para
assegurar uma congela•‹o perfeita. Este per’odo de
tempo pode ser abreviado segundo a quantidade de
alimentos a congelar.Durante a congela•‹o o
compressor funciona no m‡ximo da sua potencia.
Mantenha o comando na mesma posi•‹o durante
mais 24 horas depois de ter introduzido os
alimentos. Depois ponha o comando na posi•‹o de
conserva•‹o normal.
Tenha em aten•‹o a capacidade de congela•‹o do
aparelho, isto Ž a quantidade m‡xima de alimentos
que se podem congelar em 24 horas (22kg./24h.).
Coloque os alimentos por congelar nos
compartimentos superiores, para que n‹o estejam
em contacto com produtos congelados, pois a
temperatura destes poderia aumentar.
Depois de decorrido o per’odo de congela•‹o,
coloque os alimentos recŽm congelados nas
gavetas, para deixar o espa•o livre para congelar
outros alimentos.
Importante
Se faltar electricidade n‹o abra a porta, pois se esta
falsa for breve (6 a 8 h.) os alimentos n‹o ficam
alterados. Caso contrario consuma-os brevemente
ou cozinhe-os e congele-os novamente.
Aten•‹o
Na parte de dentro da porta do congelador h‡ uma
tabela de alimentos.Na parte superior h‡ desenhos
de animais, seguidos da indica•‹o do per’odo
m‡ximo de conserva•‹o para cada alimento.
Conservar alimentos congelados
Quando ligar o congelador pela primeira vez, ou
depois de um prolongado per’odo sem funcionar,
coloque o comando N/S na posi•‹o de congela•‹o
r‡pida descrita anteriormente, e espere duas horas
antes de introduzir os alimentos no congelado.
Depois disto coloque o comando na posi•‹o de
conserva•‹o de congelados. Se o aparelho j‡
estiver a trabalhar n‹o necessita de esperar as
referidas duas horas.
Descongelar alimentos
congelados
Antes de utilizar os alimentos congelados pode
descongel‡-los no refrigerador ou ‡ temperatura
ambiente, de acordo com o tempo disponivel. Os
alimentos pequenos podem ser cozinhados
congelados, mas neste caso prolongue o tempo de
confec•‹o Os alimentos j‡ confeccionados e
embalados em pequenas por•›es podem cozinhar-
se sem serem descongelados mas o tempo de
confec•‹o ter‡ de ser maior do que o habitual.
Produ•‹o de cubos de gelo
O frigorifico tem uma ou mais cuvettes para a
produ•‹o de gelo. Encha as cuvettes de ‡gua
pot‡vel com 3/4 da sua altura e ponha-as no
congelador no compartimento de congela•‹o r‡pida.
Se a ‡gua da sua zona tem muitos minerais, Ž
aconselh‡vel que utilize uma ‡gua minerai para
fazer os cubos de gelo Para retirar os cubos de gelo
basta fazer uma ligeira press‹o no cuvette. Nunca
utilize objectos pontiagudos para libertar a cuvette
do gelo.
Massa eutŽctica
O seu aparelho Žsta provido de una massa
eutŽctica. A massa deve ser retirada do
compartimento congelador e colocada na posi•‹o
prevista.
Em caso de interrup•‹o da corrente, a massa
eutŽctica vai prolongar de algumas horas a
conserva•‹o dos produtos congelados.

8
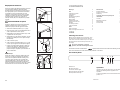
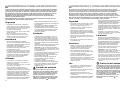
Rear spacers
The plastic bag containing all relevant
documentation also contains two rear wall spacers to
be fitted into special slots on the back of the
appliance. Fit the spacers into the slots, taking care
to ensure that the arrow (A) is positioned as shown
in the figure. Next, turn them through 45¡ (arrow in
vertical position) until they lock into place.
Door reversal
Unplug the appliance before all operations.
To reverse the door, proceed as follows:
1. dismantle the lower hinge (1), and the support
foot (2);
2. unscrew the left front foot (3) and reposition on
the opposite side;
3. slide the door out from pin (G),unscrew the pin
and reposition on the opposite side;
4. unscrew the two screws which mask the holes for
fixing the hinge from the left front side;
5. reassemble the door;
6. reassemble the lower hinge (1), and the support
foot (2) on the opposite side;
7. dismantle the handle and reassemble it on the
opposite side.Cover the holes left open with the
plugs contained in the documentation pack.
Warning:
After having reversed the opening direction of
the doors check that all the screws are properly
tightened and that the magnetic seal adheres to
the cabinet. If the ambient temperature is cold (i.e.
in Wõnter), the gasket may not fit perfectly to the
cabinet. In that case, wait for the natural fitting of the
gasket or accelerate this process by heating up the
part involved with a normal hairdrier.
G
D715 PIED/M
1
2
3
D162/1
PR60
A
45°
17
êNSTALA‚ÌO
Advert•nciase e conselhos importantes 16
Uso e funcionamiento 17
Limpeza das partes internas 17
Ligar 17
Congela•‹o r‡pida 18
Luz de alarme de temperatura 18
Congelar alimentos 18
Conservar alimentos congelados 18
Descongelar alimentos congelados 18
Produ•‹o de cubos de gelo 18
Massa eutŽctica 18
Conselhos 19
Conselhos para a congela•‹o 19
Conselhos para a coserva•‹o dos alimentos
congelados 19
Manuten•‹o 20
Limpeza peri—dica 20
Paragem prolongada 20
Remo•‹o de gelo 20
Assist•ncia tŽcnica e pe•as de substsui•‹o 21
Installa•‹o 21
Coloca•‹o 21
Liga•‹o elŽtrica 21
Distancias posteriores 22
Reversibilidade da porta 22
USO E FUNCIONAMIENTO
Limpeza das partes internas
Estando o aparelho convenientemente instalado,
antes de o utilizar, aconselhamos a sua limpeza
cuidadosa com ‡gua tŽpida e sab‹o neutro para
retirar o cheiro caracter’stico do ÒnovoÓ.
N‹o utilize detergentes ou p—s abrasivos,
que podem danificar os acabamentos.
Enxague e seque cuidadosamente.
Este congelador marcado com o s’mbolo que significa que est‡ apto para congelar alimentos
frescos, para conservar alimentos congelados (atŽ 3 meses), e para produzir cubos de gelo.
E
DCB
A
0
6
5
4
3
2
1
A - Comando N/S
B - Comando do term—stato
C - Indicador luminoso de funcionamento
D - Indicador luminoso de congela•‹o r‡pida
E - Indicador luminoso de alarme da temperatura
Ligar
Introduza a ficha na tomada mais pr—xima (a luz C
fica acesa, indicando que o congelador est‡ sendo
alimentado elŽctricamente). Gire o comando do
termdstato (A) para a diretta atŽ uma posi•‹o
intermŽdia (a luz (E) fica acesa).
Para obter uma perfetta conserva•‹o dos alimentos
congelados, a temperatura interior do congelador
tem que ser inferior a -18¡C.
Page is loading ...
Page is loading ...
Page is loading ...
Page is loading ...
-
 1
1
-
 2
2
-
 3
3
-
 4
4
-
 5
5
-
 6
6
-
 7
7
-
 8
8
-
 9
9
-
 10
10
-
 11
11
-
 12
12


Ask a question and I''ll find the answer in the document
Finding information in a document is now easier with AI
in other languages
- español: Zanussi ZV210R Manual de usuario
- português: Zanussi ZV210R Manual do usuário
Related papers
Other documents
-
CORBERO CV1240S/O User manual
-
Electrolux ERD3622 User manual
-
-
Electrolux ER7425D User manual
-
Zoppas PVF240E User manual
-
-
-
-
-