BrightLink
®
1485Fi/1485Fi+
EPSON is a registered trademark, EPSON Exceed Your Vision is a registered
logomark, and Epson iProjection is a trademark of Seiko Epson Corporation.
BrightLink and PrivateLine are registered trademarks of Epson America, Inc.
Windows is a registered trademark of Microsoft Corporation in the United States
and/or other countries.
Mac is a trademark of Apple Inc., registered in the U.S. and other countries.
Android is a trademark of Google LLC.
General Notice: Other product names used herein are for identification purposes
only and may be trademarks of their respective owners. Epson disclaims any and all
rights in those marks.
This information is subject to change without notice.
© 2019 Epson America, Inc., 9/19 CPD-57746R1
Printed in XXXXXX
Start Here
Your BrightLink projector is a productivity tool that allows you to project and interact with content or create a digital
whiteboard. This card will help you get started.
What can you do?
Interact with your computer
View your desktop and use the interactive pens as a
mouse.
Use your mobile device
Connect your mobile device and display your content
on the screen.
Project from any source
Import content from a connected device to your
whiteboard.
Start writing
Draw on the projected screen with the interactive pens
or your finger.
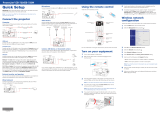
Interacting with your computer
1
Turn on the projector by pressing the power button
on the remote control or the projector control pad.
2
Connect an HDMI cable from the projector control
pad to your computer.
HDMI
3
Connect the USB cable from the projector control
pad’s USB-B port directly to any available USB port
on your computer.
USB-B
4
The default language of the menu system is English.
To select another language, press the Menu button on
the remote control. Select Management and
press . Select Language and press . Select your
language and press . Press the Menu or Esc button
to exit the menu system.
5
Display an image or open a web page from your
computer.
If your computer screen is not projected, see “Need help?”
on the back of this card.
Choosing the right tool
If you already have annotation software, you can use it
with your BrightLink projector. If you are using Microsoft
®
Office 2007 or later, you can also use the “inking tools”
to add handwritten notes to your documents and
PowerPoint
®
presentations.
Here are some tips on choosing from the tools that came
with your BrightLink projector:
Built-in
Toolbar
Easy
Interactive
Tools
No computer?
Use pen or finger as a
mouse
Use the board to draw
on computer content
Draw on board using
the computer
Use up to two pens
and six fingers
simultaneously*
Save whiteboard pages
in image, PDF, or
editable format
Save annotations as a
JPEG
Save annotations in
image, PDF, or editable
format
* Depending on operating system and connection
type. See the online BrightLink User’s Guide for more
information.
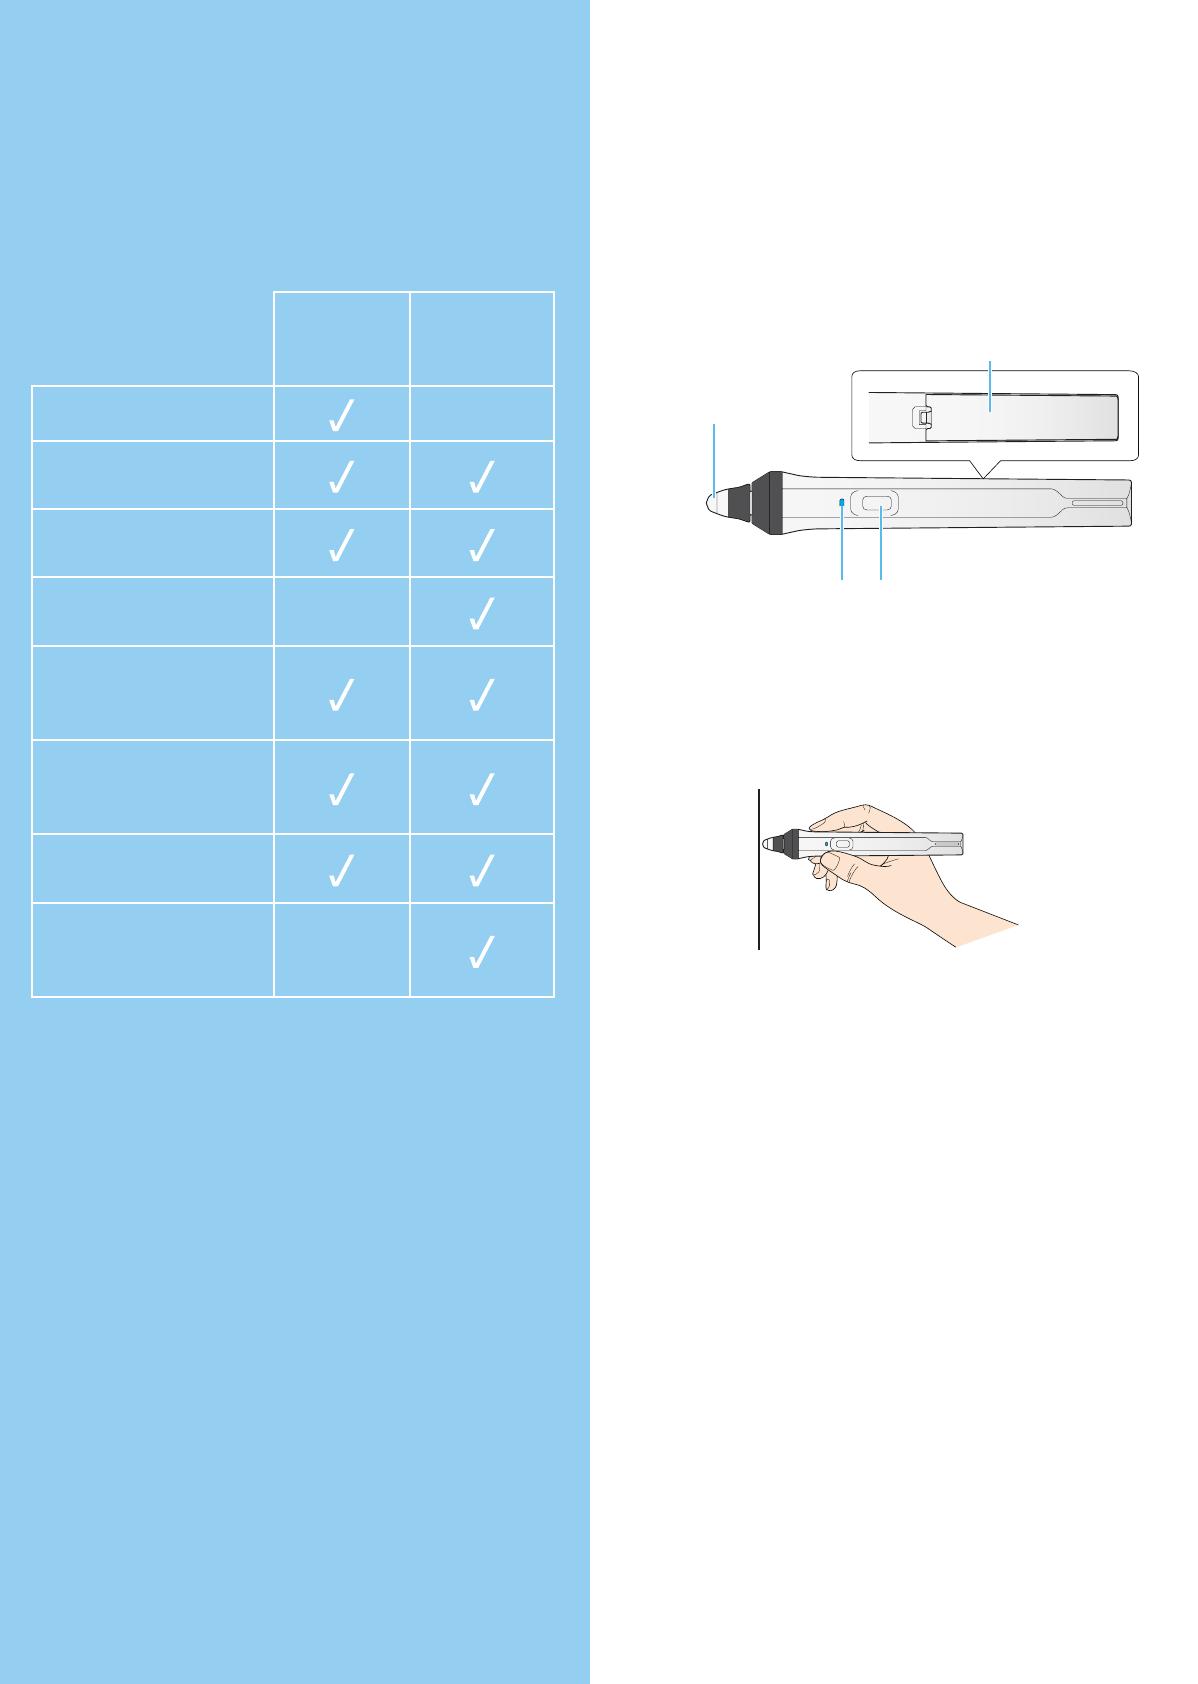
BrightLink interaction
Use the BrightLink interactive pens or your fingers to turn
almost any flat wall into an interactive area.
Interactive pens
Your projector came with 2 pens, one orange (Interactive
Pen A) and one blue (Interactive Pen B).
Make sure one AA battery is installed in each pen.
Battery
light
Button
Pen tip
(unscrew to replace)
Battery cover
•
To turn on the pen, pick it up. To check the battery,
press and hold the button. If the battery is low, the light
flashes.
•
Hold the pen perpendicular to the board when using it.
•
When you are finished using the pen, simply place it in
an area away from the projection screen.
Note: The pen turns off automatically after about
15 seconds of inactivity. Pick the pen up to turn it back on.
Finger touch
You can use your finger to perform the same functions
as the interactive pens. You can use either a pen or your
finger, or use both at the same time.
When performing finger touch operations, you can use up
to six fingers.
Note: The number of pen and finger touch inputs depends
on the interactive mode, operating system, and connection
type. See the online BrightLink User’s Guide for more
information.
Need help?
Calibration
If the cursor does not match your pen or finger location,
calibrate the pens and the finger touch unit. See the online
BrightLink User’s Guide for instructions.
Computer doesn’t project
If the image doesn’t appear after connecting a computer,
try one of the following:
•
On Windows 7 or later, hold down the Windows key
and press P at the same time, then click Duplicate.
•
On a Mac, you may need to open System Preferences
and select Displays. Click the Arrangement tab and
select the Mirror Displays checkbox.
•
See your computer’s documentation or help topics for
steps to extend or project your computer screen.
•
Try pressing the Source Search button on the remote
control.
•
Press the Home button on the remote control to
verify the source input and settings.
•
Make sure any video cables are securely connected.
Telephone support
The Epson
®
PrivateLine
®
service is for you! All you have to
do is call (800) 637-7661. This service is available for the
duration of your warranty period. You may also speak with
a projector support specialist by dialing (562) 276-4394
(U.S.) or (905) 709-3839 (Canada).
Support hours are 6 am to 8 pm, Pacific Time, Monday
through Friday, and 7 am to 4 pm, Pacific Time, Saturday.
Days and hours of support are subject to change without
notice. Toll or long distance charges may apply.
Online support
To access the online manuals, videos, FAQs, and more,
visit www.epson.com/brightlinkdownloads (U.S.),
www.epson.ca/brightlinkdownloads (Canada), or
www.epson.com.jm/support (Caribbean) and select
your product.