Polar Electro A360 User manual

Category
Activity trackers
Type
User manual
USER MANUAL
2
CONTENTS
Contents 2
Introduction 9
Polar A360 9
USB cable 10
Polar Flow App 10
Polar FlowSync Software 10
Polar Flow Web Service 10
Get started 11
Set up your A360 11
Choose one option for setup: computer or a compatible mobile device 11
Option A: set up with your computer 12
Option B: set up with polar flow app using your mobile device or tablet 13
Languages 14
Wristband 15
Menu structure 15
Activity 16
My day 16
Training 16
My heart rate 17
3
Favorites 17
Watch faces 17
Pairing 18
Pair a Heart Rate Sensor with A360 18
Settings 20
Display setting 20
Time of day setting 20
Settings 21
Display setting 21
Time of day setting 21
Restart A360 22
Reset A360 22
Firmware Update 22
With computer 22
With mobile device or tablet 23
Flight mode 23
Turn flight mode ON 23
Turn flight mode OFF 23
Control menu 23
Time view icons 24
Training 25
4
Wear your A360 25
Start a Training Session 26
Start a training session with a target 26
During training 27
Training views 27
Training with heart rate 27
Training with a duration or calorie based training target 28
Training with a phased training target 30
Pause/Stop a training session 30
Training Summary 31
After Training 31
Training summary in A360 31
Polar Flow App 33
Polar Flow Web Service 33
Features 34
24/7 Activity Tracking 34
Activity Goal 34
Activity data 34
Inactivity alert 35
Sleep information in the Flow web service and Flow app 35
Activity data in Flow App and Flow web service 36
5
Smart notifications (iOS) 36
Smart Notification Settings 36
Polar Flow mobile app 36
Do not disturb setting in Polar Flow app 37
Do not disturb setting on your A360 37
Phone settings 38
Use 38
Dismissing Notifications 38
The Smart Notifications Feature Works via Bluetooth Connection 39
Smart notifications (Android) 39
Smart Notification Settings 39
Setting the Smart Notifications on/off 39
Do not disturb setting in Polar Flow app 40
Do not disturb setting on your A360 40
Block apps 41
Phone settings 41
Use 42
Dismiss Notifications 42
The Smart Notifications Feature Works via Bluetooth Connection 42
Polar Sport Profiles 42
Polar Smart Coaching features 43
6
Smart Calories 43
Heart Rate Zones 43
Training Benefit 48
Alarm 49
Polar Flow app and Web Service 51
Polar Flow App 51
Pair a Mobile Device with A360 51
Polar Flow Web Service 52
Feed 52
Explore 52
Diary 52
Progress 53
Plan Your Training 53
Create a Training Target 53
Quick Target 53
Phased target 54
Favorites 54
Sync the Targets to your A360 54
Favorites 55
Add a Training Target to Favorites: 55
Edit a Favorite 55
7
Remove a favorite 55
Polar Sport profiles in Flow Web Service 56
Add a Sport profile 56
Edit a Sport Profile 56
Syncing 57
Sync with Flow mobile App 57
Sync With Flow Web Service Via FlowSync 58
Important Information 59
Taking Care of Your A360 59
Storing 60
Service 60
Batteries 60
Charging A360 battery 61
Battery Operating Time 62
Low Battery Notifications 63
Precautions 63
Interference 63
Minimizing Risks When Training 64
Technical Specification 65
A360 65
Polar FlowSync Software and USB Cable 66
8
Polar Flow Mobile Application Compatibility 66
Water Resistance 66
Limited International Polar Guarantee 67
Disclaimer 69
9
INTRODUCTION
Congratulations on your new A360! This waterproof fitness tracker has a wrist-based heart rate monitor,
unique Polar smart coaching features and smartwatch features like smart notifications and a color touch-
screen. With 24/7 activity measurement your new companion encourages you towards a more active and
healthier lifestyle. Get an instant overview of your daily activity on your A360 or with Polar Flow app. Together
with the Polar Flow web service and the Flow app your A360 helps you to understand how your choices and
habits affect your well-being.
This user manual helps you get started with your new A360. To check the video tutorials and the latest version
of this user manual, go to www.polar.com/support/A360.
1. Touchscreen
2. Button
l To activate the display: press the button or turn your wrist when you're wearing the fitness tracker.
l To change the watch face: tap and hold the display in time view, and swipe up or down. Then choose
one by tapping it.
POLAR A360
Track your activities in your everyday life and enjoy training with wrist-based heart rate. See how they benefit
your health and get tips on how to reach your daily activity goal. Follow your activity goal in your wrist and find
more details about your activity in Flow app or Flow web service. Use smart notifications if you want to stay
10
connected and get alerts from your phone directly to you wrist. Change the wristband and accessorize any out-
fit. You can buy additional wristbands separately.
USB CABLE
The product set includes a standard USBcable. You can use it for charging the battery and syncing data
between your A360 and Flow web service via FlowSync software.
POLAR FLOW APP
View your activity and training data at a glance. Flow app syncs your activity and training data wirelessly to
the Polar Flow web service. Get it on the App Store
SM
or Google play
TM
. You can start using your A360 also
with the Flow app and update your A360 wirelessly too.
POLAR FLOWSYNC SOFTWARE
Polar FlowSync syncs your data between your A360 and the Polar Flow web service on your computer. Go to
flow.polar.com/start to start using your A360 and to download and install the FlowSync software.
POLAR FLOW WEB SERVICE
Plan your training, follow your achievements, get guidance and see detailed analysis of your activity and train-
ing results. Let all your friends know about your achievements. Find all this at polar.com/flow.
11
GET STARTED
SET UP YOUR A360
When you get hold of your new A360, it’s in storage mode. It wakes up when you plug it into a computer for
setup or a USB charger for charging. We recommend that you charge the battery before you start using your
A360. If the battery is completely empty, it takes a couple of minutes for the charging to start. See Batteries
for detailed information on charging the battery, battery operating times and low battery notifications.
CHOOSE ONE OPTION FOR SETUP: COMPUTER OR A COMPATIBLE MOBILE DEVICE
You can choose how to set up your A360, with a computer and a USBcable or wirelessly with a compatible
mobile device. Both methods require an Internet connection.
l Mobile setup is convenient if you don't have access to a computer with a USB port, but it might take
longer.
l Wired setup is quicker and you can charge your A360 at the same time, but you need a USB cable and
computer available.
12
OPTION A: SET UP WITH YOUR COMPUTER
1. Go to flow.polar.com/start and install the FlowSync software to set up your A360 and update the firm-
ware if needed.
2. Push down the top part (A) of the USB cover inside the bracelet to access the micro USB port and plug
in the supplied USB cable (B).
Don't charge the device when its USB port is wet. If the USB port of your A360 has gotten wet,
let it dry up before plugging in.
3. Plug the other end of the cable into the USB port of your computer for setup and charging the battery
(C).
4. Then we’ll walk you through signing up for the Polar Flow web service and personalizing your A360.
To get the most accurate and personalized activity and training data, it’s important that you’re pre-
cise with the physical settings when signing up for the web service. When signing up, you can choose
a language and get the latest firmware for your A360.
When closing the USB cover, make sure it fits flush on the device.
13
After the setup is done, you’re ready to go. Have fun!
OPTION B: SET UP WITH POLAR FLOW APP USING YOUR MOBILE DEVICE OR TABLET
Polar A360 connects to the Polar Flow mobile app wirelessly via Bluetooth Smart, so remember to have it
turned on in your mobile device.
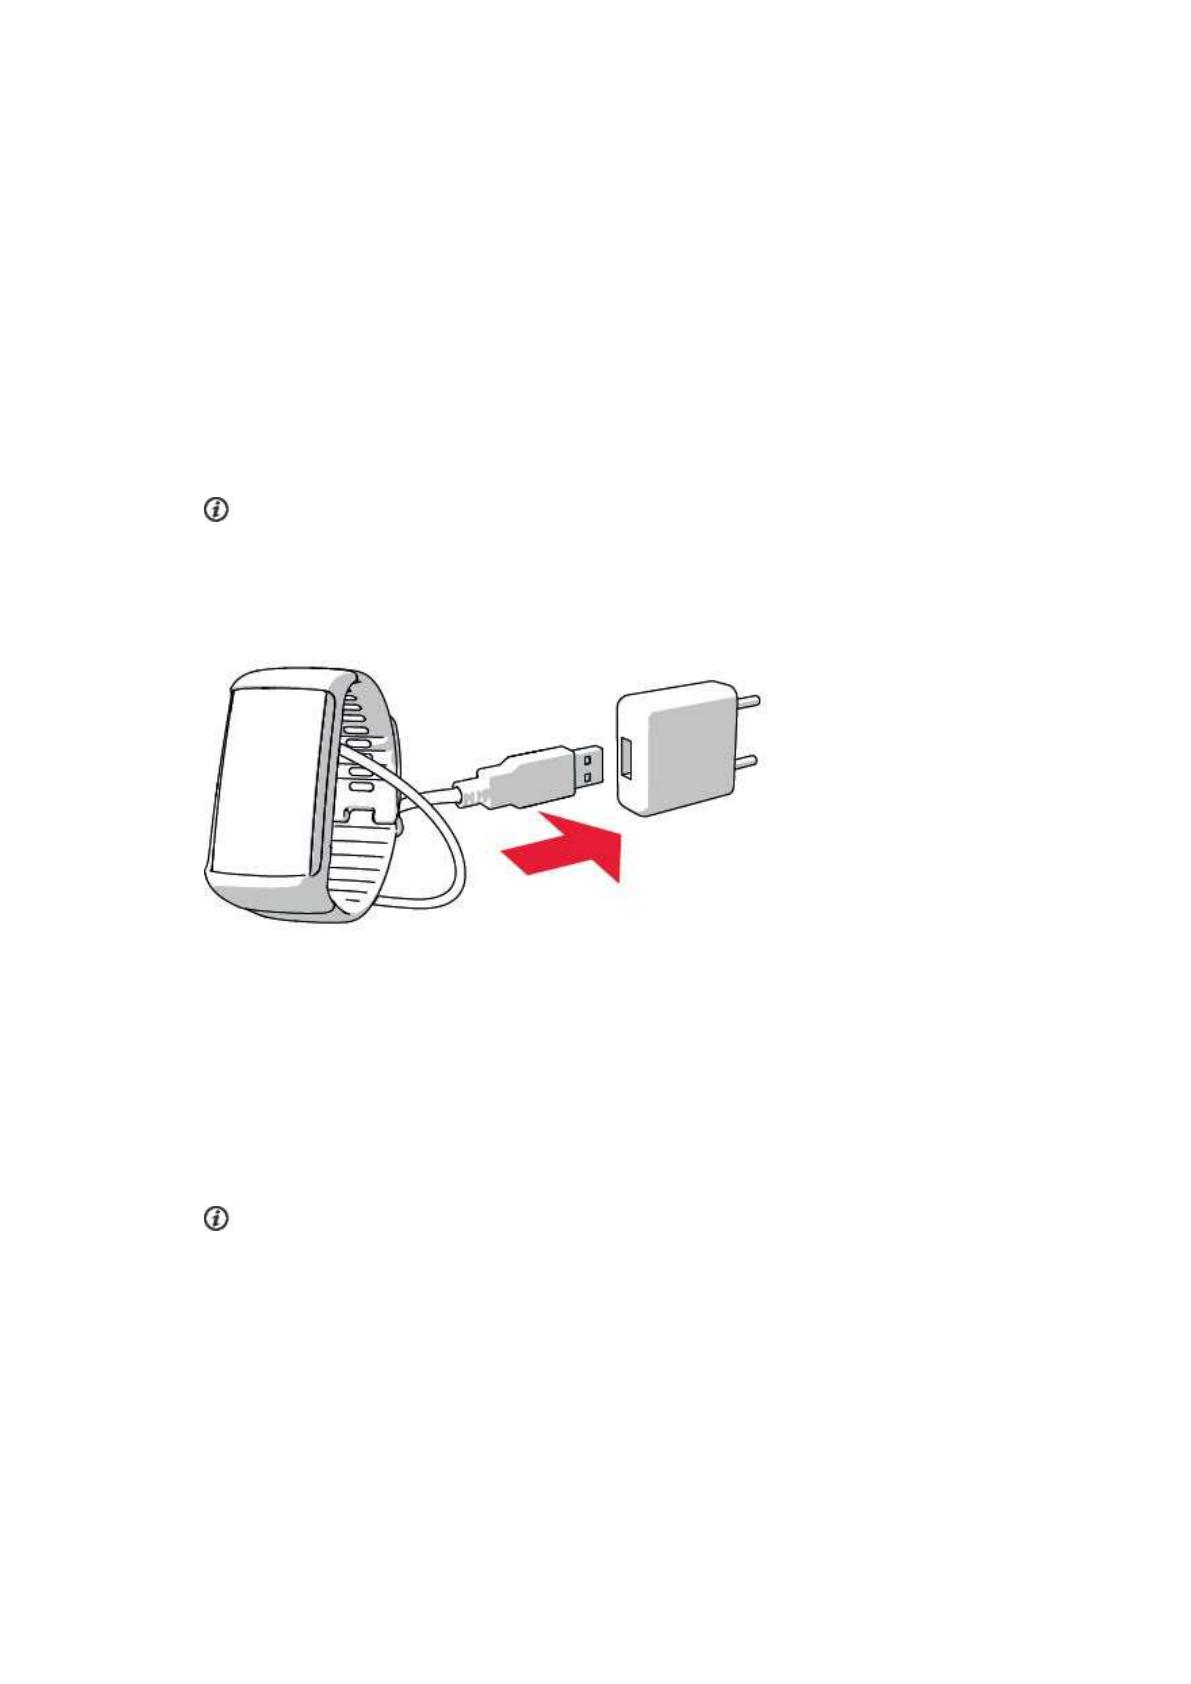
1. To make sure there’s enough charge in your A360 during the mobile setup, just plug the USB cable in a
powered USB port or a USB power adapter. Make sure that the adapter is marked with "output 5Vdc"
and that it provides a minimum of 500mA. The display begins to show an animated circle with
Bluetooth and USB icons.
Don't charge the device when its USB port is wet. If the USB port of your A360 has gotten wet,
let it dry up before plugging in.
2. Go to the App Store
SM
or Google Play
TM
on your mobile device and search and download the Polar
Flow app.
The mobile compatibility is available at polar.com/support.
3. When you open the Flow app it recognizes your new A360 nearby and prompts you to start pairing it.
Accept the pairing request and enter the Bluetooth pairing code from your A360 to the Flow app.
Make sure your A360 is powered up in order to make the connection possible.
4. Then create an account or sign in if you already have a Polar account. We’ll walk you through the sign-
up and setup within the app. Tap Save and sync when you’ve defined all the settings. Your per-
sonalized settings will now be transferred to the bracelet.
To get the most accurate and personal activity and training data, it’s important that you’re precise with
14
the settings.
Please notice your A360 may get the latest firmware update during the wireless setup, and depend-
ing on your connection it may take up to 20 minutes to complete. Your A360 will receive the language
package according to your selection in the setup and it will also take some time.
5. A360 display will open to the time view once the synchronization is done.
You’re ready to go, have fun!
LANGUAGES
When you set up your A360, you can select one from the following languages to use it with:
l English
l Spanish
l Portuguese
l French
l Danish
l Dutch
l Swedish
l Norwegian
l German
l Italian
l Finnish
l Polish
l Russian
l Chinese (simplified)
l Japanese
After the setup you can change the language in the Flow app or in the web service.
15
WRISTBAND
The wristband of your A360 is easy to change. Very handy if you want to color coordinate with your outfit, for
example.
1. Bend the wristband from both sides, one side at a time, to detach it from the device.
2. Pull the device from the wristband.
To attach the wristband, perform the steps in the reverse order. Make sure the band fits flush with the device
on both sides.
MENU STRUCTURE
You can turn on the display by a simple wrist gesture or press the button on the side.
Enter and browse through the menu by swiping the touch screen up or down. Select items by tapping the
icons, and return with pressing the button on the side.
16
ACTIVITY
Your daily activity goal is visualized in some of the watch faces and in the activity bar in My day menu. For
example, you can see your progress towards the goal how the clock numbers fill up with color in one.
For more information, see 24/7 Activity Tracking.
MY DAY
Here you'll see the progress of your daily activity goal in more detail, steps, distance and calories and any
training sessions you've done so far during the current day or any planned training sessions you've created in
the Flow web service.
Tap each event in your day to see the it in more detail. To see what you have left to go to reach your daily activ-
ity goal, tap the activity data.
TRAINING
This is where you start your training sessions. Tap the icon to access the sport selection menu. You can edit
the selection in the Flow web service to keep your favorite sports more easily accessible on your A360. Go to
Flow, click your name and Sport profiles. Add or remove your favorite sports from there.
To start training, wait for your heart rate to appear next to a sport icon and tap the sport icon and the training
session begins.
17
MY HEART RATE
Here you can quickly check your current heart rate without starting a training session. Just tighten your wrist-
band, tap the icon and you'll see your current heart rate in a moment. Press the side button to exit.
FAVORITES
In Favorites you'll find training sessions you have saved as favorites in the Flow web service. If you've not
saved any favorites in Flow, this item is not in the A360 menu.
For more information, see Favorites.
WATCH FACES
To change the watch face of your fitness tracker:
1. Tap and hold the touch display with your finger until you see a thumbnail menu of the watch faces:
2. Swipe up or down to see them all and tap the one you choose.
Here are the options:
l Vertical clock and date
l Activity bar filling from left to right
18
l Round clock with date
l Round activity bowl filled with the daily activity goal progress with color and per-
centage number
l Horizontal clock and date, no activity bar
l The color changes with the time of day: yellow during the day and dark blue during the
night
Good choice for checking the time during night time.
l Default vertical clock
l Activity shown with color filling up the numbers with the daily activity goal progress
PAIRING
Bluetooth Smart ® heart rate sensor has to be paired with your A360 for them to function together. Pairing
takes only a few seconds, and ensures that your A360 receives signals from only your sensors and devices ,
and allows disturbance-free training in a group. Before entering an event or race, make sure that you do the
pairing at home to prevent interference from other devices.
Polar A360 fitness tracker is compatible with Polar Bluetooth Smart® heart rate sensors H6 and H7.
PAIR A HEART RATE SENSOR WITH A360
When using a Polar Bluetooth Smart® heart rate sensor, A360 does not measure heart rate from the wrist.
There are two ways to pair a heart rate sensor with your A360:
19
1. Wear the heart rate sensor, and press and hold the button in time view until a message displays to
touch the device with the A360.
2. Touch the heart rate sensor with your A360.
3. Pairing completed is shown when you're done.
OR
1. Wear the heart rate sensor, tap Training on your A360.
2. Touch the heart rate sensor with your A360.
3. Pairing completed is shown when you're done.
20
SETTINGS
DISPLAY SETTING
You can choose on which hand you want to wear your A360 either in the Polar Flow web service or the Polar
Flow mobile app. The setting changes the orientation of the A360 display accordingly.
We recommend wearing the bracelet on your non-dominant hand to get the most accurate activity tracking
results.
You can edit your settings any time in the Polar Flow web service and mobile app.
To change the display setting on your computer
1. Plug in your A360 to your computer's USB port, go to polar.com/flow and sign in.
2. Go to Settings and Products.
3. Choose your A360, click and change the handedness.
The display orientation on your A360 will change on the next synchronization.
To change the display setting on the mobile app
1. Go to Settings.
2. Tap Product information and choose the desired wrist handedness for your A360.
The display orientation on your A360 will change on the next synchronization.
TIME OF DAY SETTING
The current time and its format are transferred to your A360 from your computer system clock when you sync
with the Polar Flow web service. To change the time, you'll first need to change the time zone on your com-
puter and then sync your A360.
If you change the time or time zone on your mobile device and sync the Polar Flow app with the Polar Flow
web service and your A360, the time also changes on your A360. Your mobile device needs to have Internet
connection available in order to change the time.
  • Page 1 1
  • Page 2 2
  • Page 3 3
  • Page 4 4
  • Page 5 5
  • Page 6 6
  • Page 7 7
  • Page 8 8
  • Page 9 9
  • Page 10 10
  • Page 11 11
  • Page 12 12
  • Page 13 13
  • Page 14 14
  • Page 15 15
  • Page 16 16
  • Page 17 17
  • Page 18 18
  • Page 19 19
  • Page 20 20
  • Page 21 21
  • Page 22 22
  • Page 23 23
  • Page 24 24
  • Page 25 25
  • Page 26 26
  • Page 27 27
  • Page 28 28
  • Page 29 29
  • Page 30 30
  • Page 31 31
  • Page 32 32
  • Page 33 33
  • Page 34 34
  • Page 35 35
  • Page 36 36
  • Page 37 37
  • Page 38 38
  • Page 39 39
  • Page 40 40
  • Page 41 41
  • Page 42 42
  • Page 43 43
  • Page 44 44
  • Page 45 45
  • Page 46 46
  • Page 47 47
  • Page 48 48
  • Page 49 49
  • Page 50 50
  • Page 51 51
  • Page 52 52
  • Page 53 53
  • Page 54 54
  • Page 55 55
  • Page 56 56
  • Page 57 57
  • Page 58 58
  • Page 59 59
  • Page 60 60
  • Page 61 61
  • Page 62 62
  • Page 63 63
  • Page 64 64
  • Page 65 65
  • Page 66 66
  • Page 67 67
  • Page 68 68
  • Page 69 69

Polar Electro A360 User manual

Category
Activity trackers
Type
User manual

Ask a question and I''ll find the answer in the document

Finding information in a document is now easier with AI