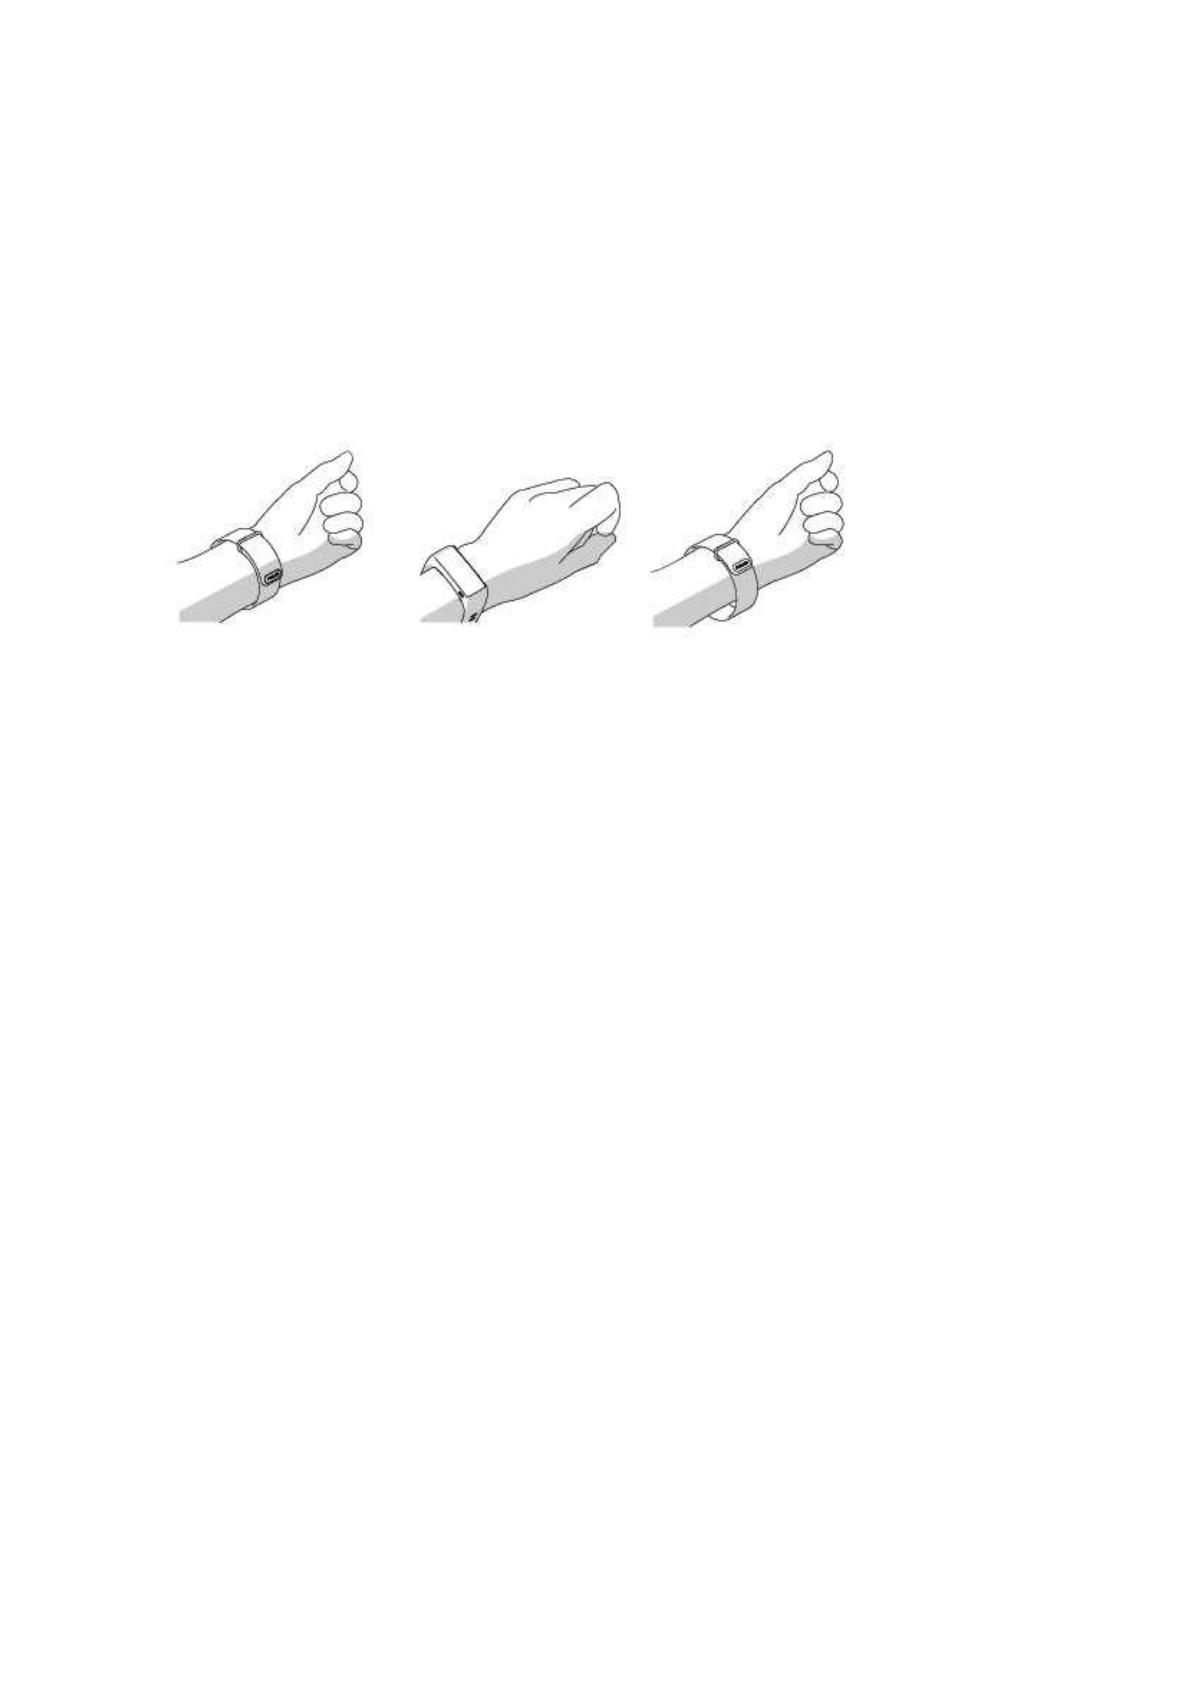
Polar A360 User manual

Category
Activity trackers
Type
User manual
USER MANUAL
2
CONTENTS
Contents 2
Introduction 8
Polar A360 8
USB cable 9
Polar Flow App 9
Polar FlowSync Software 9
Polar Flow Web Service 9
Get started 10
Set up your A360 10
Choose one option for setup: computer or a compatible mobile device 10
Option A: set up with your computer 10
Option B: set up with polar flow app using your mobile device or tablet 11
Wristband 12
Menu structure 13
Activity 14
My day 14
Training 14
Favorites 14
Settings 15
3
Display setting 15
Time of day setting 15
Flight mode 16
Turn flight mode ON 16
Turn flight mode OFF 16
Training 17
Wear your A360 17
Start a Training Session 18
Start a training session with a target 18
During training 19
Training views 19
Training with heart rate 19
Training with a duration or calorie based training target 19
Training with a phased training target 21
Pause/Stop a training session 21
Training Summary 22
After Training 22
Training summary in A360 22
Polar Flow App 23
Polar Flow Web Service 23
Features 24
4
24/7 Activity Tracking 24
Activity Goal 24
Activity data 24
Inactivity alert 25
Sleep information in the Flow web service and Flow app 25
Activity data in Flow App and Flow web service 26
Smart notifications 26
Smart Notification Settings 26
Polar Flow mobile app 26
Do not disturb 27
Phone 27
Smart Notifications in practice 28
The Smart Notifications Feature Works via Bluetooth Connection 28
Polar Sport Profiles 28
Polar Smart Coaching features 28
Smart Calories 29
Heart Rate Zones 29
Training Benefit 33
Polar Flow app and Web Service 36
Polar Flow App 36
Pair a Mobile Device with A360 36
5
Polar Flow Web Service 37
Feed 37
Explore 37
Diary 37
Progress 38
Plan Your Training 38
Create a Training Target 38
Quick Target 38
Phased target 39
Favorites 39
Sync the Targets to your A360 39
Favorites 40
Add a Training Target to Favorites: 40
Edit a Favorite 40
Remove a favorite 40
Polar Sport profiles in Flow Web Service 41
Add a Sport profile 41
Edit a Sport Profile 41
Syncing 42
Sync with Flow mobile App 42
Sync With Flow Web Service Via FlowSync 42
6
Firmware Update 44
With computer 44
With mobile device or tablet 44
Pairing 45
Pair a Heart Rate Sensor with A360 45
Restart A360 46
Reset A360 47
Important Information 48
Taking Care of Your A360 48
Storing 49
Service 49
Batteries 49
Charging A360 battery 50
Battery Operating Time 51
Low Battery Notifications 52
Precautions 52
Interference 52
Minimizing Risks When Training 53
Technical Specification 54
A360 54
Polar FlowSync Software and USB Cable 54
7
Polar Flow Mobile Application Compatibility 55
Water Resistance 55
Limited International Polar Guarantee 56
Disclaimer 57
8
INTRODUCTION
Congratulations on your new A360! This waterproof fitness tracker has a wrist-based heart rate monitor,
unique Polar smart coaching features and smartwatch features like smart notifications and a color touch-
screen. With 24/7 activity measurement your new companion encourages you towards a more active and
healthier lifestyle. Get an instant overview of your daily activity on your A360 or with Polar Flow app. Together
with the Polar Flow web service and the Flow app your A360 helps you to understand how your choices and
habits affect your well-being.
This user manual helps you get started with your new A360. To check the video tutorials and the latest version
of this user manual, go to www.polar.com/support/A360.
1. Touchscreen
2. Button
l To activate the display: press the button or turn your wrist when you're wearing the fitness tracker.
l To change the watch face: tap and hold the display in time view, and swipe up or down. Then choose
one by tapping it.
POLAR A360
Track your activities in your everyday life and enjoy training with wrist-based heart rate. See how they benefit
your health and get tips on how to reach your daily activity goal. Follow your activity goal in your wrist and find
more details about your activity in Flow app or Flow web service. Use smart notifications if you want to stay
9
connected and get alerts from your phone directly to you wrist. Change the wristband and accessorize any out-
fit. You can buy additional wristbands separately.
USB CABLE
The product set includes a standard USBcable. You can use it for charging the battery and syncing data
between your A360 and Flow web service via FlowSync software.
POLAR FLOW APP
View your activity and training data at a glance. Flow app syncs your activity and training data wirelessly to
the Polar Flow web service. Get it on the App Store
SM
or Google play
TM
. You can start using your A360 also
with the Flow app and update your A360 wirelessly too.
POLAR FLOWSYNC SOFTWARE
Polar FlowSync syncs your data between your A360 and the Polar Flow web service on your computer. Go to
flow.polar.com/start to start using your A360 and to download and install the FlowSync software.
POLAR FLOW WEB SERVICE
Plan your training, follow your achievements, get guidance and see detailed analysis of your activity and train-
ing results. Let all your friends know about your achievements. Find all this at polar.com/flow.
10
GET STARTED
SET UP YOUR A360
When you get hold of your new A360, it’s in storage mode. It wakes up when you plug it into a computer for
setup or a USB charger for charging. We recommend that you charge the battery before you start using your
A360. If the battery is completely empty, it takes a couple of minutes for the charging to start. See Batteries
for detailed information on charging the battery, battery operating times and low battery notifications.
CHOOSE ONE OPTION FOR SETUP: COMPUTER OR A COMPATIBLE MOBILE DEVICE
You can choose how to set up your A360, with a computer and a USBcable or wirelessly with a compatible
mobile device. Both methods require an Internet connection.
l Mobile setup is convenient if you don't have access to a computer with a USB port, but it might take
longer.
l Wired setup is quicker and you can charge your A360 at the same time, but you need a USB cable and
computer available.
OPTION A: SET UP WITH YOUR COMPUTER
1. Go to flow.polar.com/start and install the FlowSync software to set up your A360 and update the firm-
ware if needed.
2. Push down the top part (A) of the USB cover inside the bracelet to access the micro USB port and plug
in the supplied USB cable (B).
Don't charge the device when its USB port is wet. If the USB port of your A360 has gotten wet,
let it dry up before plugging in.
11
3. Plug the other end of the cable into the USB port of your computer for setup and charging the battery
(C).
4. Then we’ll walk you through signing up for the Polar Flow web service and personalizing your A360.
To get the most accurate and personalized activity and training data, it’s important that you’re pre-
cise with the physical settings when signing up for the web service. When signing up, you can choose
a language and get the latest firmware for your A360.
When closing the USB cover, make sure it fits flush on the device.
After the setup is done, you’re ready to go. Have fun!
OPTION B: SET UP WITH POLAR FLOW APP USING YOUR MOBILE DEVICE OR TABLET
Polar A360 connects to the Polar Flow mobile app wirelessly via Bluetooth Smart, so remember to have it
turned on in your mobile device.
1. To make sure there’s enough charge in your A360 during the mobile setup, just plug the USB cable in a
powered USB port or a USB power adapter. Make sure that the adapter is marked with "output 5Vdc"
and that it provides a minimum of 500mA. The display begins to show an animated circle with
Bluetooth and USB icons.
Don't charge the device when its USB port is wet. If the USB port of your A360 has gotten wet,
let it dry up before plugging in.
12
2. Go to the App Store
SM
or Google Play
TM
on your mobile device and search and download the Polar
Flow app.
The mobile compatibility is available at polar.com/support.
3. When you open the Flow app it recognizes your new A360 nearby and prompts you to start pairing it.
Accept the pairing request and enter the Bluetooth pairing code from your A360 to the Flow app.
Make sure your A360 is powered up in order to make the connection possible.
4. Then create an account or sign in if you already have a Polar account. We’ll walk you through the sign-
up and setup within the app. Tap Save and sync when you’ve defined all the settings. Your per-
sonalized settings will now be transferred to the bracelet.
To get the most accurate and personal activity and training data, it’s important that you’re precise with
the settings.
Please notice your A360 may get the latest firmware update during the wireless setup, and depend-
ing on your connection it may take up to 10 minutes to complete. Your A360 will receive the language
package according to your selection in the setup and it will also take some time.
5. A360 display will open to the time view once the synchronization is done.
You’re ready to go, have fun!
WRISTBAND
The wristband of your A360 is easy to change. Very handy if you want to color coordinate with your outfit, for
example.
13
1. Bend the wristband from both sides, one side at a time, to detach it from the device.
2. Pull the device from the wristband.
To attach the wristband, perform the steps in the reverse order. Make sure the band fits flush with the device
on both sides.
MENU STRUCTURE
You can turn on the display by a simple wrist gesture or press the button on the side.
Enter and browse through the menu by swiping the touch screen up or down. Select items by tapping the
icons, and return with pressing the button on the side.
14
ACTIVITY
Your daily activity goal is visualized in some of the watch faces and in the activity bar in My day menu. For
example, you can see your progress towards the goal how the clock numbers fill up with color in one.
For more information, see 24/7 Activity Tracking.
MY DAY
Here you'll see the progress of your daily activity goal in more detail, steps, distance and calories and any
training sessions you've done so far during the current day or any planned training sessions you've created in
the Flow web service.
Tap each event in your day to see the it in more detail. To see what you have left to go to reach your daily activ-
ity goal, tap the activity data.
TRAINING
This is where you start your training sessions. Tap the icon to access the sport selection menu. You can edit
the selection in the Flow web service to keep your favorite sports more easily accessible on your A360. Go to
Flow, click your name and Sport profiles. Add or remove your favorite sports from there.
To start training, wait for your heart rate to appear next to a sport icon and tap the sport icon and the training
session begins.
FAVORITES
In Favorites you'll find training sessions you have saved as favorites in the Flow web service. If you've not
saved any favorites in Flow, this item is not in the A360 menu.
For more information, see Favorites.
15
SETTINGS
DISPLAY SETTING
You can choose on which hand you want to wear your A360 either in the Polar Flow web service or the Polar
Flow mobile app. The setting changes the orientation of the A360 display accordingly.
We recommend wearing the bracelet on your non-dominant hand to get the most accurate activity tracking
results.
You can edit your settings any time in the Polar Flow web service and mobile app.
To change the display setting on your computer
1. Plug in your A360 to your computer's USB port, go to polar.com/flow and sign in.
2. Go to Settings and Products.
3. Choose your A360, click and change the handedness.
The display orientation on your A360 will change on the next synchronization.
To change the display setting on the mobile app
1. Go to Settings.
2. Tap Product information and choose the desired wrist handedness for your A360.
The display orientation on your A360 will change on the next synchronization.
TIME OF DAY SETTING
The current time and its format are transferred to your A360 from your computer system clock when you sync
with the Polar Flow web service. To change the time, you'll first need to change the time zone on your com-
puter and then sync your A360.
If you change the time or time zone on your mobile device and sync the Polar Flow app with the Polar Flow
web service and your A360, the time also changes on your A360. Your mobile device needs to have Internet
connection available in order to change the time.
16
FLIGHT MODE
Flight mode cuts off all wireless communication from your A360. You can still use it, but you can't sync your
data with the Polar Flow mobile app or use it with any wireless accessories.
TURN FLIGHT MODE ON
1. Press and hold the button until you see an airplane icon. First you'll see the pair/sync notification, just
keep pressing the button until the airplane icon shows up..
2. Tap the icon and FLIGHT MODE ON is shown.
TURN FLIGHT MODE OFF
1. Press and hold the button until you see an airplane icon.
2. Tap the icon and FLIGHT MODE OFF is shown.
17
TRAINING
WEAR YOUR A360
Your Polar A360 fitness tracker has a built-in heart rate sensor that measures heart rate from the wrist. To
measure wrist-based heart rate accurately you need to wear the bracelet snugly on top of your wrist, just
behind the wrist bone. The sensor must be in constant touch with your skin, but the wristband should not be
too tight either to prevent blood flow.
You can wear the bracelet a little looser, if you like, while not working out, but you should tighten it up for your
training sessions to make sure you get accurate heart rate readings from the wrist. If you have tattoos on the
skin of your wrist, avoid placing the sensor right on it as it may prevent accurate readings.
Also it's a good idea to warm up the skin if your hands and skin get cold easily. Get the blood going before
starting your session!
In sports where it's more challenging to keep the sensor stationary on your wrist or where you have pressure
or movement in muscles or tendons near the sensor, we recommend using a Polar H7 heart rate sensor with a
chest strap to get better measurement of your heart rate.
Follow your heart rate zones directly from your device and get guidance for training sessions you've planned in
the Flow web service
Although there are many subjective clues as to how your body is doing during exercise (perceived exertion,
breathing rate, physical sensations), none of them are as reliable as measuring heart rate. It is objective and is
affected by both internal and external factors - meaning you will have a dependable measure of your physical
state.
18
START A TRAINING SESSION
In the time view, swipe the display up or down and tap Training to enter pre-training mode: a
heart icon turns to display your heart rate when it's been found.
Choose the sport profile you want to use by swiping up or down.
Tap the chosen sport icon to start the session.
See Functions During Training for more information on what you can do with your A360 during training.
To pause a training session, press the button. Paused is displayed and the A360 goes to pause mode. To
continue your training session, tap the green arrows icon.
To stop a training session, press and hold the button during training recording or in pause mode until the ses-
sion summary comes up. Or you can tap and hold the red stop icon for three seconds to end the recording.
START A TRAINING SESSION WITH A TARGET
You can plan your training and create detailed training targets in the Flow web service and sync them to your
A360 with Flowsync software or Flow app. Your A360 will guide you towards completing your target during
training.
To start a training session with a target:
19
1. Go to My day.
2. Choose the target from the list by tapping it.
3. Choose the sport you want to use by tapping its icon.
4. Training display comes up and you can start training.
DURING TRAINING
TRAINING VIEWS
You can activate the display by a wrist gesture and browse through training views by swiping the display up or
down. The display turns off automatically to save battery. You can see the available training views below.
TRAINING WITH HEART RATE
Your current heart rate in the color of the current heart rate zone.
The duration of your training session so far.
Time of day
Calories burned so far during training
You can also disable the heart rate sensor for your next session by tapping and holding a sport icon while
in the Training menu.
TRAINING WITH A DURATION OR CALORIE BASED TRAINING TARGET
If you have created a training target based on duration or calories in the Flow web service and synced it to your
A360, you have the following views:
OR If you've created a target based on calories, you can see how much of your target you've com-
pleted both in calories and as a percentage.
20
If you've created a target based on time, you can see how much of your target you've com-
pleted both in time and as a percentage.
Your current heart rate
The duration of your training session so far
Your current heart rate.
The color of the heart rate number shows in which heart rate zone you are.
Time spent in the heart rate zone you are currently in
Time of day
Calories burned so far during training
  • Page 1 1
  • Page 2 2
  • Page 3 3
  • Page 4 4
  • Page 5 5
  • Page 6 6
  • Page 7 7
  • Page 8 8
  • Page 9 9
  • Page 10 10
  • Page 11 11
  • Page 12 12
  • Page 13 13
  • Page 14 14
  • Page 15 15
  • Page 16 16
  • Page 17 17
  • Page 18 18
  • Page 19 19
  • Page 20 20
  • Page 21 21
  • Page 22 22
  • Page 23 23
  • Page 24 24
  • Page 25 25
  • Page 26 26
  • Page 27 27
  • Page 28 28
  • Page 29 29
  • Page 30 30
  • Page 31 31
  • Page 32 32
  • Page 33 33
  • Page 34 34
  • Page 35 35
  • Page 36 36
  • Page 37 37
  • Page 38 38
  • Page 39 39
  • Page 40 40
  • Page 41 41
  • Page 42 42
  • Page 43 43
  • Page 44 44
  • Page 45 45
  • Page 46 46
  • Page 47 47
  • Page 48 48
  • Page 49 49
  • Page 50 50
  • Page 51 51
  • Page 52 52
  • Page 53 53
  • Page 54 54
  • Page 55 55
  • Page 56 56
  • Page 57 57
  • Page 58 58

Polar A360 User manual

Category
Activity trackers
Type
User manual

Ask a question and I''ll find the answer in the document

Finding information in a document is now easier with AI