Yealink EXP50 User guide

Type
User guide

Yealink EXP50 is an innovative color-screen expansion module that enhances productivity and efficiency for Yealink IP phones. Equipped with a vivid color display and user-friendly interface, it provides easy access to a wealth of features and applications. The EXP50 allows you to handle multiple calls simultaneously, view contacts and call history, and access a variety of other productivity-enhancing tools. With its sleek design and seamless integration with Yealink IP phones, the EXP50 is the perfect addition to any professional workspace.

Yealink EXP50 is an innovative color-screen expansion module that enhances productivity and efficiency for Yealink IP phones. Equipped with a vivid color display and user-friendly interface, it provides easy access to a wealth of features and applications. The EXP50 allows you to handle multiple calls simultaneously, view contacts and call history, and access a variety of other productivity-enhancing tools. With its sleek design and seamless integration with Yealink IP phones, the EXP50 is the perfect addition to any professional workspace.

Quick Start
Guide for
Color-screen Expansion Module EXP50
Package Contents
The following items are included in your package. If you nd anything missing, contact your
system administrator.
breezeline.com 2
Connecting to the Phone
1. Connect the EXP50 and the phone using the supplied screw and connecting sheet,
as shown below:
You may need to pull out the silica gel on the phone when connecting expansion module.
PackageContents
1
Thefollowingitemsareincludedinyourpackage.Ifyoufindanythingmissing,contactyoursystem
administrator.
Screwdriver
Color-screen
ExpansionModuleStandConnectingSheetUSBCableScrewQuickStartGuide
1. ConnecttheEXP50andthephoneusingthesuppliedscrewandconnectingsheet,
asshownbelow:
Youmayneedtopulloutthesilicagelonthephonewhenconnectingexpansionmodule.
ConnectingtothePhone
Color-screen
Expansion Module
PackageContents
1
Thefollowingitemsareincludedinyourpackage.Ifyoufindanythingmissing,contactyoursystem
administrator.
Screwdriver
Color-screen
ExpansionModuleStandConnectingSheetUSBCableScrewQuickStartGuide
1. ConnecttheEXP50andthephoneusingthesuppliedscrewandconnectingsheet,
asshownbelow:
Youmayneedtopulloutthesilicagelonthephonewhenconnectingexpansionmodule.
ConnectingtothePhone
Stand
PackageContents
1
Thefollowingitemsareincludedinyourpackage.Ifyoufindanythingmissing,contactyoursystem
administrator.
Screwdriver
Color-screen
ExpansionModuleStandConnectingSheetUSBCableScrewQuickStartGuide
1. ConnecttheEXP50andthephoneusingthesuppliedscrewandconnectingsheet,
asshownbelow:
Youmayneedtopulloutthesilicagelonthephonewhenconnectingexpansionmodule.
ConnectingtothePhone
Connecting
Sheet
PackageContents
Thefollowingitemsareincludedinyourpackage.Ifyoufindanythingmissing,contactyoursystem
administrator.
Screwdriver
Color-screen
ExpansionModuleStandConnectingSheetUSBCableScrewQuickStartGuide
1. ConnecttheEXP50andthephoneusingthesuppliedscrewandconnectingsheet,
asshownbelow:
Youmayneedtopulloutthesilicagelonthephonewhenconnectingexpansionmodule.
ConnectingtothePhone
USB Cable
PackageContents
1
Thefollowingitemsareincludedinyourpackage.Ifyoufindanythingmissing,contactyoursystem
administrator.
Screwdriver
Color-screen
ExpansionModuleStandConnectingSheetUSBCableScrewQuickStartGuide
1. ConnecttheEXP50andthephoneusingthesuppliedscrewandconnectingsheet,
asshownbelow:
Youmayneedtopulloutthesilicagelonthephonewhenconnectingexpansionmodule.
ConnectingtothePhone
Screw
PackageContents
1
Thefollowingitemsareincludedinyourpackage.Ifyoufindanythingmissing,contactyoursystem
administrator.
Screwdriver
Color-screen
ExpansionModuleStandConnectingSheetUSBCableScrewQuickStartGuide
1. ConnecttheEXP50andthephoneusingthesuppliedscrewandconnectingsheet,
asshownbelow:
Youmayneedtopulloutthesilicagelonthephonewhenconnectingexpansionmodule.
ConnectingtothePhone
Quick Start
Guide
PackageContents
1
Thefollowingitemsareincludedinyourpackage.Ifyoufindanythingmissing,contactyoursystem
administrator.
Screwdriver
Color-screen
ExpansionModuleStandConnectingSheetUSBCableScrewQuickStartGuide
1. ConnecttheEXP50andthephoneusingthesuppliedscrewandconnectingsheet,
asshownbelow:
Youmayneedtopulloutthesilicagelonthephonewhenconnectingexpansionmodule.
ConnectingtothePhone
Screwdriver
PackageContents
1
Thefollowingitemsareincludedinyourpackage.Ifyoufindanythingmissing,contactyoursystem
administrator.
Screwdriver
Color-screen
ExpansionModuleStandConnectingSheetUSBCableScrewQuickStartGuide
1. ConnecttheEXP50andthephoneusingthesuppliedscrewandconnectingsheet,
asshownbelow:
Youmayneedtopulloutthesilicagelonthephonewhenconnectingexpansionmodule.
ConnectingtothePhone
breezeline.com 3
Connecting two Expansion Modules
2. Follow the same step to connect two expansion modules:
Connecting the USB Cable
3. Connect the USB jack of the IP phone and the mini USB jack of the rst module using a USB
cable. If you want to connect another module, connect the USB jack of the rst module and the
mini USB jack of the second module using a USB cable. As shown below:
The slots are plugged up by silica gel.
You can pull out the silica gel when cascading expansion modules.
Your phone and the two expansion modules are connected as shown below:
Note: The T53/T53W/T54W/T57W/T58A/T58A with camera IP phone can support 3 expansion modules
at most. But if you use more than one expansion module, you need to connect an additional
Yealink power adapter (5V/2A) to any one of the expansion modules. The power adapter should
be purchased separately.
Note: You just need to connect the USB jack of the previous module and the mini USB jack of the next
module using a USB cable.
ConnectingtwoExpansionModules
2
Note:YoujustneedtoconnecttheUSBjackofthepreviousmoduleandtheminiUSBjackofthe
nextmoduleusingaUSBcable.
2. Followthesamesteptoconnecttwoexpansionmodules:
Theslotsarepluggedupbysilicagel.Youcanpulloutthesilicagelwhencascading
expansionmodules.
Yourphoneandthetwoexpansionmodulesareconnectedasshownbelow:
3. ConnecttheUSBjackoftheIPphoneandtheminiUSBjackofthefirstmodule
usingaUSBcable.Ifyouwanttoconnectanothermodule,connecttheUSBjack
ofthefirstmoduleandtheminiUSBjackofthesecondmoduleusingaUSB
cable.
Asshownbelow:
ConnectingUSBCable
Note:TheT53/T53W/T54W/T57W/T58A/T58AwithcameraIPphonecansupport3expansionmodules
atmost.Butifyouusemorethanoneexpansionmodule,youneedtoconnectanadditional
Yealinkpoweradapter(5V/2A)toanyoneoftheexpansionmodules.Thepoweradaptershould
bepurchasedseparately.
ConnectingtheUSBCable
Pullout
Connecting USB Cable
ConnectingtwoExpansionModules
2
Note:YoujustneedtoconnecttheUSBjackofthepreviousmoduleandtheminiUSBjackofthe
nextmoduleusingaUSBcable.
2. Followthesamesteptoconnecttwoexpansionmodules:
Theslotsarepluggedupbysilicagel.Youcanpulloutthesilicagelwhencascading
expansionmodules.
Yourphoneandthetwoexpansionmodulesareconnectedasshownbelow:
3. ConnecttheUSBjackoftheIPphoneandtheminiUSBjackofthefirstmodule
usingaUSBcable.Ifyouwanttoconnectanothermodule,connecttheUSBjack
ofthefirstmoduleandtheminiUSBjackofthesecondmoduleusingaUSB
cable.
Asshownbelow:
ConnectingUSBCable
Note:TheT53/T53W/T54W/T57W/T58A/T58AwithcameraIPphonecansupport3expansionmodules
atmost.Butifyouusemorethanoneexpansionmodule,youneedtoconnectanadditional
Yealinkpoweradapter(5V/2A)toanyoneoftheexpansionmodules.Thepoweradaptershould
bepurchasedseparately.
ConnectingtheUSBCable
Pullout
Pull out
ConnectingtwoExpansionModules
2
Note:YoujustneedtoconnecttheUSBjackofthepreviousmoduleandtheminiUSBjackofthe
nextmoduleusingaUSBcable.
2. Followthesamesteptoconnecttwoexpansionmodules:
Theslotsarepluggedupbysilicagel.Youcanpulloutthesilicagelwhencascading
expansionmodules.
Yourphoneandthetwoexpansionmodulesareconnectedasshownbelow:
3. ConnecttheUSBjackoftheIPphoneandtheminiUSBjackofthefirstmodule
usingaUSBcable.Ifyouwanttoconnectanothermodule,connecttheUSBjack
ofthefirstmoduleandtheminiUSBjackofthesecondmoduleusingaUSB
cable.
Asshownbelow:
ConnectingUSBCable
Note:TheT53/T53W/T54W/T57W/T58A/T58AwithcameraIPphonecansupport3expansionmodules
atmost.Butifyouusemorethanoneexpansionmodule,youneedtoconnectanadditional
Yealinkpoweradapter(5V/2A)toanyoneoftheexpansionmodules.Thepoweradaptershould
bepurchasedseparately.
ConnectingtheUSBCable
Pullout
3
AssemblingtheEXP50
BasicConfigurations
Thenyoucanattachthestand,thepoweradapterandtheEthernetcabletothe
phone,connectthehandsetandheadsettouse.
Attachthestand,asshownbelow:
DeskMountMethod
TheEXP50supports60DSSkeysinthreescreenpages.Eachpagedisplays20DSSkeys.
Youcanpress , or toswitchtothecorrespondingpageanduseyourdesired
DSSkey.
YoucanassignafeaturetoaDSSkeyviaphoneuserinterface.PressthedesiredDSSkey
ofEXP50forabout5seconds,thephoneLCDscreenwillpromptthesettingofthiskey.
Thefollowingsectionsprovideyouwithdetailedinstructionofassigningsomefrequently
usedfeaturestotheDSSkeysviawebuserinterface.
Conference
Theconferencekeyallowsyoutosetupaconferencewithathirdpartywhenalreadyin
acall.
1. ClickonDsskey->ExtKey.
2. InthedesiredDSSkeyfield,selectConferencefromthepull-downlistofType.
3. EnterthephonenumberorextensionofthedestinationpartyintheValuefield.
4. (Optional.)EnterthestringthatwillappearontheLCDscreenintheLabelfield.
5. ClickConfirmtoacceptthechange.
Forward
Whenthereisanincomingcall,youcanpresstheforwardkeytoforwardtheincoming
calltothepre-defineddestinationnumber.
1. ClickonDsskey->ExtKey.
2. InthedesiredDSSkeyfield,selectForwardfromthepull-downlistofType.
3. EnterthedestinationnumbertoforwardtheincomingcallstointheValuefield.
4. (Optional.)EnterthestringthatwillappearontheLCDscreenintheLabelfield.
5. ClickConfirmtoacceptthechange.
Desk Mount Method
3
AssemblingtheEXP50
BasicConfigurations
Thenyoucanattachthestand,thepoweradapterandtheEthernetcabletothe
phone,connectthehandsetandheadsettouse.
Attachthestand,asshownbelow:
DeskMountMethod
TheEXP50supports60DSSkeysinthreescreenpages.Eachpagedisplays20DSSkeys.
Youcanpress , or toswitchtothecorrespondingpageanduseyourdesired
DSSkey.
YoucanassignafeaturetoaDSSkeyviaphoneuserinterface.PressthedesiredDSSkey
ofEXP50forabout5seconds,thephoneLCDscreenwillpromptthesettingofthiskey.
Thefollowingsectionsprovideyouwithdetailedinstructionofassigningsomefrequently
usedfeaturestotheDSSkeysviawebuserinterface.
Conference
Theconferencekeyallowsyoutosetupaconferencewithathirdpartywhenalreadyin
acall.
1. ClickonDsskey->ExtKey.
2. InthedesiredDSSkeyfield,selectConferencefromthepull-downlistofType.
3. EnterthephonenumberorextensionofthedestinationpartyintheValuefield.
4. (Optional.)EnterthestringthatwillappearontheLCDscreenintheLabelfield.
5. ClickConfirmtoacceptthechange.
Forward
Whenthereisanincomingcall,youcanpresstheforwardkeytoforwardtheincoming
calltothepre-defineddestinationnumber.
1. ClickonDsskey->ExtKey.
2. InthedesiredDSSkeyfield,selectForwardfromthepull-downlistofType.
3. EnterthedestinationnumbertoforwardtheincomingcallstointheValuefield.
4. (Optional.)EnterthestringthatwillappearontheLCDscreenintheLabelfield.
5. ClickConfirmtoacceptthechange.
breezeline.com 4
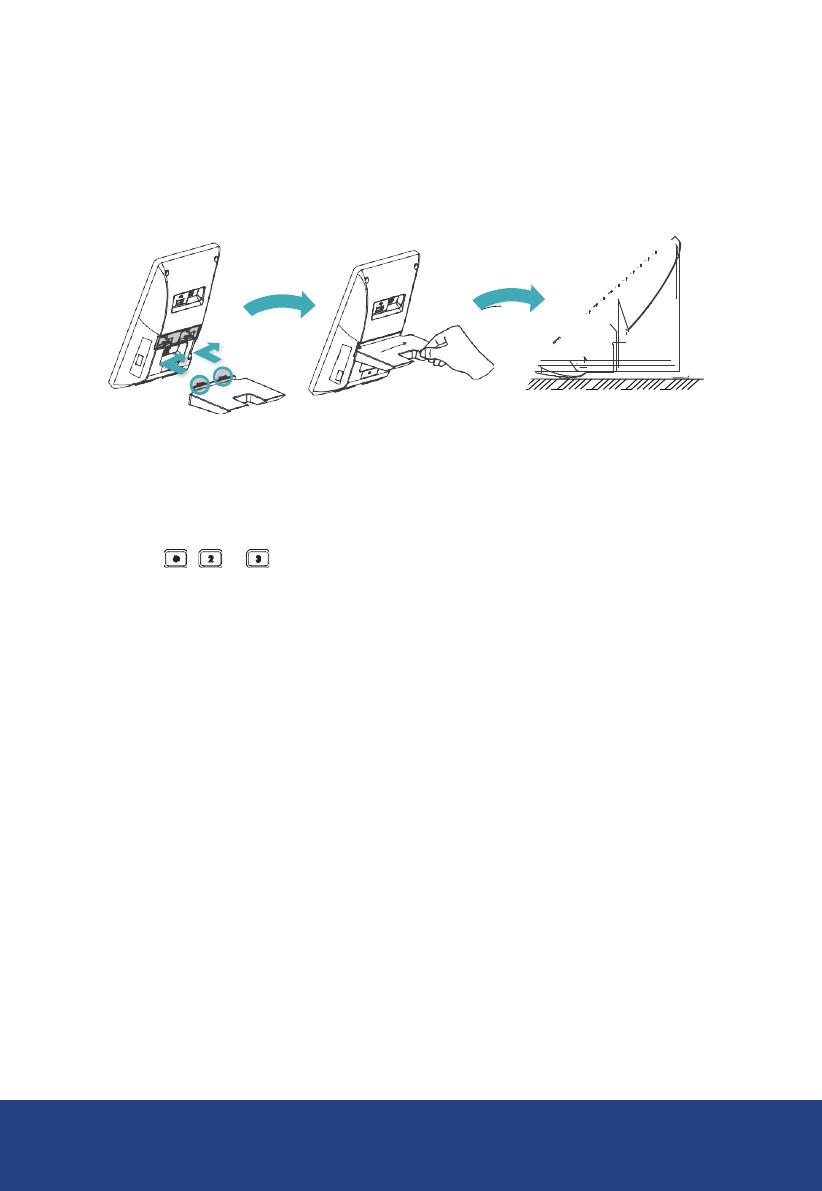
Assembling the EXP50
Attach the stand, as shown below:
Basic Congurations
The EXP50 supports 60 DSS keys in three screen pages. Each page displays 20 DSS keys.
You can press
3
AssemblingtheEXP50
BasicConfigurations
Thenyoucanattachthestand,thepoweradapterandtheEthernetcabletothe
phone,connectthehandsetandheadsettouse.
Attachthestand,asshownbelow:
DeskMountMethod
TheEXP50supports60DSSkeysinthreescreenpages.Eachpagedisplays20DSSkeys.
Youcanpress , or toswitchtothecorrespondingpageanduseyourdesired
DSSkey.
YoucanassignafeaturetoaDSSkeyviaphoneuserinterface.PressthedesiredDSSkey
ofEXP50forabout5seconds,thephoneLCDscreenwillpromptthesettingofthiskey.
Thefollowingsectionsprovideyouwithdetailedinstructionofassigningsomefrequently
usedfeaturestotheDSSkeysviawebuserinterface.
Conference
Theconferencekeyallowsyoutosetupaconferencewithathirdpartywhenalreadyin
acall.
1. ClickonDsskey->ExtKey.
2. InthedesiredDSSkeyfield,selectConferencefromthepull-downlistofType.
3. EnterthephonenumberorextensionofthedestinationpartyintheValuefield.
4. (Optional.)EnterthestringthatwillappearontheLCDscreenintheLabelfield.
5. ClickConfirmtoacceptthechange.
Forward
Whenthereisanincomingcall,youcanpresstheforwardkeytoforwardtheincoming
calltothepre-defineddestinationnumber.
1. ClickonDsskey->ExtKey.
2. InthedesiredDSSkeyfield,selectForwardfromthepull-downlistofType.
3. EnterthedestinationnumbertoforwardtheincomingcallstointheValuefield.
4. (Optional.)EnterthestringthatwillappearontheLCDscreenintheLabelfield.
5. ClickConfirmtoacceptthechange.
,
3
AssemblingtheEXP50
BasicConfigurations
Thenyoucanattachthestand,thepoweradapterandtheEthernetcabletothe
phone,connectthehandsetandheadsettouse.
Attachthestand,asshownbelow:
DeskMountMethod
TheEXP50supports60DSSkeysinthreescreenpages.Eachpagedisplays20DSSkeys.
Youcanpress , or toswitchtothecorrespondingpageanduseyourdesired
DSSkey.
YoucanassignafeaturetoaDSSkeyviaphoneuserinterface.PressthedesiredDSSkey
ofEXP50forabout5seconds,thephoneLCDscreenwillpromptthesettingofthiskey.
Thefollowingsectionsprovideyouwithdetailedinstructionofassigningsomefrequently
usedfeaturestotheDSSkeysviawebuserinterface.
Conference
Theconferencekeyallowsyoutosetupaconferencewithathirdpartywhenalreadyin
acall.
1. ClickonDsskey->ExtKey.
2. InthedesiredDSSkeyfield,selectConferencefromthepull-downlistofType.
3. EnterthephonenumberorextensionofthedestinationpartyintheValuefield.
4. (Optional.)EnterthestringthatwillappearontheLCDscreenintheLabelfield.
5. ClickConfirmtoacceptthechange.
Forward
Whenthereisanincomingcall,youcanpresstheforwardkeytoforwardtheincoming
calltothepre-defineddestinationnumber.
1. ClickonDsskey->ExtKey.
2. InthedesiredDSSkeyfield,selectForwardfromthepull-downlistofType.
3. EnterthedestinationnumbertoforwardtheincomingcallstointheValuefield.
4. (Optional.)EnterthestringthatwillappearontheLCDscreenintheLabelfield.
5. ClickConfirmtoacceptthechange.
or
3
AssemblingtheEXP50
BasicConfigurations
Thenyoucanattachthestand,thepoweradapterandtheEthernetcabletothe
phone,connectthehandsetandheadsettouse.
Attachthestand,asshownbelow:
DeskMountMethod
TheEXP50supports60DSSkeysinthreescreenpages.Eachpagedisplays20DSSkeys.
Youcanpress , or toswitchtothecorrespondingpageanduseyourdesired
DSSkey.
YoucanassignafeaturetoaDSSkeyviaphoneuserinterface.PressthedesiredDSSkey
ofEXP50forabout5seconds,thephoneLCDscreenwillpromptthesettingofthiskey.
Thefollowingsectionsprovideyouwithdetailedinstructionofassigningsomefrequently
usedfeaturestotheDSSkeysviawebuserinterface.
Conference
Theconferencekeyallowsyoutosetupaconferencewithathirdpartywhenalreadyin
acall.
1. ClickonDsskey->ExtKey.
2. InthedesiredDSSkeyfield,selectConferencefromthepull-downlistofType.
3. EnterthephonenumberorextensionofthedestinationpartyintheValuefield.
4. (Optional.)EnterthestringthatwillappearontheLCDscreenintheLabelfield.
5. ClickConfirmtoacceptthechange.
Forward
Whenthereisanincomingcall,youcanpresstheforwardkeytoforwardtheincoming
calltothepre-defineddestinationnumber.
1. ClickonDsskey->ExtKey.
2. InthedesiredDSSkeyfield,selectForwardfromthepull-downlistofType.
3. EnterthedestinationnumbertoforwardtheincomingcallstointheValuefield.
4. (Optional.)EnterthestringthatwillappearontheLCDscreenintheLabelfield.
5. ClickConfirmtoacceptthechange.
to switch to the corresponding page and use your desired DSS key.
You can assign a feature to a DSS key via phone user interface. Press the desired DSS key of EXP50 for about
5 seconds, the phone LCD screen will prompt the setting of this key. The following sections provide you with
detailed instruction of assigning some frequently used features to the DSS keys via web user interface.
Then you can attach the stand, the power adapter and the Ethernet cable to the phone,
connect the handset and headset to use.
CONFERENCE
The conference key allows you to set up a conference with a third party when already in a call.
1. Click on Dsskey->Ext Key.
2. In the desired DSS key eld, select Conference from the pull-down list of Type.
3. Enter the phone number or extension of the destination party in the Value eld.
4. (Optional.) Enter the string that will appear on the LCD screen in the Label eld.
5. Click Conrm to accept the change.
FORWARD
When there is an incoming call, you can press the forward key to forward the incoming
call to the pre-dened destination number.
1. Click on Dsskey->Ext Key.
2. In the desired DSS key eld, select Forward from the pull-down list of Type.
3. Enter the destination number to forward the incoming calls to in the Value eld.
4. (Optional.) Enter the string that will appear on the LCD screen in the Label eld.
5. Click Conrm to accept the change.
breezeline.com 5
TRANSFER
You can press the transfer key to perform a Blind/Semi-Attended/Attended transfer during a call.
1. Click on Dsskey->Ext Key.
2. In the desired DSS key eld, select Transfer from the pull-down list of Type.
3. Enter the phone number you want to transfer the call to in the Value eld.
4. (Optional.) Enter the string that will appear on the LCD screen in the Label eld.
5. Click Conrm to accept the change.
HOLD
You can press the hold key to hold and retrieve a call.
1. Click on Dsskey->Ext Key.
2. In the desired DSS key eld, select Hold from the pull-down list of Type.
3. (Optional.) Enter the string that will appear on the LCD screen in the Label eld.
4. Click Conrm to accept the change.
DND
You can press the DND key when the phone is idle to activate or deactivate the DND mode.
1. Click on Dsskey->Ext Key.
2. In the desired DSS key eld, select DND from the pull-down list of Type.
3. (Optional.) Enter the string that will appear on the LCD screen in the Label eld.
4. Click Conrm to accept the change.
RECALL
You can place a call back to the caller of the last incoming call by pressing the ReCall key.
1. Click on Dsskey->Ext Key.
2. In the desired DSS key eld, select Recall from the pull-down list of Type.
3. (Optional.) Enter the string that will appear on the LCD screen in the Label eld.
4. Click Conrm to accept the change.
SMS
You can access the SMS more quickly and easily by pressing the SMS key.
1. Click on Dsskey->Ext Key.
2. In the desired DSS key eld, select SMS from the pull-down list of Type.
3. (Optional.) Enter the string that will appear on the LCD screen in the Label eld.
4. Click Conrm to accept the change.
DIRECT PICKUP
If you press the direct pickup key when the specic phone number receives an incoming call, the call is
answered on your phone.
1. Click on Dsskey->Ext Key.
2. In the desired DSS key eld, select Pickup from the pull-down list of Type.
3. Enter the direct call pickup code followed by the specic number that you want to pick
up a call from in the Value eld.
breezeline.com 6
4. (Optional) Enter the string that will appear on the LCD screen in the Label eld.
5. Select the desired line from the pull-down list of Line.
6. Click Conrm to accept the change.
GROUP PICKUP
You can pick up the incoming call of the pre-dened group by pressing the group pickup key.
1. Click on Dsskey->Ext Key.
2. In the desired DSS key eld, select Group PickUp from the pull-down list of Type.
3. Enter the group call pickup code in the Value eld.
4. (Optional.) Enter the string that will appear on the LCD screen in the Label eld.
5. Select the desired line from the pull-down list of Line.
6. Click Conrm to accept the change.
CALL PARK
You can park a call at an extension by pressing the call park key. The current call is put on hold
and can be retrieved on another IP phone.
1. Click on Dsskey->Ext Key.
2. In the desired DSS key eld, select Call Park from the pull-down list of Type.
3. Enter the call park code in the Value eld.
4. (Optional.) Enter the string that will appear on the LCD screen in the Label eld.
5. Select the desired line from the pull-down list of Line.
6. Click Conrm to accept the change.
VOICE MAIL
You can access the voice mail more quickly by pressing the voice mail key.
1. Click on Dsskey->Ext Key.
2. In the desired DSS key eld, select Voice Mail from the pull-down list of Type.
3. Enter the voice mail access code in the Value eld.
4. (Optional.) Enter the string that will appear on the LCD screen in the Label eld.
5. Select the desired line from the pull-down list of Line.
6. Click Conrm to accept the change.
SPEED DIAL
You can speed up dialing the numbers which are frequently used or hard to remember by pressing
the speed dial key.
1. Click on Dsskey->Ext Key.
2. In the desired DSS key eld, select SpeedDial from the pull-down list of Type.
3. Enter the desired number you want to dial out directly in the Value eld.
4. (Optional.) Enter the string that will appear on the LCD screen in the Label eld.
5. Select the desired line from the pull-down list of Line.
6. Click Conrm to accept the change.
breezeline.com 7
INTERCOM
You can connect to the operator or the secretary more quickly by pressing the intercom key in an
ofce environment.
1. Click on Dsskey->Ext Key.
2. In the desired DSS key eld, select Intercom from the pull-down list of Type.
3. Enter the remote extension number in the Value eld.
4. (Optional.) Enter the string that will appear on the LCD screen in the Label eld.
5. Select the desired line from the pull-down list of Line.
6. Click Conrm to accept the change.
LINE
You can congure a DSS key as the line key. It performs the same as a hard line key.
1. Click on Dsskey->Ext Key.
2. In the desired DSS key eld, select Line from the pull-down list of Type.
3. (Optional.) Enter the string that will appear on the LCD screen in the Label eld.
4. Select the desired line from the pull-down list of Line.
5. Click Conrm to accept the change.
BLF
The BLF key allows you to monitor the status of the pre-dened number. You can also pick up incoming
calls of the monitored number.
1. Click on Dsskey->Ext Key.
2. In the desired DSS key eld, select BLF from the pull-down list of Type.
3. Enter the phone number or extension you want to monitor in the Value eld.
4. (Optional.) Enter the string that will appear on the LCD screen in the Label eld.
5. Select the desired line from the pull-down list of Line.
6. Enter the directed call pickup code in the Extension eld.
7. Click Conrm to accept the change.
GROUP LISTENING
You can congure a DSS key as the group listening key. Then you are allowed to activate the
Speakerphone and Handset/Headset at the same time by pressing the group listening key.
1. Click on Dsskey->Ext Key.
2. In the desired DSS key eld, select Group Listening from the pull-down list of Type.
3. (Optional.) Enter the string that will appear on the LCD screen in the Label eld.
4. Click Conrm to accept the change.
breezeline.com 8
Regulatory Notices
Operating Ambient Temperatures
• Operating temperature: +32 to 104°F (0 to 40°C)
• Relative humidity: 5% to 90%, noncondensing
• Storage temperature: -22 to +160°F (-30 to +70°C)
Warranty
Our product warranty is limited only to the unit itself, when used
normally in accordance with the operating instructions and the
system environment. We are not liable for damage or loss resulting
from the use of this product, or for any claim from a third party. We
are not liable for problems with Yealink device arising from the use
of this product; we are not liable for nancial damages, lost prots,
claims from third parties, etc., arising from the use of this product.
Explanation of the symbols
is the DC voltage symbol
WEEE Warning symbol
To avoid the potential effects on the environment and human health
as a result of the presence of hazardous substances in electrical
and electronic equipment, end users of electrical and electronic
equipment should understand the meaning of the crossed-out
wheeled bin symbol. Do not dispose of WEEE as unsorted municipal
waste and have to collect such WEEE separately.
Restriction of Hazardous Substances Directive (RoHS)
This device complies with the requirements of the EU RoHS Directive.
Statements of compliance can be obtained by contacting support@
yealink.com.
Safety Instructions
Save these instructions. Read the safety instructions before use!
General Requirements
Before you install and use the device, read the safety instructions
carefully and observe the situation during operation.
During the process of storage, transportation, and operation,
please always keep the device dry and clean, avoid collision
and crash.
Please attempt not to dismantle the device by yourself. In case of
any discrepancy, please contact the appointed maintenance center
for repair.
Please refer to the relevant laws and statutes while using the
device. Legal rights of others should be respected as well.
Environmental Requirements
Place the device at a well-ventilated place. Do not expose the
device under direct sunlight.
Keep the device dry and free of dusts.
Do not place the device on or near any inammable or
re-vulnerable object, such as rubber-made materials.
Keep the device away from any heat source or bare re, such
as a candle or an electric heater.
Operating Requirements
Do not let a child operate the device without guidance.
Do not let a child play with the device or any accessory in case
of accidental swallowing.
Please use the accessories provided or authorized by the
manufacturer only.
The power supply of the device shall meet the requirements
of the input voltage of the device. Please use the provided
surge protection power socket only.
Before plugging or unplugging any cable, make sure that your
hands are completely dry.
Do not spill liquid of any kind on the product or use the equipment
near water, for example, near a bathtub, washbowl, kitchen sink,
wet basement or near a swimming pool.
During a thunderstorm, stop using the device and disconnect
it from the power supply. Unplug the power plug and the
Asymmetric Digital Subscriber Line (ADSL) twisted pair (the radio
frequency cable) to avoid lightning strike.
If the device is left unused for a rather long time, disconnect it
from the power supply and unplug the power plug.
When there is smoke emitted from the device, or some abnormal
noise or smell, disconnect the device from the power supply, and
unplug the power plug immediately.
Contact the specied maintenance center for repair.
Do not insert any object into equipment slots that is not part of
the product or auxiliary product.
Before connecting a cable, connect the grounding cable of the
device rst. Do not disconnect the grounding cable until you
disconnect all other cables.
Cleaning Requirements
• Before cleaning the device, disconnect it from the power supply.
• Use a piece of soft, dry and anti-static cloth to clean the device.
• Keep the power plug clean and dry.
Troubleshooting
The unit cannot supply power to Yealink device.
There is a bad connection with the plug.
1. Clean the plug with a dry cloth.
2. Connect it to another wall outlet.
The usage environment is out of operating temperature range.
1. Use in the operating temperature range.
The cable between the unit and the Yealink device is
connected incorrectly.
1. Connect the cable correctly.
You cannot connect the cable properly.
1. You may have connected a wrong Yealink device.
2. Use the correct power supply.
Some dust, etc., may be in the port.
1. Clean the port.
Contact your dealer or authorized service facility for any
further questions.
FCC Statement
This device complies with part 15 of the FCC Rules. Operation
is subject to the following two conditions: (1) this device may
not cause harmful interference, and (2) this device must accept
any interference received, including interference that may cause
undesired operation.
Any Changes or modications not expressly approved by the party
responsible for compliance could void the user’s authority to operate
the equipment.
Services subject to availability. Call Breezeline for more information. Breezeline and the Breezeline logo are trademarks of Cogeco US Finance LLC. © 2023 Breezeline
  • Page 1 1
  • Page 2 2
  • Page 3 3
  • Page 4 4
  • Page 5 5
  • Page 6 6
  • Page 7 7
  • Page 8 8

Yealink EXP50 User guide

Type
User guide

Yealink EXP50 is an innovative color-screen expansion module that enhances productivity and efficiency for Yealink IP phones. Equipped with a vivid color display and user-friendly interface, it provides easy access to a wealth of features and applications. The EXP50 allows you to handle multiple calls simultaneously, view contacts and call history, and access a variety of other productivity-enhancing tools. With its sleek design and seamless integration with Yealink IP phones, the EXP50 is the perfect addition to any professional workspace.

Ask a question and I''ll find the answer in the document

Finding information in a document is now easier with AI