Page is loading ...

P a g e 1
Issue 002
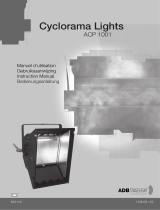
"A" Range
Professional Spotlights
300 / 500 / 650 W
Manuel d'utilisation
Gebruiksaanwijzing
Instruction Manual
Bedienungsanleitung
1106.05.070
M 5070
Prism-convex,
Fresnel and
Profile
Spotlights

Page 10
Issue 002
Advice before use
• Read attentively these instructions.
• As the equipment is delivered, open packings
and inspect the equipment carefully.
If you notice any damage, contact
immediately the transport company and
register your complaint in due form with
mention of the defects.
Be sure that this equipment left our factory in
perfect condition.
• Check if the received equipment is consistent
with the delivery notice and if this delivery notice
is consistent with your order.
If it is not, contact immediately your supplier.
General Remarks
This luminaire is a part of lighting equipment
designed for professional use only in theatre, indoor
television or cinema shootings.
Designed and built in accordance with the
EN 60598-1 and EN 605598-2-17safety
regulations, it must imperatively be connected
to earth by means of its earth wire.
To prevent any electrical shock, there is no need
to open this equipment during operation.
Nevertheless:
• protection devices and lenses have to be
replaced if they are visibly damaged so their
efficiency might be reduced; for example in
case of deep cracks or scratches.
• lamp must be changed if damaged or distorted
by heat.
If internal access is needed for control, service or
repair purposes, always refer to qualified personnel.
In all events, always unplug the power supply cable
before opening,
LethaL VoLtage present inside
It is the user’s responsibility to use the luminaire for
its intented purpose and to check the equipment
that might be connected to it.
The luminaire can under no circumstances be
modified. ADB will not assume any responsibility in
case of damage resulting from modications made
to the luminaire.
This luminaire is a piece of professional equipment
designed for easy and simple use. Nevertheless,
always refer to qualified personnel for any
installation or repair.
Important Remark
Power supply cables and other connections are
essential for your equipment, they play a great part
in safety and good working order.
• Always hold the plug when disconnecting a
cable, never pull the cable.
• Never use cables or connectors in bad
condition, check them when installing or at
regular intervals for fixed equipment.
• Never tie power supply cable and data cable
together.
A 56 C
A 57 F
A 59 Z

Page 11
Issue 002
A 56 C
A 57 F
A 59 Z
Installation
This luminaire can be suspended from a suspension
bar by means of A6, A25 or A30 hook clamps; it
can also be mounted on a stand (these accessories
are available as options).
• Avoid installing the luminaire near inflammable
matters. Minimum distance between luminaire
and inflammable matters is indicated on the
identification plate.
• Stay within the maximum tilt angles allowed
(indicated on the identification plate).
• In accordance with safety regulations, ALWAYS
attach a safety cable to the luminaire yoke.
• In accordance with safety regulations, it is
an obligation to use a wire mesh lens safety
guard to prevent accidental fall of glass pieces
resulting from lens breaking.
Remark:
The weight of the accessories shall not be more
than 25% of the weight of the luminair.
Wire Mesh Safety Guard
This wire mesh safety guard is supplied with the
luminaire. It must always stay within the filter frame
cassette to prevent the fall of glass pieces in case
of lens breaking.
Insert this wire mesh safety guard into the slot
closest to the lens.
Filter Frame
A filter frame is supplied with the luminaire. Insert
colour gel filter into this filter frame. Then insert the
filter frame into the filter frame cassette and close
the access door.
4-leaf Barndoor
Open the filter frame cassette access door. Insert
the barndoor ring into the slot farest from the lens.
Then close the access door.
Lamping
ALWAYS unplug luminaire power supply cable
before re-lamping.
Open the access door to the lamp.
Refer to identification plate and to following
paragraph for the type of lamp to use. For optimal
lamp performance, please refer to manufacturer’s
notice.
Plug the lamp into the lampholder (GY 9,5), fixed
on the lamp carrier.
Lamp must be changed if damaged or distorted
by heat.
Type of lamp to use
• lampholder : GY 9.5
• light centre height (HCL) : 46.5 mm
• wattage : 300 W, 500 W or 650 W
• voltage : 220 V - 240 V
Electrical Connection
This luminaire is designed for operation at a
maximum voltage of 220 V - 240 V.
It is delivered with a cable HO7-RNF 3 x 1.5 mm
2
2 m
length, equipped with a EEC 22 at the luminaire site.
In use, take care to move away the cable from
the hot parts of the luminaire.
For your own safety, check that the earth wire
(yellow-green) is ALWAYS connected to earth.
Plug the cable into the socket at luminaire's lower
part. Secure the power plug by means of the stirrup.

Page 12
Issue 002
A56C & A57F - PC and Fresnel Spotlights
Focus Adjustment
These luminaires feature a knob underneath the
housing which allows easy focus adjustment.
This knob allows you to adjust the light beam
diameter.
Mirror Cleaning and Replacement
The mirror should be cleaned every time you
re-lamp. Unplug the luminaire. Let it cool down.
Open the access door to the lamp; position the
lamp carrier back at full stroke, close to the power
supply socket. Remove the lamp.
Clean the mirror with a clean and soft cloth soaked
in alcohol. Replace the lamp and close the luminaire.
The mirror is fixed on the holder by three screws.
To replace the mirror, unscrew these three screws;
mount the new mirror on the holder and screw tight.
Lens Cleaning and Replacement
The lens must be regularly cleaned to preserve the
luminaire optimum performances.
Unplug the luminaire. Let it cool down.
Open the lower door to the lamp. Clean the lens
with a clean and soft cloth soaked in alcohol.
To replace the lens, take all the accessories out of
the filterframe cassette (wire mesh safety guard,
barndoor, filterframe).
The cassette is held by four screws, unscrew
them to separate the cassette from the luminaire
housing and to remove the lens.
Then replace the lens and reverse the procedure
to reassemble.
A 56 C
A 57 F
A 59 Z
Description
A59Z
A56C & A57F
1. yoke
2. locking handle
3. lens
4. filter frame cassette
5. filter frame cassette access door
6. slides for accessories
7. handle
8. access door for lamp housing
9. power supply socket and stirrup
10. access door lock
11. focus knob
1. yoke
2. locking handle
3. zoom access door
4. slide for beam shaping shutters
5. slide for iris diaphragm
6. slide for gobo holder
7. filter frame cassette access
door
8. filter frame cassette
9. handle
10. power supply socket and stirrup
11. access door lock
12. knob for fine adjustment of beam
edge sharpness
13. zoom adjustment knobs

Page 13
Issue 002
A 56 C
A 57 F
A 59 Z
A59Z - Profile Spotlights
Beam Shaping Shutters
4 beam shaping shutters are supplied with the
luminaire. Insert each beam shaping shutter in
its slide.
Iris-diaphragm
This luminaire accepts an iris diaphragm (option).
Drop the iris diaphragm into the horizontal slide
next to the lamp housing
Gobo Holder
This luminaire accepts a double gobo holder
(option).
Drop the iris diaphragm into the horizontal slide
next to the zoom housing
Zoom Adjustment
• loosen the two zoom adjustment knobs (ref.13)
• adjust the lenses for the desired light beam
diameter
• tighten the two knobs
Beam Edge Sharpness Fine Adjustment
The luminaire features a knob under the lamp
housing allowing easy focus adjustment.
Once the light beam diameter is set with zoom
and iris diaphragm, adjust the focus to optimise
light distribution ; this can nearly double the axial
intensity when working with a narrow beam angle.
Mirror Cleaning and Replacement
The mirror should be cleaned every time you
re-lamp. Unplug the luminaire. Let it cool down.
Open the access door to the lamp; position the
lamp carrier back at full stroke, close to the power
supply socket. Remove the lamp.
Clean the mirror with a clean and soft cloth soaked
in alcohol. Replace the lamp and close the luminaire.
The mirror is fixed on the holder by three screws.
To replace the mirror, unscrew these three screws;
mount the new mirror on the holder and screw tight.
Zoom Lens Cleaning and Replacement
The lens must be regularly cleaned to preserve
the luminaire optimum performance. Unplug the
luminaire. Let's it cool down.
Open the access door (ref.3). Clean the lens with
a clean and soft cloth soaked in alcohol.
The lens is fixed by three retainer-clips. To remove
a lens, take off the clips, change the lens and
replace the clips.
Condenser Lens Cleaning and Repla-
cement
The condenser lens should be cleaned every time
you re-lamp. Unplug the luminaire. Let it cool down.
Open the access door to the lamp; position the
lamp carrier back at full stroke, close to the power
supply socket.
Clean the mirror with a clean and soft cloth soaked
in alcohol and close the luminaire.
The condenser lens is fixed on the holder by four
screws. To replace the lens, unscrew these four
screws, take off the lens and the two positioning
metallic plates; mount the new lens and reverse
the procedure to reassemble.

Page 18
Issue 002
La plaque signalétique, placée sur la face arrière de l'appareil
reprend les indications suivantes :
1 type du projecteur
2 marquage CE
3 distance minimale des matières inflammables à toute
surface externe du projecteur, en m (pour prévenir
l'inflammation des matières inflammables)
4 température ambiante maximale admissible pour un
fonctionnement normal du projecteur, en °C
5 poids du projecteur sans accessoires, en Kg
6 degré de protection contre la pénétration des poussières, des
corps solides et de l'humidité selon le code IP (International
Protection)
7 symbole du type de projecteur
8 numero de code du projecteur
9 puissance maximale de la lampe, en W
10 courant maximal admissible, en A
11 température maximale de la carcasse du projecteur en
fonctionnement de régime, en °C
12 numéro de série du projecteur
13 position d'utilisation autorisée du projecteur
14 température maximale de l'isolement des câbles
d'alimentation, en °C
15 tension d'alimentation maximale admissible, en V
16 type de douille
17 indication du "haut" du luminaire
The indentification plate located on one side of the luminaire provides
following information :
1 luminaire type
2 CE marking
3 minimum distance between inflammable matters and any
external surface of the luminaire in m (to prevent ignition or
inflammable matters)
4 maximum permissible ambient temperature, in °C, for
normal operatin
5 weight without lamp and accessories, in kg
6 index of protection IP (International Protection) which refers
to the resistance of the luminaire to dust and humidity
7 luminaire type
8 code number
9 maximum wattage of the lamp
10 maximum permissible current in A
11 maximum temperature of the luminaire housing during normal
operation in °C
12 serial number
13 maximum allowable tilt of luminaire referred to 0° position
14 maximum temperature, in °C, to which the supply cable will
be submitted
15 rated power supply voltage
16 lamp holder type
17 information about the top of the luminaire
Das Typenschild an der Seite des Scheinwerfers enthält die
folgenden Informationen :
1 Typenbezeichnung
2 CE Markierung
3 Minimaler Abstand des Scheinwerfergehäuses zu brennbaren
Gegenständen und Oberflächen in Meter (zur Vermeidung von
Entzündungen brennbare Gegenstände)
4 Maximale zulässige Umgebungstremperatur in °C für den
normalen Betrieb
5 Gewicht ohne Lampe und Zubehör in kg
6 Schutzart IP (International Protection) beschreibt den Schutz
gegen das Eindringen von Fremdkörpern und Wasser
7 Scheinwerferstype
8 Code
9 Maximale Leistung der Lampe in W
10 Maximal zulässiger Strom in A
11 Maximale Temperatur des Scheinwerfergehäuses unter
normalen Betriebsbedingungen in °C
12 Seriennummer
13 Maximal möglicher Neigungswinkel in Bezug auf die 0° Position
14 Höchste Temperatur in °C, der die Anschlußleitung ausgesetzt
wird
15 Betriebsspannung (V)
16 Fassungstype
17 Angabe der Richtung-Oben-für die korrekte Betriebslage des
Scheinwerfers.
De signalementskaart die op de achterzijde van het apparaat
geplaatst is, neemt volgende aanwijzigingen over :
1 type van schijnwerper
2 CE merking
3 minimumafstand van tot ontvlambare stoffen in meter t.o.v.
gelijk welk extern oppervlak van de schijnwerper (om het
ontvlammen van brandbare stoffen te voorkomen)
4 maximum toegelaten omgevingstemperatuur in °C om een
normale werking van de schijnwerper te verzekeren
5 gewicht van schijnwerper zonder toebehoren, in kilogram
6 beschermingsgraad tegen het binnendringen van stof en
vochtigheid volgens de IP-kode (International Protection)
7 type van schijnwerper
8 code nummer
9 maximumvermogen van de lamp, in W
10 maximum toegelaten stroom in A
11 maximum temperatuur van het schijnwerpershulsel in functie
van het beheer, in °C
12 serienummer van schijnwerper
13 toegelaten inclinatiehoeken voor het gebruik van de
schijnwerper
14 maximale temperatuur in °C waaraan de isolatie van de
voedingskabel mag onderworper worden
15 maximum toegelaten voedingsspanning, in volt
16 type van te gebruiken lampvoet
17 aanduiding van de bovenkant van de schijnwerper
A 56 C
A 57 F
A 59 Z

Page 19
Issue 002
A 56 C
A 57 F
A 59 Z
Accessoires et piéces de rechange Reference Accessories and Spare Parts
Jeu de 4 porte-filtres en carton ignifugé (155 x 155 mm) PFC/A650 Set of 4 cardboard filtrer frames (155 x 155 mm)
Porte-filtre métallique (155 x 155 mm) PFM/A650 Metal filter frame (155 x 155 mm)
Grillage de protection (155 x 155 mm) GR/A650 Wire mesh safety guard (155 x 155 mm)
Support gobo double SP/A650 Double gobo holder
Gobo type M GO/M Gobo type M
Coupe-flux rotatif à 4 pales CF/A650 4-leaf rotatable barndoor
Obturateur à iris OR/A650 Iris diaphragm
Crochet pour tube Ø 21 à 48 mm A6 Hook clamp for Ø 21 to 48 mm tubes
Crochet avec douille DIN A8 Hook clamp with DIN spigot adapter
Crochet pour tube Ø 35 à 50 mm A20 Hook clamp for Ø 35 to 50 mm tubes
Crochet pour tube Ø 35 à 50 mm A25 Hook clamp for Ø 35 to 50 mm tubes
Crochet pour tube Ø 45 à 60 mm A30 Hook clamp for Ø 45 to 60 mm tubes
Câble de sécurité de 1,2 m CAS120/N 1.2 m safety cable
Câble de 2 m (2 x 1,5 + 1,5 mm
2
) C.EUROPE 2 m cable (2 x 1.5 + 1.5 mm
2
)
Fiche type CEE 22 (connexion sur embase projecteur) CEE22/PLUG CEE 22 plug
Kit douille GY9,5 KIT/GY9,5/A5 GY9.5 lampholder kit
Ø 120 mm Lentille Fresnel F120/F80 Ø 120 mm Fresnel lens
Ø 120 mm Lentille prisme-convexe PC120/PEBBLE Ø 120 mm prism convex lens
Ø 60 mm Lentille condenseur PYREX/60 Ø 60 mm condenser lens
Ø 89 mm zoom 1 lentille PC PC89/RC70,4 Ø 89 mm zoom 1 PC lens
Ø 89 mm zoom 2 lentille PC PC89/RC108 Ø 89 mm zoom 2 PC lens
Jeu de 4 couteaux CM/A650 Set of 4 beam shaping shutters
Toebehoren en reserveonderdelen Type/Typ Zubehör und Ersatzteile
Set van 4 kartonnen filterhouders (155 xx 155 mm) PFC/A650 Satz von 4 Kartonfilterrhamen (155 x 155 mm)
Metalen filterhouder (155 x 155 mm) PFM/A650 Metallfilterrhamen (155 x 155 mm)
Beschermrooster (155 x 155 mm) GR/A650 Schutzgitter (155 x 155 mm)
Dubbele gobohouder SP/A650 Doppelgobohalter
Gobo type M GO/M Gobo typ M
4-vleugelige lichtafschermer CF/A650 4-fach Torblende drehbar
Iris diafragma OR/A650 Irisblende
Ophanghaak voor buizen van Ø 21 tot 48 mm A6 Aufhängehaken für Ø 21 bis 48 mm Rohr
Ophanghaak met DIN-dop A8 Aufhängehaken mit DIN Hülse
Ophanghaak voor buizen van Ø 35 tot 50 mm A20 Aufhängehaken für Ø 35 bis 50 mm Rohr
Ophanghaak voor buizen van Ø 35 tot 50 mm A25 Aufhängehaken für Ø 35 bis 50 mm Rohr
Ophanghaak voor buizen van Ø 45 tot 60 mm A30 Aufhängehaken für Ø 45 bis 60 mm Rohr
Veiligheidskabel van 1,2 m CAS120/N 1,2 m Sicherheitsseil
Kabel van 2 m (2 x 1,5 + 1,5 mm
2
) C.EUROPE 2 m Kabel (2 x 1,5 + 1,5 mm
2
)
Contrastekker CEE 22 CEE22/PLUG CEE 22 Stecker
Kit lamphouder GY9,5 KIT/GY9,5/A5 GY9,5 Lampensockel + Montagesatz
Fresnellens Ø 120 mm F120/F80 Ø 120 mm Stufenlinse
Prism convex lens Ø 120 mm PC120/PEBBLE Ø 120 mm Prismenkonvexlinse
Condensor lens Ø 60 mm PYREX/60 Ø 60 mm Kondensorlinse
Ingangslens PC Ø 89 mm zoom 1 PC89/RC70,4 Ø 89 mm Zoom 1 PC Linse
Uitgangslens PC Ø 89 mm zoom 2 PC89/RC108 Ø 89 mm Zoom 2 PC Linse
Set van 4 afsnijders CM/A650 Satz von 4 Blendenschiebern

Page 20
Issue 002
Durée de vie en h
Life expectancy in h
Lebensdauer in h
Levensduur in u
T° couleur en K
Colour T° in K
Farbtemperatur in K
Kleur T° in K
Douille
Lampholder
Lampensockel
Lampvoet
Hauteur de centre lumineux
Filament center height
Lichtschwerpunkt
Filamentcentrumhoogte
ANSI / LIF-code
Lampes halogène
Halogen Lamps
Halogenglühlampe
Halogeenlampen
300 W 500 W 500 W 500 W 650 W
2000 150 400 2000 400
2800 3200 3050 2900 3050
GY9,5 GY9,5 GY9,5 GY9,5 GY9,5
46,5 mm 46,5 mm 46,5 mm 46,5 mm 46,5 mm
M38 CP82 T25 M40 T26
A 56 C
A 57 F
A 59 Z
M-5070-4L-12q
Subject to modifications
ADB - Your Partner for Light
www.adblighting.com
Belgium N.V. ADB-TTV Technologies S.A.
(Group Headquarters) Leuvensesteenweg 585, B-1930 Zaventem
Tel : 32.2.709.32.11, Fax : 32.2.709.32.80, E-Mail : [email protected]
France ADB S.A.S.
Sales Office: 92, Avenue Jean Jaurès F-92120 Montrouge
Tel : 33.1.41.17.48.50, Fax : 33.1.42.53.54.76, E-Mail : [email protected]
Factory & Group Logistics Centre: Zone industrielle Rouvroy F-02100 Saint-Quentin
Tel : 33.3.23.06.35.70, Fax : 33.3.23.67.66.56, E-Mail : [email protected]
/