
HP Envy x2
Maintenance and Service Guide
IMPORTANT! This document is intended for HP
authorized service providers only.

© Copyright 2012 Hewlett-Packard
Development Company, L.P.
Intel is a trademark of Intel Corporation in
the U.S. and other countries. Microsoft and
Windows are U.S. registered trademarks of
Microsoft Corporation. SD Logo is a
trademark of its proprietor.
The information contained herein is subject
to change without notice. The only
warranties for HP products and services are
set forth in the express warranty statements
accompanying such products and services.
Nothing herein should be construed as
constituting an additional warranty. HP shall
not be liable for technical or editorial errors
or omissions contained herein.
First Edition: November 2012
Document Part Number: 693654-xx1

Safety warning notice
WARNING! To reduce the possibility of heat-related injuries or of overheating the device, do not
place the device directly on your lap. Use the device only on a hard, flat surface. Do not allow another
hard surface, such as an adjoining optional printer, or a soft surface, such as pillows or rugs or
clothing, to block airflow. Also, do not allow the AC adapter to contact the skin or a soft surface, such
as pillows or rugs or clothing, during operation. The device and the AC adapter comply with the user-
accessible surface temperature limits defined by the International Standard for Safety of Information
Technology Equipment (IEC 60950).
iii

iv Safety warning notice

Table of contents
1 Product description ........................................................................................................................................ 1
2 External component identification ................................................................................................................ 3
Tablet edge components ...................................................................................................................... 3
Display .................................................................................................................................................. 6
Keyboard dock ..................................................................................................................................... 8
Top ....................................................................................................................................... 8
TouchPad ............................................................................................................................ 8
Lights ................................................................................................................................... 9
Keys ................................................................................................................................... 10
Right side ........................................................................................................................... 10
Left side ............................................................................................................................. 12
Releasing the tablet from the keyboard dock .................................................................... 13
3 Illustrated parts catalog ............................................................................................................................... 14
Locating system information ............................................................................................................... 14
Computer major components ............................................................................................................. 15
Keyboard dock parts .......................................................................................................................... 17
Sequential part number listing ............................................................................................................ 19
4 Removal and replacement procedures ....................................................................................................... 23
Preliminary replacement requirements ............................................................................................... 23
Tools required .................................................................................................................... 23
Service considerations ....................................................................................................... 23
Plastic parts ....................................................................................................... 23
Cables and connectors ..................................................................................... 23
Drive handling ................................................................................................... 24
Grounding guidelines ......................................................................................................... 24
Electrostatic discharge damage ........................................................................ 24
Packaging and transporting guidelines ............................................. 26
Component replacement procedures ................................................................................................. 27
Dock components .............................................................................................................. 27
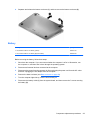
Base enclosure ................................................................................................. 28
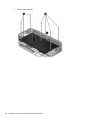
Battery ............................................................................................................................... 29
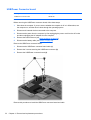
Digital media card reader board ........................................................................................ 31
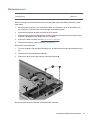
USB/Power Connector board ............................................................................................ 32
v

Multimedia board ............................................................................................................... 33
Hinge assembly removal ................................................................................................... 34
Top cover with keyboard (includes) TouchPad module ..................................................... 35
System board ..................................................................................................................... 37
Tablet parts ........................................................................................................................ 38
Display panel assembly and Battery ................................................................. 40
System board .................................................................................................... 46
Touch screen connector board ......................................................................... 49
Display bezel ..................................................................................................... 49
Webcam assembly (front) ................................................................................. 51
Audio/micro SD digital media card reader/touch screen board ......................... 55
USB/Power button board .................................................................................. 56
Speakers ........................................................................................................... 57
Micro SD digital media board ............................................................................ 58
Power button board ........................................................................................... 59
5 Setup Utility (BIOS) and System Diagnostics ............................................................................................ 61
Using Setup Utility .............................................................................................................................. 61
Starting Setup Utility .......................................................................................................... 61
Changing the language of Setup Utility ............................................................................. 61
Navigating and selecting in Setup Utility ............................................................................ 62
Displaying system information ........................................................................................... 62
Restoring factory settings in Setup Utility .......................................................................... 63
Exiting Setup Utility ............................................................................................................ 63
Updating the BIOS ............................................................................................................. 63
Determining the BIOS version ........................................................................... 64
Downloading a BIOS update ............................................................................. 64
Using System Diagnostics .................................................................................................................. 65
6 Specifications ................................................................................................................................................ 66
Computer specifications ..................................................................................................................... 66
11.6-inch display specifications .......................................................................................................... 66
7 Backing up, restoring, and recovering ....................................................................................................... 68
Creating recovery media and backups ............................................................................................... 68
Restore and recovery ......................................................................................................................... 68
Using Windows Refresh for quick and easy recovery ....................................................... 70
Remove everything and reinstall Windows ........................................................................ 70
Recovering using HP Recovery Manager .......................................................................... 71
What you need to know ..................................................................................... 71
vi

Using the HP Recovery partition to recover a minimized image (select
models only) ...................................................................................................... 71
Changing the boot order ................................................................................... 72
Removing the HP Recovery partition ................................................................................. 72
8 Power cord set requirements ...................................................................................................................... 73
Requirements for all countries ............................................................................................................ 73
Requirements for specific countries and regions ............................................................................... 73
9 Recycling ....................................................................................................................................................... 75
Index ................................................................................................................................................................... 76
vii

viii

1 Product description
Category Description
Product Name HP ENVY x2 PC
Processors Intel® Dual-Core™' Z2760 (1.8GHz, 592KB, L2)
Graphics Intel® HD Graphics Media Accelerator. Supports HD playback streaming and recording at 1080p,
30 fps. Supports DX1 0.1 and HDMI.
Panel 11.6" HD Aniti-Glare WLED UWVA 50%cg 400 nits LVDS Ultraslim 2.5mm
Supports 16:9 wide aspect ratio
Support for non-flush glass panel cover (non-PMMA)
Memory Supports up to 2–GB max system memory (on-board)
DDR2-500MHz dual channel support
Supports up to 2048 (128MB x 32 x 4PCs ) - 500 MHz
Drives eMMC NAND flash SSD configurations:
●
64-GB
●
128-GB
Audio and video Dual array digital microphones
Two integrated stereo speakers
Front 2.0 MP high-definition webcam (fixed, no tilt) and rear 8.0 MP high-definition webcam (fixed
no tilt) with LED flash and auto focus.
Wireless Integrated WLAN options by way of wireless module
Two WLAN antennas built into display assembly
Supports the following WLAN formats:
●
Broadcom 4330 802.11 a/b/g/n+ Bluetooth 4.0 combo w/* 2 Antennas
External media card Push-push insertion/removal
HP Multi-Format Digital Media Reader supports the following digital card formats on the keyboard
dock:
●
MultiMediaCard
●
Secure Digital (SD) Card
● Secure Digital High-Capacity (SDHC) Card
●
Secure Digital Extended Capacity (SDxC) Card
●
Micro Secure Digital Media Reader (SD) Card (supported on the tablet only).
1

Category Description
Ports Tablet
●
Docking connector (Power/USB). Supports charging, audio-out, and video out.
●
Mic-in (combo)
●
Audio-out (stereo headphone). Beats supported
NOTE: Stand-alone microphones and headphones with separate microphone jacks are not
supported.
Keyboard dock
●
Mic-in (combo)
●
Audio-out (stereo headphone). Beats supported
●
HDMI version 1.4a supporting 1080p at 60Hz
● USB 2.0 (2)
Keyboard Full size , island-style keyboard
TouchPad with multi-touch gestures
Taps enabled as default
Multi-touch capacitive panel (with digitizer)
Support for Atmel stylus/pen (select models only)
Power requirements Supports the following HP AC adapters:
●
20-W (non-smart) with localized cable plug support. Integrated AC adapter, power cord, and
removable duck head plug. Connects through docking connector.
Supports the following batteries:
●
2-cell, 25WHr 3.38 AH Li-ion battery (tablet)
NOTE: For more information, see
Display panel assembly and Battery on page 40.
●
2-cell, 21WHr 2.86 AH Li-ion battery (keyboard dock)
NOTE: For more information, see
Battery on page 29.
Operating system Preinstalled:
●
Windows 8 (32-bit)
Serviceability End-user replaceable parts:
●
AC adapter
2 Chapter 1 Product description

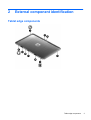
2 External component identification
Tablet edge components
Tablet edge components 3

Components Description
(1)
Power button
●
When the computer is off, press the button to turn on
the tablet.
●
When the computer is on, press the button briefly to
initiate Sleep.
●
When the computer is in the Sleep state, press the
button briefly to exit Sleep.
CAUTION: Pressing and holding down the power button
will result in the loss of unsaved information.
●
If the computer has stopped responding and
Microsoft® Windows® shutdown procedures are
ineffective, press and hold the power button down for
at least 5 seconds to turn off the tablet.
Swipe from the right edge of the TouchPad or
touch screen to display the charms, tap Search, and then
tap the search box. In the search box, type power, select
Settings, and then select Power options, or see the User
Guide.
– or –
To learn more about your power settings, on the
Start screen, type p. In the search box, type power, select
Settings, and then select Power options, or see the User
Guide.
(2) Camera light (rear) Provides flash lighting for the camera.
(3) Webcam (rear) Records video, captures still photographs, and allows
video conferences and online chat by means of streaming
video.
To use the webcam, type c, and then select Camera.
(4) Volume button Controls speaker volume on the tablet.
●
To increase speaker volume, press the + edge of the
button.
●
To decrease speaker volume, press the – edge of the
button.
(5) Micro SD Card Reader Supports micro SD cards.
(6) Alignment post connectors (2) Align and attach the tablet to the keyboard dock.
(7) Docking port/power connector Connects the tablet to the keyboard dock and connects an
AC adapter.
4 Chapter 2 External component identification

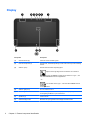
Components Description
(8) System information Displays serial number, product number, warranty, and
regulatory and wireless certification information.
(9)
Audio-out (headphone) jack/Audio-in
(microphone) jack
Connects optional powered stereo speakers, headphones,
earbuds, a headset, or a television audio cable.
WARNING! To reduce the risk of personal injury, adjust
the volume before using headphones, earbuds, or a
headset. For additional safety information, see the
Regulatory, Safety and Environmental Notices.
NOTE: When a device is connected to the jack, the
computer speakers are disabled.
NOTE: Be sure that the device cable has a 4-conductor
connector that supports both audio-out (headphone) and
audio-in (microphone).
NOTE: Stand-alone microphones and headphones with
separate microphone jacks are not supported.
Tablet edge components 5

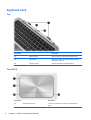
Display
Component Description
(1) WLAN antennas (2)* Send and receive wireless signals.
(2) Internal microphones (2) Record audio, automatically filtering out the noise around you and cancelling
echoes.
(3) Webcam (front) Records video and takes still photographs.
Swipe from the right edge of the TouchPad or touch screen to
display the charms, tap Search, and then tap the search box. Type c, and
then select Camera from the list of applications.
– or –
From the Start screen, type c, and then select Camera from the
list of applications.
(4) Webcam light (front) On: The webcams are on.
(5) Ambient light sensor The ambient light sensor automatically adjusts the display brightness based
on the lighting conditions in your environment.
(6) Speakers (2) Produce sound.
(7) Windows® logo button Minimizes all open applications and displays the Start screen.
6 Chapter 2 External component identification

Component Description
(8) Near Field Communication (NFC)
antenna
With HP TouchZone, you can wirelessly connect, communicate and transfer
data/info to and from your Near Field Communication (NFC)-compatible
devices.
*The antennas are not visible from the outside of the computer. For optimal transmission, keep the areas immediately
around the antennas and proximity sensors free from obstructions. For wireless regulatory notices, see the section of the
Regulatory, Safety, and Environmental Notices that applies to your country or region.
Display 7

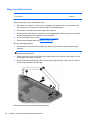
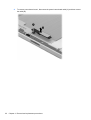
Keyboard dock
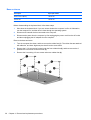
Top
Component Description
(1) Alignment posts Align and attach the tablet to the keyboard dock.
(2) Release latch Releases the tablet. To release the tablet, slide the
release latch to the left.
(3) Docking connector Connects the tablet to the keyboard dock.
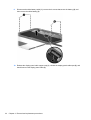
TouchPad
Component Description
(1) TouchPad on/off button Turns the TouchPad off or on when you double-tap the
button.
8 Chapter 2 External component identification

Component Description
(2) TouchPad zone Reads your finger gesture to move the pointer or activate
items on the screen.
(3) Left TouchPad button Functions like the left button of an external mouse.
(4) Right TouchPad button Functions like the right button on an external mouse.
Lights
Component Description
(1) Caps lock light
●
White: Caps lock is on.
●
Off: Caps lock is off.
(2)
Mute light ● Amber: Computer sound is off.
●
Off: Computer sound is on.
Keyboard dock 9

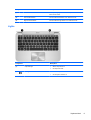
Keys
Component Description
(1) esc key Displays system information when pressed in combination with the
fn key.
(2) fn Displays system information when pressed in combination with the
esc key.
(3)
Windows button Returns you to the Start screen from an open app or the Windows
desktop.
NOTE: Pressing the Windows button again will return you to the
previous screen.
(4) b key Enables or disables Beats Audio when pressed in combination with
the fn key.
(5) Action keys Perform common tasks.
NOTE: Action keys do not display or function on the on-screen
keyboard of the tablet.
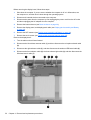
Right side
10 Chapter 2 External component identification

Component Description
(1) Digital Media Slot Supports the following digital card formats:
●
Secure Digital (SD) Memory Card
●
Secure Digital Extended Capacity (SDxC) Memory Card
●
Secure Digital High Capacity (SDHC) Memory Card
● Ultra High Speed MultiMediaCard (UHS/MMC)
(2)
USB 2.0 port Connects an optional USB device.
(3)
Power connector Connects an AC adapter.
Keyboard dock 11

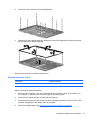
Left side
Component Description
(1)
HDMI port Connects an optional video or audio device, such as a high-
definition television, any compatible digital or audio component,
or a high-speed HDMI device.
(2)
USB 2.0 port Connects an optional USB device.
(3)
Audio-out (headphone) jack/Audio-in
(microphone) jack
Connects optional powered stereo speakers, headphones,
earbuds, a headset, or a television audio cable. Also connects
an optional headset microphone.
WARNING! To reduce the risk of personal injury, adjust the
volume before using headphones, earbuds, or a headset. For
additional safety information, see the Regulatory, Safety and
Environmental Notices.
NOTE: When a device is connected to the jack, the computer
speakers are disabled.
NOTE: Be sure that the device cable has a 4-conductor
connector that supports both audio-out (headphone) and audio-
in (microphone).
NOTE: Stand-alone microphones and headphones with
separate microphone jacks are not supported.
12 Chapter 2 External component identification
Page is loading ...
Page is loading ...
Page is loading ...
Page is loading ...
Page is loading ...
Page is loading ...
Page is loading ...
Page is loading ...
Page is loading ...
Page is loading ...
Page is loading ...
Page is loading ...
Page is loading ...
Page is loading ...
Page is loading ...
Page is loading ...
Page is loading ...
Page is loading ...
Page is loading ...
Page is loading ...
Page is loading ...
Page is loading ...
Page is loading ...
Page is loading ...
Page is loading ...
Page is loading ...
Page is loading ...
Page is loading ...
Page is loading ...
Page is loading ...
Page is loading ...
Page is loading ...
Page is loading ...
Page is loading ...
Page is loading ...
Page is loading ...
Page is loading ...
Page is loading ...
Page is loading ...
Page is loading ...
Page is loading ...
Page is loading ...
Page is loading ...
Page is loading ...
Page is loading ...
Page is loading ...
Page is loading ...
Page is loading ...
Page is loading ...
Page is loading ...
Page is loading ...
Page is loading ...
Page is loading ...
Page is loading ...
Page is loading ...
Page is loading ...
Page is loading ...
Page is loading ...
Page is loading ...
Page is loading ...
Page is loading ...
Page is loading ...
Page is loading ...
Page is loading ...
Page is loading ...
Page is loading ...
Page is loading ...
-
 1
1
-
 2
2
-
 3
3
-
 4
4
-
 5
5
-
 6
6
-
 7
7
-
 8
8
-
 9
9
-
 10
10
-
 11
11
-
 12
12
-
 13
13
-
 14
14
-
 15
15
-
 16
16
-
 17
17
-
 18
18
-
 19
19
-
 20
20
-
 21
21
-
 22
22
-
 23
23
-
 24
24
-
 25
25
-
 26
26
-
 27
27
-
 28
28
-
 29
29
-
 30
30
-
 31
31
-
 32
32
-
 33
33
-
 34
34
-
 35
35
-
 36
36
-
 37
37
-
 38
38
-
 39
39
-
 40
40
-
 41
41
-
 42
42
-
 43
43
-
 44
44
-
 45
45
-
 46
46
-
 47
47
-
 48
48
-
 49
49
-
 50
50
-
 51
51
-
 52
52
-
 53
53
-
 54
54
-
 55
55
-
 56
56
-
 57
57
-
 58
58
-
 59
59
-
 60
60
-
 61
61
-
 62
62
-
 63
63
-
 64
64
-
 65
65
-
 66
66
-
 67
67
-
 68
68
-
 69
69
-
 70
70
-
 71
71
-
 72
72
-
 73
73
-
 74
74
-
 75
75
-
 76
76
-
 77
77
-
 78
78
-
 79
79
-
 80
80
-
 81
81
-
 82
82
-
 83
83
-
 84
84
-
 85
85
-
 86
86
-
 87
87


Ask a question and I''ll find the answer in the document
Finding information in a document is now easier with AI
Related papers
-
HP Slate 7 2800 Tablet User guide
-
HP ENVY 15-c000 x2 Detachable PC User guide
-
-
HP (Hewlett-Packard) 13-m200ef User manual
-
HP Spectre Series User Spectre Pro x360 G1 Convertible PC User guide
-
-
HP Pro x2 Series Pro x2 612 G1 Tablet User guide
-
-
-