Page is loading ...

1
Schwinn
®
170 (Model Year 2017) Upright Bike
Service Manual
8012668.020118.B
Service Manual
Section Code Section Page Number
1 Important Safety Instructions 2
1 Safety Warning Labels and Serial Number 3
1 ReadingtheProductSpecicationLabel 3
1 Specications 3
1 Maintenance 4
1 Leveling the Machne 5
1 Moving the Machine 5
1 USB Charging 6
1 Troubleshooting 7
1 Console Service Mode 9
1 Maintenance Parts Exploded View 12
1 Replacement Procedure Skill Level 13
Mechanical Procedures 14
2 Belt Tension Adjustment 14
3 Set the Brake Tension (Calibration) 17
Part Replacement 20
4 Console 20
5 Pedals 22
6 Crank Arms 24
7 Transport Wheels 28
8 Shrouds 30
9 Handlebar Assembly 35
10 Console Mast 38
11 Data Cable in the Mast 42
12 Brake Assembly 45
13 Servo Motor 47
14 Drive Belt and Flywheel Assembly 51
15 Belt Tensioner Assembly (Idler Assembly) 54
16 RPM Sensor (Speed Sensor) 56
17 Power Inlet 58
Table of Contents
Nautilus, Inc., (800) NAUTILUS / (800) 628-8458, www.NautilusInc.com - Customer Service: North America (800) 605-3369, [email protected] | outside U.S. www.nautilusinternational.com |
© 2016 Nautilus, Inc. | ® indicates trademarks registered in the United States. These marks may be registered in other nations or otherwise protected by common law. Schwinn, the Schwinn
Quality logo, Schwinn 170, Schwinn Connect, and Nautilus are trademarks owned by or licensed to Nautilus, Inc. Polar® and OwnCode® are trademarks of their owner. The Bluetooth® word
mark and logos are registered trademarks owned by Bluetooth SIG, Inc., and any use of such marks by Nautilus, Inc. is under license.
8014249.020118.B

2
Important Safety Instructions and General Troubleshooting
Information for the Schwinn
®
170 (Model Year 2017) Bike
8012670.020118.B
Service Procedures
Important Safety Instructions
This icon means a potentially hazardous situation which, if not avoided, could result in death or serious injury. Read and
understand all Warnings on this machine.
Before servicing or using this equipment, obey the following warnings:
Read and understand the Service Manual before working on the machine. Failure to obey the instructions and safety warnings
could cause injury to the service technician or bystanders.
• Keep bystanders and children away from the product being serviced at all times.
• Makesurethattherepairisdoneinanappropriateworkspaceawayfromfoottrafcandexposuretobystanders.
• Disconnect all power to the machine before you service it.
• Some components of the equipment can be heavy or awkward. Enlist the service of a second person when you do maintenance steps involving
these components. Do not try to do heavy or awkward steps on your own.
• If replacement parts are necessary, use only genuine replacement parts and hardware supplied by Nautilus. Failure to use genuine replacement
parts can cause a risk to users, keep the machine from operating correctly and void the warranty.
• Be sure that all warning stickers and instructional placards applied to the product stay present and in good condition when doing maintenance or
replacing components. If necessary, request replacement warning stickers or placards from Nautilus customer service.
• Do not try to change the design or functionality of the machine being serviced as this can adversely affect user safety.
• Donotputthemachinebackinserviceuntilallshrouds,instructions,warninglabelsandcorrectfunctionalityhavebeenveriedandtestedfor
correct performance.
Nautilus, Inc., (800) NAUTILUS / (800) 628-8458, www.NautilusInc.com - Customer Service: North America (800) 605-3369, [email protected] | outside U.S. www.nautilusinternational.com | © 2016 Nautilus, Inc. |
® indicates trademarks registered in the United States. These marks may be registered in other nations or otherwise protected by common law. Schwinn, the Schwinn Quality logo, Schwinn 170, Schwinn Connect, and
Nautilus are trademarks owned by or licensed to Nautilus, Inc. Polar® and OwnCode® are trademarks of their owner. The Bluetooth® word mark and logos are registered trademarks owned by Bluetooth SIG, Inc., and any
use of such marks by Nautilus, Inc. is under license.
NOTICE: This document provides important safety instructions, adjustments, and general troubleshooting information for the maintenance of the Schwinn
®
170 (Model
Year 2017) Upright Bike.
If you need assistance, please call Schwinn Customer Service at 1-800-605-3369.
This icon means a potentially hazardous situation which, if not avoided, could result in death or serious injury. Read and understand
all Warnings on this machine.

3
Safety Warning Labels and Serial Numbers
Specications
Reading the Product Specication Decal
TheManufactureDateontheProductSpecicationDecalisa
date code: YY/WW (year/week).
TITLE.
PART NO.
REV.
SHEET 1 OF 1
SCALE: 1:1
DO NOT SCALE DRAWING
This document is the property of Nautilus, Inc. It may not be reproduced in whole or part, provided to third parties, or used for any purposes other than the performance of work for Nautilus, Inc. without written authorization. All rights are reserved, including copyrights.
DATE
PRODUCT GRAPHIC TEMPLATE_AI_4/29/2015_RevA_CRW
NAUTILUS, INC.
16400 SE NAUTILUS DRIVE, VANCOUVER, WA 98683
E. MAURICE
05/13/2015
A
PSD, SCHWINN AD8, INTL
COLOR.
100% BLACK
DIE-LINE
MATERIAL/PROCESS: SEE NOTES
ADHESIVE: SEE NOTES
FINSH / TEXTURE: SEE NOTES
NOTE:
1. INK MUST BE 100% OPAQUE TO INSURE CORRECT COLOR
2 LABEL MUST BE CREATED FROM AN AGENCY APPROVED TAMPER PROOF LABELING SYSTEM
SUCH AS UL RECOGNIZED COMPONENT AND LABELING SYSTEM (EXAMPLE: UL PGGU2) OR EQUVIALENT
3. LABEL AND ADHESIVE MUST BE RATED FOR SURFACE IT IS APPLIED TO (PAINTED METAL OR PLASTIC)
4. LABEL AND ADHESIVE MUST BE RATED FOR 60 DEGREES C MINIMUM.
5. LABEL MUST MEET UL 1647 PERMANANCE OF MARKING TEST
6. SUPPLIES SHALL POPULATE THE DATE FIELDS:
YY= MANUFACTURED YEAR
WW= MANUFACTURED WEEK
ECO REVISION REVISION DESCRIPTION APPROVED DATE
001210 A PRODUCTION RELEASE DF 05/13/2015
- - - - - - - - --/--/----
- - - - - - - - --/--/----
- - - - - - - - --/--/----
DESIGNED
8008673
800xxxx_A
18225 NE Riverside Parkway,
Portland, Or. 97230
www.nautilusinternational.com
Brand: Model:
Electrical Rating:
Accuracy Class:
Usage Class:
Maximum User Weight:
Equipment Type:
Made in:
Manufacture Date Code:
40mm
50mm
Patent: www.nautilusinc.com/IP
Nautilus, Inc.
YYWW
Serial number
Product
specication
WARNING!
• Injury or death is possible if
caution is not used while using
this machine.
• Keep children and pets away.
• Read and follow all warnings on
this machine.
• Refer to the Owner’s Manual for
additional warnings and safety
information.
• The heart rate displayed is an
approximation and should be
used for reference only.
• Not intended for use by anyone
under 13 years of age.
• The maximum user weight for
this machine is 300 lbs ( 136kg ).
• This machine is for home use
only.
• Consult a physician prior to using
any exercise equipment.
41.3” (105cm)
21.4” (54cm)
55.6” (141cm)
Maximum User Weight: 300 lbs. (136 kg)
Power Requirements:
Operating Voltage: 9VDC
Operating Current: 1.5A
Regulatory Approvals:
ACPowerAdapter: ULlisted,CSAcertied(orequivalent),Rated
120V 60Hz Input, 9VDC, 1500mA Output.
Class 2.
WARNING: This product, its packaging, and components contain
chemicals known to the State of California to cause cancer, birth
defects,orreproductiveharm.ThisNoticeisprovidedinaccordance
with California’s Proposition 65. If you would like additional
information, please refer to our website at www.nautilus.com/prop65.

4
Maintenance
Read all maintenance instructions fully before you start any repair work. In some conditions, an assistant is necessary to do the necessary tasks.
!
Equipment must be regularly examined for damage and repairs. The owner is responsible to make sure that
regular maintenance is done. Worn, damaged or loose components must be repaired or replaced
immediately. Only manufacturer supplied components can be used to maintain and repair the equipment.
If at any time the Warning labels become loose, unreadable or dislodged, contact Nautilus Customer
Service for replacement labels.
Disconnect all power to the machine before you service it.
Daily: Before each use, examine the exercise machine for loose, broken, damaged, or worn parts.
Donotuseiffoundinthiscondition.Repairorreplaceallpartsattherstsignofwearordamage.
After each workout, use a damp cloth to wipe your machine and Console free of moisture.
Note:AvoidexcessivemoistureontheConsole.
NOTICE: If necessary, only use a mild dish soap with a soft cloth to clean the Console. Do not clean
withapetroleumbasedsolvent,automotivecleaner,oranyproductthatcontainsammonia.
Do not clean the Console in direct sunlight or at high temperatures. Be sure to keep the Con-
sole free of moisture.
Weekly: Cleanthemachinetoremoveanydust,dirt,orgrimefromthesurfaces.Checkforsmoothseatslider
operation.Ifneeded,applyaverythincoatingofsiliconelubetoeaseoperation.
Silicone lubricant is not intended for human consumption. Keep out of reach of children.
Store in a safe place.
Note: Do not use petroleum based products.
Monthly
or after 20 hours:
Check pedals and crank arms and tighten as necessary. Make sure all bolts and screws are tight.
Tighten as necessary.
FCC Compliance
!
Changesormodicationstothisunitnotexpresslyapprovedbythepartyresponsibleforcompliancecouldvoid
the user’s authority to operate the equipment.
The machine and power supply comply with part 15 of the FCC rules. Operation is subject to the following two
conditions:(1)Thisdevicemaynotcauseharmfulinterference,and(2)thisdevicemustacceptanyinterference
received,includinginterferencethatmaycauseundesiredoperation.
Note:ThismachineandpowersupplyhavebeentestedandfoundtocomplywiththelimitsforaClassBdigital
device,pursuanttoPart15oftheFCCRules.Theselimitsaredesignedtoprovidereasonableprotection
against harmful interference in a residential installation. This equipment generates, uses and can radiate
radio frequency energy and, if not installed and used in accordance with the instructions, may cause harmful
interference to radio communications.
However,thereisnoguaranteethatinterferencewillnotoccurinaparticularinstallation.Ifthisequipmentdoes
causeharmfulinterferencetoradioortelevisionreception,whichcanbedeterminedbyturningtheequipmentoffand
on, the user is encouraged to try to correct the interference by one or more of the following measures:
•Reorientorrelocatethereceivingantenna.
•Increasetheseparationbetweentheequipmentandreceiver.
•Connecttheequipmentintoanoutletonacircuitdifferentfromthattowhichthereceiverisconnected.
• Consult the dealer or an experienced radio/TV technician for help.

5
Leveling Your Bike
LevelersarefoundoneachsideoftheRearStabilizer.Turntheknobtoadjustthestabilizerfoot.Makesurethebike
islevelandstablebeforeyouexercise.
Moving Your Bike
Tomovetheuprightbike,carefullytilttheHandlebarstowardyouwhilepushingthefrontofthebikedownward.Pushthe
bike to the desired location.
NOTICE:Becarefulwhenyoumovethebike.Abruptmotionscanaffectthecomputeroperation.

6
USB Charging
IfaUSBDeviceisattachedtotheUSBPort,thePortwillattempttochargetheDevice.
Note:Dependingontheamperageofdevice,thepowersuppliedfromtheUSBPortmaynotbeenoughtooperate
theDeviceandchargeitatthesametime.
Virtual Reality experience on your tness machine
ThistnessmachineisequippedtosupportaVirtualReality(VR)experienceonsupporteddevices.TheRPMSensor
detectsthemotionofthe8SpeedSensorMagnetsontheDrivePulleyasitrotates,andtransmitsthesignalstothe
Console for VR input.
Review, understand, and follow all warning instructions and the correct operation as supplied with your
Virtual Reality equipment.
No one under the age of 13 should use this exercise equipment or the Virtual Reality experience.
Before starting a workout with the Virtual Reality experience, be sure the workout area is and will be clear
throughout the workout, and that all persons or pets are restricted from the workout area. If necessary, a
second person should be used to help secure the area.
The VR experience produces an immersive virtual reality experience that distracts and blocks the view of
the actual surroundings. For the safest experience, only use the VR experience when operating the tness
equipment in the seated position. Do not start the VR experience until seated and ready to start a workout.
Be sure the area is secure and that the workout area is safe from potential harm and clear of all obstacles
within reach. Damage to you or items in the workout area could result during a VR workout. Stay seated on
the exercise equipment until the VR gear has been removed and the actual surroundings are viewable.
If dizziness or motion sickness is experienced from the Virtual Reality experience, safely balance yourself
and stop the Virtual Reality experience as soon as possible. Coordination and balance is required when
using the VR experience with the exercise machine.
Consult with a doctor before using the VR experience if you have any conditions which may be affected by
an immersive Virtual Reality experience, such as epilepsy, pregnant, elderly, psychotic disorders, vision
abnormalities, heart conditions, or any other medical condition.

7
Troubleshooting
Condition/Problem Things to Check Solution
No display/partial display/
unit will not turn on
Check electrical (wall)
outlet
Make sure unit is plugged into a functioning wall outlet.
Check connection on
console
Connection should be secure and undamaged. Replace
adapter or connection at unit if either are damaged.
Check data cable integrity Allwiresincableshouldbeintact.Ifanyarevisiblycrimpedor
cut, replace cable.
Check data cable
connections/orientation
Be sure cable is connected securely and oriented properly.
Small latch on connector should line up and snap into place.
Check console display for
damage
Checkforvisualsignthatconsoledisplayiscrackedorother-
wise damaged. Replace Console if damaged.
Console Display IfConsoleonlyhaspartialdisplayandallconnectionsarene,
replace the Console.
Iftheabovestepsdonotresolvetheproblem,contactCus-
tomer Care for further assistance.
Unit operates but Contact
HR not displayed
HR cable connection at
Console
Be sure cable is connected securely to Console.
Sensor grip Be sure hands are centered on HR sensors. Hands must be
keptstillwithrelativelyequalpressureappliedtoeachside.
Dry or calloused hands Sensorsmayhavedifcultywithdriedoutorcallousedhands.
Aconductiveelectrodecream(heartratecream)canhelp
makebetterconduct.Theseareavailableontheweborat
medicalorsomelargertnessstores.
Handlebar Iftestsrevealnootherissues,Handlebarsshouldbereplaced.
Unit operates but
Telemetric HR not
displayed
Chest Strap (optional) Strap should be “POLAR®” compatible and uncoded. Make
sure strap is directly against skin and contact area is wet.
Chest Strap Batteries If strap has replaceable batteries, install new batteries.
CheckUserProle SelecttheEditUserProleoptionfortheUserProle.Goto
the WIRELESS HR setting and make sure that the current
valueissettoON.
Interference Trymovingunitawayfromsourcesofinterference(TV,Micro-
wave,etc).
Replace Chest Strap If interference is eliminated and HR does not function, replace
strap.
Replace Console If HR still does not function, replace Console.
Unit operates but
Telemetric HR displayed
incorrectly
Interference MakesurethattheHRreceiverisnotblockedbyapersonal
electronicdeviceintheleftsideofthemediatray.
Console displays “E2” er-
ror code
Check data cable integrity All wires in cable should be intact. If any are cut or crimped,
replace cable.
Check data cable
connections/orientation
Be sure cable is connected securely and oriented properly.
Small latch on connector should line up and snap into place.
Console Electronics Iftestsrevealnootherissues,contactCustomerCareforfur-
ther assistance.
No speed/RPM reading,
Console displays “Please
Pedal” error code
Check data cable integrity All wires in cable should be intact. If any are cut or crimped,
replace cable.
Check data cable
connections/orientation
Be sure cable is connected securely and oriented properly.
Small latch on connector should line up and snap into place.

8
Condition/Problem Things to Check Solution
Check magnet position
(requiresshroudremoval)
Magnets should be in place on pulley.
Check Speed Sensor
(requiresshroudremoval)
Speed sensor should be aligned with magnet and connected to
data cable. Realign sensor if necessary. Replace if there is any
damage to the sensor or the connecting wire.
Resistance does not
change (machine turns on
and operates)
Batteries (if equipped) Replace batteries and check for proper operation.
Check Console CheckforvisualsignthatConsoleisdamaged.ReplaceCon-
sole if damaged.
Check data cable integrity Allwiresincableshouldbeintact.Ifanyarevisiblycrimpedor
cut, replace cable.
Check data cable
connections/orientation
Be sure cable is connected securely and oriented properly.
Reseat all connections. Small latch on connector should line up
and snap into place.
CheckServoMotor
(requiresshroudremoval)
Ifmagnetsmove,adjustuntiltheyarewithintheproperrange.
ReplaceServoMotorifnotfunctioningproperly.
Iftheabovestepsdonotresolvetheproblem,contactCus-
tomer Care for further assistance.
Console shuts off (enters
sleep mode) while in use
Check electrical (wall)
outlet
Make sure unit is plugged into a functioning wall outlet.
Check connection on
console
Connection should be secure and undamaged. Replace
adapter or connection at unit if either are damaged.
Check data cable integrity All wires in the cable should be intact. If any are cut or crimped,
replace cable.
Check data cable
connections/orientation
Be sure cable is connected securely and oriented properly.
Small latch on connector should line up and snap into place.
Reset Machine Unplug unit from electrical outlet for 3 minutes. Reconnect to
outlet.
Check magnet position
(requiresshroudremoval)
Magnets should be in place on pulley.
Check Speed Sensor
(requiresshroudremoval)
Speed sensor should be aligned with magnet and connected to
data cable. Realign sensor if necessary. Replace if there is any
damage to the sensor or the connecting wire.
Unit rocks/does not sit
level
Checkleveleradjustment Adjustlevelersuntilbikeislevel.
Check surface under unit Adjustment may not be able to compensate for extremely un-
evensurfaces.Movebiketolevelarea.
Pedalsloose/unitdifcult
to pedal
Check pedal to crank arm
connection
Pedal should be tightened securely to crank. Insure connection
is not cross-threaded.
Check crank arm to axle
connection
Crank should be tightened securely to axle. Be sure cranks are
connected at 180 degrees from each other.
Clicking sound when
pedaling
Check pedal to crank arm
connection
Removepedals.Makesurethereisnodebrisonthreads,and
reinstall the pedals.
Seatpostmovement Check locking pin Be sure adjustment pin is locked into one of the seat post
adjustment holes.
Check adjustment knob Be sure knob is securely tightened.

9
Console Setup Mode – 170 / 270 series (MY17) Console
The Console Setup Mode lets you input the date and time, set the units of measurement to either English or Metric,
controlthesoundsettings(on/off),orseemaintenancestatistics(TotalRunHours–forservicetechnicianuseonly).
1. Hold down the PAUSE/END button and Right button together for 3 seconds while in the Power-Up Mode to go into
the Console Setup Mode.
Note: Push PAUSE/END to exit the Console Setup Mode and return to the Power-Up Mode screen.
2. The Console display shows the Date prompt with the current setting. To change, push the Increase/Decrease buttons
toadjustthecurrentlyactivevalue(ashing).PushtheLeft/Rightbuttonstochangewhichsegmentisthecurrently
activevalue(month/day/year).
3. Push OK to set.
4. The Console display shows the Time prompt with the current setting. Push the Increase/Decrease buttons to adjust
thecurrentlyactivevalue(ashing).PushtheLeft/Rightbuttonstochangewhichsegmentisthecurrentlyactivevalue
(hour / minute / AM or PM).
5. Push OK to set.
6. The Console display shows the Units prompt with the current setting. To change, push OK to start the Units option.
Push the Increase/Decrease buttons to change between “MILES” (Imperial English units) and “KM” (metric units).
Note:IftheunitschangewhenthereisdatainUserStatistics,thestatisticsconverttothenewunits.
7. Push OK to set.
8. The Console display shows the Sound Settings prompt with the current setting. Push the Increase/Decrease buttons
to change between “ON” and “OFF”.
9. Push OK to set.
10. The Console display shows the TOTAL RUN HOURS for the machine.
TogotothenextConsoleSetupModeprompt,pushtheOKbutton.(Gotostep11.)
11. The Console display shows the Software Version prompt. Push OK to go to the next prompt.
12. READINGBLE–TheConsoledisplayshowstheBluetooth
®
reading string.
13. DISCONNECTBLE_NO–PushtheIncrease/Decreasebuttonstoadjustthevalue(NO/YES).PushOKtoset.
14. VIEWERRORMSG_NO–PushtheIncrease/Decreasebuttonstoadjustthevalue(NO/YES).PushOKtoset.
15. RESET CONSOLE_NO – This option resets the data from user inputs. Push the Increase/Decrease buttons to adjust
thevalue(NO/YES).IfYESisselected,theConsolesetup,userrecordsandworkoutrecordswillberesettodefaults.
ThisoptiondoesnotresetMFGNVM(nonvolatilememory).
16 . The Console will display the Power-Up Mode screen.
Console Service Mode – 170 / 270 series (MY17) Console
SERVICEMODEisasub-menufromtheCONSOLESETUPMODE.MostoftheoptionscontainedwithintheService
ModeareforServiceTechniciansandshouldnotneedtobeusedbyauser.
To access the Engineering Mode:
1. From the Power Up (or Welcome) screen, push and hold down the PAUSE/STOP button and Right arrow button for
about 5 seconds to go into the Console Setup Mode. The Console display will show the Date prompt with the current
setting.
Note: Push PAUSE/STOP to exit the Console Setup Mode and return to the Power-Up Mode screen.
2. Push the OK button 4 times until the Console displays the TOTAL RUN HOURS screen.
3.ToentertheManufacturingMenu(MFGMenu),holddownthePAUSE/ENDbuttonandRightbuttontogetherfor3
seconds.TheConsoledisplayshowstheFirmwareVersionstring.PushtheUp/Downbuttonstomovethroughthe
MFGMenuoptions.PushOKtomakeaselection.
a. ENTERMFGTEST–Thisoptionisintendedforuseonthemanufacturingproductionlineonly.Itisachained
series of tests similar to the tests listed below, but optimized to be run on the production line. Use of this chained
test should not be necessary anywhere but on the production line.

10
b. The main processor SoftwareVersion prompt is displayed.
c. ENTR NVM TST – (Non-Volatile Memory or Flash test) Push OK two times. If correct, NVM ID PASS is displayed.
Press OK to exit.
d. ENTRLCDTST–Drives3x5and1x5LCDdisplayswiththefollowingpatterns:
1. All LEDs On 1 second
2. All LEDs Off 1 second
3. Sequence Segments 1 at a time – on 1 second, off 1 second
Press OK to exit test
e. ENTRLEDTST–DrivesLEDstothefollowingstates:
1. All LEDs On 1 second
2. All LEDs Off 1 second
3. Sequence Segments 1 at a time – on 1 second, off 1 second
Press OK to exit test
f. ENTR RTC TST – Shows the real time change. Push OK again to start the Console internal check. If no failure,
RTC PASS is displayed. Press OK to exit.
g. ENTR AUD TST – (audio test) Sounds each system beep / tone / sequence in order. Press OK to exit.
h. ENTR HR TST – (Wireless and Contact Heart Rate test)
-TotestContactHeartRate,applyHRsignalstocontactinputorplacehandsonheartrategrips.TheCHReld
displays contact heart rate.
-TotestWirelessHeartRate,applyHRsignalstocontactinputorturnonwirelesstransmitter.TheWHReld
displays wireless heart rate.
The numbers displayed on LCD should be within normal range and match with the test subject or simulator.
i. ENTRKEYTST–PushOKtogotoBUTTONTESTprompt.PushOKtostartthetest.TheConsoledisplay
shows the function of each button as the buttons are pressed in the correct sequence shown (1 – 25). The
function numbers are displayed as 0 – 23 then BUTTON PASS (instead of 24).
Hr
1
2
3
4
5
6
7
8
910
11
12
13
14
15
16
17
18
19
20
21
22
23
24
25
Ifthedisplayshowsanincorrectfunction,theoverlayontheConsolemaybeincorrectforthatmodel.Ifthe
displaydoesnotshowafunction,thermwareversionmaybeincorrect.
j. ENTR FAN TST – Console Firmware will cause fan to cycle between run and stop. Monitor fan’s action. Press OK
to exit.

11
k. ENTRRSTNTST–(resistancetest)ConsoleFirmwarewillcauseexternalservomotortomoveupthenbackto
lowestsetting,andshowaRESISTANCEPASS.Monitorservomotor’sactivationduringtest.PressOKtoexit.
l. ENTR INCLN TST – (incline test, 470 elliptical only.) Not used for 170/270 bikes. Allows lift motor adjustment:
moveitupordown,orstopmovement.
m. ENTR TACH TST – The tach rate will be displayed in the LCD. Displayed rate approximately equals (Input signal
inHz)X60÷8.Conrmthatthedisplayednumbermatchestheinputvalue.PressOKtoexit.
n. ENTR BLE TEST – (Bluetooth
®
test) Console Firmware will test communications with BLE module. If BLE module
communicationisvalidandprogrammed,BLEPASSisdisplayed.Ifnotcorrect,BLEFAILisdisplayed.PressOK
to exit.
o. ENTR RST CNSL – (console reset) The Console setup, user records and workout records are reset to defaults.
ThisoptionalsoresetsMFGNVM(non-volatilememory).Whencomplete,theConsoledisplaysPOWERCYCLE
NOW.Afterthe‘’POWERCYCLENOW”ashesinLCD,turnpoweroffthenbackon.TheConsolereturnsto
initial state with date inputs prompt for users.
Note:AfteraccessingtheMFGMenu,ifyouusePAUSE/ENDtogobacktothePower-UpModescreenandthenhold
downthePAUSE/END+RightbuttonsforConsoleSetupMode,theConsolewillgodirectlytotheMFGMenuinstead.It
is necessary to power the machine off and on to restore the automatic path to Console Setup Mode.

12
Maintenance Parts Exploded View
Your machine may differ. Use only as a guide.
A
B
C
C
D
E
F
G
H
J
K
I
M
R
Q
N
O
P
S
T
U
V
J
D
X
W
AA
Y
Z
CC
BB
DD
EE
A
J
L
A Console L HR Cables W Flywheel
B Console Mast M CHR Sensors X Brake Assembly
C Pedals N Seat Y RPM Sensor
D Crank Arms O Seat Post w/ Slider Z Speed Sensor Magnets (8)
E Left Shroud P Adjustment Knob AA ServoMotor
F Power Inlet Q Seat Post Shroud BB DriveBelt
G Right Shroud R Water Bottle Holder CC DrivePulley
H Top Shroud S Rear Stabilizer DD HandlebarMountCover
I MastGasket T Levelers EE T-handle
J Data Cable U Front Stabilizer
K Handlebars V Transport Wheels

13
REPLACEMENT PROCEDURE SKILL LEVEL
Level I : Low - very little mechanical knowledge or exposure.
Level II : Intermediate - some experience with mechanical procedures
Level III : Advanced - knowledgeable about mechanical procedures
!
Disconnect all power to the machine before you service it.
When disposing of old parts, obey the applicable local and provincial requirements.
For instructions to replace the following parts, please refer to the Assembly Manual for your bike:
• AC Adapter
• Seat
• Seat Post
• Front Stabilizer
• Rear Stabilizer
• Water Bottle Holder

14
Adjust the Belt Tension on the Schwinn
®
130/170/230/270 and
Journey 1.0/1.5/2.0/2.5 Exercise Bikes
SkillLevel:II
8006487.020118.D
Replacement Procedure
Nautilus, Inc., (800) NAUTILUS / (800) 628-8458, www.NautilusInc.com - Customer Service: North America (800) 605-3369, [email protected] | outside U.S. www.nautilusinternational.com | © 2013 Nautilus, Inc. |
® indicates trademarks registered in the United States. These marks may be registered in other nations or otherwise protected by common law. Schwinn is a trademark licensed to Nautilus, Inc..
NOTICE: This document provides instructions for the adjustment of the Drive Belt tension on the Schwinn
®
130/170 Upright Bikes, 230/270 Recumbent Bikes,
Journey 1.0/1.5 Upright Bikes and Journey 2.0/2.5 Recumbent Bikes.
If you need assistance, please call Schwinn Customer Service at 1-800-605-3369.
This icon means a potentially hazardous situation which, if not avoided, could result in death or serious injury. Read and understand
all Warnings on this machine.
Important Safety Instructions - Before servicing or using this equipment, obey the following warnings:
This icon means a potentially hazardous situation which, if not avoided, could result in death or serious injury. Read and understand all
Warnings on this machine.
Disconnect all power to the machine before you service it.
• Read and understand the Part Replacement Procedure before working on the machine. Failure to obey the instructions and safety warnings
could cause injury to the service technician or bystanders.
• Keep bystanders and children away from the product being serviced at all times.
•Makesurethattherepairisdoneinanappropriateworkspaceawayfromfoottrafcandexposuretobystanders.
• Some components of the equipment can be heavy or awkward. Enlist the service of a second person when you do maintenance steps
involving these components. Do not try to do heavy or awkward steps on your own.
• If replacement parts are necessary, use only genuine Nautilus replacement parts and hardware. Failure to use genuine replacement parts
can cause a risk to users, keep the machine from operating correctly and void the warranty.
• Be sure that all warning stickers and instructional placards applied to the product stay present and in good condition when doing
maintenance or replacing components. If necessary request replacement warning stickers or placards from Nautilus customer service.
• Do not try to change the design or functionality of the machine being serviced as this can adversely affect user safety.
• Do not use the machine until all shrouds, instructions, warning labels and correct functionality have been verified and tested for correct
performance.
Tools Required (not included)
#2Phillipsscrewdriver 15mmopenendwrench
Smallatheadscrewdriver 15mmsocketandwrench
Pedal wrench (130/230)
or crank puller (170/270)

15
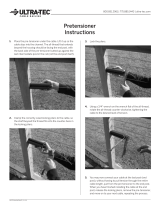
Note: Your machine may not match the image. For reference only.
1. RemovetheTopShroud,LeftShroudandRight
Shroud from the Main Unit. Refer to the “Replace the
Shrouds” procedure.
2. TotesttheDriveBelttension:
• PushtheDriveBeltdownwardatthemidpoint(M)
between the pulleys and measure the distance. The
DriveBeltshouldhaveonly0.25”(0.64cm)ofgive.
See Figure 1.
Or:
• HoldtheedgesoftheDriveBeltatthemidpoint(M)
and twist it (see Figure 2). It should turn only 90
degrees
(1/4turn,tovertical).
If the tension is correct, go to Step 6.
If the tension is too loose or too tight, adjust the position of the
Flywheel. Continue to Step 3.
3. To loosen the Flywheel hardware (A), use a 15 mm
open end wrench to hold the nut on one side steady and
loosen the nut on the opposite side with a 15 mm socket
and wrench.
4. MovetheFlywheelintheMainFramebracketas
necessary to adjust the tension. Hold it in position and
tighten the hardware.
Note: This step may require two people.
To tighten the Flywheel hardware, use a 15 mm open
end wrench to hold the nut on one side steady and
tighten the nut on the opposite side with a 15 mm socket
and wrench.
5. Carefullyturnthecrankarmsandcheckthemovement
ofthedrivebelt.TheCrankArmsandFlywheelshouldmove
as one.
!
Be sure to keep ngers clear of all pinch hazards when you
turn the Drive Pulley.
Adjust the belt tension again if necessary.
!
Disconnect all power to the machine before you service it.
NOTICE:ItisnecessarytoremovetheShroudsforthisprocedure.Refertothe“ReplacetheShrouds”procedure.
M
M
0.25”
0.64 cm
}
A
(Main Frame bracket not shown for clarity)
Figure 1
Figure 2

16
6. Reassemblyisthereverseprocedure.
NOTICE: Be sure not to crimp any cables.
130/230 bikes—To reinstall the Pedals, carefully align the
threadsandhandtightentopreventcross-threading.Then
tighten fully with pedal wrench.
Note: The Left Pedal is reverse-threaded. Orientation is
based from a seated position on the bike. The Left
Pedal has an “L”, the Right Pedal an “R”.
16. Final Inspection
Inspect your machine to ensure that all hardware is tight and
components are properly assembled.
!
Do not use until the machine has been fully assembled and
inspected for correct performance in accordance with the
Owner’s Manual.

17
Set the Brake Tension (Calibration) on the Schwinn
®
130/170
and Journey 1.0/1.5 Bikes
SkillLevel:III
8006749.020118.D
Replacement Procedure
NOTICE: ThisdocumentprovidesinstructionsforthecalibrationoftheBraketensionontheSchwinn
®
130/170 and Journey 1.0/1.5 Upright Bikes.
If you need assistance, please call Schwinn Customer Service at 1-800-605-3369.
This icon means a potentially hazardous situation which, if not avoided, could result in death or serious injury. Read and understand
all Warnings on this machine.
Important Safety Instructions - Before servicing or using this equipment, obey the following warnings:
This icon means a potentially hazardous situation which, if not avoided, could result in death or serious injury. Read and understand all
Warnings on this machine.
Disconnect all power to the machine before you service it.
• Read and understand the Part Replacement Procedure before working on the machine. Failure to obey the instructions and safety warnings could cause
injury to the service technician or bystanders.
• Keep bystanders and children away from the product being serviced at all times.
•Makesurethattherepairisdoneinanappropriateworkspaceawayfromfoottrafcandexposuretobystanders.
• Some components of the equipment can be heavy or awkward. Enlist the service of a second person when you do maintenance steps involving these
components. Do not try to do heavy or awkward steps on your own.
• If replacement parts are necessary, use only genuine replacement parts and hardware supplied by Nautilus. Failure to use genuine replacement parts can
cause a risk to users, keep the machine from operating correctly and void the warranty.
• Be sure that all warning stickers and instructional placards applied to the product stay present and in good condition when doing maintenance or replacing
components. If necessary request replacement warning stickers or placards from Nautilus customer service.
• Do not try to change the design or functionality of the machine being serviced as this can adversely affect user safety.
• Do not use the machine until all shrouds, instructions, warning labels and correct functionality have been verified and tested for correct performance.
Tools Required (not included)
#2Phillipsscrewdriver 7mmopenendwrench
Smallatheadscrewdriver
Pedal wrench (130)
or crank puller (170)
2.5” x 10” cardboard (3mm / 1/8” thick)
and tape
Nautilus, Inc., (800) NAUTILUS / (800) 628-8458, www.NautilusInc.com - Customer Service: North America (800) 605-3369, [email protected] | outside U.S. www.nautilusinternational.com | © 2013 Nautilus, Inc. |
® indicates trademarks registered in the United States. These marks may be registered in other nations or otherwise protected by common law. Schwinn is a trademark licensed to Nautilus, Inc.

18
Note:Yourmachinemaynotmatchtheimage.Forreferenceonly.
1. Disconnect and reconnect the AC Adapter from the wall
outlet to turn the power off and on.
2. PushQuickStartandverifythattheconsoleshowsthat
thedefaultresistancelevelis4.
Disconnect all power and allow to sit for 5 minutes.
3. CarefullyremovetheSeatPost,SeatPostShroud,
Left Shroud and Right Shroud. (Refer to the “Replace the
Shrouds” procedure.) Turn the Top Shroud to keep it clear of
thepulleyassembly.DonotremovetheConsoleandMast,
and keep the Power Inlet cable (P) in the Shroud connected
to the wiring harness on the motor (D).
4. Insert 2.5” x 10” cardboard between the Brake Magnet
(A) and the Flywheel (B), and tape the cardboard to the
Brake Magnet.
Note:BesurethecardboardcoversalloftheBrake
Magnet.
5. Turn the power on again.
Machine is on. Current is active. There is risk of electrical
shock.
6. Use the console to set the resistance to the highest
level.ThismovestheBrakeMagnetArm(A1)forward.After
theBrakeMagnetArmstopsatthehighestresistancelevel,
turn power off.
Disconnect all power and allow to sit for 5 minutes.
NOTICE:Itisnecessarytoremovetheshroudsforthisprocedure.Refertothe“ReplacetheShrouds”procedure.
P
B
A
D
A1

19
7. To adjust the Brake tension, loosen the 2 hex head bolts
(C)andmovetheServoMotorassembly(D)untiltheclosest
point on the Brake Magnet (A) is within 3.0 mm (1/8”) of the
Flywheel (B). Tighten the bolts.
Note: If the cardboard is not 3mm (1/8”) thick, you can
use the pages of a paperback book to measure
the gap. Approximately 36 pages (sheets) = 3mm.
8. Turn the power on again. Use the console to check the
resistance adjustment.
Machine is on. Current is active. There is risk of electrical
shock.
Note: BeforefullyattachingtheShrouds,removethe
cardboard from between the Brake Magnet (A) and
theFlywheel(B).Powerupthemachinetoverify
thattheMagnetArmcanmovefreely,andthatthe
Brake Magnet and Flywheel do not touch.
9. Final Inspection
Inspect your machine to ensure that all hardware is tight and
components are properly assembled.
Do not use until the machine has been fully assembled and
inspected for correct performance in accordance with the
Owner’s Manual.
B
D
A
C

20
Replace the Console on the Schwinn
®
130/170/230/270 and
Journey 1.0/1.5/2.0/2.5 Bikes
SkillLevel:II
8007218.020118.C
Replacement Procedure
Nautilus, Inc., (800) NAUTILUS / (800) 628-8458, www.NautilusInc.com - Customer Service: North America (800) 605-3369, [email protected] | outside U.S. www.nautilusinternational.com | © 2013 Nautilus, Inc. |
® indicates trademarks registered in the United States. These marks may be registered in other nations or otherwise protected by common law. Schwinn is a trademark licensed to Nautilus, Inc.
NOTICE: ThisdocumentprovidesinstructionsforthereplacementoftheConsoleontheSchwinn
®
130/170 Upright Bikes, 230/270 Recumbent
Bikes, Journey 1.0/1.5 Upright Bikes and Journey 2.0/2.5 Recumbent Bikes.
If you need assistance, please call Schwinn Customer Service at 1-800-605-3369.
This icon means a potentially hazardous situation which, if not avoided, could result in death or serious injury. Read and understand
all Warnings on this machine.
Important Safety Instructions - Before servicing or using this equipment, obey the following warnings:
This icon means a potentially hazardous situation which, if not avoided, could result in death or serious injury. Read and understand all
Warnings on this machine.
Disconnect all power to the machine before you service it.
• Read and understand the Part Replacement Procedure before working on the machine. Failure to obey the instructions and safety warnings
could cause injury to the service technician or bystanders.
• Keep bystanders and children away from the product being serviced at all times.
•Makesurethattherepairisdoneinanappropriateworkspaceawayfromfoottrafcandexposuretobystanders.
• Some components of the equipment can be heavy or awkward. Enlist the service of a second person when you do maintenance steps
involving these components. Do not try to do heavy or awkward steps on your own.
• If replacement parts are necessary, use only genuine Nautilus replacement parts and hardware. Failure to use genuine replacement parts
can cause a risk to users, keep the machine from operating correctly and void the warranty.
• Be sure that all warning stickers and instructional placards applied to the product stay present and in good condition when doing
maintenance or replacing components. If necessary request replacement warning stickers or placards from Nautilus customer service.
• Do not try to change the design or functionality of the machine being serviced as this can adversely affect user safety.
• Do not use the machine until all shrouds, instructions, warning labels and correct functionality have been verified and tested for correct
performance.
Tools Required (not included)
#2Phillipsscrewdriver
/