Page is loading ...

D-17-228-01-rev.8 17-228-01-rev.8 11/16/20
Portable Survey
EchoRange
™
Transducer with temperature
Smart
™
Sensor
Depth Transducer
EchoRange
™
Models: M195, SS510
Transducer Models: M191, SS538, SS549
Patent http://www.airmar.com/patent.html
Applications
• M191, SS510, SS538, SS549: Over-the-side mounting
recommended
• M195 can be mounted over-the-side or on the outside of a hull.
- For an over-the-side mount, Airmar recommends a fabricated
stainless steel plate and weldment that mounts to a pole.
- For an exterior mount, Airmar recommends installing the
transducer in a welded steel tank.
Tools & Materials
Safety glasses
Dust mask
Ear protection
Model M195 over-the-side mount with fabricated plate
Stainless steel plate min. thickness: 6mm (1/4")
Purchased bolts (3) 1/4" x 20NPS
or threaded rods with washers and nuts (3)
Drill bit for bolt holes 7mm, #H, or 17/64"
Hole saw for cable fitting hole 38mm or 1-1/2"
Models: M191, SS510, SS538, SS549
Pipe
1-1/4 to 2" diameter
Long enough to adjust the depth of the transducer below the
water surface
Threaded at each end to match the pipe coupling and elbow
Right-angle pipe elbow (with removable plate)
Pipe coupling(s)
Pipe coupling adaptor:
M191, SS510 1/2" x 14NPS threads
SS538, SS549 3/4" x 14NPS threads
Silicone lubricant or petroleum jelly (Vaseline
®
) (some installations)
Cable ties (some installations)
Chains or cables or lines (some installations)
Clamps (some installations)
Water-based anti-fouling coating (mandatory in salt water)
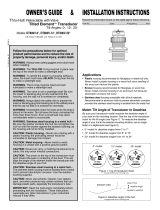
Over-the-side Mounting Location
• Locate the transducer at a sturdy support on the side of the hull
near the center (Figure 1). This location will minimize noise
from the propeller, bubbles caused by the boat’s travel, and the
effect of heave.
• The transducer must be fully submerged in water and not
subjected to air bubbles or turbulent water flowing under the
transducer’s face. Mount the transducer 1m (3') below the
water surface.
Record the information found on the cable tag for future reference.
Part No._________________Date___________Frequency________kHz
Follow the precautions below for optimal
product performance and to reduce the risk of
property damage, personal injury, and/or death.
WARNING: Always wear safety glasses, a dust mask,
and ear protection when installing.
CAUTION: Never pull, carry, or hold the transducer by
the cable as this may sever internal connections.
CAUTION: Never strike the transducer.
CAUTION: Never use solvents. Cleaner, fuel, sealant,
paint, and other products may contain solvents that can
damage plastic parts, especially the transducer’s face.
CAUTION: Never power sand or pressure wash the
transducer. It may weaken the structure or damage the
internal components.
IMPORTANT: Read the instructions completely
before proceeding with the installation. These
instructions supersede any other instructions in your
instrument manual if they differ.
EchoRange™
M195
SS510
EchoRange
™
M191
SS538
Figure 1. Over-the-side installation (SS549 shown)
Copyright © 2006 - 2010 Airmar Technology Corp.
RV Hydro Surveyor
SS549
OWNER’ S GUIDE & INSTALLATION INSTRUCTIONS
Sealcast™
Sealcast™

2
M191, SS510, SS538, SS549: Installation
1. Apply silicone lubricant or petroleum jelly to the threads of the
pipe at both ends to facilitate disassembly.
2. Twist the right-angle pipe elbow onto the upper end of the pipe.
The elbow will prevent the pipe from dropping off, protect the
cable, and can be used to orient the transducer.
3. With the appropriate pipe coupling adaptor in place, twist the
pipe coupling onto the opposite end of the pipe.
4. Guide the transducer cable through the pipe.
Alternately, after the transducer is mounted, attach the cable to
the outside of the pipe using cable ties.
5. Apply silicone lubricant or petroleum jelly to the transducer
stem. Screw the transducer stem into the pipe coupling.
6. Attach chains, cables, or lines to the pipe near the transducer
that will support the pipe from the force of the water when the
boat is underway (Figure 1).
7. Clamp the pipe to the gunnel. Be sure the pipe and thus the
transducer is perpendicular to the water surface.
8. Fasten the chains, cables, or lines as far fore and aft as is
practical. Use sufficient tension to support the pipe when the
boat is underway.
9. Route the cable to the instrument being careful not to tear the
cable jacket. To reduce electrical interference, separate the
transducer cable from other electrical wiring. Coil any excess
cable and secure it in place with cable ties to prevent damage.
10.Refer to the survey recorder owner’s manual to connect the
transducer to the instrument.
M195, SS510 EchoRange™ Models:
Cable Routing & Connecting
1. Route the cable to the instrument being careful not to tear the
cable jacket. To reduce electrical interference, separate the
transducer cable from other electrical wiring.
2. If the instrument is connected to a power source, the power
must be OFF before connecting the transducer to the
instrument.
NOTE: If there is no terminal for the bare wire (shield), cut it off
flush with the cable jacket.
3. Fasten the cable in place.
Maintenance & Replacement
Anti-fouling Coating
Surfaces exposed to salt water must be covered with an anti-
fouling coating. Use a water-based anti-fouling coating made for
transducers only. Never use ketone based paint, since ketones
can attack many plastics possibly damaging the transducer.
Brush on anti-fouling coating every 6 months.
Inspecting the Cable
Periodically inspect connections and connectors for indications of
corrosion. Inspect the cable for kinks, abrasions, and cuts. Repair
any damage using Airmar’s splash-proof Junction Box No. 33-035.
Cleaning
Keep the transducer assembly free of weeds and debris.
Aquatic growth can accumulate rapidly on the transducer’s
surface reducing its performance within weeks. Clean it using a
Scotch-Brite® scour pad and mild household detergent, being
careful to avoid making scratches. In severe cases, lightly wet
sand the surface with fine grade wet/dry paper.
Parts & Transducer Replacement
The information needed to order a replacement transducer is
printed on the cable tag. Do not remove this tag. When ordering,
specify the part number, date, and frequency in kHz. For
convenient reference, record this information on the top of page 1.
Lost, broken, or worn parts should be replaced immediately.
Obtain parts from your instrument manufacturer or marine dealer.
Gemeco
USA
Tel: 803-693-0777
Email: [email protected]
Airmar EMEA Europe, Middle East, Africa
Tel: +33.(0)2.23.52.06.48
Email: sales@airmar-emea.com

IMPORTANT: Some printers and printer
settings can alter the size of the template.
Verify the location of the holes before drilling
by placing the template over the transducer.
M195 Template

Copyright © 2006 - 2020 Airmar Technology Corp. All rights reserved.
35 Meadowbrook Drive, Milford, New Hampshire 03055-4613, USA
•
www.airmar.com
/