Page is loading ...
ROTARY HAMMER DRILL
OWNER’S OPERATING MANUAL
ERH710RG
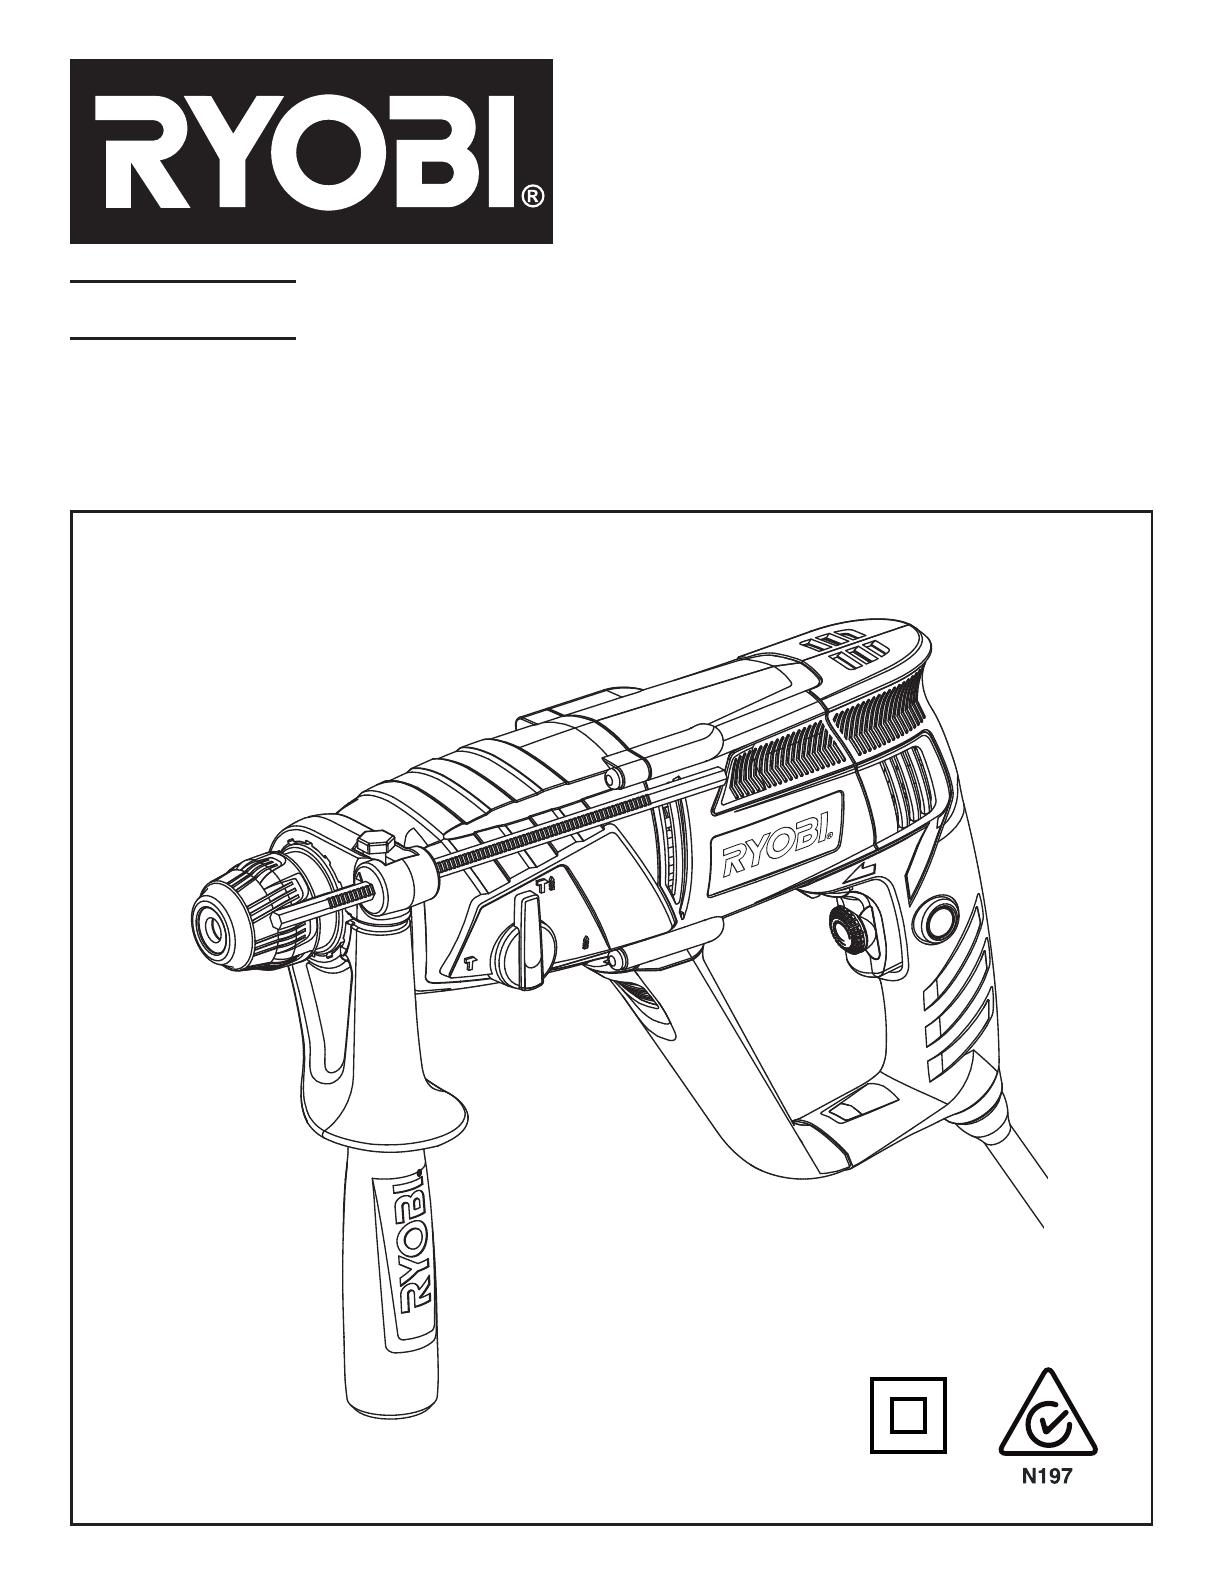
1. Locking collar
2. Variable switch with reverse action
3. Lock-on button
4. Auxiliary handle
5. Depth stop
6. Mode selector
7. Live tool indicator
8. Hammer mode
9. Hammer drill mode
10. Drill mode
DESCRIPTION
Fig. 1
Fig. 2 Fig. 3
1
5
6
4
1
1
2
3
7
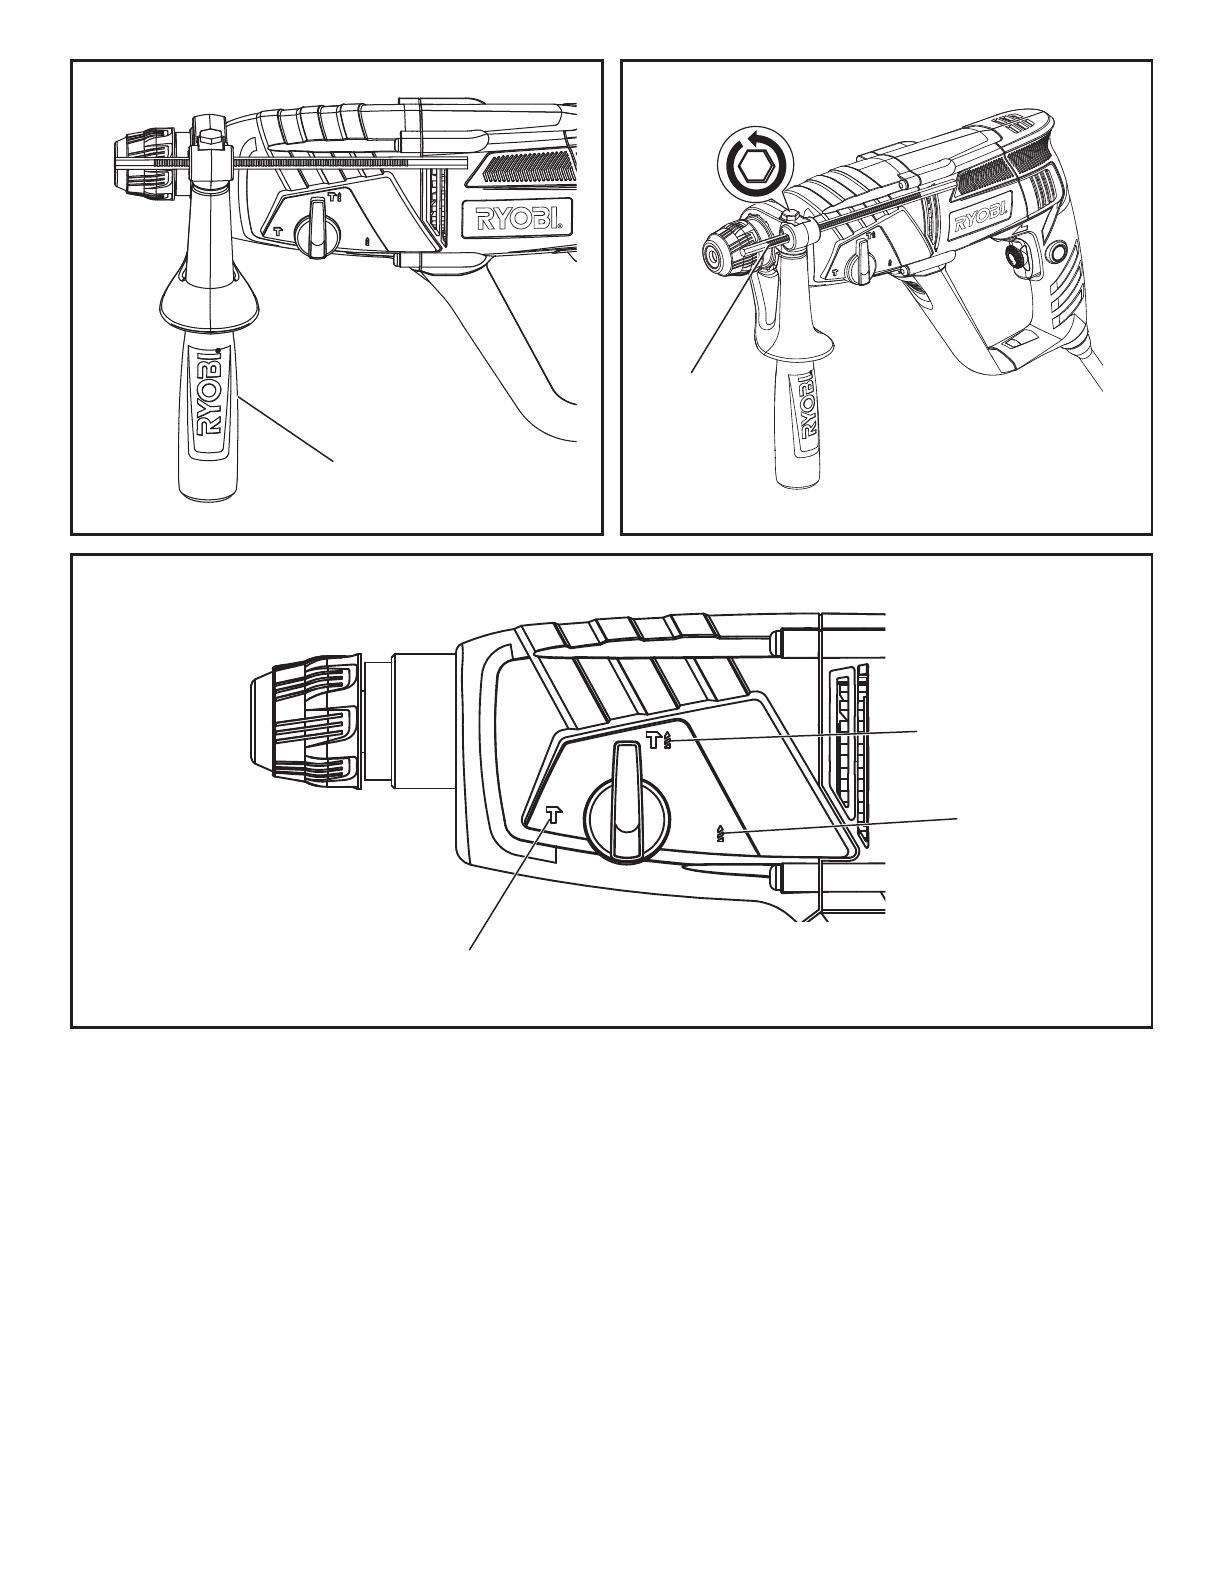
Fig. 4 Fig. 5
Fig. 6
4
5
8
9
10

Important!
It is essential that you read the instructions in this manual before
operating this machine.
Subject to technical modifications.

1
English
GENERAL POWER TOOL SAFETY WARNINGS
WARNING
Read all safety warnings and all instructions. Failure
to follow the warnings and instructions may result in electric
shock, fi re and/or serious injury.
Save all warnings and instructions for future
reference.
The term “power tool” in the warnings refers to your
mains-operated (corded) power tool or battery-operated
(cordless) power tool.
1. WORK AREA
a. Keep work area clean and well lit. Cluttered or
dark areas invite accidents.
b. Do not operate power tools in explosive
atmospheres, such as in the presence of
flammable liquids, gases, or dust. Power tools
create sparks which may ignite the dust or fumes.
c. Keep children and bystanders away while
operating a power tool. Distractions can cause
you to lose control.
2. ELECTRICAL SAFETY
a. Power tool plugs must match the outlet. Never
modify the plug in any way. Do not use any
adaptor plugs with earthed (grounded) power
tools. Unmodifi ed plugs and matching outlets will
reduce risk of electric shock.
b. Avoid body contact with earthed or grounded
surfaces such as pipes, radiators, ranges and
refrigerators. There is an increased risk of electric
shock if your body is earthed or grounded.
c. Do not expose power tools to rain or wet
conditions. Water entering a power tool will
increase the risk of electric shock.
d. Do not abuse the cord. Never use the cord for
carrying, pulling or unplugging the power tool.
Keep cord away from heat, oil, sharp edges
or moving parts. Damaged or entangled cords
increase the risk of electric shock.
e. When operating a power tool outdoors, use an
extension cord suitable for outdoor use. Use of
a cord suitable for outdoor use reduces the risk of
electric shock.
f. If operating power tools in a damp location
is unavoidable, use a residual current device
(RCD) protected supply. Use of an RCD reduces
the risk of electric shock.
3. PERSONAL SAFETY
a. Stay alert, watch what you are doing and
use common sense when operating a power
tool. Do not use a power tool while you are
tired or under the influence of drugs, alcohol
or medication. A moment of inattention while
operating power tools may result in serious
personal injury.
b. Use personal protective equipment. Always
wear eye protection. Protective equipment such
as dust mask, non-skid safety shoes, hard hat, or
hearing protection used for appropriate conditions
will reduce personal injuries.
c. Prevent unintentional starting. Ensure the
switch is in the off-position before connecting
to power source and/or battery pack, picking
up or carrying the tool. Carrying power tools with
your fi nger on the switch or energising power tools
that have the switch on invites accidents.
d. Remove any adjusting key or wrench before
turning the power tool on. A wrench or a key left
attached to a rotating part of the power tool may
result in personal injury.
e. Do not overreach. Keep proper footing and
balance at all times. This enables better control
of the power tool in unexpected situations.
f. Dress properly. Do not wear loose clothing or
jewellery. Keep your hair, clothing and gloves
away from moving parts. Loose clothes, jewellery
or long hair can be caught in moving parts.
g. If devices are provided for the connection of
dust extraction and collection facilities, ensure
these are connected and properly used. Use of
dust collection can reduce dust-related hazards.
4. POWER TOOL USE AND CARE
a. Do not force the power tool. Use the correct
power tool for your application. The correct
power tool will do the job better and safer at the
rate for which it was designed.
b. Do not use the power tool if the switch does not
turn it on and off. Any power tool that can not be
controlled with the switch is dangerous and must
be repaired.
c. Disconnect the plug from the power source
and/or the battery pack from the power tool
before making any adjustments, changing
accessories, or storing power tools. Such
preventive safety measures reduce the risk of
starting the power tool accidentally.
d. Store idle power tools out of the reach of
children and do not allow persons unfamiliar
with the power tool or these instructions
to operate the power tool. Power tools are

2
English
dangerous in the hands of untrained users.
e. Maintain power tools. Check for misalignment
or binding of moving parts, breakage of parts
and any other condition that may affect the
power tools operation. If damaged, have the
power tool repaired before use. Many accidents
are caused by poorly maintained power tools.
f. Keep cutting tools sharp and clean. Properly
maintained cutting tools with sharp cutting edges
are less likely to bind and are easier to control.
g. Use the power tool, accessories and tool bits
etc., in accordance with these instructions and
in the manner intended for the particular type
of power tool, taking into account the working
conditions and the work to be performed. Use
of the power tool for operations different from
intended could result in a hazardous situation.
5. SERVICE
a. Have your power tool serviced by a qualified
repair person using only identical replacement
parts. This will ensure that the safety of the power
tool is maintained.
SPECIAL SAFETY RULES
Wear ear protectors. Exposure to noise can cause
hearing loss.
Use auxiliary handles supplied with the tool. Loss
of control can cause personal injury.
If operation is dusty, also wear a dust mask.
Hold power tool by insulated gripping surfaces
when performing an operation where the cutting
accessory may contact hidden wiring or its own
cord. Cutting accessory contacting a “live” wire may
make exposed metal parts of the power tool “live” and
could give the operator an electric shock.
This appliance is not intended for use by persons
(including children) with reduced physical,
sensory or mental capabilities, or lack of
experience and knowledge, unless they have been
given supervision or instruction concerning use
of the appliance by a person responsible for their
safety. Children should be supervised to ensure
that they do not play with the appliance.
This appliance is not intended for use by young
children or infirm persons. Adequate supervision by a
responsible person must be provided to ensure that
they do not play with the appliance.
Keep children and visitors away. Visitors should
wear safety glasses and be kept a safe distance from
work area. Do not let visitors contact tool or extension
cord.
Complies with AS/NZS 60745.
Recommended for the use of a residual current device
with a rated residual current of 30 mA or less.
SAFETY PRECAUTIONS
IMPORTANT
To protect yourself from the risk of electric shock, injury
and fi re when using an electric tool, it is imperative to take
the following basic safety precautions. Before you use
your tool, read these instructions carefully and make sure
that you understand them thoroughly.
Make sure that the supply voltage (Volts) used
corresponds to the voltage marked on the tool's rating
plate.
When using cable drums, run all the cable off the
drum. Minimum cable across section: 1.0 mm.
When using the electric hammer drill outdoors,
connect it to an outdoor-grade extension cable type
H07RN-F 2G, 1.0 mm and rain-water-protected plugs
in proper working order.
Make sure of your footing when drilling freehand.
Before drilling, use a line detector to locate concealed
electric, water or gas lines in walls. Avoid touching live
components or conductors.
Wear goggles and use a dust mask on jobs generating
dust.
Wear ear protectors. Exposure to noise can cause
hearing loss.
Do not use your hammer drill near flammable liquids
or gases.
Always pull the plug out of the socket before cleaning
your tool or changing accessories.
Keep the power cable in good condition. Oil and acid
can damage the cable.
Never overload the tool.
Make sure your workplace is safe.
IMPORTANT
It is imperative to follow all national safety regulations
concerning installation, operation and maintenance of
the tool.
If incorrectly fitted, chisel bits and drill bits may be flung
out of the tool accidentally and cause serious injury.
Before you start using your hammer drill, always check
that the chisel or drill bit is properly locked in the chuck.
Examine the chuck regularly for signs of wear or

3
English
damage.
Always press the hammer drill against the work
surface (wall, ceiling, etc.) before you start it.
When you are finished, unplug the hammer drill from
the power supply and remove the chisel or drill bit.
Always disconnect the hammer drill from the power
supply before you change the chisel or drill bit.
Wear safety goggles to protect your eyes from flying
particles and splinters. Have other workers do the
same. Wear a helmet and put up partition walls in your
work place!
Wear work gloves to protect fingers from bruising and
grazing.
Vibrations can injure the hand-arm system. Keep
exposure to vibrations as short as possible.
Always keep the power cord behind the tool.
Store the tool out of the reach of children.
When using the tool, always hold it with both hands
and ensure that you have stable footing.
SPECIFICATIONS
Voltage 240 V 50 Hz
Power consumption 710 W
No-load speed (Drill mode) 0-1100 min
-1
Hammer speed (Blows per
minute)
0-4000 min
-1
Impact energy 2.0 J
Tool attachment SDS-plus
Weight 3.0 kg
Maximum drilling capacity
steel 13 mm
concrete/stone 24 mm
OPERATION
BEFORE STARTING TO USE YOUR HAMMER DRILL
Examine the place where the tool is to be used for
hidden electrical cables, gas, and water pipes using a
pipe finding device.
Before you plug in your tool, make sure that the supply
voltage used corresponds to that indicated on the
rating plate.
FITTING AND CHANGING BITS
See Figure 2 - 3.
The device is equipped with an SDS-plus attachment
system.
Clean the bit and grease it with a thin layer of machine
grease before inserting it into the chuck.
Pull back the locking collar and hold it.
Push and rotate the dust-free tool into the bit holder
as far as it will go.
Release the locking collar to lock the bit.
Check that it has locked by pulling on it.
REMOVING THE BIT FROM THE SDS-PLUS SYSTEM
Pull back the locking collar and remove the bit.
CHUCK ADAPTOR (IF INCLUDED)
For drilling work in metal, wood and plastic with drill bits
that have non SDS plus shaft, the drill adaptor is available.
SWITCHING ON/OFF
Speed control
The speed of the drill may be varied by increasing the
pressure exerted on the trigger. The speed will increase
as more pressure is applied. To limit the maximum speed
of the drill, rotate the dial on the front of the trigger until the
desired setting is achieved.
Lock-on button
If you want to keep your hammer drill operating at a
constant speed, press the lock-on button while pressing
the variable switch. To unlock this function, briefl y press
the variable switch then release it.
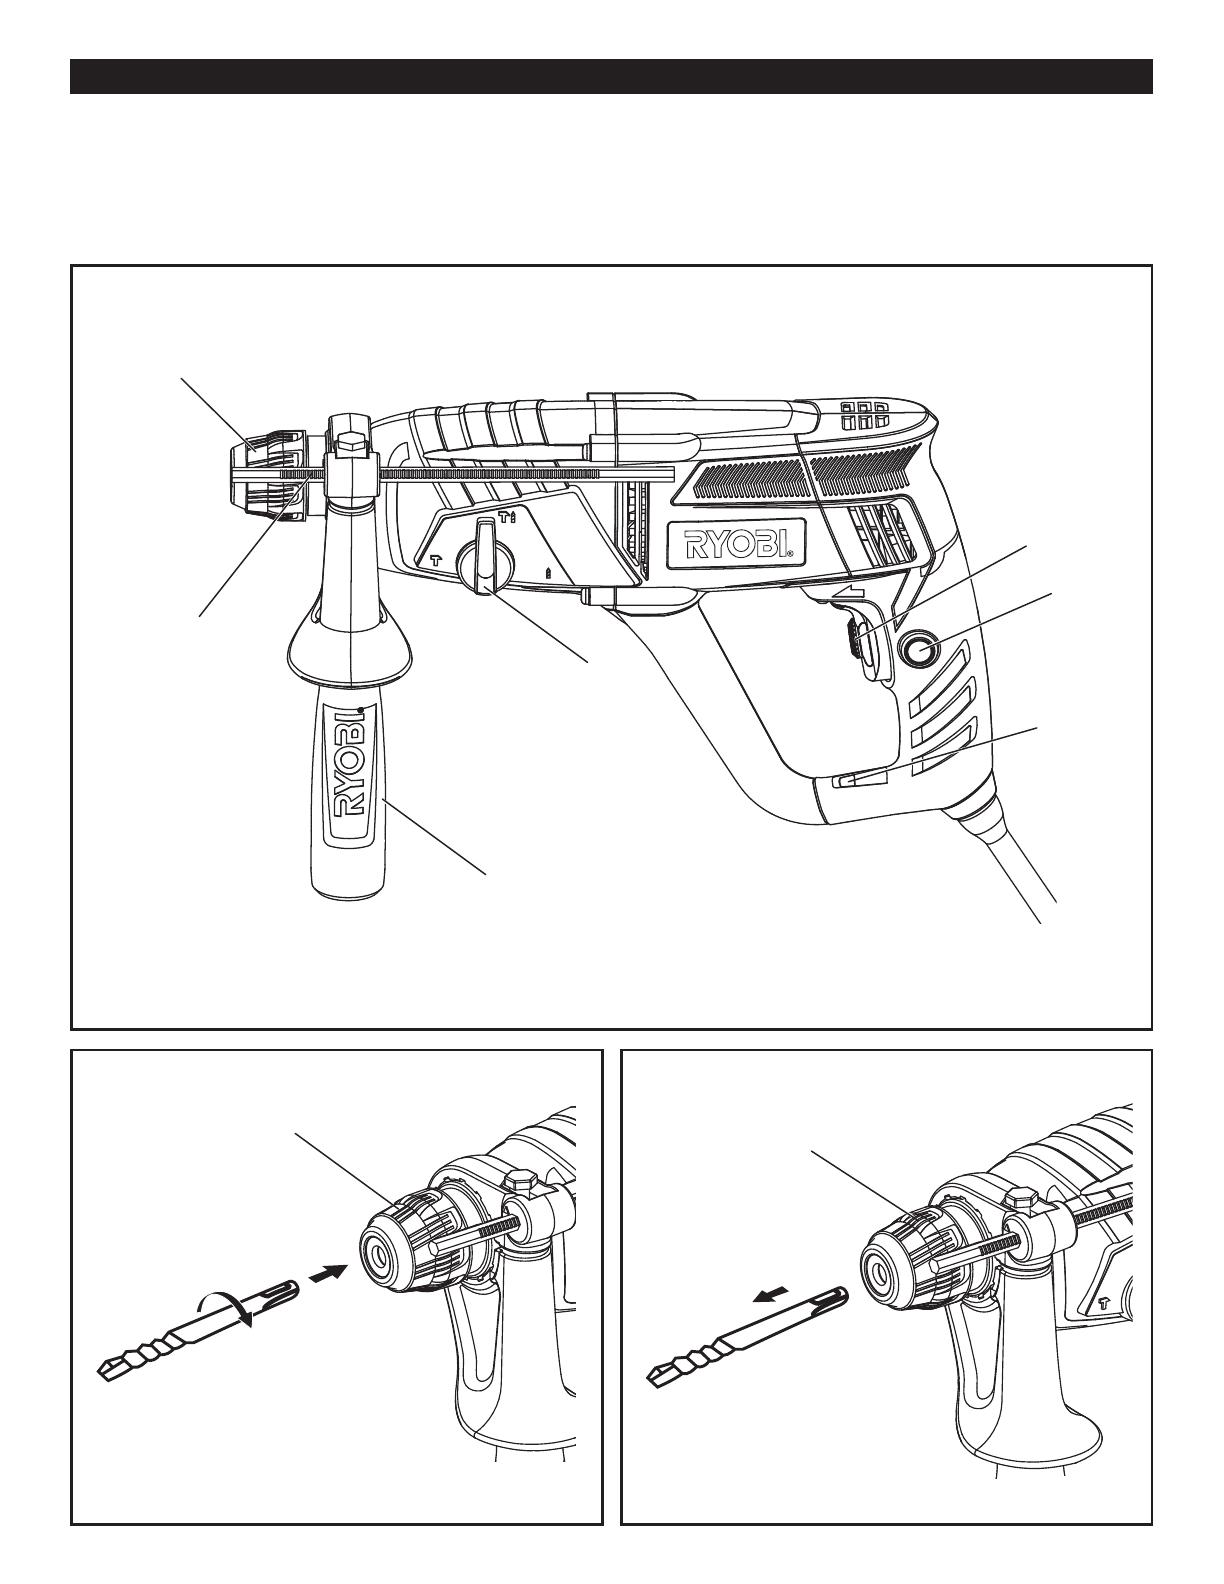
AUXILIARY HANDLE
See Figure 4.
For reasons of safety, only use the hammer drill when it is
fi tted with the auxiliary handle.
To loosen the auxiliary handle, rotate the handle
anticlockwise until the handle is free to move. Position
the handle as required then lock securely by rotating the
handle clockwise until it is tight.
DEPTH STOP
See Figure 5.
Fit the depth stop. Loosen wing bolt to adjust the depth
stop. The depth of the hole drilled will be equal to the
distance between the end of the drill bit and the front end
of the depth stop.
4
English
MODE SELECTOR
See Figure 6.
Your hammer drill is equipped with a hammer stop facility
for smooth drilling.
To deactivate the hammer action, turn the mode
selector clockwise to
.
To reactivate the hammer drill action, the mode
selector has to be reset to
.
You can use the selector to change modes even when
the hammer drill is operating (at low speed). The selected
mode is only activated once the variable switch is pressed
to start the tool.
NOTE: Anti-clockwise rotation during impact drilling
damages the drill bit. Deactivate the hammer action when
using a diamond drill bit.
ROTATION STOP
The mode selector on the ERH710RG features a third
position, Rotation Stop Mode
, which stops the rotation
of the tool whilst maintaining the hammer action. This
feature enables the tool to be used for chiselling, when
fi tted with the appropriate bit.
REVERSING THE DIRECTION OF ROTATION
The direction of rotation of the drill may be changed by the
use of the reverse lever on the switch, situated above the
trigger. The position of this should only be changed when
the drill is at a standstill.
The reverse lever has two positions:
Clockwise rotation: Set the reverse lever to the right
position.
Anti-clockwise rotation: Set the reverse lever to the left
position.
IMPORTANT
When hammer drilling, you do not need to force the
drill. Too much pressure will place unnecessary load on
the motor. Check the drill bits regularly. Re-sharpen or
replace blunt drill bits.
LIVE TOOL INDICATOR
This tool features a live tool indicator which illuminates as
soon as the tool is connected to the supply. This warns the
user that the tool is connected and will operate when the
switch is pressed.
MAINTENANCE
WARNING
When servicing, use only identical Ryobi replacement
parts. Use of any other parts may create a hazard or
cause product damage.
Unplug the hammer drill before making any adjustment,
servicing or cleaning the tool.
Keep your machine clean at all times.
Never use caustic agents to clean the plastic parts.
At the end of your work, to prevent dust deposits, use
compressed air (maximum of 3 bars) to clean out the
ventilation slots.
Check the carbon brushes regularly (dirty or worn
carbon brushes result in excessive sparking and
speed faults).
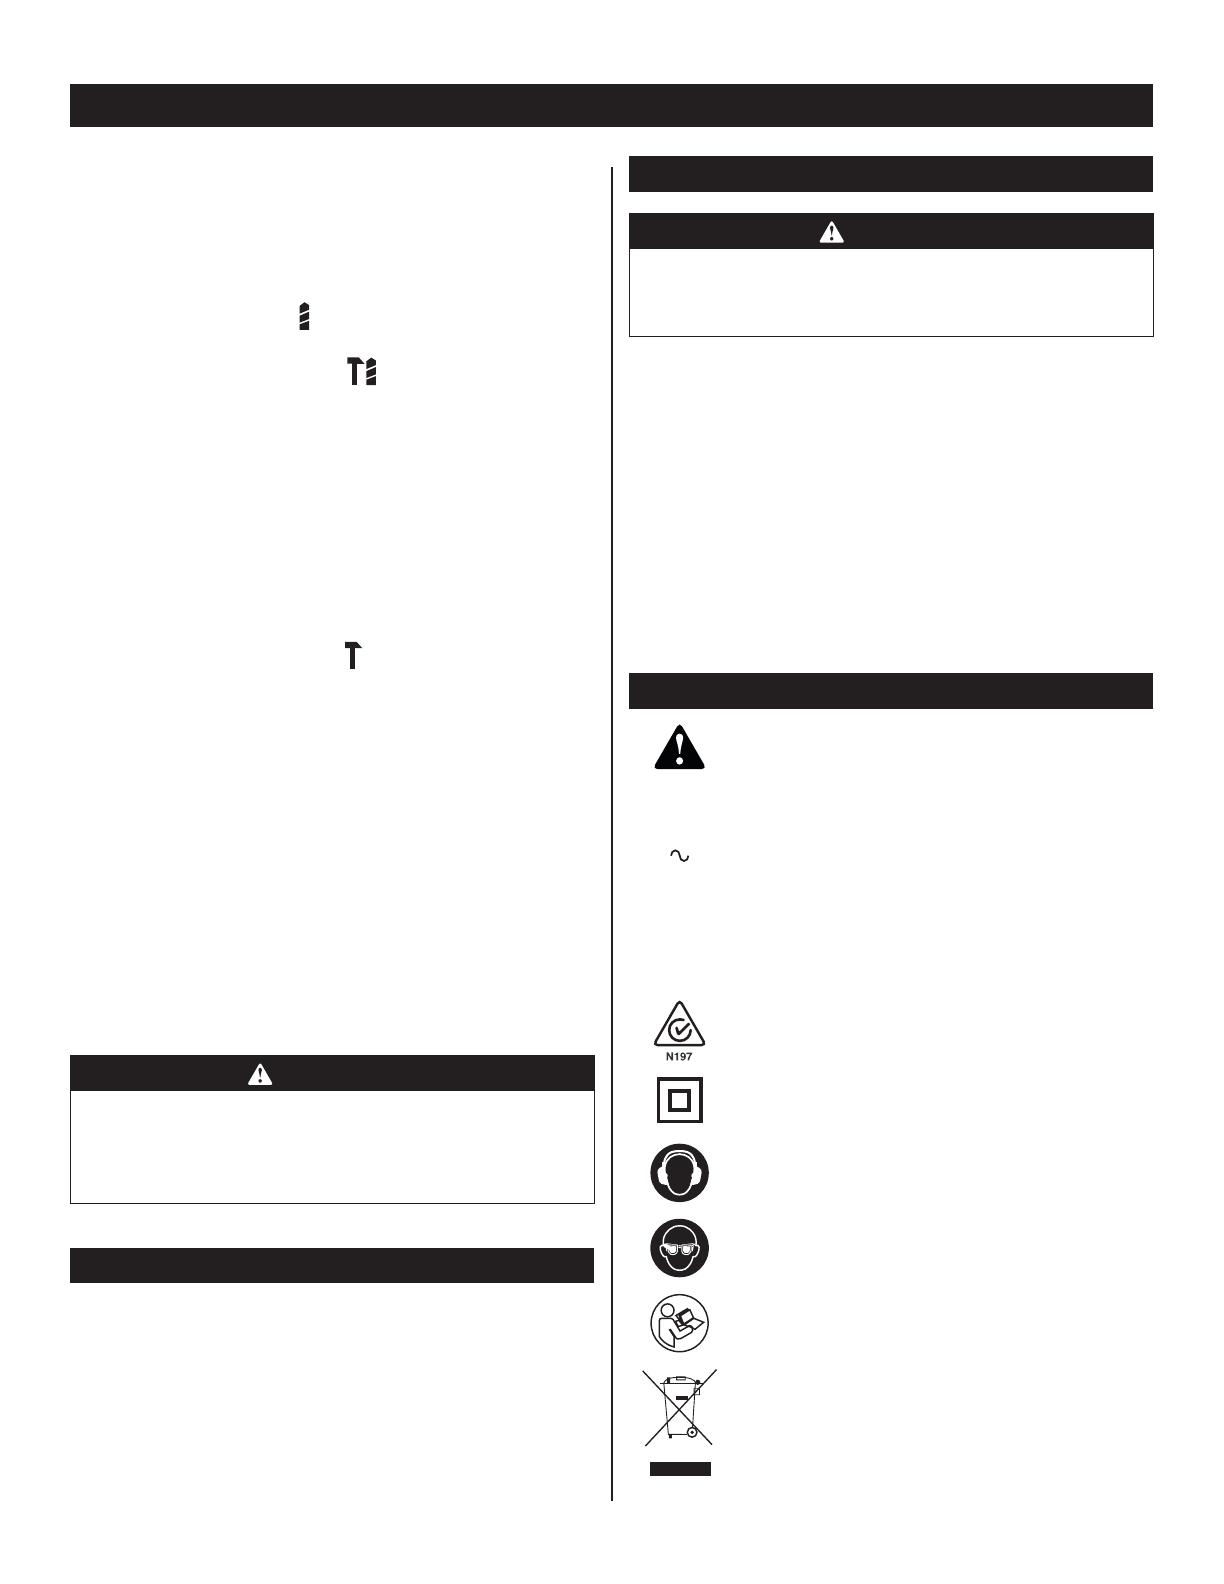
SYMBOL
Safety Alert
V Volts
Hz
Hertz
Alternating Current
W
Watts
J
Joules
no
No-load speed
min
-
1
Revolutions or reciprocations per minute
Conformity
Double insulation
Wear ear protection
Wear eye protection
Please read the instructions carefully before
starting the machine.
Waste electrical products should not be
disposed of with household waste. Please
recycle where facilities exist. Check with your
Local Authority or retailer for recycling advice.
7(&+7521,&,1'8675,(6$8675$/,$37</7'
/HYHO'RQFDVWHU5RDG
'RQFDVWHU9LFWRULD
$XVWUDOLD
7HO)D[1R
/