
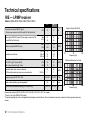
ENHANCE PRO PM
Receiver-In-Ear hearing aids
USER GUIDE

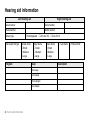
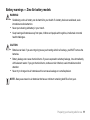
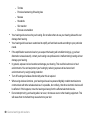
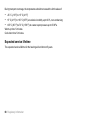
Hearing aid information
Left hearing aid Right hearing aid
Serial number Serial number
Model number Model number
Battery type £Rechargeable £Zinc-Air 312 £Zinc-Air 13
Dome/earmold type Closed dome
£Small
£Medium
£Large
Open dome
£Small
£Medium
£Large
Power dome
£Small
£Medium
£Large
£Tulip dome £RIEearmold
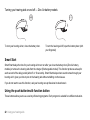
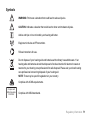
Program Beep Description
1 One beep
2 Two beeps
3 Three beeps
4 Four beeps
2Hearing aid information

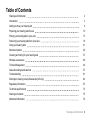
Table of Contents
Hearing aid information 2
Introduction 5
Getting to know your hearing aid 6
Preparing your hearing aids for use 10
Placing your hearing aids in your ears 15
Removing your hearing aids from your ears 19
Using your hearing aids 21
Advanced options 29
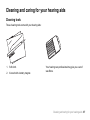
Cleaning and caring for your hearing aids 37
Wireless accessories 48
Tinnitus Management 49
General warnings and cautions 57
Troubleshooting 61
Warnings to hearing care professionals (US only) 64
Regulatory information 67
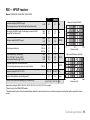
Technical specifications 72
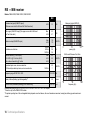
Hearing aid variants 75
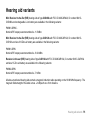
Additional information 76
Hearing aid information 3

4Hearing aid information

Introduction
Thank you for choosing our hearing aids. We recommend that you use your hearing aids every day.
NOTE: Read this booklet carefully BEFORE using your hearing aids.
Intended use
Generic air-conduction hearing aids are wearable sound-amplifying devices intended to compensate for
impaired hearing. The fundamental operating principle of hearing aids is to receive, amplify, and transfer sound
to the eardrum of a hearing impaired person.
The hearing aid is intended to be used by adults and children 12 years of age or older. The hearing aid is
intended to be used by lay persons.
For devices including a Tinnitus Sound Generator module
The Tinnitus Sound Generator module is a tool to generate sounds to be used in a tinnitus management program
to temporarily relieve patients suffering from tinnitus. The target population is primarily the adult population over
18 years of age. This product may also be used with children 12years of age or older.
For devices including a dome
The dome is intended to be connected to a receiver tube on the hearing aid. The dome is intended to ensure that
the sound outlet of the hearing aid is placed in the ear canal.
This accessory is intended to be used by the same age group as the hearing aid. The accessory is intended to be
used by lay persons.
Introduction 5

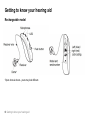
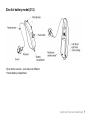
Getting to know your hearing aid
Rechargeable model
*Open dome is shown - yours may look different.
6Getting to know your hearing aid

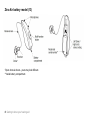
Zinc-Air battery model (312)
*Open dome is shown - yours may look different.
**Inside battery compartment.
Getting to know your hearing aid 7

Zinc-Air battery model (13)
*Open dome is shown - yours may look different.
**Inside battery compartment.
8Getting to know your hearing aid

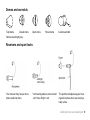
Domes and earmolds
Tulip dome Closed dome Open dome Power dome Custom earmold
Domes are all light grey.
Receivers and sport locks
Your receiver may have a micro-
phone as shown here.
Your hearing aids are color-coded.
Left = blue. Right = red.
The sport lock helps keep your hear-
ing aids in place when you are phys-
ically active.
Getting to know your hearing aid 9

Preparing your hearing aids for use
Battery warnings — all models
WARNING: Batteries are harmful to the environment. Therefore, never try to burn them – dispose of your
used batteries according to your country’s regulations or return them to your hearing care professional.
Battery warnings — Rechargeable model
WARNING:
•Rechargeable hearing aids contain Li-Ion batteries. Exposure or ingestion can be seriously harmful.
•Never put your rechargeable hearing aid in your mouth. Keep your rechargeable hearing aid away from
pets, children and people with cognitive, intellectual or mental health challenges.
•If a Li-Ion battery or a rechargeable hearing aid is swallowed, seek immediate medical attention.
•If the outer casing of your rechargeable hearing aid is broken, the rechargeable batteries inside may
leak. In this case, do not attempt to use the hearing aid – contact your hearing care professional.
•Battery leakage can cause chemical burns. If you get exposed to battery leakage material, rinse
immediately with warm water. If you get chemical burns, redness or skin irritation from battery leakage,
seek medical attention.
10 Preparing your hearing aids for use

Battery warnings — Zinc-Air battery models
WARNING:
•Swallowing a zinc-air battery can be harmful to your health. If a battery has been swallowed, seek
immediate medical attention.
•Never put a hearing aid battery in your mouth.
•Keep hearing aid batteries away from pets, children and people with cognitive, intellectual or mental
health challenges.
CAUTION:
•Batteries can leak. If you are not going to use your hearing aids for a few days, you MUST remove the
batteries.
•Battery leakage can cause chemical burns. If you are exposed to a battery leakage, rinse immediately
with lukewarm water. If you get chemical burns, redness or skin irritation, seek immediate medical
attention.
•Never try to charge zinc-air batteries as this can cause leakage or a small explosion.
NOTE: Always use new zinc-air batteries that have a minimum remaining shelf life of one year.
Preparing your hearing aids for use 11

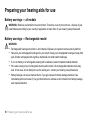
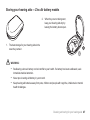
Inserting the battery into your hearing aid — Zinc-Air battery models
1. Open the battery door with
your fingernail. Remove the
old battery (if there is one).
2. Remove the packaging and
protective foil from the new
battery. Wait for two
minutes while the battery
activates.
3. Insert the new battery, with the plus
(+) sign correctly positioned, into the
battery compartment door. Do not
insert it directly into the hearing aid.
4. Close the battery door.
NOTE:
•To save battery power, turn off your hearing aids when they are not in use.
•At night, turn off the hearing aids. Open the battery door completely to allow moisture to evaporate and
prolong the hearing aids’ lifespan.
12 Preparing your hearing aids for use

•If the hearing aids are experiencing frequent loss of connection to wireless accessories, contact your
hearing care professional for a list of low impedance batteries.
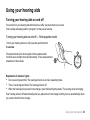
Charging your hearing aids — Rechargeable model
We recommend that you fully charge your hearing aids before using them. To learn how to charge your hearing
aids, please consult the manual for your hearing aid charger.
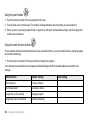
Low battery warning (All models)
When the batteries are low on power, your hearing aids reduce the volume, and play a melody every 15minutes,
until they are empty and turn off.
NOTE: Keep spare batteries on hand. (Zinc-Air battery models)
Low battery warning when paired with wireless accessories (all models)
NOTE: Your batteries will drain faster when you use wireless functions like streaming from your TV with
our TV streamer. As the battery power declines, the wireless functions stop working. A short melody will
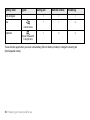
play every five minutes to let you know that the battery power is low. The table below shows the
functionality with different battery charge levels.
Preparing your hearing aids for use 13

Battery level Signal Hearing aid Remote control Streaming
Fully charged P P P
Low
4 even tones
P P x
Depleted
3 even tones and
1 longer tone
Px x
These will work again when you insert a new battery (Zinc-Air battery models) or charge the hearing aid
(Rechargeable model).
14 Preparing your hearing aids for use

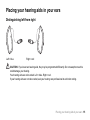
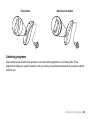
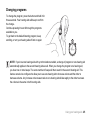
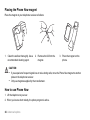
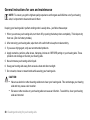
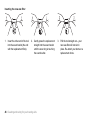
Placing your hearing aids in your ears
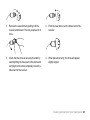
Distinguishing left from right
Left = blue Right = red
CAUTION: If you have two hearing aids, they may be programmed differently. Do not swap them as this
could damage your hearing.
Your hearing aids are color-coded. Left = blue. Right = red.
If your hearing aids are not color-coded, ask your hearing care professional to add color coding.
Placing your hearing aids in your ears 15

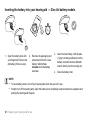
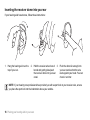
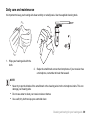
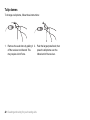
Inserting the receiver dome into your ear
If your hearing aids have domes, follow these instructions:
1. Hang the hearing aid over the
top of your ear.
2. Hold the receiver wire where it
bends and gently place/push
the receiver dome into your ear
canal.
3. Push the dome far enough into
your ear canal so that the wire
rests against your head. You can
check in a mirror.
NOTE: If your hearing care professional has provided you with a sport lock on your receiver wire, ensure
you place the sport lock into the indentation above your earlobe.
16 Placing your hearing aids in your ears

To avoid whistling, ensure that the wire and dome fit correctly into your ear. If you continue to experience
whistling, check the troubleshooting guide for other possible reasons and solutions.
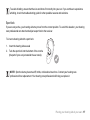
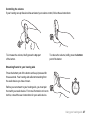
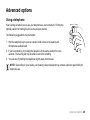
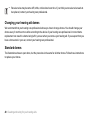
Sport lock
If you are very active, your hearing aids may move from the correct position. To avoid this situation, your hearing
care professional can attach and adjust a sport lock to the receiver.
To insert a hearing aid with a sport lock:
1. Insert the hearing aid as usual
2. Tuck the sport lock into the bottom of the concha
(the part of your ear just outside the ear canal).
NOTE: Sport locks may become stiff, brittle, or discolored over time. Contact your hearing care
professional for a replacement. Your hearing care professional will help you replace it.
Placing your hearing aids in your ears 17

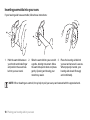
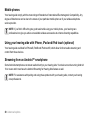
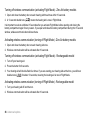
Inserting earmolds into your ears
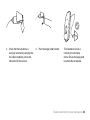
If your hearing aids have earmolds, follow these instructions:
1. Hold the earmold between
your thumb and index finger
and position the sound out-
let into your ear canal.
2. Slide the earmold into your ear with
a gentle, twisting movement. Move
the earmold up and down and press
gently. Opening and closing your
mouth may assist.
3. Place the hearing aid behind
your ear and ensure it is secure.
When properly inserted, your
hearing aids should fit snugly
and comfortably.
NOTE: When inserting an earmold, it may help to pull your ear up and outward with the opposite hand.
18 Placing your hearing aids in your ears

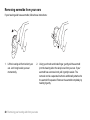
Removing your hearing aids from your ears
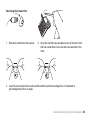
Removing receiver domes from your ears
If your hearing aids have domes, follow these instructions:
1. Lift the hearing aid off your ear. 2. Hold the receiver wire with your thumb and
forefinger where it bends and pull the dome out of
your ear canal.
Removing your hearing aids from your ears 19

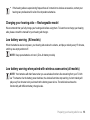
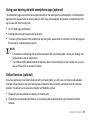
Removing earmolds from your ears
If your hearing aids have earmolds, follow these instructions:
1. Lift the hearing aid from behind your
ear. Let it hang beside your ear
momentarily.
2. Using your thumb and index finger, gently pull the earmold
(not the hearing aid or the wire) loose from your ear. If your
earmold has a removal cord, pull it gently to assist. The
removal cord is a separate line that is additionally attached to
the earmold if requested. Remove the earmold completely by
twisting it gently.
20 Removing your hearing aids from your ears
Page is loading ...
Page is loading ...
Page is loading ...
Page is loading ...
Page is loading ...
Page is loading ...
Page is loading ...
Page is loading ...
Page is loading ...
Page is loading ...
Page is loading ...
Page is loading ...
Page is loading ...
Page is loading ...
Page is loading ...
Page is loading ...
Page is loading ...
Page is loading ...
Page is loading ...
Page is loading ...
Page is loading ...
Page is loading ...
Page is loading ...
Page is loading ...
Page is loading ...
Page is loading ...
Page is loading ...
Page is loading ...
Page is loading ...
Page is loading ...
Page is loading ...
Page is loading ...
Page is loading ...
Page is loading ...
Page is loading ...
Page is loading ...
Page is loading ...
Page is loading ...
Page is loading ...
Page is loading ...
Page is loading ...
Page is loading ...
Page is loading ...
Page is loading ...
Page is loading ...
Page is loading ...
Page is loading ...
Page is loading ...
Page is loading ...
Page is loading ...
Page is loading ...
Page is loading ...
Page is loading ...
Page is loading ...
Page is loading ...
Page is loading ...
Page is loading ...
Page is loading ...
Page is loading ...
Page is loading ...
-
 1
1
-
 2
2
-
 3
3
-
 4
4
-
 5
5
-
 6
6
-
 7
7
-
 8
8
-
 9
9
-
 10
10
-
 11
11
-
 12
12
-
 13
13
-
 14
14
-
 15
15
-
 16
16
-
 17
17
-
 18
18
-
 19
19
-
 20
20
-
 21
21
-
 22
22
-
 23
23
-
 24
24
-
 25
25
-
 26
26
-
 27
27
-
 28
28
-
 29
29
-
 30
30
-
 31
31
-
 32
32
-
 33
33
-
 34
34
-
 35
35
-
 36
36
-
 37
37
-
 38
38
-
 39
39
-
 40
40
-
 41
41
-
 42
42
-
 43
43
-
 44
44
-
 45
45
-
 46
46
-
 47
47
-
 48
48
-
 49
49
-
 50
50
-
 51
51
-
 52
52
-
 53
53
-
 54
54
-
 55
55
-
 56
56
-
 57
57
-
 58
58
-
 59
59
-
 60
60
-
 61
61
-
 62
62
-
 63
63
-
 64
64
-
 65
65
-
 66
66
-
 67
67
-
 68
68
-
 69
69
-
 70
70
-
 71
71
-
 72
72
-
 73
73
-
 74
74
-
 75
75
-
 76
76
-
 77
77
-
 78
78
-
 79
79
-
 80
80


Jabra Enhance Pro PM Receiver-in-Ear 61 Rechargeable User guide
- Type
- User guide
- This manual is also suitable for
Ask a question and I''ll find the answer in the document
Finding information in a document is now easier with AI
Related papers
-
Jabra Enhance Pro 10 Completely-in-Canal User guide
-
-
-
-
-
-
-
-
-
Other documents
-
ReSound ONE Receiver-in-Ear User guide
-
-
YOUTONG R48 User manual
-
 Sensorex TX100 User manual
-
 MEDIC THERAPEUTICS 603-0092 User guide
-
-
-
Starkey Genesis AI Custom Rechargeable Hearing Aid User manual
-
-
Starkey ITC R User manual

