Page is loading ...

DRAKE AUTOMOTIVE GROUP • 130 CASSIA WAY • HENDERSON, NV • 702.853.2060
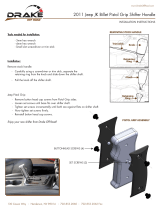
DRAKE OFF ROAD DASHBOARD CONSOLE TRAY
INSTALLATION INSTRUCTIONS
FITS: 2007-10 JEEP JK PART NO: JP-180030-B
Thank you for purchasing a quality Drake Off Road product.
Please refer to the installation instructions below when
installing this product.
Tools needed:
• Interior trim removal tool
• Phillips head screw driver
• Pick or at blade screwdriver
TOOLS REQUIRED:
INSTALLATION:
Step 1: Using trim removal tool pry edge closest to the
windshield upwards to pop the two retaining clips
loose that are under the factory plastic piece.
Step 2: Lift windshield rear edge upwards till plastic panel
is at about a 45 degree angle and pull the whole
piece gently towards the rear of the jeep about 1
inch to clear additional retaining tab.
Step 3: Slowly lift panel upwards and look underneath. If
your vehicle is equipped with digital compass the
sensor is secured to the bottom side of this panel.
Push the release clip on the wiring harness and
unplug it.
Step 4: Remove plastic panel from vehicle.
Step 5: Using a screwdriver, remove two screws securing
compass module to bottom side of panel.
Step 6: Using a pick, at blade screwdriver, or something
similar pry off 2 metal retaining clips from plastic
prongs on bottom side of panel. Take care not to
distort or bend the tabs as they need to be reused.
Step 7: Install compass module on bottom side of Drake
Offroad panel using 2 small screws supplied. (Use
force pushing screw into hole while threading in to
get threads started.)
continued on back
IS-DOR-JP-180030-B
Step 1
Step 3
Step 5
Step 2
Step 4
Step 6

DRAKE AUTOMOTIVE GROUP • 130 CASSIA WAY • HENDERSON, NV • 702.853.2060
DRAKE OFF ROAD DASHBOARD CONSOLE TRAY
INSTALLATION INSTRUCTIONS
FITS: 2007-10 JEEP JK PART NO: JP-180030-B
CONTINUED
Questions about Drake Off Road products,
visit www.DrakeOffRoad.com or call our
customer service department toll free:
855.DRAKEOR
702.853.2060
Mon - Thurs 7:45 a.m. to 5:00 p.m. PST
Friday 7:45 a.m. to 4:30 p.m. PST
If you are not happy with this product, for any reason, or found product
to be defective in manufacturing, simply return it to Drake Off Road within
30 days of purchase and we will replace it - no questions asked. We stand
behind our products one hundred percent, so you can sit behind the wheel
with pride.
*Proof of purchase and dated reciept must be present with any return. All
returned products are tested and if found to be damaged by the installer, no
replacement will be issued. You pay the the cost to ship to us, we pay for the
return shipping. Guarantee does not include any labor and/or tax charges
incurred.
SATISFACTION GUARANTEE:
Step 8: Push metal retaining clips onto the tabs at bottom
of Drake Off Road Tray. May need to use trim tool
or something similar to help push them on to the
tabs depending on difculty level.
Step 9: Position the Drake Off Road Tray over top of dash
and plug harness back into compass module if
equipped.
Step 10: Tilt the Drake Off Road Tray to similar 45 degree
angle that was used during the removal and slide
forward onto front retaining clip.
Step 11: On the front side towards windshield gently press
downward making sure clips line up and push down
engaging the clips in place.
Step 12: Lay non slip material into 2 matching pockets and
enjoy.
Step 7
Step 9
Step 11
Step 8
Step 10
Step 12
/