Huddlecam HC20X-SIMPLTRACK2 Quick start guide
- Type
- Quick start guide

SimplTrack 2 Auto Tracking Camera
Quick Start Guide
Step 1: The first thing to do when you receive your SimplTrack 2 is read through the included
manual.
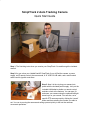
Step 2: As you unbox your HuddleCamHD SimplTrack 2 you will find the camera, a power
supply, an IR remote control, the user manual, a 10’ USB 3.0 A-B cable, and a serial control
cable used for joystick controllers.
Step 3: Now it is time to plug your camera into
power with the included power supply. Let’s put the
included AAA batteries inside our remote control
and take a look at the features. You can pan, tilt
and zoom your camera using the up/down/left/right
arrow keys on your remote. You can also, set a
specific PTZ camera preset by clicking the “preset”
button and than entering the number you want to
set. You can try moving the camera and calling a preset quickly to test out the cameras
movement operations.

Note: In order to configure the camera, you will need to connect the camera to a live network
feed from a network with a DHCP server. Once the camera is turned on and connected to the
network we can install the HuddleCamHD SimplTrack control software.
Step 4: You can download the HuddleCamHD SimplTrack control software from
HuddleCamHD.com/Resources
Note: This software is only available for Windows. Therefore a Windows computer will be
required for initial setup of this camera
Step 5: Once the software is installed on your computer, make sure your computer is connected
to the same network as the camera. The software should automatically recognize your
SimplTrack camera on the network. You can simply double click the camera in your camera list
to start configuration.

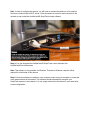
Step 6: You may want to connect your camera to a meeting room computer or in room display.
You can connect the camera to a computer using the USB 3.0 output, to any standard television
using a DVI to HDMI cable, and to an SDI monitor using a standard SDI cable.
Note: The camera features auto resolution & frame rate conversion upon connecting to a video
conference software via USB. The camera may auto power cycle in order to reset the camera
resolution to match your connected source.
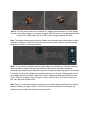
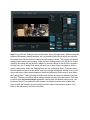
Step 7: Let’s review the software interface and configure your SimplTrack. The main interface
offers the ability to interact with the basic features of the camera not directly relating to
auto-tracking in addition to providing a live preview. Clicking the magnifying glass in the Camera
List section will show the available auto tracking cameras on a network. Simply double click on
an available camera to connect. Under Lens Control, standard controls are available for Zoom
(Tele / Wide), Focus (Near / Far), Iris (Open / Close), and Iris Reset. The Presets section will
Set, Call, and Clear Presets 0-255.
Note: Preset 1 is used as a reference for framing your tracking subject and Preset 0 is typically
used for framing your stage / podium. This is how you tell the camera how much space you
want around your subject during the auto-tracking mode.

Step 8: The PTZ Controls section serves two functions: first, to provide manual Pan and Tilt
controls, the other is to control the OSD using the Menu button. You can start and stop the
cameras auto-tracking capabilities at any time using the Start and Stop buttons under Tracking
Control. But before we turn on the auto-tracking let’s set some parameters that will ensure
seamless operation.
Note: Use the “Iris+” button within the OSD to choose options, and “Iris-” to go back a field.

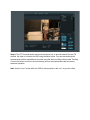
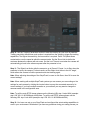
Step 9: Let’s click the “Settings” button at the bottom right of this application. When entering the
Advanced Parameters settings interface, the live preview will switch to a split-screen showing
the images from both the reference camera and the tracking camera. This is where all features
relating to auto-tracking can be setup. Under the Basic Settings section, the SDI & DVI Output
resolution and frame rate can be set in addition to protocol settings for the RS-232 connection.
Clicking Set in the Tracking Zone section will allow you to draw a green rectangle to define a
priority tracking area. Within the Tracking Zone you can set Blocking Zones. These are areas
that the camera will ignore motion within, such as a doorway with people walking by or an LCD
screen with active video content displayed. Note that the Blocking Zones must be used within
the Tracking Zone. Tracking Setting will define what actions the camera is allowed to perform.
Use Auto-Tilt when your subject will be walking towards and away from the camera. Free track
is used to track any moving object regardless of being within the defined tracking zone. Use
Permanent Track if your presenter walks outside of the defined tracking zone. Enable Auto
Zoom to allow the presenter to move freely beyond the Object Lost reference position. Auto
Zoom is also affected by the Zoom Limit slider.

Step 10: Use the Tracking Parameters section to cater the tracking for your room & presenter.
Tracking sensitivity defines how much motion is required from the subject to trigger the tracking
capabilities. The higher the sensitivity, the less motion is required. Pan & Tilt Speed allows
customization over the speed at which the camera tracks. Set the Zoom Limit to define the
maximum distance the camera will auto zoom. Set the Lost Timeout to set when the camera will
automatically go back to the reference preset after the presenter is lost.
Step 11: The Object Lost Action tells the camera to go to Preset 0, Preset 1 or to Stay when the
presenter is lost by the camera. For best results, set the Object Lost Action to the full “stage”,
which allows the camera to find the presenter and start tracking again.
Note: When adjusting the settings of the SimplTrack, be sure to click Save, then OK to save the
current settings.
Note: When working with multiple SimplTrack systems you can ensure you are working on live
settings for each camera by clicking the Inquire button to query the connected camera for its
current settings. If you have multiple cameras on your network you may want to change the
cameras name in the configuration area.
Note: To pull the main RTSP stream please use the following URL rtsp://:/main.h264 (example:
rtsp://192.168.111.85:5000/main.h264) Note: To pull the sub RTSP stream please use the
following URL rtsp://:/sub.h264 (example: rtsp://192.168.111.85:5000/sub.h264)
Step 12: You have now set up your SimplTrack and configured the auto-tracking capabilities to
work in your environment. Remember if you have any questions during your setup process you

can always call our support team using the phone number listed on our website. You can also
submit a support ticket at any time at help.huddlecamhd.com. Enjoy!
-
 1
1
-
 2
2
-
 3
3
-
 4
4
-
 5
5
-
 6
6
-
 7
7


Huddlecam HC20X-SIMPLTRACK2 Quick start guide
- Type
- Quick start guide
Ask a question and I''ll find the answer in the document
Finding information in a document is now easier with AI
Related papers

Other documents
-
AVer TR310 User manual
-
Lumens CMS Software User manual
-
-
-
VADDIO RoboTRAK Integrator's Complete Manual
-
Marshall CV620-TBI/TWI Auto Track, Follow and Frame 20x PTZ Camera User manual
-
-
-
-