Best iQ6 iQ6 Installation Guide 99045165B.pdf
- Type
- iQ6 Installation Guide 99045165B.pdf
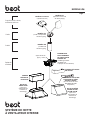
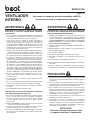
Best iQ6 is a powerful internal blower designed for use with compatible BEST® range hoods. Engineered for efficiency and safety, it features a 600 CFM airflow capacity, ensuring effective removal of smoke, grease, and odors from your kitchen. The iQ6 blower boasts a thermal overload protection system that automatically shuts off the motor in case of overheating, preventing damage and ensuring longevity. With its simple calibration process, the iQ6 blower optimizes airflow performance, guaranteeing that your range hood operates at its peak efficiency.
Best iQ6 is a powerful internal blower designed for use with compatible BEST® range hoods. Engineered for efficiency and safety, it features a 600 CFM airflow capacity, ensuring effective removal of smoke, grease, and odors from your kitchen. The iQ6 blower boasts a thermal overload protection system that automatically shuts off the motor in case of overheating, preventing damage and ensuring longevity. With its simple calibration process, the iQ6 blower optimizes airflow performance, guaranteeing that your range hood operates at its peak efficiency.


-
 1
1
-
 2
2
-
 3
3
-
 4
4
-
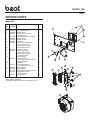 5
5
-
 6
6
-
 7
7
-
 8
8
-
 9
9
-
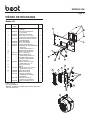 10
10
-
 11
11
-
 12
12
-
 13
13
-
 14
14
-
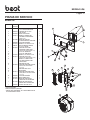 15
15
-
 16
16


Best iQ6 iQ6 Installation Guide 99045165B.pdf
- Type
- iQ6 Installation Guide 99045165B.pdf
Best iQ6 is a powerful internal blower designed for use with compatible BEST® range hoods. Engineered for efficiency and safety, it features a 600 CFM airflow capacity, ensuring effective removal of smoke, grease, and odors from your kitchen. The iQ6 blower boasts a thermal overload protection system that automatically shuts off the motor in case of overheating, preventing damage and ensuring longevity. With its simple calibration process, the iQ6 blower optimizes airflow performance, guaranteeing that your range hood operates at its peak efficiency.
Ask a question and I''ll find the answer in the document
Finding information in a document is now easier with AI
Related papers
Other documents
-
 Sunbeam Major Appliances Compact Refrigerators User manual
-
NuTone LK30ABS Installation guide
-
-
Thermador HPCB36NS Installation guide
-
Viking VBCV3038 User manual
-
Viking Range 440 CFM Interior-Power Ventilator Kit Installation guide
-
Broan RM325H User manual
-
Wolf 814425 Quick start guide
-
-
