Panasonic CQC8300W Operating instructions
- Category
- Car media receivers
- Type
- Operating instructions
This manual is also suitable for

42
CQ-C8400/8300W
CQ-C8400/8300W
43
(page 44)
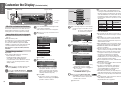
Audio Settings
[VOLUME "]: Up
[VOLUME #]: Down
Note:
≥ Press [DISP] (display) to return to the regular
mode.
≥ If no operation takes place for more than
5 seconds in audio setting (2 seconds in the
volume setting, 10 seconds in SQ adjustment),
the display returns to the regular mode.
≥ The volume can also be adjusted directly using
[VOLUME] on the main unit (page 21).
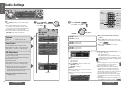
1 Press [VOLUME]
(PUSH SEL: select).
Press [SEL].
Volume
Default: 13 Setting range: 0 to 40
Bass/Treble
You can adjust the bass and treble sound.
Default: BAS (bass) 0 dB TRE (treble) 0 dB
Setting range: j12 dB to i12 dB (by 2 dB)
SQ Adjustment
You can adjust the characteristics of the currently
selected sound type (SQ).
It is also possible for a maximum of 5 different
adjusted SQ to be preset.
Adjustable frequency:
60 Hz, 160 Hz, 400 Hz, 1 kHz, 3 kHz, 6 kHz, 16 kHz
Setting range: j12 dB to i12 dB (by 2 dB)
≥ Setting of SQ, bass/treble and volume are
infl uenced one another. If the infl uence
mentioned above causes distortion to the audio
signal, readjust bass/treble or volume
.
∫ To return an adjusted SQ to the default
setting (page 43)
2 Turn [VOLUME].
Press [VOL "] or [VOL #].
[VOLUME "]: Increased
[VOLUME #]: Decreased
[VOLUME "]: Increased
[VOLUME #]: Decreased
E
N
G
L
I
S
H
23
E
N
G
L
I
S
H
24
(Push.)
Push
Push
Push
Push
[VOLUME "]
[VOLUME #]
64
97
5
Car Audio
SOURCE
MUTE
POWER
RAND
VOL
312
DISPBAND
REP
6
5
SET
SEL
#
SCAN
MENU
NUMBER
8
0
[DISP]
(Display)
[SEL]
(Select)
[VOL "]
[VOL #]
["] [#]
[%] [$]
Adjust
1 Press [%] or [$] to select a frequency.
[$]: Increased
[%]: Decreased
2
Turn [VOLUME] to adjust the equalizer level.
[VOLUME "]: Up
[VOLUME #]: Down
Memorize
3 Press and hold ["] or [#] for more than
2 seconds to enter.
4 Press ["] or [#] to select a preset number
(2 to 6).
5
Press and hold ["] or [#] for more than
2 seconds to memorize.
≥ The display blinks once.
≥ The adjusted SQ is preset in the number of the
selected button, and the regular display is restored.
Press and hold one of the buttons from
[2]
to
[6]
for
more than 2 seconds.
Note:
≥
Only buttons [2] to [6] can be used to preset the adjusted
SQ. An adjusted SQ cannot be preset in button [1].
≥ To call a preset SQ, refer to page 23.
≥ While the SQ adjustment mode is established,
only adjustments are performed, and even if the
adjustment mode is exited without presetting an
adjusted effect, what has been set will be refl ected as
the current SQ until another SQ is selected.
≥ Even when the SQ presets are adjusted, the display
which appears when the settings are called remains
unchanged.
≥ The SQ adjustment mode can be established also by
pressing [SQ] for more than 2 seconds.
Example: CD mode
[2] to [6]
(SQ preset
buttons)
∫ To return an adjusted SQ to the default
setting
1 Press [SQ] during regular mode, and select
the SQ which is to be returned to the default
setting.
2 Press and hold [BAND] for more than
2 seconds.
[BAND]

44
CQ-C8400/8300W
CQ-C8400/8300W
45
Audio Settings
(continued)
Note:
≥ Press [DISP] (display) to return to the
regular mode.
≥ If no operation takes place for more than
5 seconds in audio setting (2 seconds
in the volume setting, 10 seconds in SQ
adjustment), the display returns to the
regular mode.
≥ When SBC-SW setting (page 21) has
been selected to ON, the settings resulting
from the adjustments performed at the
subwoofer level and subwoofer low pass
fi lter settings are refl ected in the output.
Balance/Fader
You can adjust the sound balance among the
front, rear, right and left speakers.
Default: BAL (balance) CNT (center)
FAD (fader) CNT (center)
Setting range: 15 levels each
Subwoofer Level
You can change the subwoofer volume level.
Default: 0 dB
Setting range: j¶ (subwoofer mute),
j6 dB to i6 dB (by 2 dB)
Subwoofer Low Pass Filter
(LPF)
You can select the upper limit frequency of the
sound from subwoofer.
Default: 80 Hz
Setting range: 80 Hz/120 Hz/160 Hz
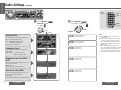
[VOLUME "]: Right enhanced
[VOLUME #]: Left enhanced
[VOLUME "]: Increased
[VOLUME #]: Decreased
[VOLUME "]: Increased
[VOLUME #]: Decreased
[VOLUME "]: Front enhanced
[VOLUME #]: Rear enhanced
High Pass Filter (HPF)
Select the lower limit frequency of the sound
from speakers (except subwoofer).
Default: OFF
Setting range: OFF/90 Hz/135 Hz/180 Hz/225 Hz
[VOLUME "]: Increased
[VOLUME #]: Decreased
(Push.)
Push
Push
Push
Push
Push
64
97
5
Car Audio
SOURCE
MUTE
POWER
RAND
VOL
312
DISPBAND
REP
6
5
SET
SEL
#
SCAN
MENU
NUMBER
8
0
[DISP]
(Display)
[SEL]
(Select)
[VOL "]
[VOL #]
E
N
G
L
I
S
H
25
E
N
G
L
I
S
H
26
2 Turn [VOLUME].
Press [VOL "] or [VOL #].
[VOLUME "]
[VOLUME #]
1 Press [VOLUME]
(PUSH SEL: select).
Press [SEL].
(page 42)

46
CQ-C8400/8300W
CQ-C8400/8300W
47
64
97
5
Car Audio
SOURCE
MUTE
POWER
RAND
VOL
312
DISPBAND
REP
6
5
SET
SEL
#
SCAN
MENU
NUMBER
8
0
[DISP]
(Display)
[MENU]
[$]
[BAND]
(Set)
64
97
5
Car Audio
SOURCE
MUTE
POWER
RAND
VOL
312
DISPBAND
REP
6
5
SET
SEL
#
SCAN
MENU
NUMBER
8
0
[SEL]
(MENU)
["] [#]
(Submenu)
[%] [$]
[BAND]
(SET)
2 Submenu
1 Press ["] or [#].
2 Press [SET].
Display Settings
E
N
G
L
I
S
H
27
E
N
G
L
I
S
H
28
Background Display
Selection
(GRAPHIC PATTERN)
Default: ALL
Variety: 7 types
F1
Random display among pattern A to E.
Background Display
Selection
(STILL IMAGE)
Default: ALL
Setting range: 11 types
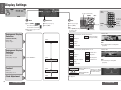
1 Menu
1 Press [MENU].
Press and hold [MENU]
for more than 2 seconds.
2 Press [%] or [$] to select
“DISPLAY”.
3 Set
1 Press [%] or [$].
2 Press [SET].
Select “DISPLAY”.
ALL
A
Metropolis
B
Surfi ng
C
Soccer
D
Snow board
E
Spectrum analyzer
display (25 bands)
S·A
F1
Random display among pattern 1 to 10.
ALL
Palm tree
Soccer
Approach of planet
Warp
Snow board
Contrast
Default: 3
Setting range: 1 to 5
Maximum difference
in contrast
Minimum difference
in contrast
CONTRAST 5
CONTRAST 1
[$][%]
Clock Adjustment
See page 15.
Select
∫ GRAPHIC PATTERN
Select
∫ STILL IMAGE
Select
∫ CONTRAST
Select
∫ CLOCK ADJ
["] [#] (Submenu)
[SET][MENU]
[%] [$]
Example: ALL
Example: ALL
1
2
3
4
5
6
Saxophone
Woman’s face
7
Planetary probe
Mountain view
8
9
10
Note:
≥ Press [DISP] (display)
to return to the
regular mode.
[DISP]
(Display)
Note:
≥ The graphic pattern is changeable
(page 50).
Note:
≥ The still image is changeable
(page 50).
[DISP]
(Display)
Allows you to adjust
the display contrasts
for better viewing.

48
CQ-C8400/8300W
CQ-C8400/8300W
49
2 Submenu
Press ["] or [#].
Function Settings
E
N
G
L
I
S
H
29
E
N
G
L
I
S
H
30
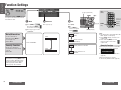
Mute/Attenuation
You can select mute or
attenuation when [MUTE] is
pressed (page 21).
Default: MUTE
No sound
(Mute)
Decrease 10 steps
(Attenuation)
Security Function
Allows you to activate the
anti-theft function when leaving
your car.
Default: ON
Security function is activated.
Security function is not
activated.
Security Function
When the key in the ignition is turned OFF
≥ Security message will be displayed.
≥ The panel removal alarm will be active
(page 59).
When the front panel is removed
≥ The security indicator blinks (page 59).
Select
∫ MUTE KEY
3 Set
Press [SET].
Select
∫ SECURITY
Select “FUNCTION”.
ATT
MUTE
ON
OFF
["] [#] (Submenu)
[SET][MENU]
[%] [$]
64
97
5
Car Audio
SOURCE
MUTE
POWER
RAND
VOL
312
DISPBAND
REP
6
5
SET
SEL
#
SCAN
MENU
NUMBER
8
0
[DISP]
(Display)
[MENU]
[$]
[BAND]
(Set)
64
97
5
Car Audio
SOURCE
MUTE
POWER
RAND
VOL
312
DISPBAND
REP
6
5
SET
SEL
#
SCAN
MENU
NUMBER
8
0
[SEL]
(MENU)
["] [#]
(Submenu)
[%] [$]
[BAND]
(SET)
1 Menu
1 Press [MENU].
Press and hold [MENU]
for more than 2 seconds.
2 Press [%] or [$] to select
“FUNCTION”.
Note:
≥ Press [MENU] to
return to the regular
mode.
Note:
≥ No settings can be performed while “NO
DISC” appears on the display.
≥ Press [DISP] (display) to return to the
regular mode.
≥ Press and hold [MENU] for more
than 2 seconds to return to the
regular mode.
[DISP]
(Display)
[DISP]
(Display)
The Function Settings can be established
not only from the radio mode but from
other modes as well.
This unit’s settings which can be
adjusted after pressing [MENU] are the
Function Settings (Mute/Attenuation
and Security Function), the Display
Settings (page 46) and the Mode
Settings (pages 30, 34 and 40).

50
CQ-C8400/8300W
CQ-C8400/8300W
51
Customize the Display
(Customize function)
[%] [$] (Select)
["] [#]
(Select)
[SEL] (Select)[SOURCE]
Note:
≥ Do not write data on the CD-R/RW disc if, by
so doing, the maximum allowed number of fi les
listed below will be exceeded. If fi les are written
on the CD-R/RW disc in a number which exceeds
the maximum number of fi les allowed as given in
the table below, it will not be possible to use the
excess fi les.
Type of image Extension Max. number of
fi les allowed
Moving image .pfm 10
Still image .pfs 15
Opening image .pfo 5
Closing image .pfe 5
≥ Do not write any data except data for customizing
on the CD-R/RW disc.
≥ Do not change the fi le extension since doing so
will make it impossible for the image to be written
properly.
≥ When data is to be recorded on the CD-R/RW
disc, be absolutely sure to record it in the root
directory (the highest hierarchical level). Do not
write the data in a folder.
≥
When a CD-RW disc has been inserted into the unit,
it may take a few moments for its data to be loaded.
≥ GRAPHIC PATTERN A and STILL IMAGE No.1
cannot be overwritten.
≥
The bigger the fi le, the longer customizing will take
(approx. 8 minutes for the largest fi le with 751KB).
≥ When the power is turned off, when the engine
is stopped or when the panel is released while
customizing is underway, the customizing
operation will be aborted and the data being
rewritten will be lost. In a case like this, proceed
with the customizing operation again.
≥ If the corrupted data is selected, “DISPLAY FILE
INCOMPLETE” appears.
≥ Do not perform any operations while customizing
is in progress (step 7-2).
≥ To return to the default image, download the
applicable fi le on the web site (page 50) and,
using the CD-R/RW disc containing this fi le,
perform the rewriting process again.
≥ The download service may be temporarily shut
down without warning due to unspecifi ed reasons.
Furthermore, it may not always be available in all
areas.
≥ For further details, refer to Panasonic’s web site
at the address provided below.
http://www.panasonic.co.jp/global/
(Example: GRAPHIC PATTERN)
The screen showing what will
be overwritten is previewed.
≥ Customizing is completed successfully,
and operation returns to step 4.
≥ Operation also returns to step 4 when
“No” is selected.
≥ In case of customization failure,
“CUSTOMIZING FAILED” appears.
E
N
G
L
I
S
H
31
E
N
G
L
I
S
H
32
[SET]
Customize menu screen
∫ GRAPHIC PATTERN
∫ STILL IMAGE
∫ OPENING MESSAGE
∫ CLOSING MESSAGE
64
97
5
Car Audio
SOURCE
MUTE
POWER
RAND
VOL
312
DISPBAND
REP
6
5
SET
SEL
#
SCAN
MENU
NUMBER
8
0
["] [#]
[%] [$]
(Select)
[BAND]
(SET)
[SOURCE]
Returns to step 5
2
What the customize function does
This function enables the user to rewrite the unit’s
graphic pattern, still picture or opening or closing
moving picture into a desired replacement image.
Image data which can be changed
≥ Data downloaded from Panasonic’s dedicated
web site
≥ Data generated by a PC
The rewriting process is performed using a CD-R/RW
disc on which the replacement data is recorded.
The replacement data and the application (IMAGE
STUDIO) for creating the replacement data using a PC
can be downloaded from the following web site:
http://panasonic.co.jp/pas/en/software/customize/
index.html
Customizing procedure
Preparation:
≥ Have ready the CD-R/RW* disc on which the
replacement data is recorded.
* A dedicated writing software and a drive
are needed to create the CD-R/RW disc.
For further details, refer to Panasonic’s web site
(page 51) or the operating instructions of the
writing software.
Press and hold [SEL] for more than
4 seconds to enter the customize menu.
2
(Make sure there is no CD insert in the unit.)
Press [SOURCE] to select the CD mode.
1
Insert the CD-R/RW disc containing the data
to be used for customizing.
≥ The customize menu screen now appears.
3
1 Press ["] or [#] to select an item to be
customized.
4
1 Press ["] or [#] to select a fi le.
≥ The maximum number of characters
displayed for fi lenames is 16. (The
number of characters in the fi le name
may be limited, depending on the type
of writing software being used.)
2 Press [SET].
≥ The previous screen is restored when
BACK is selected using [$] and [SET] is
pressed to enter the selection.
5
1 For a moving image fi le or still image fi le,
press [%] or [$] to select where to save
the fi le.
6
2 Press [SET].
1 Press [%] or [$] to select “YES”.
7
2 Press [SET].
New data overwrites existing data.
1 Press and hold [SEL] for more than
4 seconds to exit the customize menu.
≥ The customize mode is released, and
the CD mode is restored.
2 Eject the disc.
8
Moving image data
Still image data
Moving image at power on
Moving image at power off
2 Press [SET].
-
 1
1
-
 2
2
-
 3
3
-
 4
4
-
 5
5


Panasonic CQC8300W Operating instructions
- Category
- Car media receivers
- Type
- Operating instructions
- This manual is also suitable for
Ask a question and I''ll find the answer in the document
Finding information in a document is now easier with AI
Related papers
-
Panasonic CQC8300W Operating instructions
-
-
-
-
-
-
-
-
-