Page is loading ...

Operating and Installation Instructions
Ventilation Hood
To prevent accidents and damage to the appliance, you must
read
these instructions before installing the appliance and using it for the first
time.
en-US M.-Nr. 09 805 980

Contents
2
IMPORTANT SAFETY INSTRUCTIONS................................................................. 4
Caring for the environment.................................................................................
13
Description of functions......................................................................................
14
Con@ctivity 2.0 function ........................................................................................ 15
Guide to the appliance.........................................................................................
16
Operation (Automatic mode)...............................................................................
18
Cooking with Con@ctivity 2.0 (Automatic mode)................................................... 18
Temporarily exiting Automatic mode ..................................................................... 20
Resuming Automatic mode ................................................................................... 20
Operation (Manual mode)....................................................................................
21
Cooking without Con@ctivity 2.0 (Manual mode).................................................. 21
Turning on the fan .................................................................................................. 21
Selecting the power level....................................................................................... 21
Selecting the delayed shut down time................................................................... 21
Turning off the fan.................................................................................................. 21
Turning overhead lighting on/off ............................................................................ 22
Power management............................................................................................... 22
Operation (Automatic and Manual modes)........................................................
23
Filter saturation indicator ....................................................................................... 23
Adjusting the filter saturation indicator for the grease filter .............................. 23
Activating/changing the OdorFree Charcoal Filter operating hours counter .... 24
Checking the filter saturation indicator............................................................. 24
Sensor button signal tone...................................................................................... 25
Cleaning and care................................................................................................
26
Stainless steel housing .......................................................................................... 26
Special instructions for glass surfaces ............................................................. 27
Grease filters.......................................................................................................... 27
OdorFree Charcoal Filter........................................................................................ 29
Resetting the operating hours counter for the OdorFree Charcoal Filter.......... 30
Disposing of the OdorFree Charcoal Filter........................................................ 30
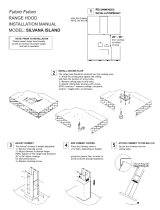
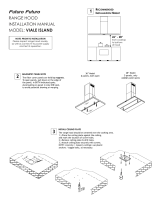
Installation ............................................................................................................ 31
Before installation .................................................................................................. 31
Installation parts..................................................................................................... 31
Appliance dimensions............................................................................................ 32
Distance between cooktop and ventilation hood (S) ............................................. 33
Installation recommendations................................................................................ 34
Structural support .................................................................................................. 34

Contents
3
Removing the protective film ................................................................................. 34
Exhaust duct.........................................................................................................
46
Condensate trap .................................................................................................... 47
Electrical connection........................................................................................... 48
Grounding Instructions .......................................................................................... 48
Activating Con@ctivity 2.0...................................................................................
49
Installation of the Con@ctivity 2.0 stick ................................................................. 49
Activating the Con@ctivity 2.0 function ................................................................. 49
Activating the ventilation hood ......................................................................... 49
Activating the cooktop...................................................................................... 50
Activation failed ................................................................................................ 50
Deactivating Con@ctivity 2.0 ................................................................................. 50
Service and warranty........................................................................................... 51
Location of the data plate ...................................................................................... 51
Technical data .....................................................................................................
52

IMPORTANT SAFETY INSTRUCTIONS
4
READ AND SAVE THESE INSTRUCTIONS
This appliance complies with current safety requirements. Improp‐
er use
of the appliance can lead to personal injury and material
damage.
Read all instructions before installing or using the appliance for
the first time. Only use the appliance for its intended purpose.
Keep these operating instructions in a safe place and pass them
on to any future user.
Use
C
AUTION: For General Ventilating Use Only. Do Not Use To Ex‐
haust Hazardous Or Explosive Materials And Vapors.
This applianc
e is intended for residential use only. Use only as de‐
scribed in these operating instructions.
This ventilation hood is designed for domestic use and for use in
simil
ar residential environments.
This venti
lation hood is not intended for outdoor use.
It
must only be used to extract and clean vapors produced during
cooking. Any other use occurs at the owner's own risk.
This appliance is suitable for installation above gas or electric
coo
king surfaces.
P
ersons who lack physical, sensory or mental abilities, or experi‐
ence with the appliance should not use it without supervision or in‐
struction by a responsible person.

IMPORTANT SAFETY INSTRUCTIONS
5
Children
As w
ith any appliance, close supervision is necessary when used
by children.
Please super
vise children in the vicinity of the hood and do not let
them play with it.
Dange
r of suffocation! Ensure that any plastic wrappings, bags,
etc. are disposed of safely and kept out of the reach of children.
Technical safety
W
ARNING: TO REDUCE THE RISK OF FIRE, ELECTRIC SHOCK,
OR INJURY TO PERSONS, OBSERVE THE FOLLOWING:
– Use this appliance only in the manner intended by the manufac‐
tur
er. If you have questions, contact Miele.
– Before servicing or cleaning the appliance, switch power off at
the ser
vice panel and lock the service disconnecting means to
prevent power from being switched on accidentally. If the service
disconnecting means cannot be locked, securely fasten a promi‐
nent warning device, such as a tag, to the service panel.
Installatio
n, repair and maintenance work should be performed by
a Miele authorized service technician in accordance with national
and local safety regulations and the provided installation instruc‐
tions. Contact Miele’s Technical Service Department for examina‐
tion, repair or adjustment. Repairs and other work by unauthorized
persons could be dangerous and may void the warranty.
A d
amaged ventilation hood oven can be dangerous. Always
check for visible signs of damage. Never use a damaged ventilation
hood.

IMPORTANT SAFETY INSTRUCTIONS
6
Be cer
tain your appliance is properly installed and grounded by a
qualified technician. To guarantee the electrical safety of this appli‐
ance, continuity must exist between the appliance and an effective
grounding system. It is imperative that this basic safety requirement
be met. If there is any doubt, have the electrical system of the house
checked by a qualified electrician.
T
o avoid damaging the ventilation hood, make sure that the con‐
nection data (voltage and frequency) on the data plate correspond to
the building's power supply before connecting the appliance. When
in doubt, consult a qualified electrician.
Do not use a power bar or e
xtension cord to connect the ventila‐
tion hood to electricity. These are a fire hazard and do not guarantee
the required level of appliance safety.
T
o ensure safe operation, only use the ventilation hood after it has
been properly installed.
This ventilation hood may not be used in non-stationary locations
(e.g. on a ship).
Only open the housing as described in the enclosed "Installation
diagr
am" and in the "Cleaning and care" section of this manual. Un‐
der no circumstances should any other parts of the housing be
opened.
Tampering with electrical connections or components and mechani‐
cal parts is highly dangerous to the user and can cause operation
faults.

IMPORTANT SAFETY INSTRUCTIONS
7
Defective co
mponents should be replaced by Miele original parts
only. Only with these parts can the manufacturer guarantee the safe‐
ty of the appliance.
During
installation, maintenance, and repair work, the ventilation
hood must be disconnected from the electrical supply. It is only
completely isolated from the electricity supply if one of the following
applies:
– The circuit breakers on the electrical service panel are tripped.
– The screw-type fuses on the electrical service panel have been
r
emoved.
– The power cable (if present) has been unplugged from the socket
(pull the plug no
t the cord).
Proper use
W
ARNING: TO REDUCE THE RISK OF A COOKTOP GREASE
FIRE:
– a) Never leave surface units unattended at high settings. Boil‐
ove
rs cause smoking and greasy spillovers may ignite. Heat oils
slowly on low or medium settings.
– b) Always turn the hood on when cooking at a high heat.
– c) Clean the ventilation hood frequently. Grease should not be al‐
lo
wed to accumulate on the fan or filter.
– d) Use the proper pan size. Always use cookware appropriate for
the siz
e of the cooking area.
Never use an open flame beneath the ventilation hood.
T
o avoid the risk of fire, do not flambé or grill over an open flame.
When turned on, the ventilation hood will draw any flames into the
filter. Fat deposits may ignite.

IMPORTANT SAFETY INSTRUCTIONS
8
W
ARNING: TO REDUCE THE RISK OF INJURY TO PERSONS IN
THE EVENT OF A COOKTOP GREASE FIRE, OBSERVE THE FOL‐
LOWING*:
– a) SMOTHER FLAMES with a close fitting lid, cookie sheet, or
metal
tray then turn off the burner. BE CAREFUL TO PREVENT
BURNS. If the flames do not go out immediately, EVACUATE AND
CALL THE FIRE DEPARTMENT.
– b) NEVER PICK UP A FLAMING PAN - You may be burned.
– c) DO NOT USE WATER, including wet dishcloths or towels - a vi‐
olent steam explosion will result.
– d) Use a fire extinguisher ONLY if:
– 1) You have a class ABC extinguisher, and you know how to operate it.
– 2) The fire is small and contained in the area where it started.
– 3) The fire department is being called.
– 4) You can fight the fire with your back to an exit.
*Based on "Kitchen Firesafety Tips" published by NFPA.
The venti
lation hood may become damaged if exposed to exces‐
sive heat from a gas cooktop.
– When using the ventilation hood over a gas cooktop, ensure that
any burne
rs in use are always covered by cookware. Turn burners
off when removing the cookware, even if doing so for just a short
time.
– Select cookware that is suitable for the size of the burner.
– Adjust the flame so that it never extends up the sides of the cook‐
war
e.
– Avoid overheating the cookware (e.g., when cooking with a wok).
Always turn the ventila
tion hood on whenever a burner is in use to
prevent damage from condensation.

IMPORTANT SAFETY INSTRUCTIONS
9
Overheat
ed oils and fats can ignite and set the ventilation hood
on fire.
When cooking with oils or fats, do not leave pots, pans or fryers un‐
attended. Never leave an electric grill unattended when grilling.
F
at and debris deposits impair the proper functioning of the venti‐
lation hood.
To ensure that cooking vapors are properly cleaned, never use the
ventilation hood without the grease filters in place.
A filt
er containing too much grease is a fire hazard!
The filters should be cleaned or replaced at regular intervals.
Please no
te that the heat rising from the stovetop during cooking
can cause the ventilation hood to become very hot.
Do not touch the housing or the grease filters until the ventilation
hood has cooled down.

IMPORTANT SAFETY INSTRUCTIONS
10
Proper installation
W
ARNING: TO REDUCE THE RISK OF FIRE, ELECTRIC SHOCK,
OR INJURY TO PERSONS, OBSERVE THE FOLLOWING:
– a) Installation work and electrical wiring must be done by quali‐
fied person(s) in accor
dance with all applicable codes and stand‐
ards, including fire-rated construction.
– b) Sufficient air is needed for combustion and exhausting of gas‐
es thr
ough the flue (chimney of fuel burning equipment to prevent
back drafting. Follow the heating equipment manufacturer’s
guideline and safety standards such as those published by the
National Fire Protection Association (NFPA) and the American So‐
ciety for Heating, Refrigeration and Air Conditioning Engineers
(ASHRAE), and the local code authorities.
– c) When cutting or drilling into the wall or ceiling, do not damage
electrical wiring and other hidden utilities.
– d) Ducted hoods must always be vented to the outdoors.
– e) Do not use this hood with any solid-state speed control device.
T
o determine whether a ventilation hood may be operated above
your cooking appliance, please refer to the information provided by
the appliance's manufacturer.
Safety r
egulations prohibit the installation of a ventilation hood
above solid fuel stoves.
Insufficient distance between the cooking appliance and the ven‐
tilatio
n hood can result in damage to the hood.
The minimum safety distances between the appliance and the bot‐
tom of the ventilation hood specified in the "Installation" section
must be maintained, unless the appliance's manufacturer has indi‐
cated that a greater distance is required.
If more than one cooking appliance is used beneath the ventilation
hood, and if different minimum safety distances apply for these ap‐
pliances, you should use the greater distance.

IMPORTANT SAFETY INSTRUCTIONS
11
Be sur
e to observe the information contained in the "Installation"
section when mounting the ventilation hood.
Metal par
ts can have sharp edges which may cause injury.
Wear gloves to protect your hands from being cut.
When installing the exhaust duct, only use pipes or tubes made of
non-flammable material. These can be obtained from your Miele
dealer or from Miele Technical Service.
Exhaust air shou
ld not be vented into a chimney or vent flue
which is otherwise in use and should not be channeled into ducting
which ventilates rooms with fuel-burning installations.
If
exhaust air is to be extracted into a chimney or vent flue no lon‐
ger used for other purposes, be sure to comply with all applicable
regulations.
W
ARNING: TO REDUCE THE RISK OF FIRE USE ONLY METAL
DUCTWORK.

IMPORTANT SAFETY INSTRUCTIONS
12
Cleaning and care
Never use a st
eam cleaner to clean the ventilation hood.
The steam can reach the electrical components and cause a short
circuit.
Accessories
Use only ge
nuine original Miele parts. If parts or accessories from
other manufacturers are used, the warranty will become void.
FCC Declaration of Conformity
These device
s comply with FCC Rules Part 15. This equipment
has been tested and found to be in compliance with the limits for a
Class B digital device, pursuant to Part 15 of the FCC Rules of Oper‐
ation and is subject to the following conditions:
These devices may not cause harmful interference.
These devices must accept any interference received, including in‐
terference that may cause undesired operation.
FCC Radiation Exposure Statement
This equipment co
mplies with FCC radiation exposure limits set
forth for an uncontrolled environment. This equipment should be in‐
stalled and operated with minimum distance 8" (20 cm) between the
radiator and your body.
Industry Canada Statement
This digi
tal apparatus does not exceed the Class B limits for Ra‐
dio Noise Emissions from digital apparatus set out in the Radio In‐
terference Regulations of the Canadian Department of Communica‐
tions.
Complies with Canadian ICES-003 Class B specifications.

Caring for the environment
13
Disposal of the packing mate‐
rial
The cardboard box and packing materi‐
als pr
otect the appliance during ship‐
ping. They have been designed to be
biodegradable and recyclable.
Ensure that any plastic wrappings,
bags, etc. ar
e disposed of safely and
kept out of the reach of children. Dan‐
ger of suffocation!
Disposal of your old appliance
Do not dispose of this appliance with
your ho
usehold waste.
Old appliances may contain materials
that can be r
ecycled. Please contact
your local recycling authority about the
possibility of recycling these materials.
Before discarding an old appliance en‐
sur
e that it presents no danger to chil‐
dren while being stored for disposal.
Unplug it from the outlet, cut off its
power cord and remove any doors to
prevent hazards.

Description of functions
14
The following functions are available on
your ventilation hood, depending on the
model:
Vented mode
The air is drawn in and cleaned by the
gr
ease filters and directed outside.
Non-return flap
A non-return flap in the ducting pre‐
vents the e
xchange of inside and out‐
side air from occurring when the venti‐
lation hood is not in use.
The flap is closed when the ventilation
hood is turned off.
When the ventilation hood is turned on,
the non-return flap opens so that the
exhaust air can be transported outside
without any obstruction.
A non-return flap has been provided
with the hood in case your ducting
does not have o
ne. It is inserted into
the outlet duct collar of the fan.
Recirculation mode
The recirculation mode requires a recir‐
cula
tion kit and OdorFree Charcoal Fil‐
ter (available as optional accessories,
see "Technical Data" for more informa‐
tion)
The air is drawn in and first cleaned by
the gr
ease filters and then by an Odor‐
Free Charcoal Filter. The cleaned air is
then recirculated back into the kitchen.

Description of functions
15
Con@ctivity 2.0 function
Automatic control
This hood features a communication
fun
ction which enables the automatic
control of the hood based on the opera‐
tional status of a Miele cooktop.
To enable the communication function,
th
e cooktop must be equipped with the
corresponding Con@ctivity 2.0 stick .
Please refer to the installation instruc‐
tions for the Co
n@ctivity 2.0 stick to
determine whether connection to your
cooktop is possible.
There must be radio contact between
the cooktop and the hood for you to be
able to use the Con@ctivity 2.0 function
(see "Activating Con@ctivity 2.0").
The cooktop transmits information
about its oper
ational status to the hood
using a radio signal.
– When a burner is turned on, the
coo
ktop lighting on the hood turns
on automatically. After a brief delay,
the ventilation hood fan also comes
on.
– During cooking, the hood automati‐
cally selects the fan level based on
the nu
mber of burners in operation
and their power levels.
– Once you have turned off the cook‐
t
op, the fan and the lighting will turn
off automatically after a predeter‐
mined delay.
Detailed information about this function
can be found under "Operation."

Guide to the appliance
16

Guide to the appliance
17
a
Chimney extension
b
Chimney
c
Canopy
d
Control panel
The symbols act as sensor-controlled buttons. To select a function, tap the
butt
on. An audible tone sounds briefly to confirm selection.
e
Grease filter
f
Spacer frame
The spacer frame creates a shadow gap between the chimney and the ceiling.
The ho
od can be installed with or without the spacer frame.
g
Recirculation vent
(only for recirculation mode)
h
Overhead lighting
i
OdorFree Charcoal Filter
Optional accessory for recirculation mode
j
Turns the fan on and off
k
Overhead light button
l
Fan power selection
m
Delayed shut-down button
n
Filter saturation indicator for the grease filters
o
Filter saturation indicator for the OdorFree Charcoal Filter

Operation (Automatic mode)
18
When Con@ctivity 2.0 is active, the
hoo
d always operates in Automatic
mode (see "Activating Con@ctivity
2.0").
See "Cooking without Con@ctivity 2.0"
for informa
tion on manually operating
the hood.
Cooking with Con@ctivity 2.0
(Au
tomatic mode)
Turn on a burner to the desired power
setting.
The hood lighting will come on.
After a few seconds, the fan will come
on, briefly oper
ating at power level 2
before immediately switching to level 1.
The hood selects the fan level automat‐
ically during cooking.
This level is determined by the total
output of the coo
ktop, i.e. the number
of burners in operation and the power
settings selected.
If you select a higher power setting
on the
cooktop or switch on multiple
burners, the hood will switch to a
higher fan level.
If you select a lower power setting on
the cooktop or turn off a burner, the
hood will accordingly switch to a low‐
er fan level.
Examples for fan levels 1 t
o 4
Reaction time
Changing the power setting on the
coo
ktop does not lead to an immediate
increase or decrease in cooking vapors.
For this reason, the hood reacts with a
slight delay.
Delays can also result from the fact that
the coo
ktop transmits the information
to the hood in intervals.
The reaction time can vary from a few
secon
ds to a couple of minutes.

Operation (Automatic mode)
19
Cooking process
If,
for example, you switch on a burn‐
er at the highest power setting to
heat cookware in preparation for
searing and then reduce the power
level after approx. 60 to 90 seconds,
a cooking process is recognized.
The hood turns on automatically and,
after the cooktop power level has been
reduced, switches back to fan level 3,
where it remains for approx. 5 minutes.
After this, the fan level is once again
det
ermined by the Con@ctivity function.
Y
ou can also manually select a differ‐
ent fan level before then.
Turning off
T
urn off all burners.
Over the next few minutes, the ventila‐
tion ho
od fan setting will decrease one
level at a time until the hood eventually
turns off.
This helps to neutralize any lingering
vapors and odors in the air
.
– From the intensive setting IS, the fan
immedia
tely switches to level 3.
– If the fan is operating at level 3, it will
switch t
o level 2 after approx. 1 mi‐
nute.
– From level 2, the fan switches to level
1 aft
er 2 minutes.
– After 2 minutes at level 1, the fan au‐
t
omatically turns off.
– After another 30 seconds, the lighting
turns off.
The cooking process is now finished.

Operation (Automatic mode)
20
Temporarily exiting Automatic
mode
To temporarily exit the Automatic mode
when cooking:
Manu
ally select a different fan level,
or
Manually turn the hood off, or
Activat
e the Delayed shut down func‐
tion on the ventilation hood. The
fan turns off after the delay time se‐
lected, and the lighting will remain on.
The ventilation hood functions can now
be oper
ated manually (see "Cooking
without Con@ctivity 2.0").
Resuming Automatic mode
The ventilation hood resumes Automat‐
ic mode:
If the ventilation hood has not been
used for a period of app
rox. 5 mi‐
nutes after the manual selection of a
fan level, or
If the manuall
y selected fan level
once again matches the automatic
setting, or
If the ventilation hood fan and the
coo
ktop have been turned off for at
least 30 seconds.
Automatic mode will resume the next
time the cooktop is turned on.
If you wish to manually operate the
ventilation hood for a complete cook‐
ing process, turn on the ventilation
hood fan before turning on the cook‐
top.
If the ventilation hood and the cook‐
top have been turned off for at least
30 seconds after you have finished
cooking, Automatic mode will resume
the next time the cooktop is turned
on.
/