Page is loading ...

Using an Extension Cable
An extension cable should not be used unless absolutely necessary. Use of an improper extension cable could
result in a risk of fire and electric shock. If an extension cable must be used, use only those that are approved by
the country's Electrical Authority. Make sure that extension cord is in good condition before using. Always use the
cord that is suitable for the power input of your tool (see technical data on name plate).
When using a cable reel, always unwind the cable completely.
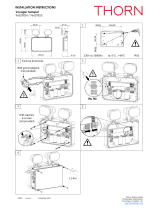
Features (fig. A)
Your Black & Decker hammer drill has been designed for screwdriving applications and for drilling in wood, metal,
plastic and concrete.
This tool is intended for consumer use only.
1. Variable speed on/ off trigger switch
2. Lock-on button
3. Forward/ Reverse switch
4. Drilling mode selector
5. Chuck
6. Side handle
7. Chuck Key
Your Drill Includes These Features
• The variable speed switch is used to operate your drill in all modes of operation.
• The lock-on button pr ovides continuous operation of your drill.
• The side handle gives a secondary gripping position for your drill.
• Your drill can operate as a hammer drill or as a rotary drill depending on the setting of the hammer / drill switch.
• The forward/reverse switch controls the direction of rotation when your drill is used as a screwdriver, or when
cleaning a jammed drill bit.
Assembly and Adjustment
Prior to assembly and adjustment always unplug the tool.
N.B. Accessories mentioned in this manual may not necessarily be included in your pack.
Fitting the Side Handle (Fig. B)
The side handle (6) can be fitted to suit both right-handed and left-handed users.
• Turn the grip (8) counterclockwise until you can slide the side handle (6) onto the front of the tool as shown.
• Rotate the side handle into the desired position.
• T ighten the side handle by turning the grip clockwise.
Fitting and Removing a Drill Bit or Screwdriver Bit (Fig. C)
Disconnect the plug from the electricity supply.
• Turn chuck key (7) counterclockwise to open chuck jaws, place bit in chuck as far as it will go and then pull it out
far enough so that the chuck jaws do not touch the flutes of the bit.
• T ighten chuck collar by hand.
• Place chuck key in each of the three holes, and tighten in clockwise direction. It’s important to tighten the chuck
with all three holes to prevent bit slippage.
• To release bit, turn chuck key counterclockwise in just one hole, then continue to loosen chuck by hand.
Removing and Fitting a Chuck (Fig. D)
• Open the chuck jaws as far as possible.
• Insert a screwdriver into the chuck and remove the chuck retaining screw (9) by turning clockwise as shown.
• Insert the chuck key (7) into one of the holes in the side of the chuck and strike it with a hammer as shown.
Instruction for Use
Always observe the safety instructons and applicable regulations.
• Be aware of the location of pipework and wiring.
Selecting the Direction of Rotation (Fig. E)
• For drilling and for tightening screws, place the forward reverse switch (3) in the neutral position. See arrows on
tool.
• For loosening screws or removing a jammed drill bit, turn the forward/ reverse switch (3) to the left. See arrows on
tool.
Always wait until the motor has come to a complete standstill before changing the direction of rotation.
Selecting the Drilling Mode (Fig. F)
• For drilling in masonry, set the drilling mode selector (4) to the position.
• For drilling in other materials and for screwdriving, set the drilling mode selector (4) to the position.
Switching On and Off (Fig. G)
• To switch the tool on, press the on/off trigger switch (1). The more the trigger (1) is depressed the faster the speed
will be.
• As a general rule, use low speeds for large diameter drill bits and high speeds for smaller diameter drill bits.
• For continuous operation, press the lock-on button (2) and release the variable speed switch. This option is
available only at full speed.
• To switch the tool off, release the variable speed switch. To switch the tool off when in continuous operation,
press the variable speed switch once more and release it.
Maintenance
Your Black & Decker power tool has been designed to operate over a long period of time with a minimum of maintenance.
Continuous satisfactory operation depends upon proper tool care and regular cleaning.
This hammer drill is not user-serviceable. Take it to an authorized Black & Decker repair agent for service.
Lubrication
Your drill has been adequately lubricated before leaving the factory.
Tool Cleaning
Unplug the tool before you use a cloth to clean the housing.
With the motor running, blow dirt and dust out of all air vents with dry air regularly. Wear safety glasses when
performing this. Exterior plastic parts may be cleaned with a damp cloth and mild detergent. Although these parts
are highly solvent resistant, NEVER use solvents.
Important
To ensure product SAFETY and RELIABILITY, repairs, maintenance and adjustment (other than those listed in this
manual) should be performed by authorized service centers or other qualified organizations, always using identical
replacement parts. Unit contains no user serviceable parts inside.
Accessories
The performance of any power tool is dependent upon the accessory used. Black & Decker accessories are
engineered to high quality standards and are designed to enhance the performance of your power tool. By using
a Black & Decker accessories you will get the very best from your tool.
Black & Decker offers a large selection of accessories°@available at our local dealer or authorized service center at
extra cost.
CAUTION: The use of any non-recommended accessories may be hazardous.
Protecting The Environment
Should you find one day that your tool needs replacement, or if it is of no further use to you, think of the
protection of the environment. Black & Decker recommends you to contact your local council for disposal
information.
Service Information
Black & Decker offers a full network of company-owned and authorized service locations throughout Asia. All Black &
Decker Service Centers are staffed with trained personnel to provide customers with efficient and reliable power tool
service.
Whether you need technical advice, repair, or genuine factory replacement parts, contact the Black & Decker location
nearest to you.
Notes
• Black & Decker's policy is one of continuous improvement to our products and, as such, we reserve the right to
change product specifications without prior notice.
• Standard equipment and accessories may vary by country.
• Product specifications may differ by country.
• Complete product range may not be available in all countries. Contact your local Black & Decker dealers for range
availability.
EC declaration of conformity
Black & Decker declares that these products conform to: 98/37/EC, 89/336/EEC, 73/23/EEC, EN 50144, EN 55014,
EN 61000. L
pA
(sound pressure): 91 dB(A), L
wA
(acoustic power): 104 dB(A), hand/arm weighted vibration 5.2 m/s
2
.
Kevin Hewitt
Director of Consumer Engineering
Spennymoor, County Durham DL16 6JG,
United Kingdom
This manual is applicable for -B1 & -TW only.
Black & Decker Copyright 2004 (JUN–2004)
www.blackanddecker.com
––––––––––––––––––––––––––––––––––––––––––––––––––––––
CD70K
13mm Variable Speed Electronic Reversing Hammer Drill
––––––––––––––––––––––––––––––––––––––––––––––––––––––
Technical Data
––––––––––––––––––––––––––––––––––––––––––––––––––––––––––––––––––––––––––––––––––––––––––––––––––––
Hammer Drill CD70K
––––––––––––––––––––––––––––––––––––––––––––––––––––––––––––––––––––––––––––––––––––––––––––––––––––
Power input W 710
––––––––––––––––––––––––––––––––––––––––––––––––––––––––––––––––––––––––––––––––––––––––––––––––––––
Rated Output Power W 345
––––––––––––––––––––––––––––––––––––––––––––––––––––––––––––––––––––––––––––––––––––––––––––––––––––
Chuck Size mm 1.5-13
––––––––––––––––––––––––––––––––––––––––––––––––––––––––––––––––––––––––––––––––––––––––––––––––––––
No Load Speed RPM 0-2,800
––––––––––––––––––––––––––––––––––––––––––––––––––––––––––––––––––––––––––––––––––––––––––––––––––––
Impact Rate BPM 0-44,800
––––––––––––––––––––––––––––––––––––––––––––––––––––––––––––––––––––––––––––––––––––––––––––––––––––
Reverse Yes
––––––––––––––––––––––––––––––––––––––––––––––––––––––––––––––––––––––––––––––––––––––––––––––––––––
Max. Drilling Capacity – steel / wood / concrete mm 13/25/13
––––––––––––––––––––––––––––––––––––––––––––––––––––––––––––––––––––––––––––––––––––––––––––––––––––
Weight Kg 1.74
––––––––––––––––––––––––––––––––––––––––––––––––––––––––––––––––––––––––––––––––––––––––––––––––––––
Cable Length M 2
––––––––––––––––––––––––––––––––––––––––––––––––––––––––––––––––––––––––––––––––––––––––––––––––––––
Secondary Handle Yes
––––––––––––––––––––––––––––––––––––––––––––––––––––––––––––––––––––––––––––––––––––––––––––––––––––
Safety Instructions
When using power tools, always observe the safety regulations applicable in your country to reduce the
risk of fire, electric shock, personal injury and material damage. Read the following safety instructions
before attempting to operate this product. Keep these instructions in a safe place!
The following symbols are used throughout this manual:
Donates risk of personal injury, loss of life or damage to the tool in case of non-observance of the instructions in
this manual.
Denotes risk of electric shock.
Fire hazard.
1. Keep work area clean. Cluttered areas and benches can cause accidents.
2. Consider work area environment. Do not expose power tool to humidity. Keep work area well lit (250-300
Lux). Do not use Power Tools in the presence of inflammable liquids or gases.
3. Guard against electric shock. Prevent body contact with earthed surfaces (e.g. pipes, radiators, cookers and
refrigerators).
4. Keep children away. Do not let children come into contact with the tool or extension cord. Keep all people away
from the work area.
5. Store idle tools. When not in use, power tools must be stored in a dry place and locked up securely, out of reach
of children.
6. Use appropriate tool. The intended use is laid down in this instruction manual. Do not force small tools or
attachments to do the job of a heavy-duty tool. The tool will do the job better and safer at the rate for which it was
intended. Do not force the tool.
Warning! The use of any accessory or attachment or performance of any operation with this tool, other than
those recommended in this instruction manual may present a risk of personal injury.
7. Dress properly. Do not wear loose clothing or jewelry. They can be caught in moving parts. Preferably wear
rubber gloves and non-slip footwear when working outdoors. Wear protective hair covering to keep long hair out
of the way. When working outdoors, preferably wear suitable gloves and non-slip footwear.
8. Personal protection. Always use safety glasses. Everyday eyeglasses only have impact resistant lenses, they
are not safety glasses. Use a face or dust mask whenever the operations may produce dust or flying particles. If
these particles might be considerably hot, also wear a heat-resistant apron. Wear ear protection whenever the
sound level seems uncomfortable, i.e. if the sound pressure stated in this manual exceeds 85 dB(A).
9. Connecting dust extraction equipment. If devices are provided for the connection of dust extraction and
collection ensure these are connected and properly used, especially in confined areas.
10. Do not abuse cord. Never carry the tool by its cord or yank it to disconnect from the socket. Keep the cord away
from heat, oil and sharp edges.
11. Secure workpiece. Use clamps or a vice to hold the workpiece. It is safer and it frees both hands to operate the
tool.
12. Do not overreach. Keep proper footing and balance at all times.
13. Maintain tools with care. Keep the tools in good condition and clean for better and safer performance.
Follow the instructions for maintenance and changing accessories. Inspect the tool cords at regular intervals
and, if damaged, have them repaired by an authorized repair agent. Inspect the extension cords periodically
and replace them if damaged. Keep all controls dry, clean and free from oil and grease.
14. Disconnect tool. Switch off and wait for the tool to come to a complete standstill before leaving it unattended.
Unplug the tool when not in use, before servicing or changing accessories.
15. Remove adjusting keys and wrenches. Always check that adjusting keys and wrenches are removed from
the tool before switching on.
16. Avoid unintentional starting. Do not carry the plugged-in tool with a finger on the switch. Be sure that the
switch is released when plugging in.
17. Extension cords for outdoor use. When the tool is used outdoors, only use extension cords intended for
outdoor use and marked accordingly. Before use, inspect the extension cable and replace if damaged.
18. Stay alert. Watch what you are doing. Use common sense. Do not operate the tool when you are tired.
19. Check for damaged parts. Before using the tool, carefully check it for damage to ensure that it will operate
properly and perform its intended function. Check for misalignment and seizure of moving parts, breakage of
parts and any other conditions that may affect its operation. Have damaged guards or other defective parts
repaired or replaced as instructed. Do not use the tool if the switch is defective. Have any damaged or defective
parts replaced by an authorized repair agent. Never attempt any repairs yourself.
20. Have your tool repaired by an authorized repair agent. This Power Tool is in accordance with the relevant
safety regulations. To avoid danger, electric appliances must only be repaired by qualified technicians using
original spare parts.
Additional Safety Instructions for Hammer Drills
21. Keep your drill bits sharp for best and safest performance.
22. When fitting and changing accessories, always use the instructions supplied with the accessory.
23. Should your hammer drill develop a fault, do not try to fix it yourself, but take it to one of our authorized repair
agents.
24. Make sure the power switch is not "on" before you plug in. Always switch off before you put your hammer drill
down.
25. Do not force your hammer drill - it will do a better and safer job at the speed for which it was designed.
Warning: Some dust created by power sanding, sawing grinding, drilling, and other construction activities
contains chemicals known to cause cancer, birth defects or other reproductive harm. Some examples of these
chemicals are:
• Lead from lead-based paints,
• Crystalline silica from bricks and cement and other masonry products, and
• Arsenic and chromium from chemically-treated lumber (CCA).
Your risk from these exposures varies, depending on how often you do this type of work. To reduce your exposure to
these chemicals: work in a well ventilated area, and work with approved safety equipment, such as those dust masks
that are specially designed to filter out microscopic particles.
Avoid prolonged contact with dust from power sanding, sawing, grinding, drilling, and other construction
activities. Wear protective clothing and wash exposed areas with soap and water. Allowing dust to get into
your mouth, eyes, or lay on the skin may promote absorption of harmful chemicals.
Labels on your tool
They may include the following symbols.
V .............. volts
A .............. Amperes
Hz .............. Hertz
W .............. Watts
Min. .............. Minutes
.............. Alternating current
.............. Direct current
n
o
.............. No load speed
.............. Class II Construction
.............. Earthing terminal
.............. Safety alert symbol
.../min .............. Revolutions or reciprocation per minute
.../bpm .............. Beats per minute
Save these instructions.
Double Insulation
The tool is double insulated. Double insulation means that all the external metal parts are electrically
insulated from the mains power supply. This is done by placing insulated barriers between the electrical
and mechanical components so as to making unnecessary for the tool to be earthed. Note: Double
insulation does not take the place of normal safety precautions when operating this tool. The insulation system is
for added protection against injury resulting from a possible electrical insulation failure within the tool.
Electrical safety
The electric motor has been designed for one voltage only. Always check that the power supply corresponds to the
voltage on the rating plate.
Warning: Never connect the live (L) or neutral (N) wires to the earth pin marked E or .
––––––––––––––––––––––––––––––––––––––––––––––––––––––
CD70K*
13 !"#$%&'( )
––––––––––––––––––––––––––––––––––––––––––––––––––––––
!
–––––––––––––––––––––––––––––––––––––––––––––––––––––––––––––––––––––––––––––––––––––––––––––
! CD70K
–––––––––––––––––––––––––––––––––––––––––––––––––––––––––––––––––––––––––––––––––––––––––––––
! 710
–––––––––––––––––––––––––––––––––––––––––––––––––––––––––––––––––––––––––––––––––––––––––––––
!"# 345
–––––––––––––––––––––––––––––––––––––––––––––––––––––––––––––––––––––––––––––––––––––––––––––
! 1.5-13
–––––––––––––––––––––––––––––––––––––––––––––––––––––––––––––––––––––––––––––––––––––––––––––
! !" 0-2,800
–––––––––––––––––––––––––––––––––––––––––––––––––––––––––––––––––––––––––––––––––––––––––––––
!"#$ 0-44,800
–––––––––––––––––––––––––––––––––––––––––––––––––––––––––––––––––––––––––––––––––––––––––––––
!
–––––––––––––––––––––––––––––––––––––––––––––––––––––––––––––––––––––––––––––––––––––––––––––
!"# –– L L 13/25/13
–––––––––––––––––––––––––––––––––––––––––––––––––––––––––––––––––––––––––––––––––––––––––––––
1.74
–––––––––––––––––––––––––––––––––––––––––––––––––––––––––––––––––––––––––––––––––––––––––––––
! 2
–––––––––––––––––––––––––––––––––––––––––––––––––––––––––––––––––––––––––––––––––––––––––––––
!
–––––––––––––––––––––––––––––––––––––––––––––––––––––––––––––––––––––––––––––––––––––––––––––
!
!"#$%&'()*+,-./012345678!9:;<=>?@ABCDEFGHIJ
!"#$%&'("%&)*+,-
!"#$%&'()*+
!"#$%&'()*+,-./0123456789
!"#$%&'
!"#$%&
1. !"#$ !"#$!"%&'()*+,-.
2. !"#$%&'()*+, !"#$%&'()*+,-./*+0123,*45.6
!"=E250-300 F !"#$%&'()*+,-./0123
3. !"#$% !"#$ !"# $%" &' ()*+ !"#$%&'()*
!"#$%&'()* !"#$%&'()*+,-./0*1234
4. !"#$ !"#$%&'()*+,-.!"#/01&23456789:
5. !"#$%& !"#$%&'() *+,-./0123456789:
6. !"#$% !"#$%&'()*+,-./01$2!3 456789!3:;<
!"#$%&'%()*'+,)-./012345/
!"#$%&'()*+,-./01234
7. !"#$ !"#$%&'()*+,-./0123456"7/894:;<=)>&
!"#$%&'()*+,-)./01234567'+891: !"#$%&0
8. !" !"#$%&'!(#)*+,-(.#/0, !(123456789:#;
!"#$%&'()*+,-./01234567!8'9:;+7<=/>?@ABCDE
!"#$%&' 85 !"#$%&
9. !"#$ !"#$%#&'()*+,-./01(2345*6&789
10. !"#$ !"#$%&'()*"# +,-.+/01"#234567869:;
!"#$%&
11. !" !"#! $%&'()*+,-.'/0123*45%67
12. !"#$%& !"#$%&'()
13. !"#$ !"#$%& !"#$%"&'()*+,-./01234(567
!"#$%!&'()*+,-./0123456789:;<=>?2
14. !" !"#$%&'()*+, !"#$"% &' () !"#$%&
15. !"# !$%& !"#$%&'()*+,-./0123456789:;-<=>
!"#
16. !"#$%& !"#$%&'()*+ !"#$%&'()*+,-./
!"#"$%&'()*+,-./0123
17. !"#$%&'()!"* "+,-. !"#$%&'()*+,-./0*123
18. !" !"#$%& !'($)*+,-&./"01
19. !"#$% !"#$%&'()*+,-./012#3456789#:;/<=>?
!"#$%&'()*+,-./'()*012345678/9:;<=>?@A$B
!"#$%&'()*+,-./0,123456789:;<=>?@AB:CD:EF
!"#$%&'#()*+,-./012#(3
20. !"#$%&'()#$*+, !"#$%&'()*+,-"./01234536*
! "#$%&'()'*+,-./01234
!"#$%&'(
21. !"#$%&'(&)*+,-.
22. !"#$%&'()*+$%,-./#01234
23. !"#$%&'()*+,-./'0123456789:;<.=>?@A
24. !"#$%&'() !"#$%&'()*+,-
25. !"# –––– !"#$%&'()*+,-./-012345
!"#$%#&"#'()*+,-./01234561789:;<=>?@A#B
!"#$%&'()*+,-./01(2345
• !"#
• !"#$%&'()* +,-./0
• !"#$%&'()(CCA)
!"#$%&'(#)*+,$-./01234567*89:;<=>?@A$BC+,;D
!"#$%& !"# $%& '()*+,(-. /
!"#$%&'()'*&'+,-./0123456789:;<=>?@ABCDEFG-C
!"#$%&'()*+, !"#$%&'()*+,-./0'12&34(567894
!"#
!"#$%&'()*+,
V ..............
A ..............
Hz ..............
W ..............
Min. ..............
..............
..............
n
o
.............. !
.............. !
.............. !
.............. !"#
.../min .............. !"#$%&'
.../bpm .............. !"#$
!"#$%
!
!"#$%&'()*+,-./012%#$34567869'2-%:;-.<!
!"#$%&'()*+,-./0123456# !"#$%&'()*
!"#$%&'()*+,-./0123456789:4;<
!
!"#$%&'()*+,-!"./0(123456789":".;<=>!".?@/
!"L N E ====== !"#$%
!"
!"#$%&'()*%&+,-.'()/0123456.78*9!%&+:"#&;<
!"#$%&'()*+,-.%&'$/01234567 8$9:; !"#$%&
7
6
31
2
4
5
A
68
B
7
C
9
7
D
3
E
4
F
12
G
CD70K

!"#$%&'()"#$%*+,-.
A
!"#$%&'()*+,(-./0123145-678$9:;<
!"#$%&'(
1. !"#
2.
3. !"#$
4. !"#$
5. !
6. !
7. !
!"#$%&'=W
• !"#$%&'()
• !"#$%&'()
• !"#$%&'()*+,-./0
• !"#$%&'()*+ !,-. !"#/
• !"#$%&'()!*+,-.'(/0123(.456/789:)';<
!"
!"#$%&'()*+
!"#$%&'()*+,-./
!"# B
!(6) !"#$%&'()*+
• !"#$%&'()*'+,(8) !"#!$%&'()*+ !
• !"#$%&'()
• !"#$%&'
!"#$! C
!"#$
• !"#$%&'((7) !"#$%&"'(!")*$+%&",-./0&"12!
• !"#$
• !"#$ %&'()*+,&-./0123456 789:;
• !"#$%&'()*+",-./012#3456+")789:
! D
• !"#$%&
• !"#$%&'()*+,-./0!"12345%&6 (9)
• !"ETF !"#$%&'()*+,-./01234
!
!"#$%&'()*
• !"#$%&'(#)*+
!"# E
• !"#$%&'()*+,-.(3) !"#$%&'()*+,-./
• !"#$%&'()*+,-./01(3) !"#$%&'()*+,-
!"#$%&'()*+,-./012
!"# F
• !"#$%&'()(4)=====
• !"#$%&'()*+,-./(4)====
! G
• !"#$%&'(!)*(1) !"(1) !"#$%&'(
• !"#$%&'()* !+$%&,()-
• !"#$!%&'(")*
• !"#$%&'(#)$*+,(2) !""#$%&'(')*+,-./0123$
• !"#$%&'()*!+,-./01234
!"#$%&'()*+&,-./01#2345&!"678#9:4/5);<=#>?"2
!"
!"#$%&'()*+,-./01234$%5678
!"#$%&'()*
!
!"#$%&'()*+
!"#$%&'()*+,-./01"#$23* !"#$456789:;<=>?@A+B
!"#$"#%&'()*+,-./01$23%456781$%
!
!"#$ ! !"#$%&'()*+,-%&./01%&23456789:;<=
!"#$%&'()*+,-./01#$"2&'
!"#$%&'()*+,-$./$01,$./2'34567089:;<=>?@A3BC
!"#$%&'()*!+,-./01023456789:;:<=>?@ABCDEF!67
!"#$%&'()*+,-./)012345)6789:;$
!"#$%&'()*+,-./0123456
!
!"#$%&'%&(!)*+,-./0123456.789:;<=>?@A-BCD
!"#$%&
!
!"#$%&'()*+,-./012345'./01-6789%:;'<=>?@AB
!"#$%&'()*
!"#$%&'()*+,-./0123456789():;<=>
!
• !"#$%&'()*+,-./012)#$34567+89:'(;<=>?@A
• !"!#$%&'()*+,-./
• !"#$%&'()*+
• !"#$%&'()*+,-./&01234*56789:;<=>?@AB2
EC
!
!"#$%&'()*+, 98/37/EC 89/336/EEC 73/23/EEC EN 50144 EN 55014 EN
61000 L
pA
91 !"L
wA
104 !"#$%&'(5.2 m/s
2
Kevin Hewitt
!
!"#
Spennymoor, County Durham
DL16 6JG, United Kingdom.
*K !"#
CD70K
CD70K
710
345
13
0-2,800
0-44,800
13/25/13
1.73
2
Kevin Hewitt
Director of Consumer Engineering
Spennymoor, County Durham DL16 6JG,
United Kingdom
/