Page is loading ...

Instruction Manual
DE: Bedienungsanleitung - de.startech.com
FR: Guide de l'utilisateur - fr.startech.com
ES: Guía del usuario - es.startech.com
IT: Guida per l'uso - it.startech.com
NL: Gebruiksaanwijzing - nl.startech.com
PT: Guia do usuário - pt.startech.com
Manual Revision: 06/21/2012
For the most up-to-date information, please visit: www.startech.com
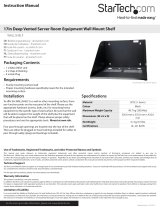
4POSTRACK12
12U 4 Post Server Equipment Open Frame Rack Cabinet
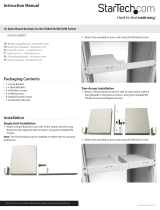
Packaging Contents
• 2xFront/RearFrame
• 2xFloorPlates
• 4xAdjustableHorizontalArm
• 2xFloorMountingBrackets
• 1xM8Hex(Allen)key
• 8xM8x25HexSocketScrews
• 42xM5x15TrussHeadScrews
• 16xBushingCaps
• 24xCabinetScrews
• 24xCageNuts
Tools Required
• 1xPhillips(crosshead)Screwdriver
WARNING! Pleaseensurethattherackisfullyassembledwith
allincludedpartsandfastenersbeforeattemptingtomountany
rackequipment.Failuretoinstallandfullytightenanyhardware
couldseverelycompromisethestructuralintegrityoftherack.If
anyhardwareismissing,pleasecontactStarTech.comcustomer
serviceimmediately.
Installation
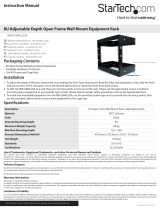
1. Makesurethatthefrontandrearframesarerightsideup.The
bottomoftheframehasholesfortheoormountingbrackets
andcasters.Makesurethatthepicturedendisatthebottom.
2. Attachthearmstotheframes.Separateyourarmsintopairs
(consistingofonewideandonenarrowarmperpair).Youwill
havefourpairsofarms,twoforeachsideoftherack.Thenarrow
armsthatconnectthebottomoftheframescanbeidentiedby
thepre-mountedcagenutsontheinsideofthearms.
NOTE: Wheninstallingthearms,itmightbeeasiesttostartwith
thetoparmsforstabilityreasons.
OptionalCaster
mountingpoint,on
bottomofrackframe
Pre-installed
cagenuts
Installation Cont’d
3. Forthetoparms,snapthecagenutsintotheback(inside)ofthe
narrowarms.Itisrecommendedthatyouinstallseveralcagenuts
oneacharm.Thecagenutsareeasiertoinstallwhentherackis
notfullyassembled.Youshouldinstallmorecagenutsthanmaybe
necessaryincaseyouchangethedepthoftherackinthefuture.
4. Determinethedesireddepthofyourrack.Usingtwoscrews,
attachoneofthearmstotheholesontheinsideoftheframe.
Attachtheotherarmtotheothersideoftheframe,makingsure
thatthewiderarmisontheoutsideofthenarrowarm.Securethe
twoarmstogetherusingtheprovidedscrews.
NOTE:Forstability,StarTech.comrecommendsthatyouhaveuseat
leasttwoscrewstosecuretherackarms.
5. Attachtheoormountingbrackets(theL-shapedbrackets)tothe
bottomoftheframes.Usingtheincludedhexkey,installthehex
socketscrews.Install4screwsperbracket.
6. Placetheoorplatesoverthebottomoftherack.Oneoorplate
hasonlyone“ap”alongtheside.Youcanoverlapthisoorplate
overtheotherwhennecessary.Securetheoorplatestotherack
fromthetop.
Insideofanarrow
armwithcage
nutsinstalled
Connectthe
armstothe
frameshere
HexSocketScrews
Secureoor
plates

FCC Compliance Statement
ThisequipmenthasbeentestedandfoundtocomplywiththelimitsforaClassBdigitaldevice,pursuanttopart15oftheFCCRules.Theselimitsaredesignedtoprovidereasonableprotectionagainst
harmfulinterferenceinaresidentialinstallation.Thisequipmentgenerates,usesandcanradiateradiofrequencyenergyand,ifnotinstalledandusedinaccordancewiththeinstructions,maycause
harmfulinterferencetoradiocommunications.However,thereisnoguaranteethatinterferencewillnotoccurinaparticularinstallation.Ifthisequipmentdoescauseharmfulinterferencetoradioor
televisionreception,whichcanbedeterminedbyturningtheequipmentoandon,theuserisencouragedtotrytocorrecttheinterferencebyoneormoreofthefollowingmeasures:
• Reorientorrelocatethereceivingantenna.
• Increasetheseparationbetweentheequipmentandreceiver.
• Connecttheequipmentintoanoutletonacircuitdierentfromthattowhichthereceiverisconnected.
• Consultthedealeroranexperiencedradio/TVtechnicianforhelp.
Use of Trademarks, Registered Trademarks, and other Protected Names and Symbols
This manual may make reference to trademarks, registered trademarks, and other protected names and/or symbols of third-party companies not related in any way to
StarTech.com.WheretheyoccurthesereferencesareforillustrativepurposesonlyanddonotrepresentanendorsementofaproductorservicebyStarTech.com,oranendorsementoftheproduct(s)
towhichthismanualappliesbythethird-partycompanyinquestion.Regardlessofanydirectacknowledgementelsewhereinthebodyofthisdocument,StarTech.comherebyacknowledgesthatall
trademarks,registeredtrademarks,servicemarks,andotherprotectednamesand/orsymbolscontainedinthismanualandrelateddocumentsarethepropertyoftheirrespectiveholders.
Technical Support
StarTech.com’slifetimetechnicalsupportisanintegralpartofourcommitmenttoprovideindustry-leadingsolutions.Ifyoueverneedhelpwithyourproduct,visitwww.startech.com/supportandaccess
ourcomprehensiveselectionofonlinetools,documentation,anddownloads.
Forthelatestdrivers/software,pleasevisitwww.startech.com/downloads
Warranty Information
Thisproductisbackedbyalifetimewarranty.
Inaddition,StarTech.comwarrantsitsproductsagainstdefectsinmaterialsandworkmanshipfortheperiodsnoted,followingtheinitialdateofpurchase.Duringthisperiod,theproductsmaybereturned
forrepair,orreplacementwithequivalentproductsatourdiscretion.Thewarrantycoverspartsandlaborcostsonly.StarTech.comdoesnotwarrantitsproductsfromdefectsordamagesarisingfrom
misuse,abuse,alteration,ornormalwearandtear.
Limitation of Liability
InnoeventshalltheliabilityofStarTech.comLtd.andStarTech.comUSALLP(ortheirocers,directors,employeesoragents)foranydamages(whetherdirectorindirect,special,punitive,incidental,
consequential,orotherwise),lossofprots,lossofbusiness,oranypecuniaryloss,arisingoutoforrelatedtotheuseoftheproductexceedtheactualpricepaidfortheproduct.Somestatesdonotallow
theexclusionorlimitationofincidentalorconsequentialdamages.Ifsuchlawsapply,thelimitationsorexclusionscontainedinthisstatementmaynotapplytoyou.
7. Securethecompletedrack.Bolttheassembledrackintothe
groundorinstallthecasters(StarTech.comID:4POSTCASTER).If
youareboltingtherack,thetypeofboltyouusewilldependon
theoormaterial.
Securecastersto
bottomofrack
8. Installyourrackmountequipment.Usingtherackmountcabinet
screwsandcagenuts,installyourrackmountequipmentintotherack.
Specications
Description
DuraRak12UAdjustable4Post
OpenFrameEquipmentRack
Colour Black
Materials SPCC(2.0mm)
Weight Capacity 250kg
Dimensions (W x H) 571.0mmx646.6mm
Minimum/Maximum
Mounting Depth
469.9mm/895.4mm
Net Weight 28kg
Standards EIA-310C/D
Certications UL,CE,RoHS
/