
COPYRIGHT © SEPTEMBER, 2007 BY GRIZZLY INDUSTRIAL, INC.
WARNING: NO PORTION OF THIS MANUAL MAY BE REPRODUCED IN ANY SHAPE
OR FORM WITHOUT THE WRITTEN APPROVAL OF GRIZZLY INDUSTRIAL, INC.
#JM9879 PRINTED IN CHINA
MODEL H8209
14-PIECE AIR TOOL KIT
INSTRUCTION MANUAL

Model H8209 14-Piece Air Tool Kit -1-
Safety Instructions For Pneumatic Tools
1. READ THIS MANUAL. This tool may
cause personal injury if used incor-
rectly. This manual contains proper
safety and operating instructions that
must be followed to reduce this risk.
2. WEAR EYE PROTECTION. This
tool may throw small fragments dur-
ing operation, which may cause seri-
ous eye injury. Always wear ANSI
approved safety glasses or face shield
to reduce your risk from this hazard.
3. WEAR A RESPIRATOR. This tool
may produce fine dust during oper-
ation, which can cause respiratory
injury if inhaled. Always wear a respi-
rator NIOSH approved for the type of
material being processed.
For Your Own Safety Read Instruction Manual
Before Operating This Equipment
The purpose of safety symbols is to attract your attention to possible hazardous
conditions. This manual uses a series of symbols and signal words which
are intended to convey the level of importance of the safety messages. The
progression of symbols is described below. Remember that safety messages by
themselves do not eliminate danger and are not a substitute for proper accident
prevention measures.
Indicates a potentially hazardous situation which, if
not avoided, MAY result in minor or moderate injury.
It may also be used to alert against unsafe practices.
Indicates a potentially hazardous situation which, if
not avoided, COULD result in death or serious injury.
Indicates an imminently hazardous situation which,
if not avoided, WILL result in death or serious injury.
This symbol is used to alert the user to useful
information about proper operation of the equipment.
SAFETY
NOTICE
4. WEAR HEARING PROTECTION.
Operating this tool for prolonged time
periods may damage your hearing.
Your risk depends on length and fre-
quency of use. To reduce your risk of
this hazard, wear hearing protection.
5. MAINTAIN SAFETY GUARDS. Your
tool may be equipped with safety
guards or other structural compo-
nents designed to reduce the risk of
injury during operation. Never modify
or operate this tool with any guards or
components removed or damaged.
6. KEEP CHILDREN AWAY. Prevent
children from injury by keeping them
away from this tool. Disconnect and
lock the tool away when not in use.

Model H8209 14-Piece Air Tool Kit-2-
7. AVOID ENTANGLEMENTS. Do not
wear loose clothing, gloves, neck-
ties, rings, bracelets, or other jewel-
ry, which may get caught in moving
parts, when operating this tool. Wear
a protective hair covering to contain
long hair.
8. USE CORRECT AIR PRESSURE.
Exceeding the maximum PSI rating
of this tool may cause unpredictable
operation or bursting.
9. DISCONNECT AIR PRESSURE
before servicing, changing accesso-
ries, or moving to another location.
Never leave this tool unattended
when connected to air.
10. SECURE TOOLING. Always verify
tooling is secure before operation.
11. SHARP SURFACES. DO NOT
place hands near the tooling sur-
faces when in operation.
12. REMOVE ADJUSTING KEYS AND
WRENCHES AFTER USE. These
tools become dangerous projectiles
if left on the tool when it is started.
13. AVOID FLAMMABLES. Do not use
this tool around any flammables that
may be ignited by sparks.
14. SECURE WORK. Use clamps or a
vise to hold work when practical. It is
safer than using your hand and frees
both hands to operate tool.
15. MAINTAIN TOOLS WITH CARE.
Keep tools lubricated and clean
for best and safest performance.
Follow instructions for lubricating
and changing accessories.
16. DO NOT FORCE TOOL. It will do
the job better and safer at the rate
for which it was designed.
17. CHECK FOR DAMAGED PARTS
BEFORE USING. Check for bind-
ing and alignment of parts, broken
parts, part mounting, loose bolts,
and any other conditions that may
affect operation. Repair or replace
damaged parts before operating.
18. USE GOOD LIGHTING. Keep work
area well lighted. Dark work areas
increase risk of accidental injury.
19. AVOID UNINTENTIONAL OPERA-
TION. Always disconnect air when
not in use, and do not carry tool with
hand on trigger.
20. USE THE RECOMMENDED
ACCESSORIES. Consult owner’s
manual for recommended acces-
sories. Using improper accessories
may increase the risk of injury.
21. NEVER ALLOW UNTRAINED
USERS TO USE THIS TOOL WHILE
UNSUPERVISED.
22. IF YOU ARE UNSURE OF THE
INTENDED OPERATION, STOP
USING TOOL. Seek formal training
or research books or magazines that
specialize in pneumatic tools.
23. BE AWARE OF HOSE LOCATION.
Hoses can easily become a tripping
hazard when laid across the floor in
a disorganized fashion.
24. DO NOT USE UNDER THE
INFLUENCE OF DRUGS OR
ALCOHOL, OR WHEN TIRED.
No list of safety guidelines is complete,
because every work environment is
different. Always consider safety first
and use common sense. Failure to
use this tool with caution and respect
could result in serious personal
injury.

Model H8209 14-Piece Air Tool Kit -3-
Inventory
Figure 1. Model H8209 Inventory.
Tool Oil Bottle
Case
Teflon Tape
Blow Gun
Tire Inflator
4mm Hex Wrench
Air Hose
Quick Coupler
1
⁄2" Impact
Socket Set
Quick Connect
Fittings
1
⁄2" Impact Wrench

Model H8209 14-Piece Air Tool Kit-4-
OPERATIONS
The impact wrench requires 90 PSI to
operate correctly. To improve air tool
lifespan, use a filter/lubricator/regulator
setup shown in Figure 2.
Quick
Connector
Quick
Coupler
Air Hose
Quick
Coupler
Quick
Connector
Lubricator
Filter
Regulator
Air
Compressor
Your
Tool
Figure 2. Installed filter lubricator
regulator.
ACCIDENTAL
START HAZARD!
Disconnect before
service or tool
changes.
AIR PRESSURE
HAZARD!
Never exceed 120
PSI.
LUNG/EAR
INJURY HAZARD!
Wear protective
equipment when
using this tool.
Read the manual before operation.
Become familiar with this tool, its
safety instructions, and its operation
before beginning any work. Serious
personal injury may result if safety
or operational information is not
understood or followed.
Otherwise, lubricate the impact wrench
daily with a couple drops of pneumatic tool
oil directly into the tool's air inlet fitting, as
shown in Figure 3, before and after each
use.
Figure 3. Manual oiling.
Drive Size................................................
1
⁄2"
No Load Speed..........................7000 RPM
Max. Torque...................230 ft/lb (310N.m)
Air Inlet.....................................................
1
⁄4"
Air Hose ID...............................................
3
⁄8"
Operating Air Pressure.....................90 PSI
Average Air Consumption................4 CFM
Weight................................................5.4 lbs
Impact Wrench
Specifications
Air Supply

Model H8209 14-Piece Air Tool Kit -5-
Daily Maintenance
Your impact wrench MUST have 2-6
drops of oil directly dropped into the air
fitting before each use. In addition, we
recommend using an in-line filter, lubricator,
and regulator, as shown in Figure 2. If an
in-line lubricator is not used, add 2-3 drops
of oil into the tool air inlet every 2 hours of
continued use.
These procedures should be done
after each use:
• Before putting the impact wrench
away, put 2-6 drops of oil into the air
supply fitting and momentarily operate
the impact wrench to distribute the oil
inside the tool.
• Wipe the tool exterior and sockets with
a slightly oiled cloth. Your goal is to
leave a light film of oil on the tools to
prevent rust.
Tire Inflator
1. Connect the air hose to the tire infla-
tor.
2. Connect inflator to the tire air valve.
Impact Wrench
Your new single hammer
1
⁄2" drive impact
wrench (Figure 2) will generate up to 230
ft/lbs. of torque.
Only use thick-walled impact sockets with
this air tool. The common thin-walled
chrome sockets may explode if used as
impact sockets causing serious injury.
At the end of the handle you can adjust
the torque setting by pushing the knob in
and turning the knob to 1, 2, 3, or 4; 1 is
the lowest torque setting.
To change the impact rotation, push the
slide button toward the front of the gun
for clockwise rotation and to the rear for
counterclockwise rotation.
Figure 4. Impact wrench locations.
Torque Setting
Rotation Button
Figure 5. Tire inflator locations.
Pressure Gauge
Release Valve
Inflator
Blow Gun
1. Attach the blow gun to the air supply
with the air hose.
2. Aim the blow gun at the workpiece and
pull the trigger. DO NOT point the blow
gun in the direction of yourself or oth
-
ers.
3. Pull the trigger until the appropriate air
pressure is reached.
4. If the pressure in the tire is too high,
push the pressure release valve to
bleed the excess pressure.
EYE INJURY
HAZARD!
Wear protective
equipment when
using these tools.

AIR IMPACT WRENCH
REF PART # DESCRIPTION REF PART # DESCRIPTION
1 PH8209001 HOUSING 24 PH8209024 CYLINDER
2 PH8209002 VALVE BUSHING 25 PH8209025 ROTOR
3 PH8209003 REVERSE VALVE 26 PH8209026 ROTOR BLADE
4 PH8209004 TRIGGER 27 PH8209027 REAR END PLATE
5 PRP02M ROLL PIN 3 X 16 28 P6001 BALL BEARING 6001ZZ
6 PH8209006 VALVE STEM 29 PH8209029 FRONT END PLATE
7 PH8209007 AIR INLET 30 PRP61M ROLL PIN 3 X 12
8 PH8209008 BALL SEAT 31 PH8209031 COMPRESSION SPRING
9 PH8209009 COMPRESSION SPRING 32 PH8209032 PIN 4 X 7
10 PH8209010 STEEL BALL 33 PH8209033 GASKET
11 PH8209011 COVER 34 PH8209034 REAR COVER
12 PH8209012 AIR REGULATOR 35 PSB15M CAP SCREW M5-.8 X 20
13 PORP009 O-RING 8.8 X 1.9 P9 36 PLW01M LOCK WASHER 5MM
14 PH8209014 COMPRESSION SPRING 37 PH8209037 FRONT RUBBER
15 PH8209015 OIL SEAL 38 PH8209038 EXHAUST DEFLECTOR
16 PH8209016 PILOT SET SCREW M5.-8 X 6 39 PS12M PHLP HD SCR M3-.5 x 6
17 PH8209017 BUSHING 40 PSS26M SET SCREW M5-.8 X 6
18 PH8209018 ANVIL 41 PH8209041 C-CLIP 12MM
19 PH8209019 HAMMER CAGE 42 PORP006 O-RING 5.8 X 1.9 P6
20 PH8209020 HAMMER PIN 43 PH8209043 RUBBER
21 PH8209021 HAMMER DOG 44 PSS20M SET SCREW M8-1.25 X 8
22 PH8209022 DRIVE CAM 45 PH8209045 OIL SEAL
23 PRP15M ROLL PIN 3 X 8 46 PH8209046 O-RING KIT

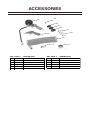
ACCESSORIES
REF PART # DESCRIPTION REF PART # DESCRIPTION
101 PH8209101 TIRE INFLATOR 107 PH8209107 FEMALE CONNECT FITTING
102 PH8209102 HEX WRENCH 4MM 108 PH8209108 MALE CONNECT FITTING
103 PH8209103 SOCKET 14MM 109 PH8209109 AIR HOSE
104 PH8209104 SOCKET 17MM 110 PH8209110 QUICK COUPLER
105 PH8209105 SOCKET 19MM 111 PH8209111 TEFLON TAPE
106 PH8209106 BLOW GUN
101
102
103
104
105
106
107
108
109
110
111
-
 1
1
-
 2
2
-
 3
3
-
 4
4
-
 5
5
-
 6
6
-
 7
7
-
 8
8


Ask a question and I''ll find the answer in the document
Finding information in a document is now easier with AI
Related papers
-
Grizzly Impact Driver G5346 User manual
-
-
-
-
-
-
-
-
-
Other documents
-
Husky HDK1008 Installation guide
-
-
-
Bostitch BTMT72391 User manual
-
Woodstock W1789 User manual
-
DeWalt DWMT70773L User manual
-
Simplicity 074003-0 User manual
-
Powerplus POWAIR0021 Owner's manual
-
-
Klutch 12 Volt Portable Tire Inflator Owner's manual