Grizzly Power Hammer H8210 User manual
- Category
- Car kits
- Type
- User manual
This manual is also suitable for

COPYRIGHT © AUGUST, 2007 BY GRIZZLY INDUSTRIAL, INC.
WARNING: NO PORTION OF THIS MANUAL MAY BE REPRODUCED IN ANY SHAPE
OR FORM WITHOUT THE WRITTEN APPROVAL OF GRIZZLY INDUSTRIAL, INC.
#JM9801 PRINTED IN CHINA
MODEL H8210
10 PIECE AIR HAMMER KIT
INSTRUCTION MANUAL


Model H8210 10 Piece Air Hammer Kit -1-
Safety Instructions For Pneumatic Tools
1. READ THIS MANUAL. This tool may
cause personal injury if used incor-
rectly. This manual contains proper
safety and operating instructions that
must be followed to reduce this risk.
2. WEAR EYE PROTECTION. This
tool may throw small fragments dur-
ing operation, which may cause seri-
ous eye injury. Always wear ANSI
approved safety glasses or face shield
to reduce your risk from this hazard.
3. WEAR A RESPIRATOR. This tool
may produce fine dust during oper-
ation, which can cause respiratory
injury if inhaled. Always wear a respi-
rator NIOSH approved for the type of
material being processed.
For Your Own Safety Read Instruction Manual
Before Operating This Equipment
The purpose of safety symbols is to attract your attention to possible hazardous
conditions. This manual uses a series of symbols and signal words which
are intended to convey the level of importance of the safety messages. The
progression of symbols is described below. Remember that safety messages by
themselves do not eliminate danger and are not a substitute for proper accident
prevention measures.
Indicates a potentially hazardous situation which, if
not avoided, MAY result in minor or moderate injury.
It may also be used to alert against unsafe practices.
Indicates a potentially hazardous situation which, if
not avoided, COULD result in death or serious injury.
Indicates an imminently hazardous situation which, if
not avoided, WILL result in death or serious injury.
This symbol is used to alert the user to useful
information about proper operation of the equipment.
SAFETY
NOTICE
4. WEAR HEARING PROTECTION.
Operating this tool for prolonged time
periods may damage your hearing.
Your risk depends on length and fre-
quency of use. To reduce your risk of
this hazard, wear hearing protection.
5. MAINTAIN SAFETY GUARDS. Your
tool may be equipped with safety
guards or other structural compo-
nents designed to reduce the risk of
injury during operation. Never modify
or operate this tool with any guards or
components removed or damaged.
6. KEEP CHILDREN AWAY. Prevent
children from injury by keeping them
away from this tool. Disconnect and
lock the tool away when not in use.

Model H8210 10 Piece Air Hammer Kit-2-
7. AVOID ENTANGLEMENTS. Do not
wear loose clothing, gloves, neck-
ties, rings, bracelets, or other jewel-
ry, which may get caught in moving
parts, when operating this tool. Wear
a protective hair covering to contain
long hair.
8. USE CORRECT AIR PRESSURE.
Exceeding the maximum PSI rating
of this tool may cause unpredictable
operation or bursting.
9. DISCONNECT AIR PRESSURE
before servicing, changing accesso-
ries, or moving to another location.
Never leave this tool unattended
when connected to air.
10. SECURE TOOLING. Always verify
tooling is secure before operation.
11. SHARP SURFACES. DO NOT
place hands near the tooling sur-
faces when in operation.
12. REMOVE ADJUSTING KEYS AND
WRENCHES AFTER USE. These
tools become dangerous projectiles
if left on the tool when it is started.
13. AVOID FLAMMABLES. Do not use
this tool around any flammables that
may be ignited by sparks.
14. SECURE WORK. Use clamps or a
vise to hold work when practical. It is
safer than using your hand and frees
both hands to operate tool.
15. MAINTAIN TOOLS WITH CARE.
Keep tools lubricated and clean
for best and safest performance.
Follow instructions for lubricating
and changing accessories.
16. DO NOT FORCE TOOL. It will do
the job better and safer at the rate
for which it was designed.
17. CHECK FOR DAMAGED PARTS
BEFORE USING. Check for bind-
ing and alignment of parts, broken
parts, part mounting, loose bolts,
and any other conditions that may
affect operation. Repair or replace
damaged parts before operating.
18. USE GOOD LIGHTING. Keep work
area well lighted. Dark work areas
increase risk of accidental injury.
19. AVOID UNINTENTIONAL
OPERATION. Always disconnect air
when not in use, and do not carry
tool with hand on trigger.
20. USE THE RECOMMENDED
ACCESSORIES. Consult owner’s
manual for recommended acces-
sories. Using improper accessories
may increase the risk of injury.
21. NEVER ALLOW UNTRAINED
USERS TO USE THIS TOOL WHILE
UNSUPERVISED.
22. IF YOU ARE UNSURE OF THE
INTENDED OPERATION, STOP
USING TOOL. Seek formal training
or research books or magazines that
specialize in pneumatic tools.
23. BE AWARE OF HOSE LOCATION.
Hoses can easily become a tripping
hazard when laid across the floor in
a disorganized fashion.
24. DO NOT USE UNDER THE
INFLUENCE OF DRUGS OR
ALCOHOL, OR WHEN TIRED.

Model H8210 10 Piece Air Hammer Kit -3-
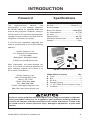
INTRODUCTION
Specifications
Bit Size....................................10mm (
13
/32")
Bore Diameter..........................................
3
/4"
Blows Per Minute.......................4,500 BPM
Air Consumption...............................5 CFM
Air Inlet.....................................................
1
/4"
Required PSI.....................................90 PSI
Maximum Sound Level.....................108 dB
Weight...................................................4 lbs
A
B
C
D
E
Model H8210 Inventory Qty
A. Case....................................................1
B. Bits ..................................................... 5
C. Air Gun ............................................... 1
D. Retainer Spring .................................. 1
E.
1
/4" NPT Male Quick Connect Fitting 1
F. Oil Bottle ............................................ 1
No list of safety guidelines can be complete. Every shop environment is different.
Always consider safety first, as it applies to your individual working conditions.
Use this air hammer and other machinery with caution and respect. Failure to do
so could result in serious personal injury, damage to equipment, or poor work
results.
F
Figure 1. H8210 Inventory
Foreword
The specifications, details, and
photographs in this manual represent
the Model H8210 as supplied when the
manual was prepared. However, owing to
Grizzly’s policy of continuous improvement,
changes may be made at any time with no
obligation on the part of Grizzly.
If you have any comments regarding this
manual, please write to us at the following
address:
Grizzly Industrial, Inc.
C/O Technical Documentation
P.O. Box 2069
Bellingham, WA 98227-2069
E-Mail: manuals@grizzly.com
Most importantly, we stand behind our
tools. If you have any service questions or
parts requests, please call or write us at
the location listed below.
Grizzly Industrial, Inc.
1203 Lycoming Mall Circle
Muncy, PA 17756
Phone: (570) 546-9663
Fax: (800) 438-5901
E-Mail: techsupport@grizzly.com
Web Site: http://www.grizzly.com

Model H8210 10 Piece Air Hammer Kit-4-
OPERATIONS
Read the manual before operation.
Become familiar with this tool, its
safety instructions, and its operation
before beginning any work. Serious
personal injury may result if safety
or operational information is not
understood or followed.
Installing Bits
The Model H8210 uses bits with a
13
/32"
(10mm) diameter shaft. See the Grizzly
catalog or www.grizzly.com for a complete
listing of available bits and accessories.
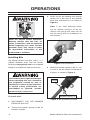
3. Insert the bit by bending the retainer
spring out of the way of the cylinder
bore and slide the bit in as shown in
Figure 2.
Note: If you have difficultly bend-
ing the retainer spring to fit the bit,
remove the spring and insert the bit
into the spring prior to threading it on
the hammer.
Figure 2. Bit installation.
Like all tools there is potential danger
when operating this tool. Accidents
are frequently caused by lack of
familiarity or failure to pay attention.
If normal safety precautions are
overlooked or ignored, serious
personal injury may occur.
4. Relax the retainer spring so the "U" sits
in front of the bit flange to hold the bit
in place, as shown in Figure 3.
To install a bit:
1. DISCONNECT THE AIR HAMMER
FROM AIR SUPPLY!
2. Thread the retainer spring on the air
hammer cylinder.
Flange
Retainer Spring "U"
Figure 3. Bit installation position.

Model H8210 10 Piece Air Hammer Kit -5-
To use the air hammer:
1. Attach the
1
/4" NPT male quick connect
fitting to the air inlet plug.
2. Attach the air hammer to an air supply
set at 90 PSI.
3. Hold the air hammer securely.
4. Use the trigger to START and STOP
the air hammer.
5. To avoid accidental starting, discon-
nect air hammer from air supply when
not in use.
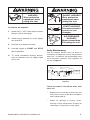
Daily Maintenance
The air hammer MUST have 2-6 drops of
oil directly dropped into the air fitting before
each use. In addition, we recommend using
an in-line filter, lubricator, and regulator as
shown in Figure 4.
ACCIDENTAL
START HAZARD!
Disconnect before
service or tool
changes.
AIR PRESSURE
HAZARD!
Never exceed max
PSI rating for tool.
EAR/LUNG
INJURY HAZARD!
Wear protective
equipment when
using this tool.
Quick
Connector
Quick
Coupler
Air Hose
Quick
Coupler
Quick
Connector
Lubricator
Filter
Regulator
Air
Compressor
Your
Tool
Figure 4. Installed filter lubricator
regulator.
EYE INJURY
HAZARD!
Wear protective
equipment when
using this tool.
These procedures should be done after
each use:
• Wipe the motor housing and tool bits with
a dry cloth, or blow off the dust and debris
with compressed air.
• Check for damage to tooling, hoses,
housing or other accessories. Promptly fix
if damage is found before using again.

H8210 PARTS LIST
REF PART # DESCRIPTION REF PART # DESCRIPTION
1 PH8210001 HANDLE 14 PH8210014 LOWER VALVE DISC
2 PRP37M ROLL PIN 3 X 14 15 PH8210015 PISTON
3 PORP008 O-RING 7.8 X 1.9 P8 16 PH8210016 CYLINDER
4 PORP008 O-RING 7.8 X 1.9 P8 17 PH8210017 RETAINER SPRING
5 PH8210005 REGULATOR 18 PH8210018 O-RING KIT
6 PH8210006 TRIGGER 19 PH8210019 1/4" NPT MALE AIR FITTING
8 PH8210008 PIN 20 PH8210020 CURVED-SPADE BIT
9 PH8210009 PIN SEAT 21 PH8210021 SPADE BIT
10 PH8210010 THROTTLE SPRING 22 PH8210022 NOTCHED-SPADE BIT
11 PH8210011 HOSE ADAPTOR 23 PH8210023 FORKED-SPADE BIT
12 PH8210012 UPPER VALVE CASE 24 PH8210024 CONE BIT
13 PH8210013 VALVE DISC
-
 1
1
-
 2
2
-
 3
3
-
 4
4
-
 5
5
-
 6
6
-
 7
7
-
 8
8


Grizzly Power Hammer H8210 User manual
- Category
- Car kits
- Type
- User manual
- This manual is also suitable for
Ask a question and I''ll find the answer in the document
Finding information in a document is now easier with AI